Urasik Extensions | Lots of new extensions to check out Learn More
  • ALL THINGS AI

    Extensions & Applications Discussions
    7
    0 Votes
    7 Posts
    305 Views
    Rich O BrienR
    Politics needs term limits.
  • [Plugin][$] FredoScale - v3.6a - 01 Apr 24

    Plugins
    1k
    4
    0 Votes
    1k Posts
    2m Views
    Rich O BrienR
    @fimo Dunno... it does behave correctly Left/Right. Just not Up/Down. https://youtu.be/bPbb8PPGtVg?t=170 In this video you can see it working as expected. Maybe @fredo6 knows more?
  • Curviloft Error

    Extensions & Applications Discussions
    2
    1
    0 Votes
    2 Posts
    120 Views
    panixiaP
    @jackieboyharpster apparently, you are trying to do it with 4 curves selected using the "loft by splines" command, this is clearly user error. Just delete the 2 straight segments (and the attached existing face of course), then select only the 2 arcs and run the command again.
  • [Plugin] Fix Reversed Face Materials

    Solved Plugins
    83
    0 Votes
    83 Posts
    120k Views
    Dave RD
    @pep75 I just installed it in SU2026 and gave it a try. It seems to do what it says on the tin. The back face color is green. [image: 1773752953208-rev.gif]
  • Model turned inside-out glitch

    SketchUp Discussions
    3
    3
    0 Votes
    3 Posts
    164 Views
    panixiaP
    It's 99,9% related to clipping planes tolerance To troubleshoot this you can type in Ruby console Sketchup.send_action 10624 Then in the windows which will pop up, check the "Force" flag and try to play a bit with "Near" and "Far" parameters. 
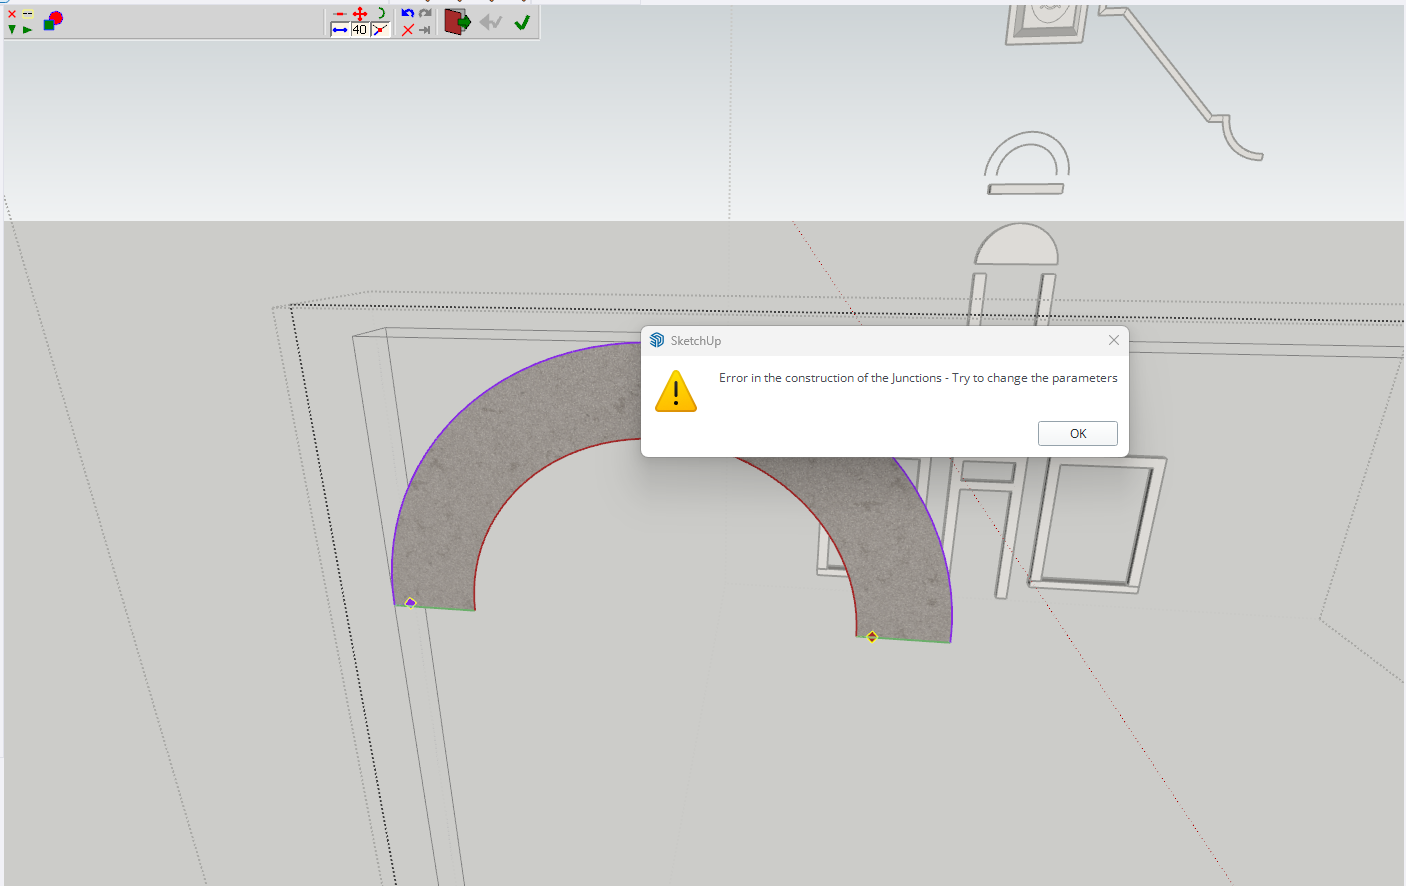
If the "Model Far" is a really huge number compared to the actual expected size of the model (causing the "Far" clipping plane to be REALLY FAR, then you can have that kind of floating-point-precision-related z-fights happening like in your screenshot). There are a few reasons that can trigger this kind of behavior (which is the pretty much the opposite of the well known "clipping problem"). Usually there's something REALLY FAR from axes origin (maybe a tiny stray segment miles away from world 0,0,0 or possibly you accidentally created a misplaced copy of your 3d text which for whatever reason ended up at light years distance from model space). In that case you can try to select whatever should actually be in your "intended" model (maybe temporarily group & lock it for added safety), then invert the selection and erase whatever else is in the model (this will clean up accidentally misplaced geometry that you can't see because it ended up into some different solar system) and everything should be fine. Another possible reason is that some of the objects in the model is actually in the right place, but its internal coordinate system has the origin miles away from model origin. In that case you can troubleshoot that looking at object bounding boxes or if you want to fix that super-fast, just install the "Axes Tool" plugin from Thomthom and recursively select components and sub-components and run the tool in order to place the object's axes in the center of the bounding box. Being that you apparently have just a few objects, you could just try to explode and regroup them one by one and that could fix the problem. Another reason which comes into my mind that can trigger this kind of glitches, is when you have some "giant" component and you scaled it insanely small compared to the original size.. in that case you can try to "scale definition" (or, again, just explode and regroup it) and that should fix the problem in such specific case. If you created your 3d text insanely big and you scaled it a lot, that could be the culprit. If none of this fixes works, maybe you can share the model and I could try to see what's goin'on exactly.
  • Box Stretching - New Dimensions

    Plugins
    15
    1 Votes
    15 Posts
    2k Views
    panixiaP
    @tomb85 Oh shit.. never noticed that.. I'm just creating a plugin which relies quite heavily on the tab key to switch between modes.. maybe I should add a Shift+TAB option in order to stay safe. Good to know.
  • 0 Votes
    14 Posts
    659 Views
    Gus RG
    @Mike-Amos Mike, yep. I am curious about Rayscraper. I've seen some really great results. Sometimes I think about getting Thea alongside D5. It's more work for creating a render. There are times when I think D5 is a little cartoonish. It has a lot of positives. Perhaps when I was starting out using D5. I used Twilight on a few projects at first right after using Kerkythea for a while. That was my main first rendering engine. I think there was this other Metropolis Light Transport plugin for Sketchup to experiment with. I neglected learning rendering even though I putzed around a lot with Kerkythea. It was with Thea render when I really started to sink my teeth into rendering.
  • Fredosection not working

    Extensions & Applications Discussions
    4
    0 Votes
    4 Posts
    180 Views
    fredo6F
    Top level geometry cannot be assigned patterns directly via mouse. Instead, they use the pattern 'Toplevel geometry' in the Special Defaults
  • [Plugin] Extended Views v1.2 UPDATE May 23, 2013

    Plugins
    80
    0 Votes
    80 Posts
    133k Views
    H
    @tomaszdrgas Thank you for your modified version of Chris plugin, it does correct the "guide points" issue for me, however it still align the views on the "world" axis and not on the user defined axis (SU2021/WIN). For those who can't find a solution, I did find a simple way without any plugin to align my views on the user defined axis as intended (at least in top view as this was my objective). Just choose the standard top view for example, which will align to the North axis. And then click on the red "X" axis of your model and click Align view... TADAM ! It is now a top view aligned according to your user defined axis. Update your scene to keep this orientation, and you can then continue your work and edit it via Layout.
  • 0 Votes
    6 Posts
    675 Views
    Mike AmosM
    @charm8888 Good luck to you and the team, I wish you the best with this endeavour.
  • Copy Materials

    SketchUp Discussions
    8
    0 Votes
    8 Posts
    307 Views
    ntxdaveN
    That is an embarrassing DUH on my part. I don't know what the heck I was thinking. It is there clear as day. I am embarrassed beyond belief
  • TIG Shadow Projector Crashing

    Extensions & Applications Discussions
    2
    0 Votes
    2 Posts
    88 Views
    TIGT
    You've already learnt that you don't need to project the shadows of every element forming the building, or every plane that might catch a shadow. Before you use the tool make a new tag to ultimately be an isolated set of geometry with the rest of the model 'off' - probably making two to reflect the original and modified forms. then make a group that is assigned the appropriate tag. Edit it and add simple faced 'box' shapes that follow the main external form of the building [used as a temporary underlay]. Only add in any wall, floor or roof faces etc, that will cast useful shadows. You can probably ignore window-openings for a study this simple. Do not include any 'rear' facing elements that won't cast meaningful shadows. Do not include any wholly internal faces as they won't cast any useful shadows. It should be relatively straightforward for you to work out which parts are needed - but the algorithm will look at everything. Every superfluous bit of geometry which might not cast any meaningful shadows should be avoided - because each one will still be pointlessly considered and processed before finally being ignored - all of this only bloats the processing time exponentially and can lead to crashes as SketchUp becomes overwhelmed. Perhaps an uploaded screen shot of the form, or even a simple skp showing what you've done so far, could elicit more useful advice...
  • Fredo6 plugins for schools

    Extensions & Applications Discussions
    3
    1 Votes
    3 Posts
    145 Views
    R
    Hello Fredo6, Thank you for your response, and sorry for the confusion. By logging in, I mean logging in to the school computer. When students log in to our school computers, a new user profile is created in Windows with their own student number. When I activate the plug-ins under the admin account, the plug-ins work normally and are activated. However, when a student logs in to Windows, the plug-ins are not activated under their individual user account. We would like to avoid students having to activate the plug-ins themselves every time they use a school computer (if they even have the permissions to do so within our network). For us, the ideal solution would be that the plug-ins are automatically available for every student who logs in, without needing to activate them for each individual user. I’m not sure if or how this would be possible. Ramon
  • 0 Votes
    1 Posts
    88 Views
    No one has replied
  • Fredo6 Lords of toolbar

    Extensions & Applications Discussions
    4
    1
    0 Votes
    4 Posts
    187 Views
    CrealC
    If I can not find any solution, is there any way to make custom toolbars ? Aerilius: Toolbar Editor does not work and also the nativ one
  • 0 Votes
    5 Posts
    157 Views
    Gus RG
    Yoni said Sketchup rolled back this update. Over at the Sketchup Forum.
  • architecture of Mannheim

    Gallery
    3
    4
    2 Votes
    3 Posts
    159 Views
    jo-keJ
    @Rich-O-Brien Here it is: https://maps.app.goo.gl/bUZHDoUDX1JepP5k6?g_st=ic
  • 0 Votes
    2 Posts
    161 Views
    Rich O BrienR
    Did you open the Ruby Console while performing steps? Error msgs ?
  • 0 Votes
    4 Posts
    339 Views
    I
    Hello everyone, Here is an image showing the rebar schedule present in the model. The table is fully dynamic: when I click on a row, the corresponding rebar is automatically highlighted in the model [image: 1773055139464-sketchucation_09.03.2026.png]
  • [Plugin] QuadFaceTools

    Plugins
    680
    0 Votes
    680 Posts
    605k Views
    panixiaP
    @alsomar said in [Plugin] QuadFaceTools: You see the model unsmoothed in 3ds Max just because your SketchUp model has unsmoothed lines. Despite the SubD subdivisions making the surface look smooth, if you can see the edges it means the lines are actually unsmoothed. In this frame I can see all the lines Nope. They are soft = false; smooth = true. The smooth attribute is the one actually welding the normals/creating smoothing groups. The soft is a Sketchup-thing only to separate "logical surfaces" which can be selected with a single click. In the legacy version of the exporter, the generated obj from 3dsMax was seen as 2 overlapped meshes: one with the properly welded/smoothed quads (BUT unwelded UV seams between each quad, despite the individual quads being perfectly in place in the UV chart) + one made of floating/unwelded triangles. In Blender the legacy exporter always worked fine (didn't test your fork against Blender, but I guess it could work fine). Another weird/interesting thing is that the same objects, when exported straight out of WrapR work 100% fine. [image: 1772915685108-16a21a1c-6526-4849-b21e-4f0317e7d105-image-resized.png]