Wow! That Looks great! I'll see if I can play with that tonight and make it work. I'll let you know. Thank you.
Oops, your profile's looking a bit empty! To help us tailor your experience, please fill in key details like your SketchUp version, skill level, operating system, and more. Update and save your info on your profile page today!
Check out Febhouse | New extensions for Shadow Analysis in SketchUp Download
Posts
-
RE: Display Case WIP
-
RE: Display Case WIP
Tinanne, thank you. You're right about the imbalance in lighting in the case. I expect that in reality, the difference would be less noticeable. I could probably turn down the point light sources a bit.
Modelhead, thanks to you as well. Quareter sawn refers to a method for cutting wood so that you have very straight grain--not the flames or cathedral grain one typically thinks of as wood grain. In oak, especially white oak, quaretersawn lumber displays ray flecks along with the straight grain. Here's a photo I found in a Google search. http://www.thecountrywoodshop.com/images/P4010008.JPG
-
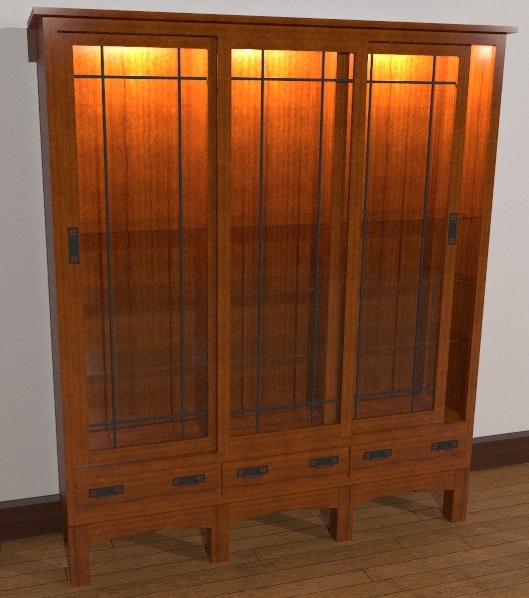
Display Case WIP
Here's a display case I designed. It is a modification of a china cabinet design I came up with for a client a few months ago. A different client wants a similar but taller case to display plaques and trophys in. It needs to fit in with some Arts & Crafts period furniture. I need a good quarter sawn oak texture though.
Rendered in Kerkythea. MLT-368 passes overnight.
Also needs some goods to fill the case.
-
RE: Simple venetian blinds
@wo3dan said:
Gaieus, somewhere around Nov 18 some people didn’t seem to know ‘this trick’ and I bet you that his three year old still does not know. But not for long.
 [/qoute]
You're not kidding! That kid is already using one of the PCs aas well as the iMac. He will be using SketchUp before too long.

@unknownuser said:
You see, both of them are putting a perfect component together. This could be applied to similar components since SU does not handle parametric components.
And I know, it was just a minor thing to mention. So please forgive me this time, please!!!
cheers, Wo3Dan
No need, nothing to forgive. Your point was well taken. It should be a well known thing and I should not have omitted it. No worries.
Dave
-
RE: [Tutorial > Modeling] Hidden Seam Tutorial
I did this one last night for a friend. Thought I'd post it as another example of this method.

-
RE: Simple venetian blinds
@wo3dan said:
Remus, Dave R,
Dave R, seamless?
It was only yesterday (= last year!) that I read about your advice somewhere in another thread about putting components (parts) seamlessly together by also erasing the inner faces.
Unfortunately now I can’t find it anymore.
Something you forgot to do here. But still, your credit. Nice useful component approach, also to Remus, thanks.Whatchoo talkin' 'bout, Willis?

Yeah, I did neglect to delete those faces as I should have done. I was fending off a 3 year old while I was working. I fixed it though.
-
RE: Simple venetian blinds
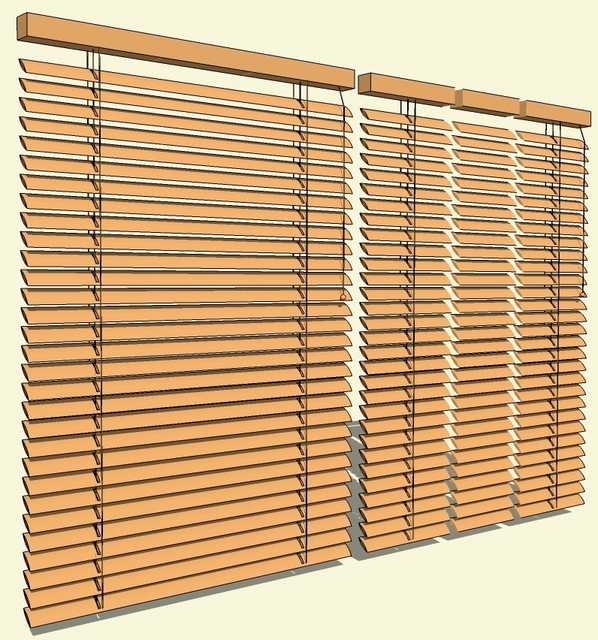
Very nice blinds Remus. I think those will come in handy.
I couldn't help myself. Had to see what I could do to reduce the file size a bit. I could reduce it more but this was quick. I did remove the wood grain texture figuring the user can add that later in their project if desired. I didn't change the pull cord but did modify the others. I also added a center section without cords that can be easily adjusted for length to make the blinds fit as needed.
-
RE: Simple venetian blinds
Remus, for something like this just remember to hide (Shift+Eraser) the edges that would form the seam line. Don't soften them. FWIW, I expect that the file size could be reduced even further without showing much in the model. If you notice, I quareted the sphere that makes up the little "toggle" on the end of the pull cord. Reducing the number of faces used to create that sphere would have helped a lot too.
-
RE: Recent Project
Phil, I have also found that the straight output from SU seems a bit flat. Since I'm also a lazy old fart, I run the output through Picasa. All I do is open the image there and hit Auto Contrast. that seems to do the trick most of the time. Ctrl+S saves the correction and I'm finished.
I like this house. Is it going to be built locally? If so, what does it take to deal with snow loads? I ask because my S-I-L is looking to replace her house which overlooks Medicine Lake and I've been trying to convince her that she needs to do something along the lines of what you've drawn.
-
RE: Spiral Through a Golden Rectangle
@mike lucey said:
Thanks Jim, Didier is truly the SketchUp Ruby Wizard, we all owe him a debt of gratitude.
BTW' "The pigs did an interpretive dance."! Do you have a picture
Mike
You're welcome Charley.
I'll have to look for a picture.
Dave
-
Spiral Through a Golden Rectangle
I was playing with Didier's Arc script and ended up with a spiral drawn in a golden rectangle. Thought that someday, someone might use it for something so here it is.spiral GR.skp
-
RE: New script to draw ARCS
Actually, there is a script to do that. It is Rick W's Weld script. It's available through smustard.com.
-
RE: Monkeying Around with Styles Again
Thank you.
You know you've had too much cold medicine when you can't recognize your own style.

 It's Old Paper Darker Lines from this thread. Sorry about that.
I wish there was some way to boost the contrast right in SketchUp. If there is, I haven't found it.
-
Monkeying Around with Styles Again
Did this last night. I was looking at the JPG export a little more today and decided I really like this. I'll have to see if I can figure out the combination of styles and if there's interest, post it when I get home. After exporting the JPG, I cropped and let Picasa do an Auto Contrast thing to arrive at this. BTW, I didn't design the wooden part of the sconce. Found it on the old SketchUp Pro forum. I did doodle up the shades.

-
RE: Playing with Sunflow
@unknownuser said:
Please do.
I checked out the above link and did not want to register just to download.Thanks Dave.
Done.
Cheers,
Dave
-
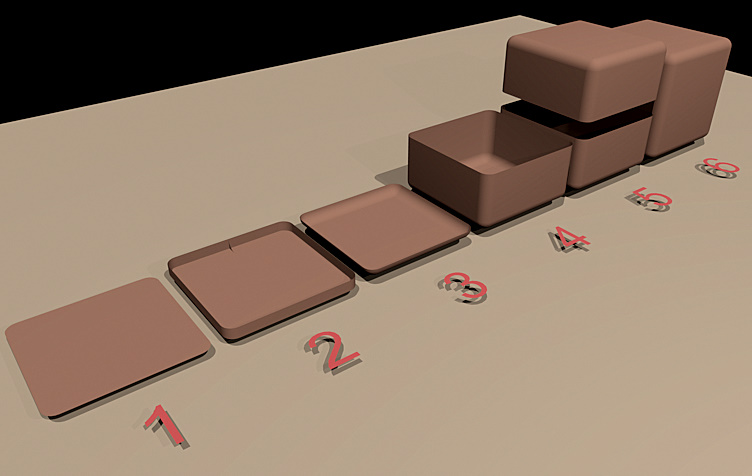
[Tutorial > Modeling] A Cube with Radiused Edges
A SketchUp user elsewhere asked me how to create a cube with a radius applied to all the edges. I did the attached tutorial and illustration. Obviously this could be used for other shapes perhaps with slight modifications.
Here's the text to go along with it.
- Square (12x12 inches in my example) with radiused corners. (1" in my example)
- Pulled up so the height is the same as the radius. Delete upper face. Draw a radius profile on the inside.
- Run Follow Me on the profile. Clean up as needed.
- Heal face on top by tracing an edge with the Pencil tool. Use Push/Pull to pull the face up. (5" in my example. 1/2 the total height of the cube minus the radius dimension. Delete the face. Clean up any visible lines--Ctrl+Eraser.
- Select the geometry and copy it with Ctrl+Move. Move it up above the original. Mirror it with Scale and -1.
- Move the top down onto the bottom. Delete the seam line edges.
Howzzat?
-
RE: Playing with Sunflow
Thank you all. Jean-Franco knows.
I could post on SCF if it's thought to have some value.
-
RE: Is this possible? [code] batch export
Jim, I tried your line of code and it seemed to work. There was a stop after the DXF export for user acknowledgement that the export had completed. I imagine Rob would like even that to be automated if it could be.
-
RE: CarLoft Designs Apartments With Individual Car-Parking on Ba
I remember a parking structure from the 70s in Madison, Wisconsin, near the capitol building. You drove your car into a sort of box and got out. The operator gave you a tag with a number on it and wisked your car up and into a number space. It was sort of like a vending machine in reverse. Then when you wanted your car back, they sent the thing up to get it. It was all open steel structure and as I recall there was nothing but a grate under the cars. The thing put a lot of cars in a small space but I wouldn't want to have my car stuck under some old leaky thing dripping oil. I think they called it an automat.
-
RE: Display cabinet
Very nice work Gidon. And I see you're a celebrity. I love the suspenders.

