I would try making the shape you want to add as a separate solid group, then use Outer Shell to combine them.
Oops, your profile's looking a bit empty! To help us tailor your experience, please fill in key details like your SketchUp version, skill level, operating system, and more. Update and save your info on your profile page today!
Check out Febhouse | New extensions for Shadow Analysis in SketchUp Download
D
Offline
Posts
-
RE: Problems with a half-torus
-
RE: Problems with a half-torus
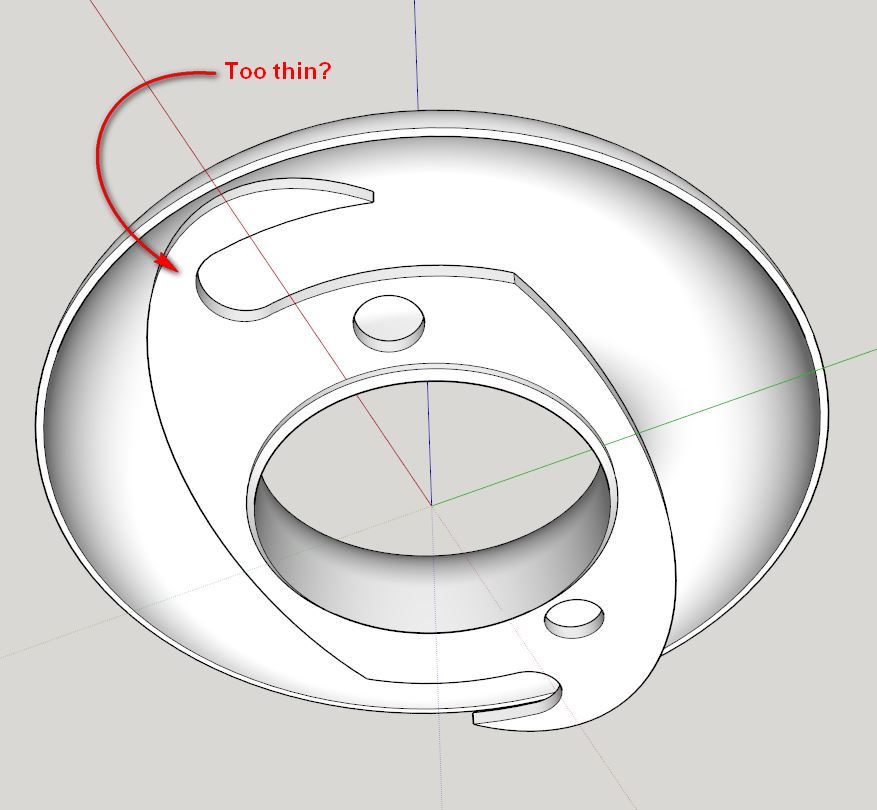
New design is SEXY!
One question...is this area under much stress? If so it may be a good idea to add some meat so it doesn't break easily.
-
RE: Q re: 3d printing sketchup models
@jim said:
It is because of how the exporters currently work that missing faces are a problem. An STL file a simple list of triangle vertices. Even if a face is missing in the SketchUp model, their vertices do still exist. So maybe an exporter could "make up" the missing faces just from the vertices.
That would be awesome
 Right now if there are missing faces, I run the model through Netfabb, which is a program that will fix minor problems like that really quickly.
@jim said:
@marcus: Thanks for the info. I bought a copy of your book; would recommend it to anyone interested in using SketchUp for 3d printing.
Much appreciated, Jim!
-
RE: Looking for a specific mouldings/components video
Matt from Mastersketchup has a good series, is this what you're thinking of?
-
RE: Problems with a half-torus
Definitely redo the model with higher resolution curves then - no reason to polish by hand more than necessary! Once you've push/pulled or follow-me'd, it has to be redrawn, unless you saved the intermediate steps like I show in the book.
Yep, pretty much any printer will automatically add the support material - that's whats shown in the T-rex model I posted before. Cleaning the support material is the tricky part, especially in an enclosed area like your model. Sorry if I didn't make that clear earlier.
Here's a video showing how the support material is cleaned out. On this particular model, it went very well.
-
RE: Problems with a half-torus
@teig said:
Just trying to get a quote now, had one for £43 which I thought a bit harsh so I'm trying some other companies now.
That's about the best price for a part of this size on a commercial printer. Cost on a desktop printer is about 1/10 that price, which is the biggest advantage of using one of them. With your newer design, you actually have a little more room for cleaning out support material.
@cotty said:
Looks good!
You can use the soften edges window to smooth out some of the lines (no difference for printing, only looks nicer ).
).+1
On the flip side, this is closer to what it'll look like after printing:
See the faceting on the curved bell surface? If you want that to print smooth, you'll need to increase the # of segments on the curves (Chapter 4 of the book). If the faceting is no problem, then you're good to go.

-
RE: New podcast about Sketchup & 3D printing, good for beginners
Thanks, James
Happy New Year 
-
RE: Problems with a half-torus
Great! It's a learning process, and you're getting a crash course
-
RE: Problems with a half-torus
Teig, two of the holes on the bottom are causing the problem, as pointed out in the following image.
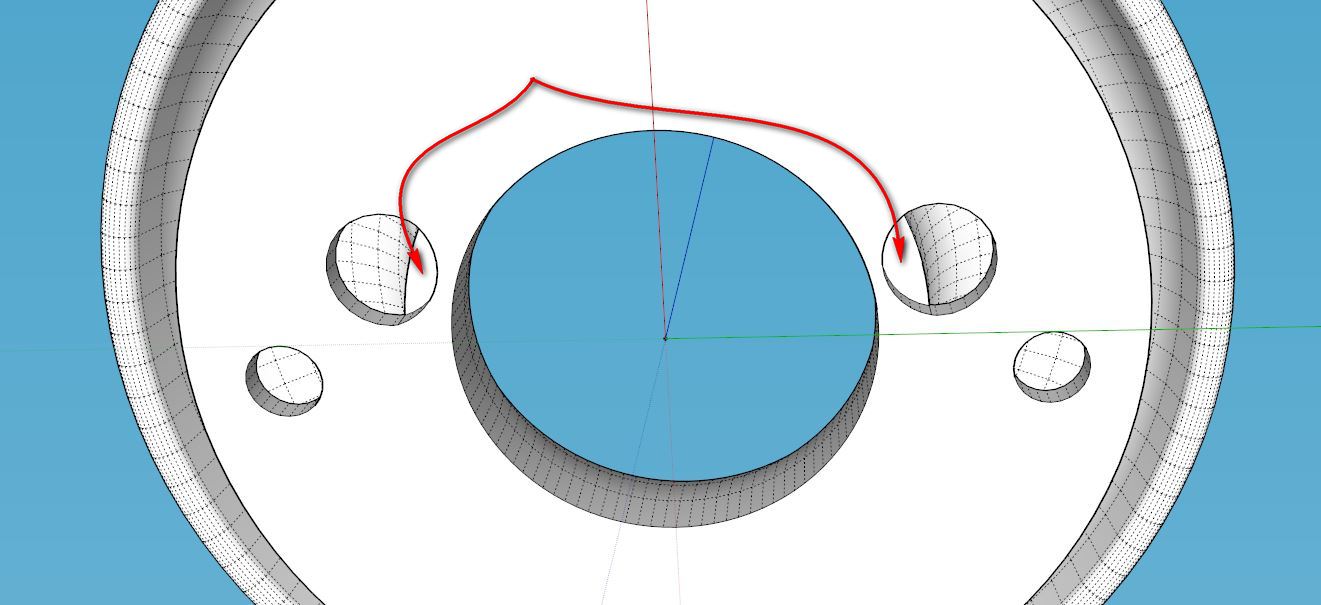
If you pull those 2 faces down a fraction of a mm and clean up the resulting internal faces, the model becomes solid.
@teig said:
So I don't need the supporting material if I go to a commercial printer? I'm starting to think that it might be the better option.
For a part with this complexity, you'd be better off. Something like Shapeways Strong and Flexible (S&F) plastic should work well. BTW, since this is a part for a carburetor, how hot would the piece get? Shapeways S&F melting point is ~180C.
ABS from a desktop printer melts at ~200C.
-
New podcast about Sketchup & 3D printing, good for beginners
Yesterday I was chatted with Jessica from the Printing Everyday podcast, and I thought you all would might like to have a listen, especially if you're getting into 3D printing.
Here's a overview of the topics:
01:20 - How is modeling for 3D printing different than modeling for rendering?
04:45 - How did you get started in 3D printing?
07:01 - Do you have a 3D printer? Where do you print your models?
09:28 - What are the differences between the Shapeways, i.materialise, and Sculpteo?
11:20 - What is your background?
12:00 - Is taking a class necessary, or can a beginner learn everything on their own?
14:30 - What is organic modeling vs engineering modeling?
16:30 - What was your biggest hurdle to learning how to model for 3D printing?
21:00 - Tell us about your book, "3D Printing with Sketchup"Here's a link to the podcast.
For a limited time (until Jan 6, 2015), my ebook is on sale for $5 at this link: 3D Printing with Sketchup book.

Happy new year to all!
-
RE: Q re: 3d printing sketchup models
Jim,
Yes, some slicing programs allow you to set a % infill, and will automagically shell the shape. These generally only work on filament-type printers though, because on a commercial powder printer you still need a way to remove the support material(un-bonded powder). On filament printers, the plastic can 'bridge' a short distance and therefore trap air inside the model.
Here's a link to documentation for Slic3r (a common slicing engine) that will help you understand how the user can tweak the number of outer shell beads laid down by the printer, as well as the pattern and % infill for the center.
On these little desktop filament printers, it's easier to leave the Sketchup model a big solid and hollow the center using the slicing program, but for commercial printers like they use at Shapeways you actually need to model the wall thickness, making the model hollow and leaving them a hole to remove the support material with compressed air.
And yes, like Cotty says, if there are missing faces, no matter how small, the model will not print properly. Most printing nozzles range from .025mm - .05mm diameter. If there is a break in the layer loop, the printer doesn't know where to go, and will not print.
Think of one slice of the model as a polygon - it MUST be a closed loop of edges so the printer can go completely around the shape and fill it in. If there is even a tiny break in the loop, the slicing engine generates an error.
-
RE: Problems with a half-torus
@teig said:
Well I bit the bullet and bought your book for the grand sum of less than a pint of beer
I've had another thought: If I made them screw together it would make it easier for assembly and disassembly. Time for a look into creating threads in SU  do I set the same kind of ~0.3mm tolerance for threads? I'll go look around.
Thanks!
For making threads, I'd start a little higher, like 0.5mm. You may have to tweak that after printing and testing though. You may be able to find and repurpose a model with threads from the 3D Warehouse or Thingiverse. I explain how to do that in Chapter 5.
@cadmunkey said:
Just bought it also. Looking to buy a small 3d printer soon so finding your book came just at the right time, thanks
Thank you too, I hope it helps you!

-
RE: Problems with a half-torus
Do yourself a favor and learn a little...watch the videos on this page, or at least the Filament printing one. Heck, spend $5 and get the ebook in my signature. #ShamelessPlug In a few hours you'll understand a lot more about how the process works, and how models need to be made in order to be printable, and you can keep all of your hair

There's not a template for making a snap fit, but here's a hint. You'll want to leave a ~0.3mm gap in between the parts to allow the parts to fit tightly, but not so tight they won't fit together.
-
RE: Problems with a half-torus
Ok, so it's a desktop printer. The reason I asked is on that kind of printer, the printer will need some kind of support to hold up the bell shape while printing. The support material is made of the same plastic, and you'll have to remove it by hand.
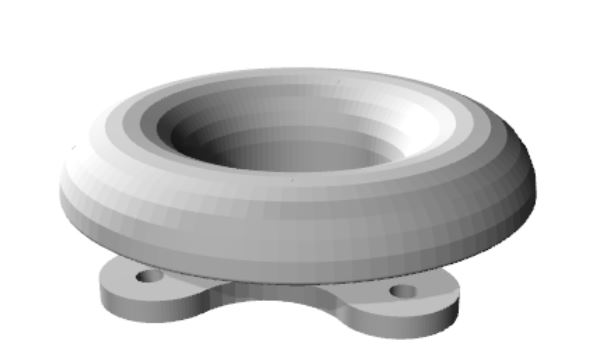
You should be aware of this, as you may need to make your design to take support removal into account. Here is an image of a T-rex head with support material:

...and the same model with the support material removed.

The gap under your bell shape is pretty small, and if it needs to be cleaned out you may be better off making the base and the bell shape in two different pieces that snap together.
If you were making this on a commercial powder printer, you could just remove the support powder with compressed air...easy peasy.
-
RE: Problems with a half-torus
Teig, I would encourage you to finish the model in Sketchup so there is no more work after 3D printing. You almost had it there once, you can do it again.
The beauty of 3D printing is a finished model, straight off the printer.What kind of machine will you be printing it with?
-
RE: Problems with a half-torus
@teig said:
I've been trying for three hours now to put an arc under the bellmouth!

You could use JointPushPull plugin to thicken a curved surface, but starting with a new profile is much cleaner and probably faster.
-
RE: Problems with a half-torus
Teig, the bottom of the bell was likely not formed when performing the follow me operation at too small of a scale.
Does the center have a hole like a donut? Assuming so, here's how I'd make the overall shape:

After you run the follow me tool, you're left with a solid that you can add the bottom holes to.
-
RE: Problems with a half-torus
@teig said:
If anyone wants to run an eye over it for errors at the 3D printing stage I'd be much obliged
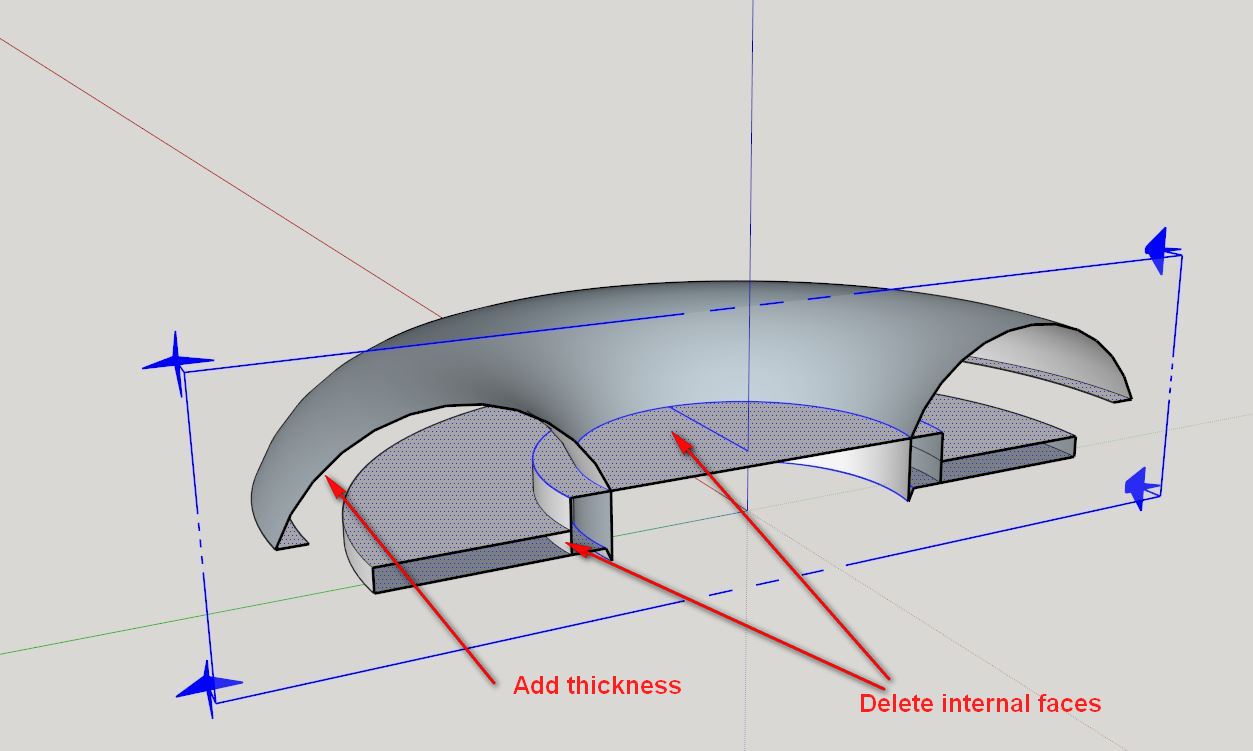
I had a quick look...your model needs to be "Solid" to be 3D printable. Right now, you have a bunch of single-face walls with no thickness that will not print. You have to actually create the desired wall thickness for it to print properly.
See this link and my attachment for more details: http://www.dummies.com/how-to/content/understanding-solid-objects-in-google-sketchup-8.html