Nah! The mirror tool is yet another tool. By the time you've remembered what the shortcut is or where the icon is located I've already done it. It's one of those things that takes less time to do than describe...3 seconds, tops. 
Oops, your profile's looking a bit empty! To help us tailor your experience, please fill in key details like your SketchUp version, skill level, operating system, and more. Update and save your info on your profile page today!
Check out Febhouse | New extensions for Shadow Analysis in SketchUp Download
Posts
-
RE: Flip Along Shortcut
-
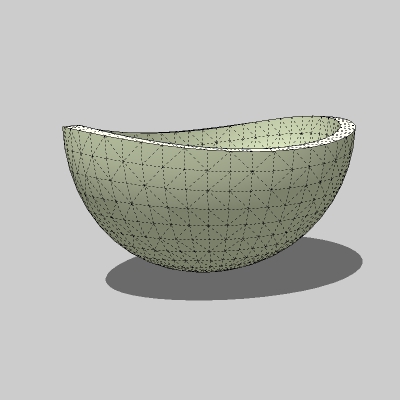
RE: [Request] How to create this curved bathtub ?
AS Cotty says, the pdf is password protected, so we can't see the actual dimensions. Looking at the jpg, the tub could either be round, oval or egg-shaped. I've taken the hardest option...egg-shaped and started with a sphere, constructed from circles of of 48 segments. There is also a parametric shapes plugin that will make such a sphere directly.
I've then cut the top off the sphere and used CP Philips's Sketchy FFD (3x3) together with the Scale tool to make the dip in the middle section...by scaling-down the middle of the 3 sets of control points. Obviously, you'll need to install this plugin and learn how to use it. It's pretty easy.
I then used FFD (FreeForm Deformation) again on the 2x2 setting to narrow one end to make the egg shape, before scaling the whole model slightly narrower into more of a bath shape.
I used Fredo's Joint Push Pull to give the whole thing some thickness.
-
RE: Chair Modelling
That's not a single primitive in that example, Cotty. I meant you can't start with a sphere and just pummel it into shape like you can with some other software like Z-Brush or some NURBS modellers.
Well, actually you can, but I wouldn't recommend it...either time-wise of for accuracy of the final result. -
RE: Chair Modelling
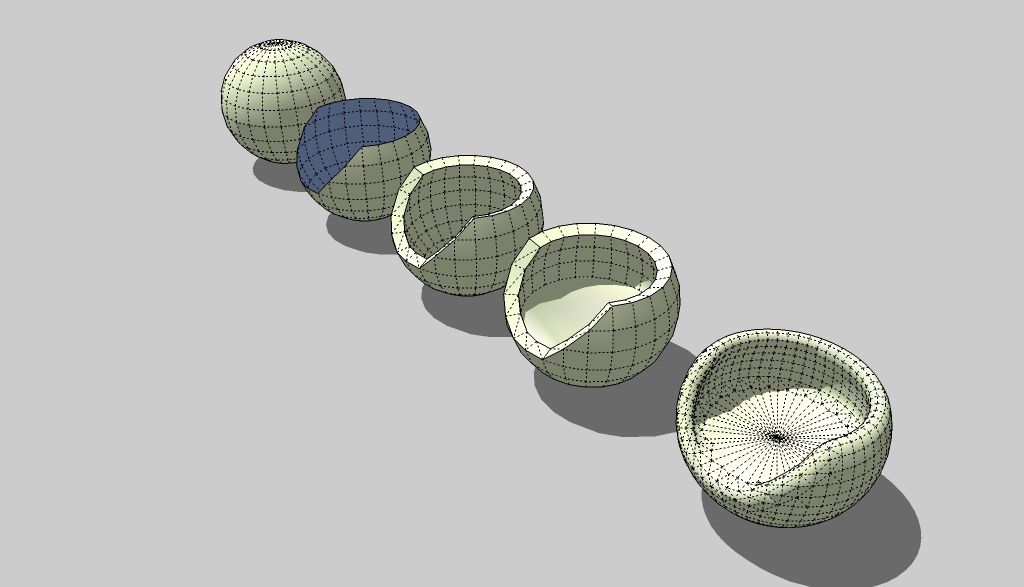
Here's a very rough demo of the process.
Draw a sphere.
Chop it into approx the right shape for the exterior.
Joint Push Pull to get the interior.
Fix the flat seat...you'll need to adjust the height of the 3 or more vertices right at the front if you want the seat completely planar.
Apply Subdivide and Smooth from Artisan.To get closer to the shape of the actual chair it looks like you'd have to take a little time selecting and then downscaling the size of the seat and those horizontal arcs in the interior before applying Subdivide. The chair doesn't seem to be quite as concave as I've drawn it.
-
RE: Chair Modelling
SketchUp is notoriously bad at this kind of thing. You can pretty much forget about starting with some kind of primitive and beating it into shape like a ball of clay...even with a plugin
Looking at the actual shape of the seat, the exterior seems to be part of a sphere and the interior is something else...flat at the bottom, underneath the cushion.
My first thought was that you could get a rough approximation using boolean subtraction with the Solid Tools...subtracting the inner surface from what is basically a little more than a quarter sphere.
But I think you might also be able to get close using Fredo's Joint Push Pull. Start with the outer shell, then JPP it inwards to form the seat. It's clearly not of equal thickness all round, so it looks like you'd then have to then select the faces on the interior and maybe move or scale them a little to get closer to the actual shape. Bear in mind that throughout all this, the connection between the inner and outer surfaces is going to look like you've cut it with a chainsaw...not the smooth final finish.
To get that smooth finish you'll probably have to use Artisan. It's commercial, but well worth the cost if you do any amount of organic modelling. You can just use its subdivide and smooth function to get the nice rounded finish. You may have to work on that flat seat part again (as it may end up too rounded.) -
RE: Improvements since Trimble Takeover
@pbacot said:
I doubt that most US firms are using Revit.
Autodesk seems to think they are...and that they need a sketchuppy finger-painting app do do all the preliminary stuff with before actually committing the design fully to Revit.
Have you ever seen anything so visually similar to SU without actually being SU? Adesk are obviously worried.
http://videos.autodesk.com/zencoder/content/dam/autodesk/www/products/FormIt/Images/overview/formit-360-overview-video-896x504.mp4 -
RE: Flip Along Shortcut
The simplest way I've found to flip a group/component along the world axis is simply to duplicate it, select both, flip them, then delete one.
-
RE: Sketch up to a new pc.
Actually, Trimble recommends that you don't just copy the plugins folder from one installation to another; you should install them properly. In any case, some extensions (like certain renderers) will install themselves into their own program folders...just putting a loader rb into Plugins. You won't have that program folder on a new system; plus you may have more than one Plugins folder. The default for 64bit versions is in Users/AppData..... but there's often another one in Application Data. It depends on what you've installed.
I would recommend making a list of all your current plugins and extensions then installing them one by one using the Sketchucation Plugin Store (rapidly evolving into the Extension Store) plugin. This will create a Bundle that you can then rapidly copy to any other SU installation.
As for the toolbar arrangement, I've made a screenshot of my preferred layout. I just import this as an image into SU, Zoom to fit, then arrange all the toolbars to match it.Also don't forget any custom templates, material libraries, styles etc. They'll need to be ported-over too.
I'm currently running SU on 3 different systems. I just use it on 1 system at a time.It's likely that the latest release of SU will be out shortly. It's also possible that it may need a clean install...ie uninstalling the old version first, so having a bundled version of up-to-date plugins that can be installed with a single click will probably prove more economic in the long term.
Like everybody else, I used to just copy-over my old plugins folder, but you can end up with a whole bunch of outdated plugins that way....except for Fredo's, which have a checking gizmo. You can also end-up with several plugs all doing effectively the same thing. I've just installed on a new laptop; and I took the opportunity to make a fresh start.
The point about the SCF Plugin Store installer is that it will automatically install the latest versions directly from here, rather than copying some old version that's been knocking around on your hard drive for years. -
RE: Reverse engineering a render file back to SKP
It's true that both formats are saved in simple text format...what appears to be a list of vertex coordinates; but it's how those vertices are referenced that appears to be different.
I think a translation from rof to obj would require at the very least some kind of batch Find and Replace script. -
RE: Help making component from jpg
The jagged lines look like a graphics card issue. Go to the Window menu . Preferences > OpenGL and look under Capabilities to see if your graphics card is good enough to support anti-aliasing. If there are a number of capabilities, see how SU performs with the best one selected. If there's only one...and anti-alias is set to zero, then there's not much you can do about it.
If hardware Acceleration and Fast Feedback aren't checked you may not see more than one capability...and probably none with anti-aliasing. In that case, you may have to turn them on...then close the Preferences box and re-open it again to see if you've got any more choices.
-
RE: [Plugin] SketchUcation Tools 2.6.1
Thanks TIG. I tried-out V3.0, but I've been sticking with 2.6.1 for now, as it still has the preview option.
-
RE: [Plugin] SketchUcation Tools 2.6.1
I realise that the plugin gets its stats from the server, but is there any way to actually delete some of the bundles listed...at least at the UI level? When you've been doing a lot of compatibility testing (as some of us have lately) that list of bundles can get quite lengthy...and not a little confusing.
If there isn't any way of deleting listed bundles, can I put in a feature request for one? There must be some way for management to still monitor what's been downloaded without individual users having to carry that record in perpetuity.
It's got to the point now where I'm just using the plugin as a handy overview, but then downloading and installing the scripts via Preferences > Extensions....which kind of defeats the object. -
RE: Brighter3D
@hornoxx said:
BTW - if B3D doesn´t run properly, it is worth to consider whether Fredo6 plugins are enabled. If so, B3D recommends to disable these temporarily because of any issues.
I've been working on this. The problem seems to be with ThruPaint and maybe also VisuHole. If you have no need for these, then simply don't install them. There is also Tools, which is a collection of a bunch of smaller scripts...including ThruPaint. Just install those other scripts individually instead of in the Tools package.
I found that I can still use all the big stuff...Tools on Surface, Joint Push Pull, Curviloft etc. without any problem. There's no need to disable everything. -
RE: Typist
You need to repaint her body map, Pete. One of those retro Space 1999 outfits would do.
Great model of a Tie Fighter BTW

-
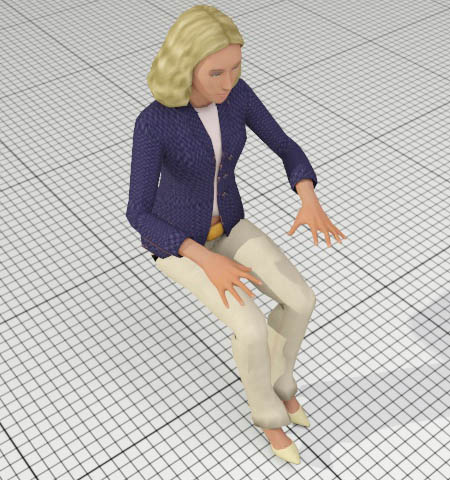
Typist
I'm trying to develop a new series of mapped figures. The main problem seems to be the horrendous Bloatfest that is the SU file format. Exporting this model as a 3ds, you get a total size of around 500KB for everything...the mesh and the texture maps. Yet try as I might, I just can't get the skp fle down to any less than around 3.2MB...quite a difference. The few dozen more triangles I could still get rid of just pale into insignificance.
I think it's because SU's weird mapping system records the UV info randomly and separately for each face instead of having some kind of sensible RLE-type system....really inefficient.Anyhow...given that it's the number of faces that's important to SU navigability...and given that this model does only have 8,700...about 3 times as many as my vertex-painted figures, but orders of magnitude better than anything Poser can do (not that you're allowed to distribute Poser meshes anyway), it shouldn't impact a model too badly.
I hope a few of you find some use for her.PS. I guess she could double as a piano player.

-
RE: Brighter3D
Haha! I have only just made the connection between the tagline at the bottom of my posts and your avatar.
What I meant about the materials is that although the Bdrf materials have V-Ray type material icons in their library...showing their colour and shininess, when you actually apply them to the model, they appear on the In Model tab as just white. They do this because the RGB value of all of them is 255,255,255.
So...when you then try to find a particular material in the In Model tab, you are faced with a sea of white squares. You can only tell which one is which by hovering over each one to see its name as a tool tip.It would be much better if each material had a RGB value that more or less represented it's rendering colour....rather like when you switch from textured to shaded mode.
The fact that all the RGB values are the same is at the root of the problem with LibFredo6.rb. Because with that active you can't even change your mind about a material. If you paint a ball with a ceramic material; and then decide to paint it gold instead...SU will not allow you too...because you are trying to paint one RGB value with the same RGB value...so it just ignores you. The new matarial will not appear in the In Model tab...however many times you apply it.
In fact, if LibFredo6 is active, you can't even repaint a suurface with a slightly different RGB value...like 254,254,254. It seems it has to be VERY different. -
RE: Managing Textures
I ran into the same problem after upgrading to Win 10. It took me a while to figure out what was happening. I don't recall permissions ever being any problem before when it comes to Materials.
-
RE: Brighter3D
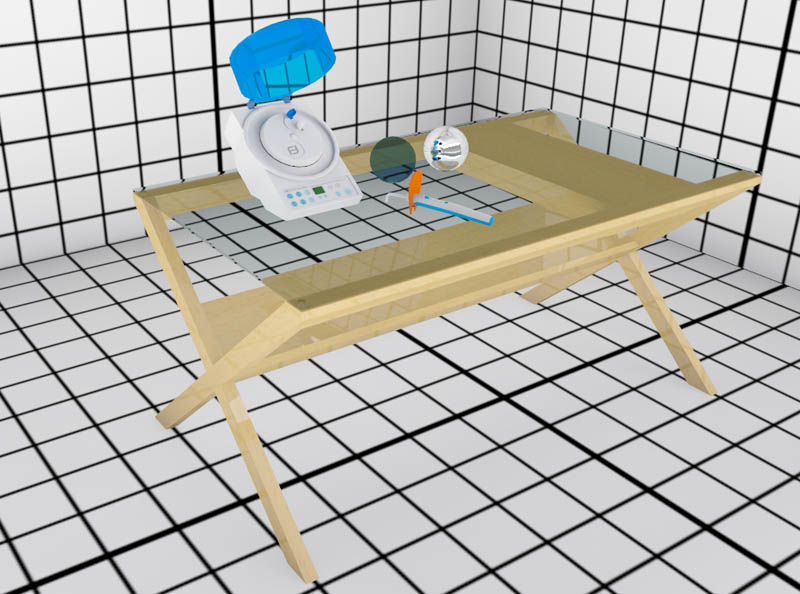
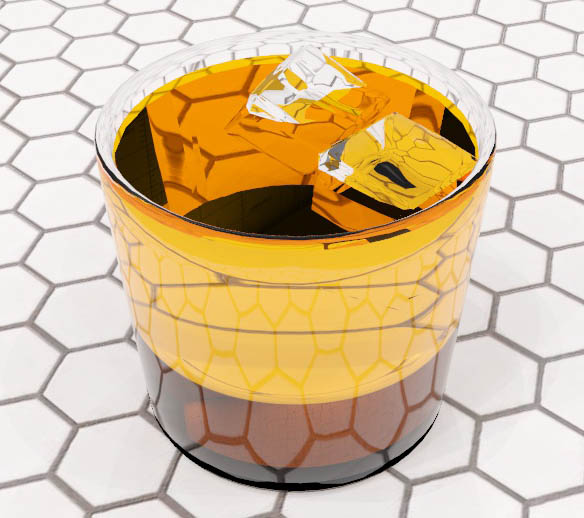
To be honest, I find it rather better for lighting than Twilight. To be able to just pull in a HDRI map and get something like this pretty much straight out of the box is rather impressive. I also like the way the glass top can be fairly easily tweaked so that it doesn't cast dense black shadows on the wood immediately underneath it. That's something else that can take a lot of fiddling in other programs...even if the material is so transparent you can barely see it.
I came across issues with LibFred06.rb in another forum. I'm running Win10 these days and it seems (on that platform at least) that with it enabled SU cannot distinguish between materials of closely-related RGB value. Not good when most of the 100 or so Brdfs in B3D are white.
-
Brighter3D
Just a heads-up on what appears to be a sadly neglected but really nice renderer. I only came across it last week, but have been impressed so far. http://www.brighter3d.com/
At $99 for lifetime updates, it's got to be a contender for anyone on a budget. The free version will render up to 640x480.
I deliberately stopped the render of the whisky glass at a mere 13 iterations (it's unbiased) It's a really impressive result for just 63 seconds.
-
RE: [SOLVED]Can't view materials
Hi Dew,
Did you solve this problem? If not, is it possible to post the model...or even a small part of it, so that we can see if it's particular to your system or something odd in the model?