hmm
not sure if I'm doing that right, but I always use the top option "Save as a new style".
If I have a shadow from the left in scene 1, in scene 2, I have a shadow from the right. - Then I always think this probably is meant with "new style". - In any case, it works. Also different layer visibilities are considered then. Did you try that?
Anyway, this option does not affect the "real" styles of SU´s syles window...
Maybe only the wording of your shown option window is somehow clumsy? From my viewpoint, all these selectable positions are expressed somehow obscure - at least for me.
Posts
-
RE: Created 8 scenes, none of them work
-
RE: Evening practice: table base
WOW !!
In addition to the "morning practices" the "evening practices" are always welcome.
pure wood - I even imagine to smell it - and again excellent presented!!


it is worth the effort chamfering(?) the material to get these clear joints.(Did You erase parts of ther rendered image layer to get this?)
-
RE: Morning SketchUp Practice
"Morning Practice"

I am always happy when I read that -
then there are mostly nice wooden things to seekeep going
-
RE: AT AT Walker/AT PT Walker
@tk0001 said:
...I'm a fan of the "clean" style...
Yes - this is absolutely and pure SketchUp clean!
 very good
It is this clear style, I liked so much many years ago, that I became aware of SketchUp.
-
A small Glass Series
Hi Everyone
Sometimes a small geometry exercise develops a life of it´s own. I suppose you all know that?I wanted to model that simple geometry of a glass, which almost everyone has in his glass cabinet
as I guess - below octagonal and round above. That alone took me at least ten attempts.
After it was finally done, I somehow had to make an immediate test rendering of course! And because
an empty glass is boring, I considered, with which I can fill in this empty glass, and so on ...Thus, my guessed small exercise developed up to a mammoth undertaking

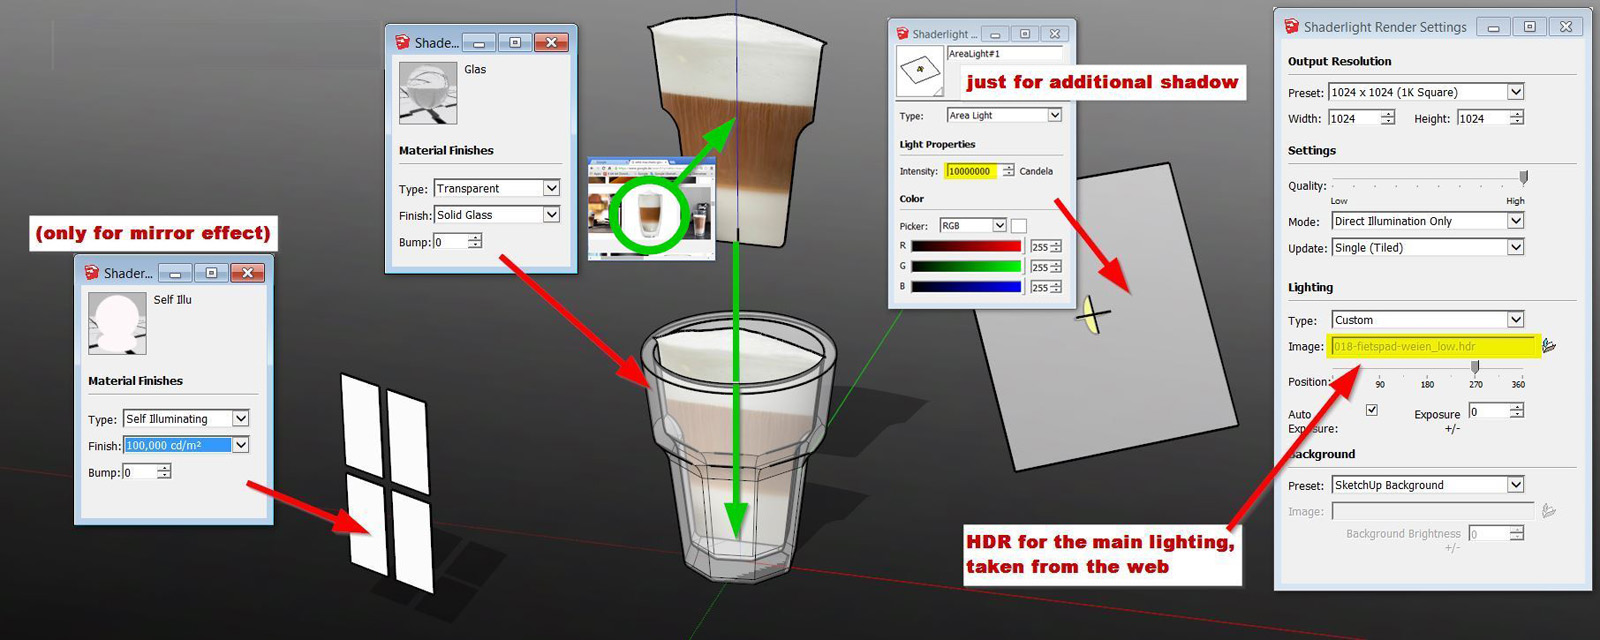
But after the results seem, however reasonable, I decided to show them here.Especially on two of them I would like to point with a few "making of" infos.
The "Latte Macchiato" version was the easiest thing. Because I was too lazy to model the
milk foam, I put a 2D image into the glass. The rendering became fantastic "out of the box",
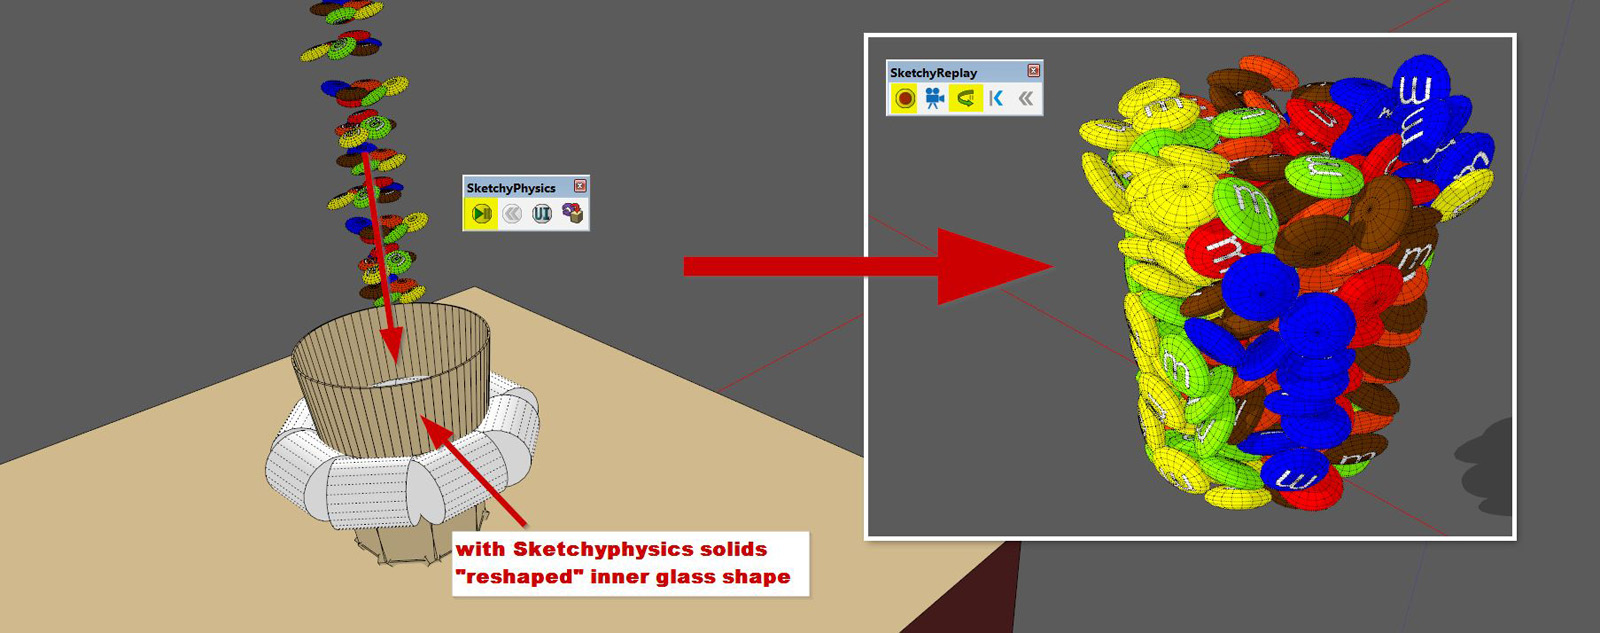
at least for my desired view of course.The "M & M's" version was a bit more difficult. Again I was too lazy to put every single
M & M into the glass. So I decided to use SketchyPhysics. The 252 pieces of chocolate brought
my computer almost to a crash but after a few attempts and a lot of patience, it finally worked.
For getting the pieces of chocolate into the glass properly, I had to remodel the inner shape of the
glass with SkPhy solids. In there I let fall the M & Ms.if anyone is interested or may need it
https://3dwarehouse.sketchup.com/model.html?id=ufe71e3be-f5d2-472b-aea0-beaebec0c100

-
RE: [UPDATED] My LayOut Scrapbook for Architectural Drawings.
Wow Kris,
both, the extend and the completeness are impressive - I can not thank you enough!

-
RE: Chocolates, anyone?
if this designer chocolates is not available at the moment, I would even take the other kind you have shown obove - my delivery address follows by email

it is incredible - somehow justifiably no one questions that there is done an effort with chocolate, which is comparable to a goldsmith´s work with jewelry
I like that work!
-
RE: Chocolates, anyone?
... still wanna have! but I forgot to say that your presentation is simply superb!!!
I've googled a bit
http://www.nendo.jp/en/works/chocolatexture-2/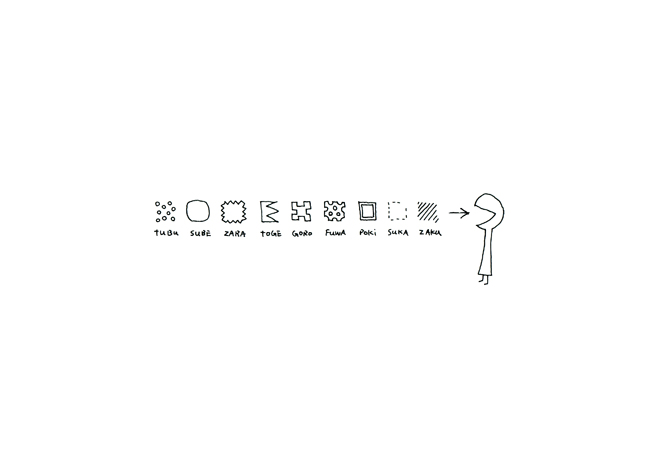
-
RE: Ceramic 3D Prints
Great!
had not yet realized that 3D printing also works with ceramic material
and your "fancy e-cigs" close ups I have first mistaken for dentist drills


What does "traditionally slip cast" mean? -
RE: Sketchup over remote desktop
hi
that's exactly the same way which I'm running my render jobs.
Even my render pc is quite similar.
The problem is not SkUp on the render pc, but the performance of the Internet connection via VNC in my case.
Every click in Skup causes a new image transfer via the internet...
Everything appears with delay which can be quite annoying. So I'm trying to fix everything on my workstation for being able to start only the render tasks later.
Something else. Not all Skup shortcuts are working via VNC.
And a rebooting of the rendering engine (crtl-alt-del) also doesn't work via VNC, if needed... -
A simple Autumn Scene
Hi All
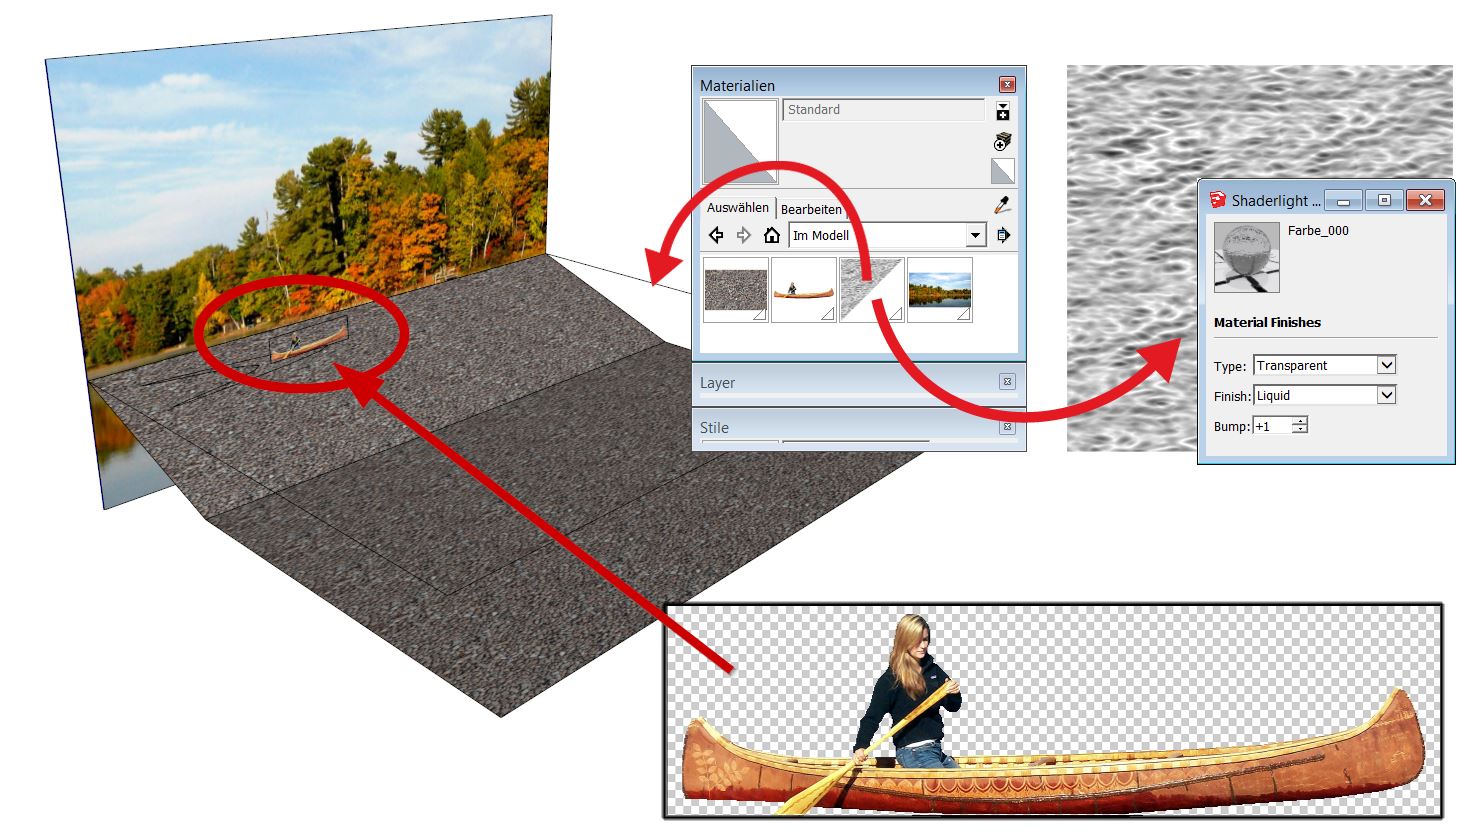
nothing really new, but I thought this little scenes exercise fits well into this season.
Only a background image, one bump map, one standard texture and one 2D cut out component were
needed to do this simple scene ...

-
RE: Ireland 1 Germany 0

for so much boredom in front of your goal, we deserve no better. Congratulations! -
RE: Strange Pumpkin-Things
Thanks Jo-Ke
"...how did you extract the fineline wire layer?..."
The pumpkin is a smoothed group. I have set "Show Hidden Geometry". That´s basically all.
In the example above, I've used a high 2d-export resolution, which enhances that "fineline" effect.
I hope that's what you asked me?I add in a little mini tutorial how to model such a thing ...
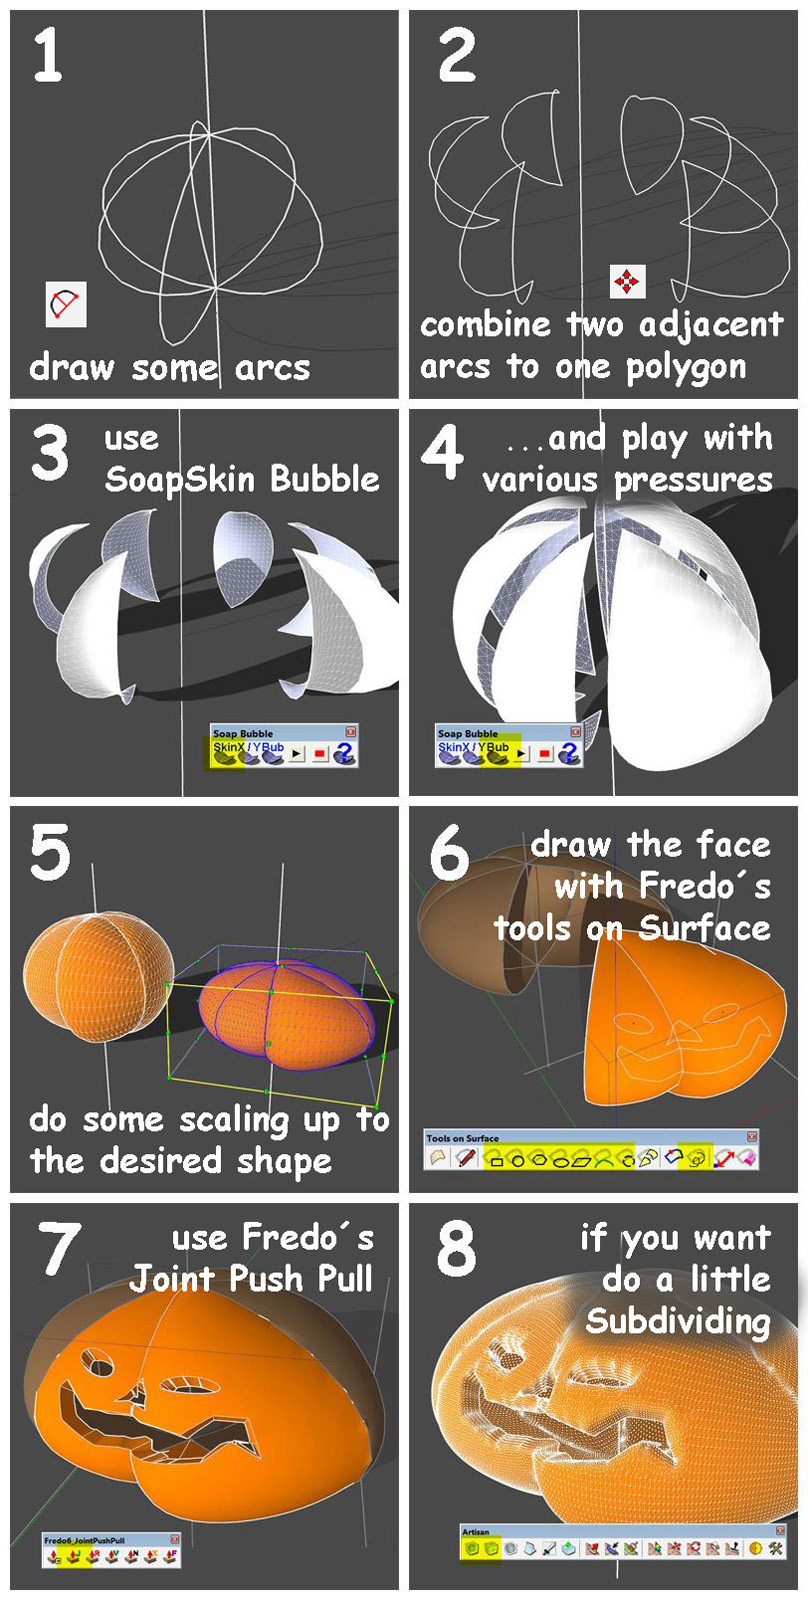
-
RE: Exporting as a 2D graphic
Hi
sometimes it helps to open the exported PDF file in Acrobat Pro and export from there into a new PDF
which then is "better compatible" to your used Creative Suite for some reason... -
RE: Strange Pumpkin-Things
thank you Oli
meanwhile I own Twilight Pro (exactly for this reason) but still can not work well with it...
