OP, I was asking what you need to build because I don't really know what you mean...
I don't need to create closed shapes or polygons to use FollowMe:
http://www.youtube.com/watch?v=3huRJehPHW4
OP, I was asking what you need to build because I don't really know what you mean...
I don't need to create closed shapes or polygons to use FollowMe:
http://www.youtube.com/watch?v=3huRJehPHW4
Dear mitcorb, you need to be more precise. Could you please give us an example of what you need to model, so we can find a way to do it?
You can also try this:
For this specific case, select the offset arc, go to Edit>Make group, right click>Flip along red, explode and try again.
For any other case, I have no idea.
Hello, everyone. I guess almost everybody here already knows this Photoshop trick (for what I see in your renderings), so this is for the newbies like me...
By the way, it works best in dark interior renderings with bright windows.
----Instructions added on Feb 6------
The following steps apply to Photoshop 7 but should be similar in newer versions.
First, unzip the attached file.
Open your render in Photoshop...
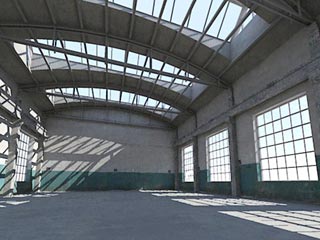
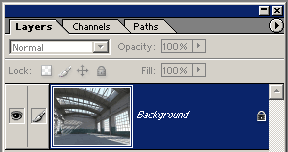
And make sure it only has a Background layer, or the actions won't work. If you opened a JPG file, you don't have to worry about this.
If you haven't already, open your "Actions" panel by going to the menu Window > Actions.
Look for the small round button with a triangle near the upper corner of the panel, click it and select "load action" from the menu:
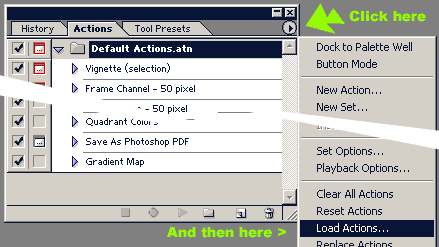
Look for the unzipped file Bloom.atn and hit the "Load" button.
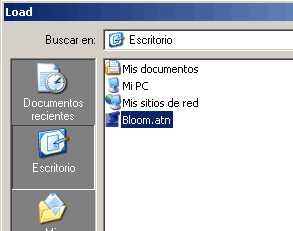
Now you have...
WAIT A SEC, STILL EDITING THE POST...
Unzip, load from Actions panel, select the action inside the folder and hit "Play".
Thank you very much!
This will save me a bunch of time when designing this kind of things:
Follow_me_and_keep should be a big hit among fans of the Great Wall, and will certainly help a lot when modeling roads. Keep up the excellent work, wikii!
Mrs. Susan, for your specific case, the screw1_5.rb script works well, too. Unlike FollowMeRotate, with screw1_5.rb you have to select both the face and its borders, and it only works around the blue axis, so before using it you have to center your stair in the origin. You can find it here:
The "first end" and "second end" that you are required to enter are just required to determine a differential in height, so, irrespective of where you click, the shape will always be created around the blue axis.
Sure, I posted the links in the Youtube video description. click on "(more info)" to show it. I'll copy the description here:
"
Today I read this tutorial for doing a "twisted leg": http://finewoodworking.taunton.com/item/6095/doin-the-twist
But I remembered that in the SketchUp Community Forums there are free tools that can do the same thing in a snap. So I decided to record a video tutorial.
You'll need the SCF Power Toolbar, which includes the "Join edges" tool by Rick Wilson:
http://www.sketchucation.com/forums/scf/viewtopic.php?f=180&t=14770&st=0&sk=t&sd=a&hilit=powertoolbar
And the "Follow me rotate" script, by wikii:
http://www.sketchucation.com/forums/scf/viewtopic.php?f=180&t=13014&st=0&sk=t&sd=a
In this video I did a counter-clockwise twist. To do it clockwise, simple input a negative value in the "Rotate" field of the Follow And Rotate script.
Remember to check that the line was properly divided before using the "Join Edges" tool; if you don't, the Follow And Rotate tool might not work properly.
Tutorial created with Camstudio, a free and open-source excellent little piece of software, and subtitles added in Windows Movie Maker.
"
Thank you, very much, wikii. This tool is extremely useful and solves one of my main gripes about SketchUp.
I created a video tutorial for twisted balaustres/legs...
[flash=425,344:10ax4kg1]http://www.youtube.com/v/0eBIQC2Cgps&hl=en&fs=1file=http://www.youtube.com/watch?v=0eBIQC2Cgps[/flash:10ax4kg1]
...in response to this tutorial found on the web:
http://finewoodworking.taunton.com/item/6095/doin-the-twist
I hope you see the BIG difference your script makes. Without Follow Me Rotate, it is like being in the stone age!
By the way, I discovered that if I don't deselect the line after dividing it and make sure it has been properly divided, sometimes Follow Me Rotate will extrude in the opposite direction.
Thank you again.
And thanks to Simon Bonnet for the tip on posting Youtube videos here.
Hello, Dave. I'm sorry, I'll be more careful with the wording in the future.
I liked your tutorial because it is actually the best way to do it in SketchUp without having to install any additional scripts.
It's just that I really think that Follow Me Rotate is an extremely cool script thas not everybody is aware of, so I wanted to share with your readers an even faster way to do the same balaustre.
Here's the Youtube link for those who can't see it embedded: http://www.youtube.com/watch?v=0eBIQC2Cgps
(Weird, it's working fine in Google Chrome...)
And sorry for my bad English, I learned it through Pink Floyd songs...
-------------------UPDATE--------------
Video does not work in Internet Explorer 6, but works fine in Firefox 2 and Google Chrome.
This is a commercial script, but it seems to be just what you're looking for:
How about putting the sharing and collaboration capabilities of the 3D warehouse to good use? Let's make a 3D 'exquisite corpse'! Everyone's invited to add a new scene:
http://sketchup.google.com/3dwarehouse/details?mid=5d999072b2960cd2fc2c2a1a2a248c5
I made the first two scenes to get the ball rolling. Here's the story so far:
Why not make a SU collaborative model that tells a story based on this kind of snobbery? It would be a cool 3D "exquisite corpse" told in several scenes.
I've been giving a try to the demo version, and indeed, it's cool to be able to navigate seeing shadows and reflections. It is like navigating your model in 3dsMAX with radiosity turned on, only a bit clumsier. However, as reflections are map-based, it is good only for reflections in non-flat surfaces... BTW, bump-mapping only becomes visible when you make the surface slightly reflective. So reflections look better on a model of the Guggenheim Museum in Bilbao than for your typical clean, boxy building.
The examples shown in the product page do no justice to the program. You can actually get good-looking images out of it, if you want to do some tweaking... And do not mind that flat mirrors will show odd reflections. Only major problem seems to be that face-me components remain static when you navigate with the tour-tool.
The real selling point to me would be the ability to create a video in no time... If the kinks were ironed out.
Remember this painting by Max Ernst?
http://en.wikipedia.org/wiki/File:Europe_After_the_Rain.jpg
The guy experimented with everything, including semi-automatic creation processes, such as frottage, a technique extensively used in this painting.
The modern equivalents of frottage seem to be PD Particles, POV's 4D-Fractals, Ultrafractal, and now Groboto. All of them are semi-automatic creation tools. You become part creator and part spectator. And I think that's actually good for when you're kinda dry of fresh ideas.
Any other tools/toys in the same spirit?
And how about sending .kmz files to your client?
I bet Google Earth has a lot more users than SketchUp.
OP:
You have SU Pro, which can export to Piranesi. Why not give it a try?
Hi, I was wondering if any of you has ever sent a SketchUp file to a client instead of just flat .JPG images...
What problems did you encounter?
Did you recommend your client to download Google SketchUp or the SketchUp viewer? Why?
Did your client figure out how to use any of them? Did he make comments using the text tool? Did he change colors?
Don't you fear that your client will run away with the 3D design and hire a low-paid draftsman to do the rest?
Would you recommend sending .skp files to a client?
There are less and less reasons for using ArchiCAD nowadays...