That would be really cool... Just like Windowizer 3, where a drop-down menu lets you choose materials for each part!
Posts
-
RE: [Plugin] Random Painter (Updated March 9th, 09)
-
RE: Req: free car cutouts
Start with the Warehouse:
http://sketchup.google.com/3dwarehouse/details?mid=a064872dcb1dc05f194f34774bdb7e18&prevstart=0
http://sketchup.google.com/3dwarehouse/details?mid=fcebdc2db3f9b4c01ca36424313a787e&prevstart=0
http://sketchup.google.com/3dwarehouse/details?mid=e316f8c4460d21e61d225d751745cd28&prevstart=12
http://sketchup.google.com/3dwarehouse/details?mid=dd219f47f06b84eb43b9eef399a0841d&prevstart=12
http://sketchup.google.com/3dwarehouse/details?mid=43d00f1f63d726b043b9eef399a0841d&prevstart=12
http://sketchup.google.com/3dwarehouse/details?mid=b18434a7db8a5f7843b9eef399a0841d&prevstart=12 -
RE: Kinemac? Anyone seen this?
Looks cool, but the problem with such real-time renderers is that they rely on reflection maps, and thus reflections only look good in curved surfaces. But it's still cool. If I only had a Mac...
-
RE: Problem with export scene ....
The quickest fix is putting both images in different layers in Photoshop, selecting the upper layer and using"difference" as the merge mode. This will allow you to [almost] precisely match both images.
Also, make sure that you haven't used the "Fix aspect ratio" ruby, as it seems to produce mis-matching between the field of view of renders and that of SketchUp output. If you did, copy everything and paste in a new file.
I don't use v-ray, but just in case, look for a setting called "Field of View", or "camera angle" and make sure the value matches the SU camera.
-
RE: Master Bath WIP
Kerkythea is tempting me...
Just a question. If you make a change to this beautiful bathroom in SketchUp and re-import in Kerkythea, do you have to re-apply all the materials? -
RE: How do you touch/collide objects ?
To avoid both entities "gluing" to each other, group them before moving.
And if you want to be more precise while moving, learn about SketchUp's inference system. Check this page:
http://sketchup.google.com/training/videos/new_to_gsu.html
And look for the "Move video". I highly recommend watching them all, however. -
Do you put up with inefficient 2D-3D workflows every day?
When I worked for a building company, their planning department had this really inefficient way of doing things:
-
Mr. Designer drafted a design in paper, then started to draw the floor plan and perhaps a facade or two in AutoCAD
-
He then handed me the .dwg and I had to build a 3D model out of it in ArchiCAD for rendering in Art-lantis. Of course, I had to correct his mistakes and read his mind as to what exactly was he thinking of. With time, I think I actually started to read his mind.
-
After the bosses (most of which are not architects or designers) and the sales people (Yes, the sales people!) approved a design, I had to extract facades and sections from the 3D model for the other draftsmen to work with. Since at the time ArchiCAD didn't have booleans, I had to do a lot of cleanup before handing those drawings to them. They then added dimensions and annotations and also made more changes to the design.
-
They then handed me again those .dwg drawings with the new floor plans and facades so I could build an updated 3D model. Again I had to correct the mistakes they made and do some mind-reading.
-
Goto > Step 3 until days to deadline = 0.
Do you have to put up with similar inefficiencies in your workplace?
-
-
RE: Textures on a bending pipe, how to do ??
I tried starting with a cylinder, texturing it and converting it to the shape you need via FFD, but the textures went crazy...
-
RE: Rubies at Work
Anyone remembers "Tron"? Think about what Disney was able to do with computers back then vs. what a talented individual can do today.
Works like this encourage me to improve my modeling skills.
Simply excellent. -
RE: Easy digital watercolor
Yet another try.

This time I applied the effect to a completely blurred version, and put it beneath the regular version. I made another copy of the regular version, and started to alter the curves of the bottom two layers, making them yellowish. I then used layer masks to hide all layers, and revealed them using Photoshop's wetmedia brushes and this brush collection:
http://fbrushes.com/2008/11/05/watercolor-1-brushes-pack/Here's how my layers look:
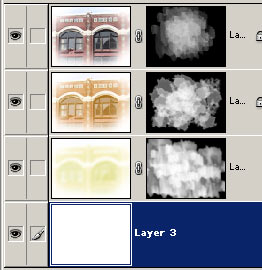
A tip: When you use the brushes I linked to, instead of dragging the brush, just apply it in spots. If the brush borders become too distracting in certain parts, blur those parts. Remember that all this work is done in the layer Mask, not the layer itself.
-
RE: Easy digital watercolor
Oh, well, since the thread has just been revived, here's my try, using an action I found on the Web:

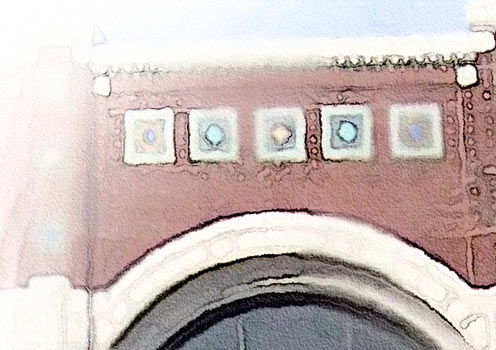
Of course, I did some manual preparations before applying the action (Resizing to about 1500px wide, whitening the border, applying Gaussian blur to the border and to several random spots)
And here's the action I found. The text file says it's OK to re-distribute as long as you keep it intact.
The documentation says it works better on images around 3000px in the biggest dimension, but I think it works equally nice on 1500px images.
-
RE: How do i make a hill?
Tip: If the "start from scratch" Sandbox tool doesn't draw anything, try typing a lower number for the divisions.
-
RE: Textures on a bending pipe, how to do ??
Pick the face containing the stripes, right click > explode, re-sample material and apply again to the bent pipe. It worked for me.
-
RE: Stick to the screen?
Sure, just assign each scene a different style in the scenes tab.
-
RE: Stick to the screen?
Exactly. Open the watermark tab by clicking on the small cube with the "OK" stamp on it. Click the + sign, open your JPG or GIF, choose overlay, in the next step drag the "Model-Image" slider until you like it (I prefer it to the right), and in the final step choose "Positioned in the screen", and choose in which part of the screen you want your logo, and how big.
-
RE: Request - Email Model function in the SU File menu
Well, the warehouse has an option for uploading private models and inviting collaborators/viewers, but it takes a while to upload, as it seems to be uploading several versions of the same file, together with a Google Earth version (Please correct me in this). I wish the warehouse gave you an option to upload only in SU7 format. Then, there would be no need for e-mailing attachments, just like Google docs.
-
RE: [Plugin] Random Painter (Updated March 9th, 09)
If someone has already worked on a "city generator" and makes it available for free, It wouldn't hurt to try and convince him to join the SketchUp Community and adapt those algorithms for SketchUp (either commercially or for free), share his source code, or provide an output in a 3D format SU can import. Check these efforts:
This guy wrote a city generator include file for POV Render. The zip download includes the city script (which you can peruse with any text editor), some pre-made buildings in .obj format, and some documentation in .txt format:
http://www.geocities.com/ccolefax/citygen.htmlAnd here's a way more sophisticated free city generator, scripted for Softimage's XSI (Now part of Autodesk):
http://www.paoloemilioselva.it/citygenerator.html -
RE: [Plugin] Random Painter (Updated March 9th, 09)
Ok, this is what I did with Random Painter + Random Push Pull + Greeble. As I just need Random Painter as a placeholder for different materials, I just entered sucessive values: Green 10, Green 20, Green 30, etc., and in the second example Red 20, Red 40, Red 80. Then I replaced those colors with materials I had prepared, and which I am attaching here.
First, I made a 1Km x 1Km square, and divided it with SCF Toolbar's Greeble several times. Then I Protruded it 100m with offset 4-12m.
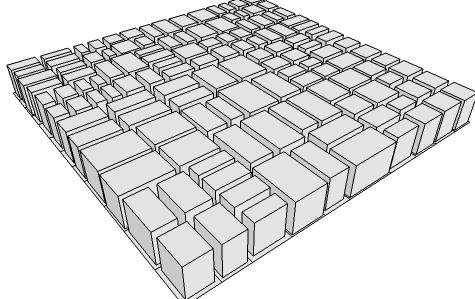
I copied the upper faces and deleted the rest. Then I divided those faces even more and again, protruded them 100m with offset 1-3m, again kept only the upper faces and procedded to "random paint" them with Green values from 10 through 110. Why Green? Because that's my favorite color.
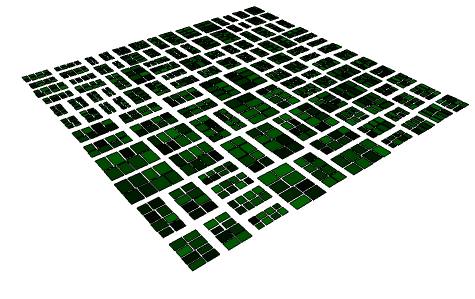
I then proceeded to replace those colors with the 11 high-rise textures I had downloaded from cgtextures.com (I had resized them to 12 pixels height (EDIT: 120 pixels) to keep the file manageable). I just used the paint bucket + Shift. I am attaching that material library as a zip file so anyone can use it.
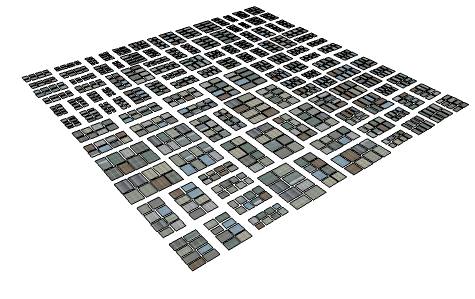
I then made three concentric groups of those faces. To make the groups, I changed to a Top view, rotated 45 degrees and used right-to-left marquee and Right click > select > all connected. For the outer ring, I used random push-pull 45/9m. I also re-pasted the faces from the first step and pushed them 20cm to act as sidewalks.
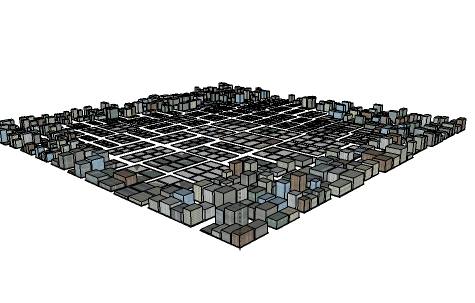
The middle ring was random pushed/pulled 90/18m, and after this graphic, the inner group was random PP 180/36m.
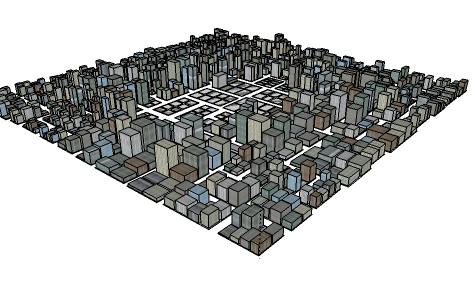
I then changed to Parallel projection > side view and carefully selected all the roof faces with a left-to-right marquee. After that, I "random painted" them with Red values 20, 40 and 80.
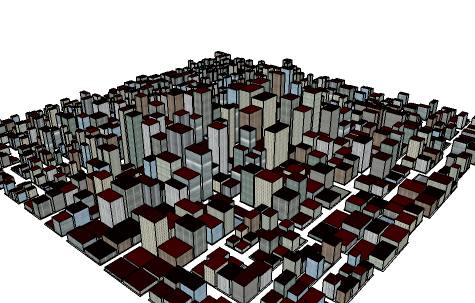
Finally, I replaced those red colors with roof textures. I then re-built the 1Km x 1Km square again to represent the streets. That's it! Greeble City made possible thanks to your "Random Painter"!
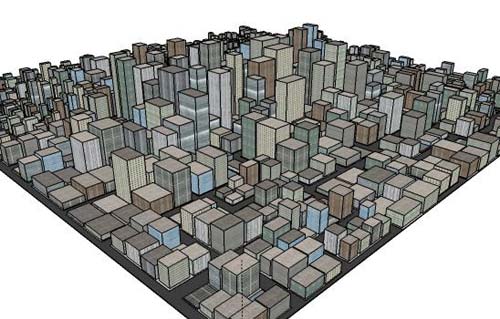
This exercise was inspired by a $4,000 program for "parametric" generation of cities I saw on the web. I just wanted to prove that you can "random generate" cities in SketchUp, too. Thank you a lot, Chris, for delivering the missing link to make this possible.
-
RE: Bonzai 3D First Impressions
I've just noticed that Bonzai has .skp files listed in the Import dialog, but can't open a single one of my SketchUp models. And .skp files do not appear at all in the export list. If this is supposed to "complement" and not "kill" SketchUp, the development team has to sort this out quickly.
Feb-8 Edit: I suspected it could open SU6 files, but I still feel that not being able to export to SketchUp is what I call putting a "lock-in" on your data. Easy comes, but not easy goes...
-
RE: Folding Along a Curved Fold Line
Let's continue with TaffGoch's "geometric obsession".

So you're interested in curved folds...
My best advice is: Do it with real paper.
Here's my try on this subject, made back in 1997, during my Freshman year:
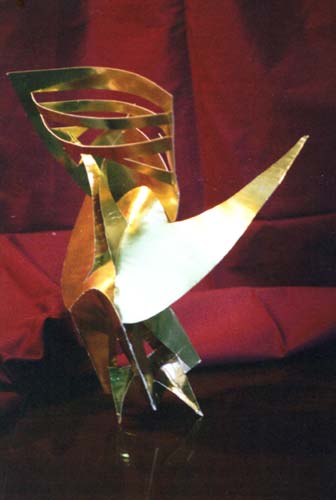
And, sincerely, I found it too difficult to do in metal, so I just covered the paper with a golden film for photography purposes . Quite often, candy is served in paper with curved folds. Study that and try to do your own. I'd say that these kind of folds do not produce any shape that I can name.. The resulting shapes are not simply cylindrical or conical in nature... they're a combination of several surface types, but you can be sure that they're all developable surfaces.
In fact, there seems to be a whole science behind curved folds, and it was discussed in last year's Siggraph:
http://graphics.stanford.edu/~niloy/research/folding/folding_sig_08.htmlI hope this link can give you some clues. At the end of the page there are some downloadable PDF papers if you feel like reading, and also a foldable car!
 I'll give that a try!