[Plugin] FredoTools::ThruPaint - v1.3a - 20 Oct 16
-
In my scripts that use arrows keys I use this
if RUBY_PLATFORM=~/mswin32/ ### PC
  KALXMINUS = 37          # Arrow Left Key
  KARXPLUS  = 39          # Arrow Right Key
  KAUYPLUS  = 38          # Arrow Up Key
  KADYMINUS = 40          # Arrow Down Key
  KSHIFT    = 16          # Shift Key
else### MAC
  KALXMINUS = 63234       # Arrow Left Key
  KARXPLUS  = 63235       # Arrow Right Key
  KAUYPLUS  = 63232       # Arrow Up Key
  KADYMINUS = 63233       # Arrow Down Key
  KSHIFT    = 131072      # Shift Key
end#if
and then test key-down events etc against these 'constants'
-
@tig said:
In my scripts that use arrows keys I use this
if RUBY_PLATFORM=~/mswin32/ ### PC
>   KALXMINUS = 37          # Arrow Left Key
>   KARXPLUS  = 39          # Arrow Right Key
>   KAUYPLUS  = 38          # Arrow Up Key
>   KADYMINUS = 40          # Arrow Down Key
>   KSHIFT    = 16          # Shift Key
> else### MAC
>   KALXMINUS = 63234       # Arrow Left Key
>   KARXPLUS  = 63235       # Arrow Right Key
>   KAUYPLUS  = 63232       # Arrow Up Key
>   KADYMINUS = 63233       # Arrow Down Key
>   KSHIFT    = 131072      # Shift Key
> end#if
and then test key-down events etc against these 'constants'
Why don't you use the built in constants? They should be reflecting the correct value based on the current OS. When you do it manually you have to keep updating it....

-
@Thomthom: I agree with you and my scripts do use the built-in constants for Arrow (and Shift, Ctrl). This is why I don't understand why it does not work. I was just wondering why the VK_constants for Oxer where in the range 123-126 whereas on the Mac I can have access to there are in the range of 63232... One possibility is that another script redefines the constants VK_.... because as far as I know, there is only a single Mac release of Sketchup, and therefore of the Ruby API (unless the Ruby API check itself the version of Mac OS).
@TIG: the values you show are correct for the Mac, as far as I knew them.
Fredo
-
@unknownuser said:
because as far as I know, there is only a single Mac release of Sketchup, and therefore of the Ruby API
I assumed that SketchUp got the key code values from the system when it initialized the Ruby interpreter and abstracted them into these system-safe constants...
-
for me u are a genius in sketchup you can now manage the textures in an intelligent way. thanks fridoooooo. grazie


-
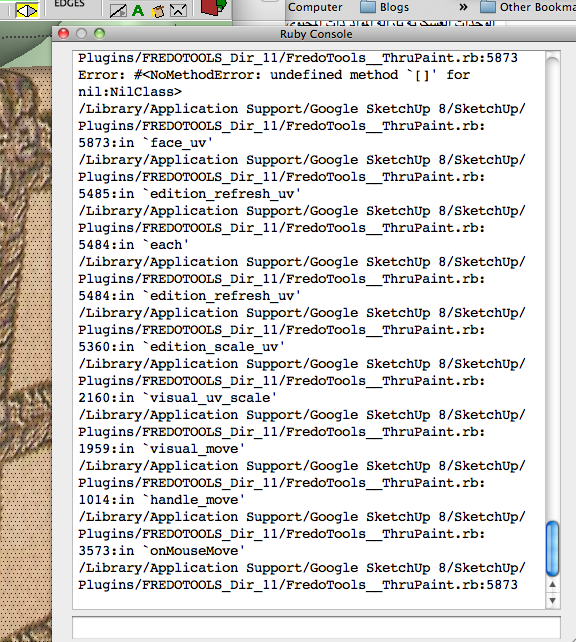
This is the result in the Ruby Console:
I have Sketchup 8 Pro
-
NEW RELEASE: ThruPaint v1.2a - 08 May 12
This update fixes some bugs and introduces 2 functional evolutions
1) Painting of components / groups, text labels and dimensions
This is a new option in the palette, very similar to the native SU Paint tool. Originally, ThruPaint was painting faces within the boundaries of containers. There are however cases where you wish to assign a material to the component or group itself. This material becomes then the default material for the faces of the component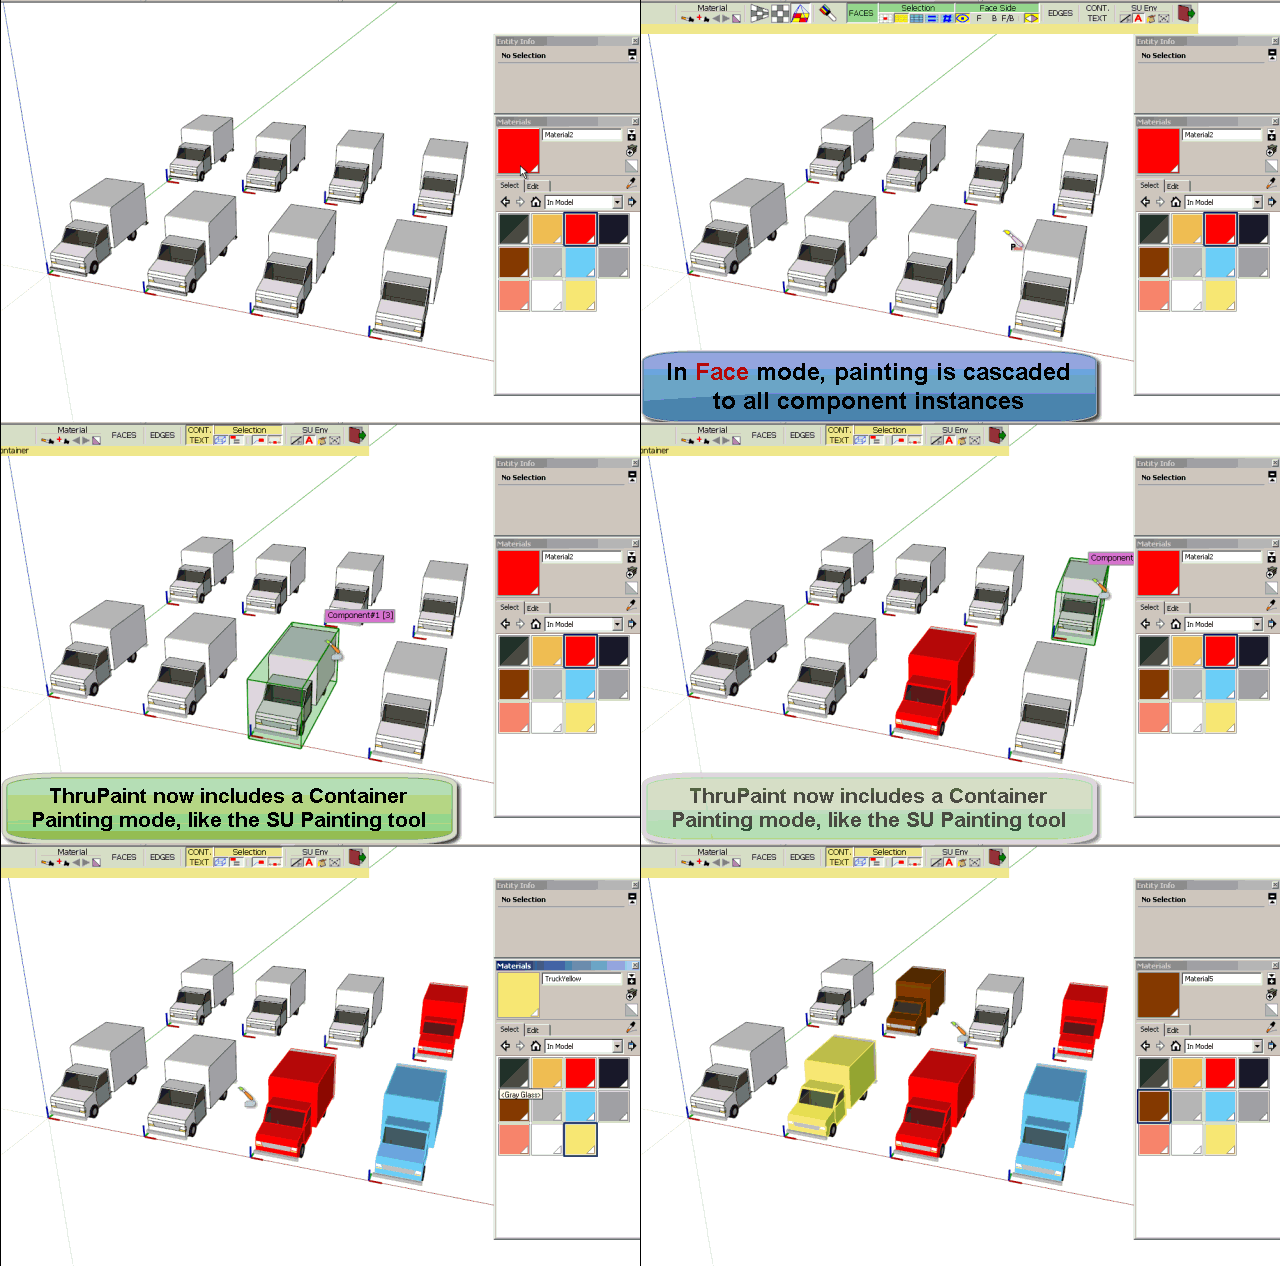
2) Modifier for Sampler
If you press Shift key, the cursor changes to sampling instead of painting. In the native SU Paint tool, this feature is covered by the Alt key (on Windows), but this is not possible in Ruby.See main post of this thread for more information on ThruPaint.
See main post of FredoTools thread for download of FredoTools, which includes the ThruPaint script.
Fredo
-
NEW RELEASE: ThruPaint v1.0n - 21 Apr 12
This update introduces 2 functional evolutions
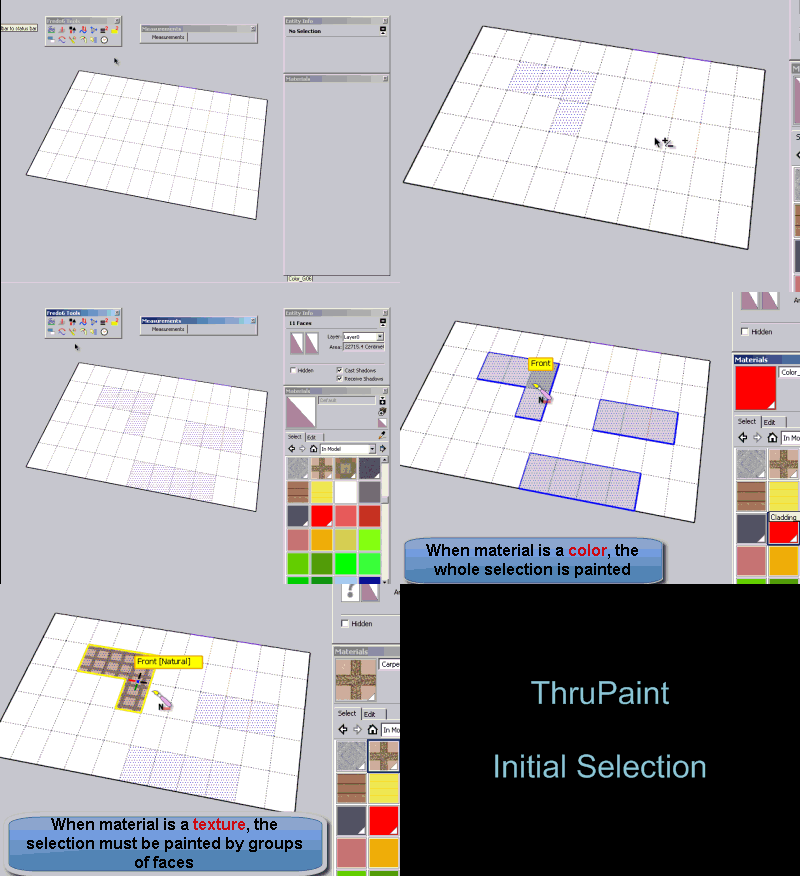
1) Painting of a preselection of faces or edges
If you select faces or edges before launching ThruPaint, the painted faces or edges will be those of the preselection whenever you mouse over them (regardless of the face selection settings in the palette).- When the material is a color or for edge painting, the painting applies to the whole pre-selection
- When the material is a texture, you have to paint by groups of faces in the preselection
2) Remembering of last scaling and rotation factors by material.
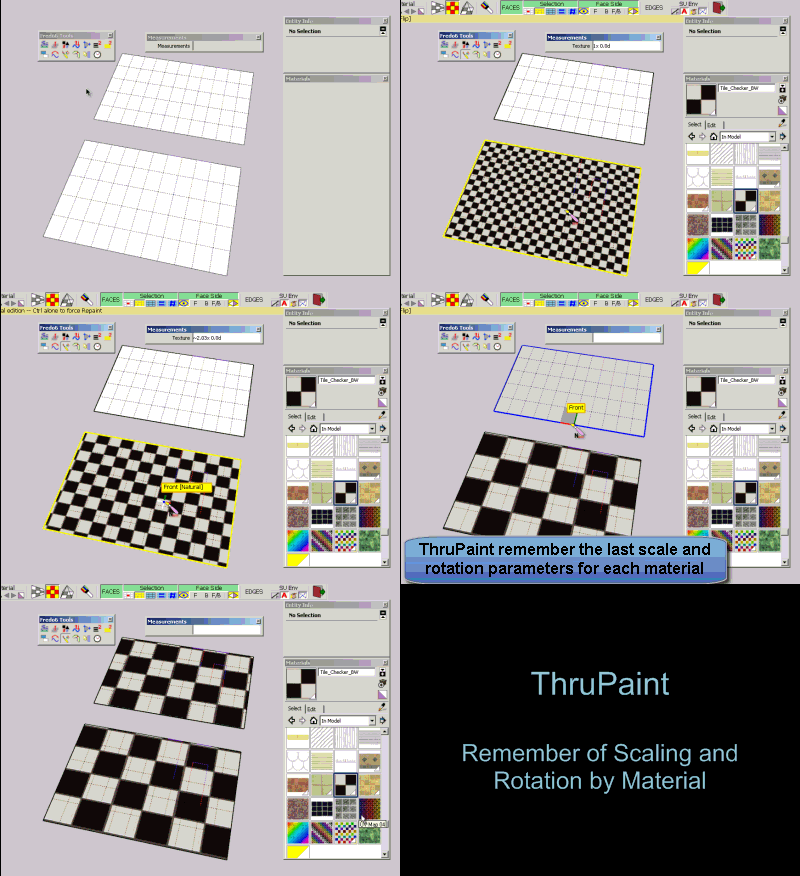
This is inspired from a request by PherimIf you apply a textured material to a face and then scale it and/or rotate it, the scaling and rotation factors will be remembered the next time you apply this material.
Likewise, the sampling of material within the model also copy the scaling and rotation factors.
See main post of this thread for more information on ThruPaint.
See main post of FredoTools thread for download of FredoTools, which includes the script.
Fredo
-
Thank You.
-
Really a fantastic plugin! I have to say it again! Thanks a lot!
But i have noticed a problem with exporting textured object for rendering, maxwell in my case...
The problem is that the exporter writes a seperated material and texture for each face! So with a complex gepmetry this results in thousands of textures and materials.My question is now, is it possible to avoid this behavior? I'm painting as QuadMesh.
Or is this problem maxwell related? I noticed the same thing when i use photomatch for texturing.Can anyone say how this works with vray?
edit: ok, problem solved... disabling texture distortions in maxwell uv export options did it. I thought this would result in distorted mapping but for now it works.
Thanks again for this incredible tool, Fredo!!!
Trimble should buy this from you as standart mapping method!
-
many many thanks for your great tool..

-
unique genius Fredeo!!!!! many many thank you, this is greaaat
-
Hey Fredo,
Thanks a lot for the great plugin! You are a hero.
I have a slight problem tho. I used your plugin and in sketchup it looks like this
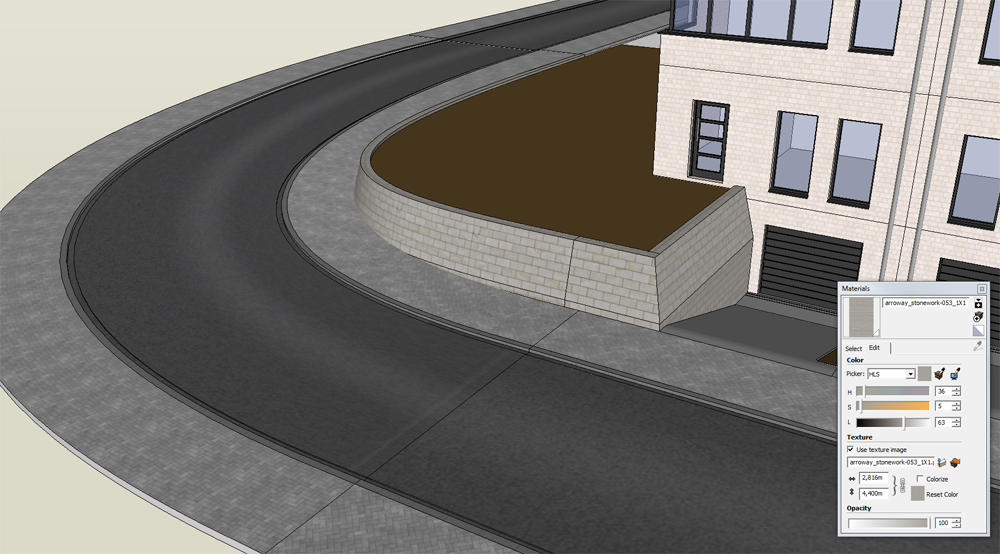
but when I render it in Maxwell Render it looks like this:
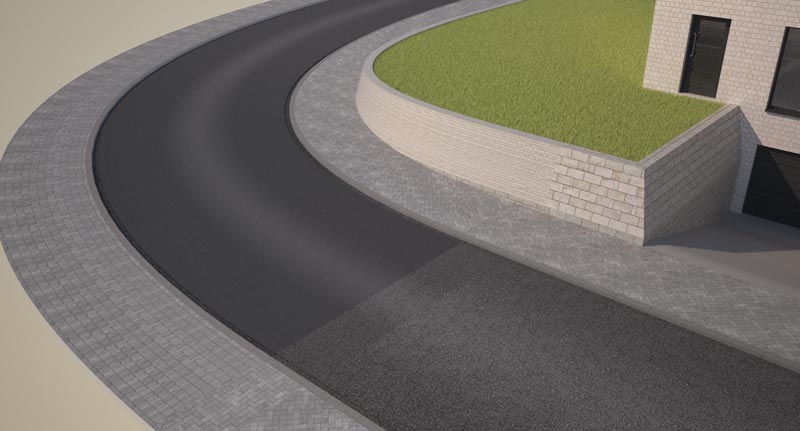
The yellow stones in the little wall have become much smaller and the middle part of the street has become darker. Do you have an idea what the problem could be?
Thanks!
Pieter
-
Check if the two surfaces have the material applied in a different way.
I suspect that one has the material applied to the face itself while the other has the material applied to the 'container' [group/component-instance] - check this by using 'Entity Info' and selecting the actual faces in each case - the 'mapping' cannot persist into exported formats when applied to a container rather than the face itself... Of course it might be a Maxwell issue with it mis-handing the UVmapping ? -
Contact Maxwell support - as this is their render engine that doesn't properly process the UV mapping.
-
I have checked, and the two materials are axactly the same. I have the free version of Maxwell Render, so I'll repost this under "extensions & applications". Thanks for answering!
-
I'd still recommend you contact Maxwell - as this would then be something that presumably affects all users. Reporting issues to the developers is important - otherwise it'll never get fixed.
-
Is this plugin for premium members only? If I click the download icon I get a banner.png.
-
@unknownuser said:
ThruPaint is installed as part of FredoTools.. It requires LibFredo6 4.4 or above.
See the main post for this plugin for Installation of FredoTools
So you have to go to Fredo tools thread to download the plugin. Scroll down the page and you'll find it below the "download" icon.
-
@massimo said:
@unknownuser said:
ThruPaint is installed as part of FredoTools.. It requires LibFredo6 4.4 or above.
See the main post for this plugin for Installation of FredoTools
So you have to go to Fredo tools thread to download the plugin. Scroll down the page and you'll find it below the "download" icon.
Cheers!
Hello! It looks like you're interested in this conversation, but you don't have an account yet.
Getting fed up of having to scroll through the same posts each visit? When you register for an account, you'll always come back to exactly where you were before, and choose to be notified of new replies (either via email, or push notification). You'll also be able to save bookmarks and upvote posts to show your appreciation to other community members.
With your input, this post could be even better 💗
Register LoginAdvertisement


