sketchucation logo sketchucation
    • Login
    1. Home
    2. facer
    3. Posts
    Oops, your profile's looking a bit empty! To help us tailor your experience, please fill in key details like your SketchUp version, skill level, operating system, and more. Update and save your info on your profile page today!
    🫛 Lightbeans Update | Metallic and Roughness auto-applied in SketchUp 2025+ Download
    Offline
    • Profile
    • Following 0
    • Followers 0
    • Topics 11
    • Posts 196
    • Groups 1

    Posts

    Recent Best Controversial
    • RE: Saint Mary Star of the Sea - 3D Virtual Model by Skp members

      Just Coincidence as far as I am aware. Although one never knows for sure, life is a "mystery".
      You will have to blame Sir Richard Charles Nicholas Branson for the name, clever marketing I think.

      @krisidious said:

      Is that Irony or Coincidence or both that your ISP is VirginBroadband?

      posted in Corner Bar
      facerF
      facer
    • RE: Saint Mary Star of the Sea - 3D Virtual Model by Skp members

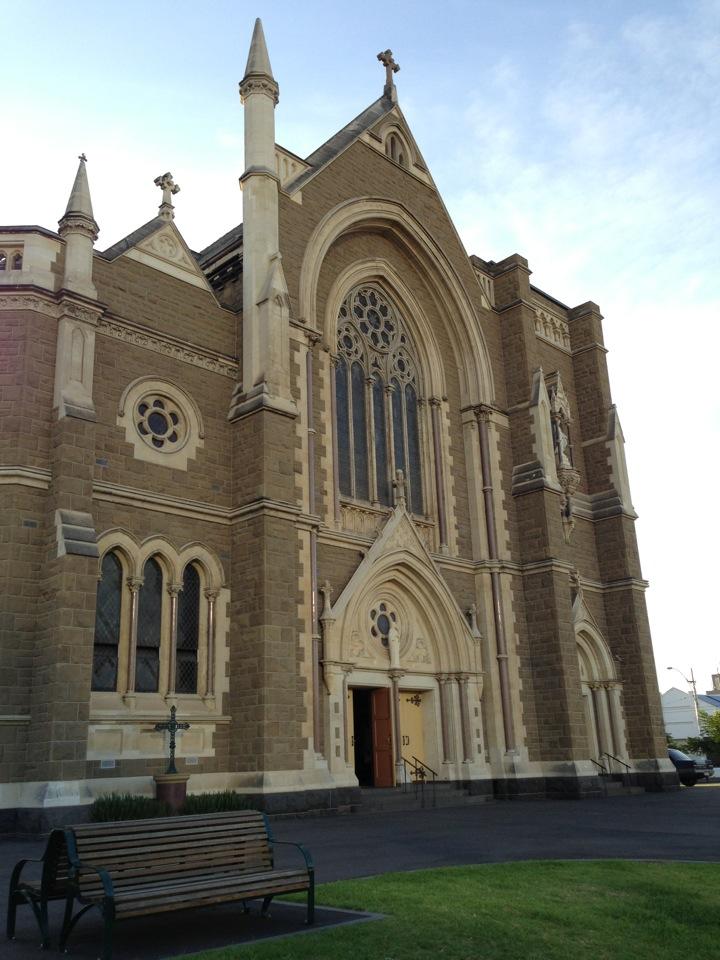
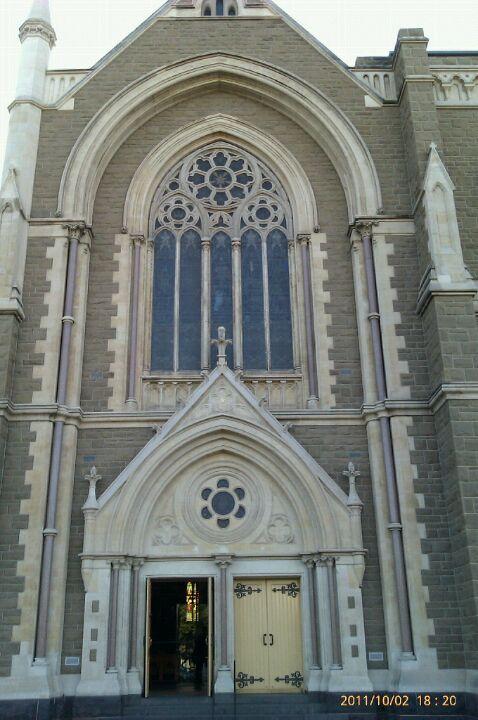
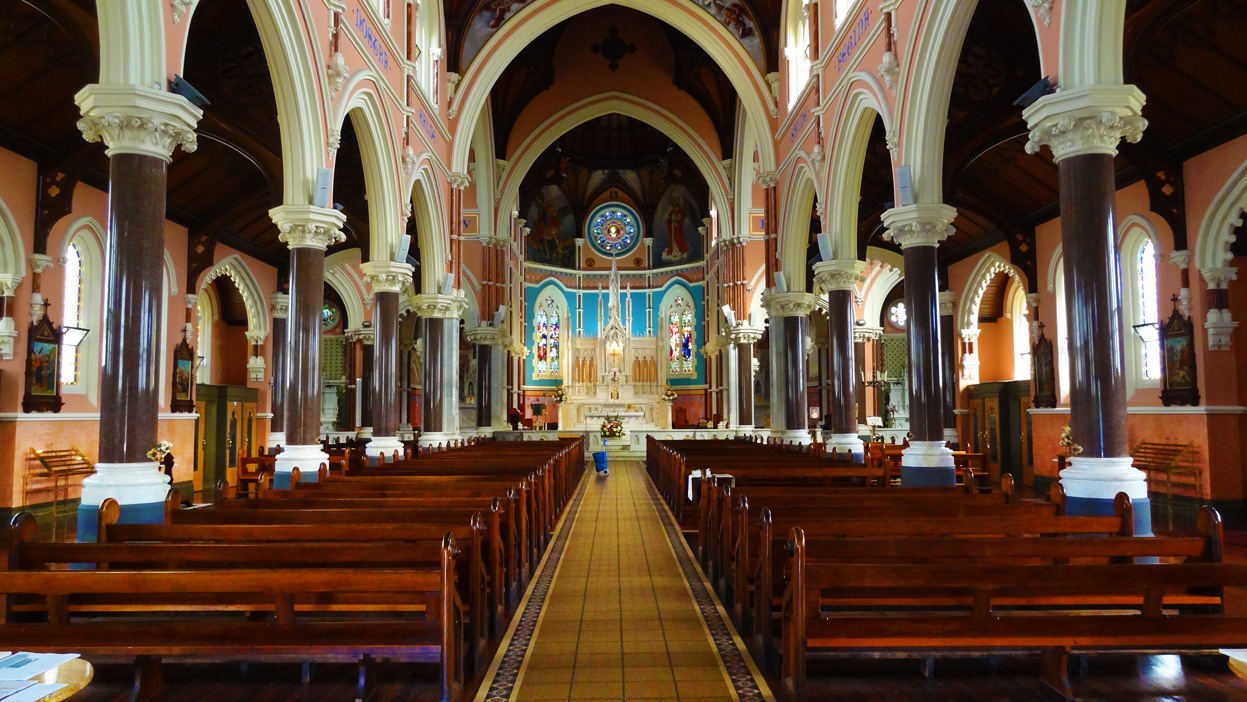
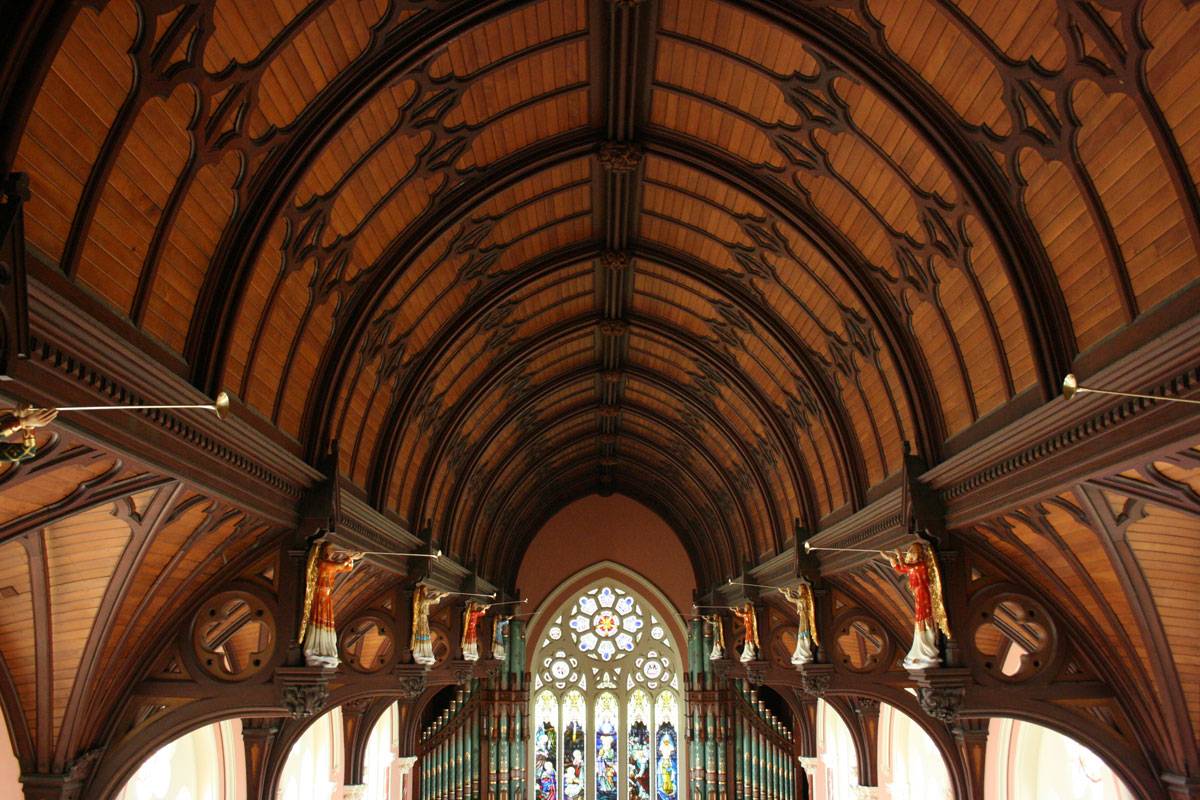
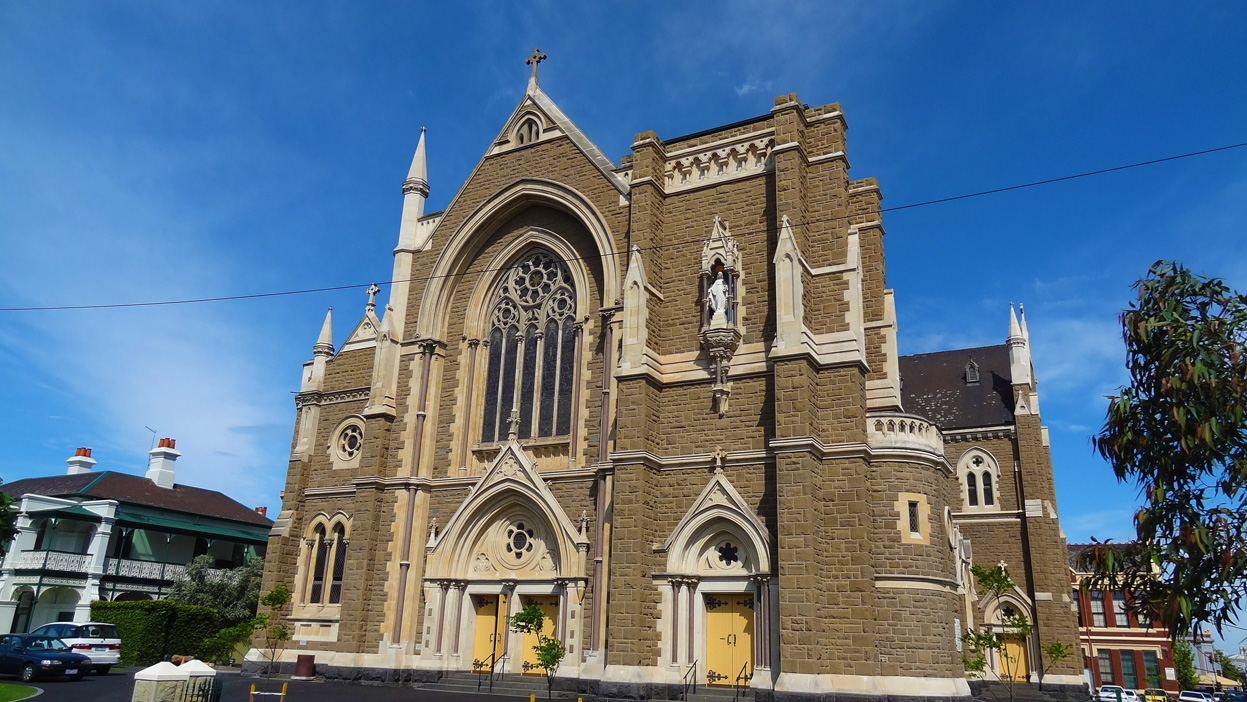
      A few more pictures of the church are attached.
      I will work on updating the "dropbox" to contain
      more pictures of the exterior and interior.


      Stella Maris West Melbourne.jpg


      west entry2.jpg


      west entry.jpg


      Stella Maris Nth Melb Interior.jpg


      St Mary Star of the Sea Catholic Church.jpg

      posted in Corner Bar
      facerF
      facer
    • Saint Mary Star of the Sea - 3D Virtual Model by Skp members

      Saint Mary - 3D Virtual Model
      by SketchUcation community volunteers

      CONCEPT:
      This is a non commercial project for the creation of a 3D SketchUp Model of
      Saint Mary Star of the Sea, West Melbourne Australia.
      Like "barn raising" in the USA it is proposed that individuals construct assigned
      assemblies of St. Mary that will then be assembled into the final version.

      Links to the 3D model will be included in the church's website.
      http://www.stmaryswestmelbourne.org

      For information on progress on the continuing renovation of St. Mary refer to video at:
      http://www.stmaryswestmelbourne.org/restoration/video-documentary/

      Additional information in regards resources and work done to date on the SketchUp model
      are available at DropBox:
      DROPBOX - https://www.dropbox.com/sh/cqer0p46144ksi2/FrFViA_-z6

      CONTACTS FOR THIS EXERCISE ARE:
      Ray Facer - Send comments and register interest by PM on SketchUcation or
      e: facer0001@gmail.com m: 0411 46 71 88
      Footnote by Ray Facer:
      I should clarify that I am receiving no commercial remuneration from this exercise.
      I am not a Christian and have no direct relation with the church. My office is
      5 minutes walking distance away. For the past 20 years I have "used" their church
      as my private meditation hall. I pick the right times when it is almost empty and hence
      perfect for contemplation and I know of no other building as calm and refreshing.
      This exercise is my way of giving a little back to the church.

      Coordinator: Fr Joseph PIch e: josephpich@gmail.com m: 0438 94 20 43

      STAGE 1:

      1. Call for registration of interest from the SketchUp community.

      2. Agreed template for SketchUp assemblies in regards naming of
        layers and related standardization of model.

      3. Dividing the model into "manageable" assemblies that allow participation of
        numerous participants.
        STAGE 2:

      4.   The model is to have two levels of detail, Simple and Complex.
        

      A Complex Model may be undertaken after the completion of a Simple Model.

      The simple model is to allow quick construction and implementation of the "concept"
      and test the integration of assemblies.

      1. Issue of "Assembly Templates" that will contain the necessary data to allow the fabrication of the SketchUp assemblies.

               1. SketchUp model template
               2. Dimensions of elements
               3. Photos
               4. Notes as required
        

      STAGE 3:

      1. Creation of the Simple Model
      2. Evaluation of the process and the results.
      3. Improvements and adjustments made and integrated into new templates and
        processes for the "Complex" model if interest is there.

      Thank you for considering the above concept.
      I look foreword to hearing from interested parties and learning more about the power of SketchUp.

      Regards,

      Ray
      Ray Facer Architect m: 0411 46 71 88

      posted in Corner Bar
      facerF
      facer
    • RE: [Plugin] Select consecutive components v2.0 110510

      @honoluludesktop said:

      Facer, Try these icons. You have the plugins in the correct folder. There is no good reason that I did not place the icons in a plugins/sub-folder. I have another release coming up, and perhaps I will do it at that time. In View > Toolbars, what is your toolbar button size set to? Try these icons at both large, and small size.

      Oops, sorry, I bumped the topic at the bottom.

      HDT,
      Okay now with icons using "Select_button_24.zip"
      I note these png image sizes as 21x24.

      Your previous "Select_buttons" had a png image size of
      314x363

      Thanks for your assistance.

      posted in Plugins
      facerF
      facer
    • RE: [Plugin] Select consecutive components v2.0 110510

      @honoluludesktop said:

      Facer, The previous menu icons were incorrectly titled, try these. Please let me know if this corrects the problem.

      HDT,
      Same as before, grey toolbar set with no icons displayed.

      A question:
      Why are the toolbar icons not stored in a "folder" linked to your plugin?

      At present the icons are stored in:
      C:\Program Files\Google\Google SketchUp 6\Plugins

      Regards.

      posted in Plugins
      facerF
      facer
    • RE: [Plugin] Select consecutive components v2.0 110510

      Using SketchUp v6

      Select_each_component Plugin.

      Thankyou for your effort on the plugin, it holds promise.

      I unzipped the toolbar icons into the main plugins folder as per instructions.

      When I activate the plugin the tool bar is visible but without the toolbar icon pics.
      When I place my cursor over the first button it reads "first instance".

      Any suggestions as to why this may be.

      Regards

      posted in Plugins
      facerF
      facer
    • RE: Face Sun Plug-in

      The SunTools plugin by Guedi Capeluto has a feature called "Sun View"
      which gives an axonometric view from the Sun.

      posted in Plugins
      facerF
      facer
    • RE: Time Tracker

      TimeStamp is a good shareware program.
      Manual stop/stop but easy to use.

      Link Preview Image
      Syntap Software

      favicon

      (www.syntap.com)

      posted in Developers' Forum
      facerF
      facer
    • RE: DC Door Builder

      Howard,
      Thank you for dc door, it has potential.

      I have not been unable to "reverse the door swing".
      Could you add to your instructions or post a video on youtube
      to illustrate how this is done.

      Would it be possible to add this as a component option?

      Adding hardware like door levers, closers etc appears to be
      the next step.

      Naming of "door types" as Fire Door 1 etc will assist in assigning doors.

      Keep up the good work.

      posted in Dynamic Components
      facerF
      facer
    • RE: [Plugin] 2D Tools

      Tig,
      Thank you for ruby, well done.

      Everything appears to work except for 2D Hatching and Text.
      I am unable to activate the 2D Hatching or Text.
      Operating system Windows 2000.

      Here is the ruby consule output for the attempts on Hatching and Text:

      Cancelled 2D Hatching.
      Cancelled 2D Hatching.
      Error: #<NoMethodError: undefined method refresh_thumbnail' for #<Sketchup::ComponentDefinition:0x74ebee0>> C:/Program Files/Google/Google SketchUp 6/Plugins/2Dtools/2DtextTool.rb:126:in activate'
      C:/Program Files/Google/Google SketchUp 6/Plugins/2Dtools/2DtextTool.rb:343:in select_tool' C:/Program Files/Google/Google SketchUp 6/Plugins/2Dtools/2DtextTool.rb:343:in texttool2D'
      C:/Program Files/Google/Google SketchUp 6/Plugins/2Dtools/2D#loader.rb:130
      C:/Program Files/Google/Google SketchUp 6/Plugins/2Dtools/2D#loader.rb:130:in `call'

      posted in Plugins
      facerF
      facer
    • RE: [Plugin] Sunposition

      I have found the free plugin "SunTool" by Guedi Capeluto useful. Available at:

      http://tx.technion.ac.il/~arrguedi/SunTools/dwnld_after_reg/STdwnld.htm

      Regards,
      Ray

      posted in Plugins
      facerF
      facer
    • RE: Problems with ShadowTime/Time conversion

      Martin,
      Thank you for the plugin it should evolve into a very useful tool.
      Cheers
      Ray

      A few suggestions:

      1. Could you give Southern Hemisphere users the option of reversing
        your Winter, Summer etc. labels for the months.

      2. An option to print out only the months and dates would assist in
        cross referencing the scenes to town planning regulations.
        For example "Sept 21 - 1500(3pm)" etc.

      3. Could there be a selection for only the times required by the
        authorities. Such as 0900 am, 1200 noon, and 1500 (3pm)

      Notes:
      I have integrated your shadows for set date and times with the SunTool to show the sun views. This results in a useful graphic.

      posted in Developers' Forum
      facerF
      facer
    • RE: [Plugin] Smoothstep Animation

      I support Dan's suggestion above (10 Feb 09) about numbering image files on export.
      I did a small test which resulted in 160 frames exported. I had to re-number
      61 frames to allow VirtualDub to read them in correctly. This would make a typical
      building file unmanageable for video software as VirtualDub.

      I have attached my CHECK Note for anyone who has not tried it before.
      This is my process for a SunTool Video TEST.

      Process:
      The following video used these key SketchUp plugins:

      1. SunTool - http://tx.technion.ac.il/~arrguedi/SunTools/dwnld_after_reg/STdwnld.htm

      2. Scenes Transition Times - scenes_transition_times.rb - by http://morisdov.googlepages.com

      3. Export smooth Animation - smoothStepAnim.rb - by Whaat

      Process used on a TEST SketchUp Model with SunTool set for the month of Sept 21

      1. Jpeg images of views are exported using Export smooth Animation. These have to be re-numbered as they are not numbered to maintain the "number width" as required. For example images0035 image0036 etc when 1000 frames are exported. This is a nuisance but it has been pointed out by Dan to Whaat the Ruby programmer. Hopefully this will be addressed in a future update.

      2. Scenes were created for:
        scene1. Sept 21 - 0800 (start)__scene2. Sept 21 - 0900
        scene3. Sept 21 - 1200__scene4. Sept 21 - 1500 (end)

      These correspond to shadow studies for one of the months and dates set by the local town planning authority hear in Melbourne.

      Layers are used to turn off the sun location graphics produced by SunTool for times not in the scene. Therefore each SCENE shows only the sun location for
      the time corresponding to the shadow turned on.

      1. Transition times are set using the Scenes Transition Times plugin. This plugin allows quick comparisons VISUALLY for different time settings for each scene.

      2. Exported jpeg images using Export smooth Animation and assign all to one folder - CHECK number sequencing to maintain "number width" (refer note above).

      3. Using VirtualDub:
        http://www.virtualdub.org/

        1.File>open video file
        select files of type - image sequence >select first file > open
        Files are imported and images should display in VirtualDub window.

        1. Video > compress (compress file size)

        2. File > save as AVI ( compressed AVI)

          1. Video Completed.
      posted in Plugins
      facerF
      facer
    • RE: [Plugin] Smoothstep Animation

      Help Note for use of:
      smoothStepAnim.rb - 0904_05apr_jpeg to avi
      Working with image sequences - using VirtualDub to convert jpeg images to avi.

      Following on from Whaat's usage notes item #3:
      smoothStepAnim.rb
      by Whaat on Tue Oct 07, 2008 4:18 am
      Usage:
      3) Plugin can export single frames only. The images must be joined into a movie format using other software (eg. VirtualDub)

      VirtualDub
      http://www.virtualdub.org/blog/pivot/entry.php?id=34
      Working with image sequences

      Time to actually post something for users and not just developers.

      To reading a series of numbered images as a video stream
      use File > Open video file... and select the first image. VirtualDub will automatically step the filename and find any sequentially numbered frames after the starting file. You can open BMPs and TARGA files this way. Starting with VirtualDub 1.6.0, you can also sequential JPEGs and single files. In 1.6.2, you can also open non-interlaced PNG. Once the sequence has loaded, use Video > Frame Rate to set the correct frame rate for the sequence.

      To exporting a video segment as a sequence of numbered images
      on disk in VirtualDub, use File > Save Image Sequence. What you may not know is that nearly all of the regular video processing modes are still enabled in this mode. This includes video format, frame rate decimation/conversion, filtering, etc. modes. In particular, if you only want to write out every fifth frame in the video, simply set frame rate decimation to "every 5" and you will only get 1/5th of the frames. Similarly, if you are writing out BMPs, you probably want to use no video compression and a normal video format such as 24-bit RGB. (That VirtualDub allows you to write out something silly like MPEG-4 compressed "BMPs" is actually a misfeature that I need to fix.) For the most part, though, what you see in the preview is what will get written out to disk as images.

      Side note:
      It isn't well known, but VirtualDub uses the exact same pipeline for all of its rendering operations. That includes AVI, WAV, and image sequence output, as well as... preview. The primary differences are whether certain outputs are disabled and whether the frame limiter is enabled. I spent a long time ago optimizing the pipeline to overlap I/O and CPU utilization and reduce synchronization overhead for better real-time preview; when you save to disk, the limiter is kicked out and you get the benefits of that work in faster rendering.
      20 comments | Dec 30, 2004 at 20:05 | default

      Additional topic - jpeg images to avi - questions
      can be viewed at:
      http://www.virtualdub.org/blog/pivot/entry.php?id=34
      pmolson posted 2007 Jun 15 00:14
      "photo slide show" (converts jpg frames to avi)
      posted in Plugins
      facerF
      facer
    • [Plugin] SunTool - new Mar 2009

      Check out free plugin that shows suns path, months, hours etc:

      http://tx.technion.ac.il/~arrguedi/SunTools/dwnld_after_reg/STdwnld.htm

      Works on SketchUp7 and for SketchUp6 (In INSTALL process have to direct it to SketchUp 6/plugin - as noted in SunTool Help file)

      posted in Plugins
      facerF
      facer
    • RE: [Request]: SunPositionGizmo.rb

      Check out new free SketchUp plugin that shows suns path, hour of day etc:

      http://tx.technion.ac.il/~arrguedi/SunTools/dwnld_after_reg/STdwnld.htm

      Works on SketchUp 7 and for SketchUp 6 (have to direct it to SketchUp 6/plugin in the INSTALL process - as instructed in SunTool Help file.)

      posted in Plugins
      facerF
      facer
    • 1
    • 2
    • 6
    • 7
    • 8
    • 9
    • 10
    • 10 / 10