@xrok1 said:
...how did you place the single verts for your center points.
Uhmm, do you mean, how did I place the centerpoints? (I don't know what 'single verts' you're referring to.)
Taff
@xrok1 said:
...how did you place the single verts for your center points.
Uhmm, do you mean, how did I place the centerpoints? (I don't know what 'single verts' you're referring to.)
Taff
moghamdi,
Using the 'push/pull' tool, as described by Luis and his model, can produce nice results, if you have accurately 'traced' the stairs on the original image. Once you have constructed accurate SketchUp edges and faces, flat on the original image, the next task (push/pull) is the easy part.
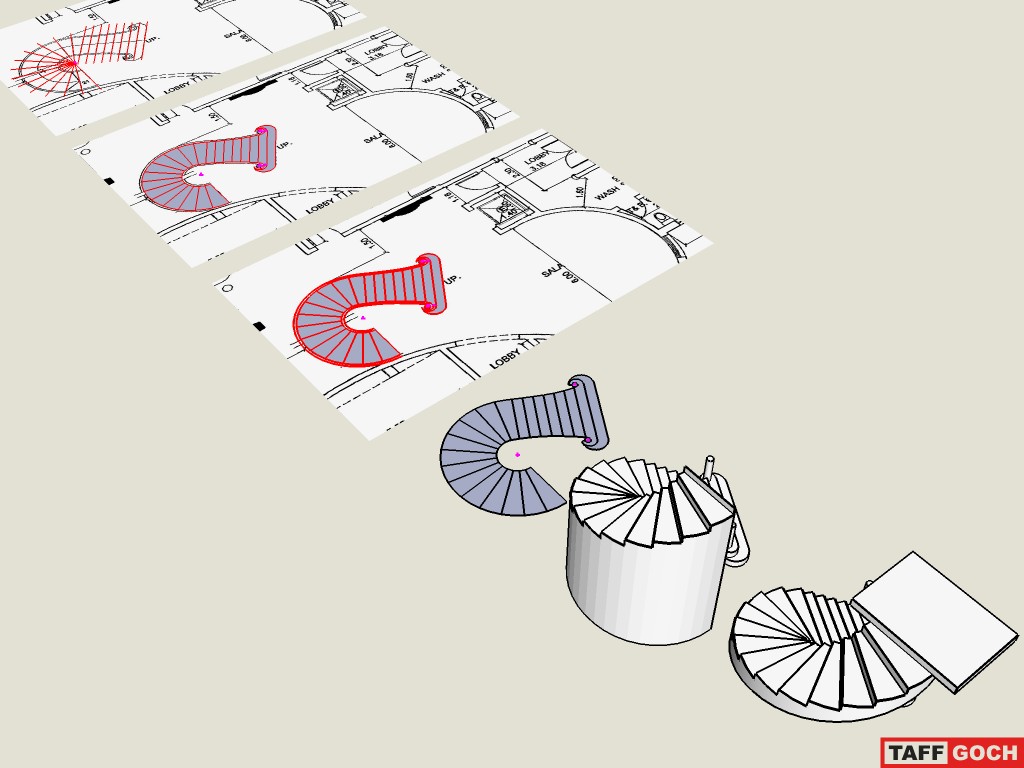
Note that, with the push/pull tool, after you have pulled up one face, you can double-click on the next step to raise it by an equivalent amount. Double-click again, and it will be raised a second time, by the same increment. Using this tool feature, you can raise subsequent steps by multiple double-clicks.
TracingStairs.skp
Taff
Hans,
This 2008 discussion (and model) appears to cover the same issue:
Texture: how to map it to a bending cylinder
Useful tips & techniques are described in that thread.
Taff
Yikes! Ecuadorian may have just introduced me to a new SketchUp obsession!
Just a quick search reveals many SketchUp challenges...
Flickr "curved folding"
(Dozens of examples)
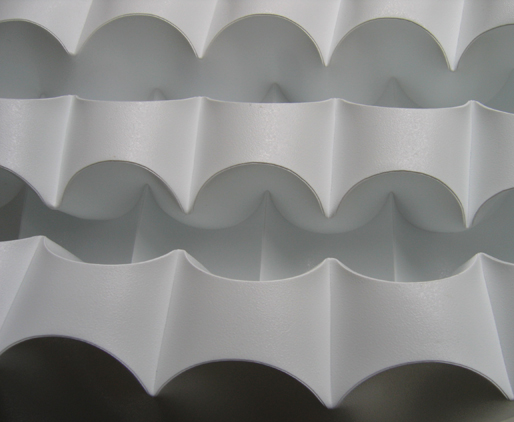
Developing such SketchUp models, where the unfolded pattern lies on one plane, may cost me more sleep-loss.
Taff
Click Draw,
'Window > Styles'
'Edit' tab
Fourth button; 'Watermark'
You can specify an image to use as the watermark, size it, place in foreground/background, position and set transparency.
Taff
@gaieus said:
First I didn't even think about how it should be done in "real world" - just "bent" the whoile thing. It was perpendicular and I was satisfied.
Gaieus,
Your description may be all William really needed.
My geometric obsession, though, kept me awake. I didn't have an "EUREKA!" moment while relaxing in the tub, but in bed.
Taff
I woke up at 3:30 in the morning, realizing the errors of my ways...
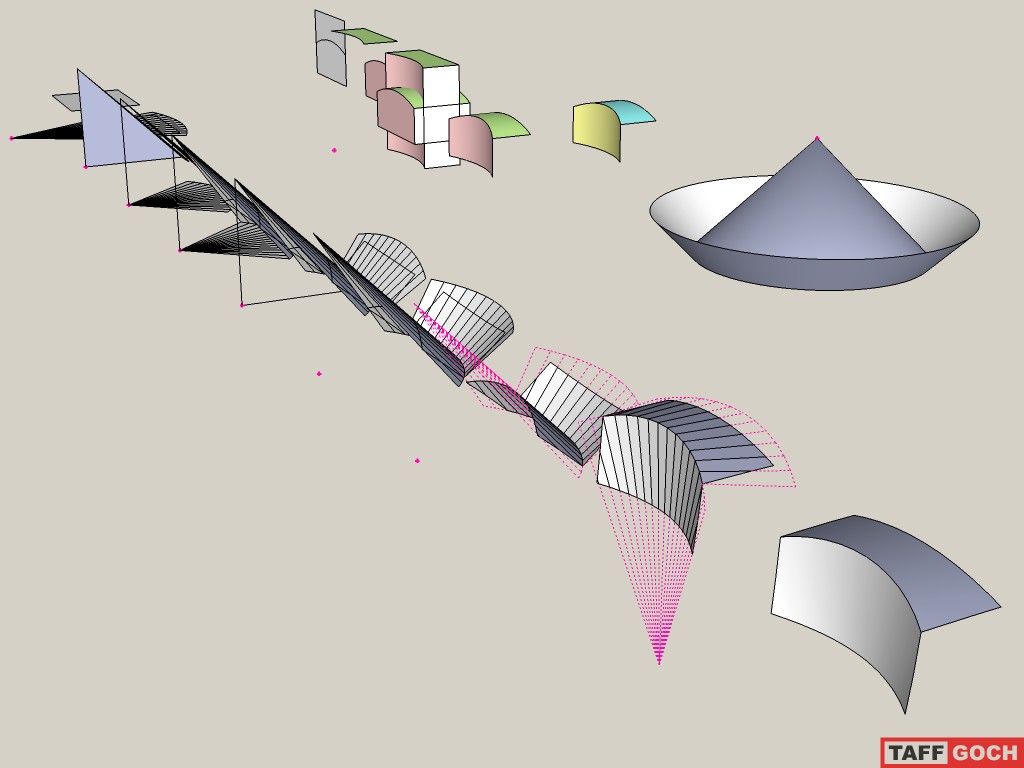
If the sheet (paper/aluminum) is folded along that curve, such that each segment of the arc is folded at 90-degrees, the resultant shape is going to be a section of a CONE, not a cylinder. So, even though my previous approximation is closer to the real world, it's still off -- by quite a bit.
Constructing a cone, with 45-degree sides, with the bottom folded-up (also at 45 degrees,) provides for a 90-degree total bend. That's easy!
What makes it more difficult is that intersections no longer define the retangular edges of the paper/aluminum (since the geometry isn't cylindrical, but conical.) Incrementally rotating radial segments of the original pattern produces the correct, final result. This one is spot-on accurate -- no approximations.
Interesting geometry exercise. (Maybe I'll sleep better tonight.)
Regards,
Taff
Ummm,...
...guys, unfortunately, it's not that simple.
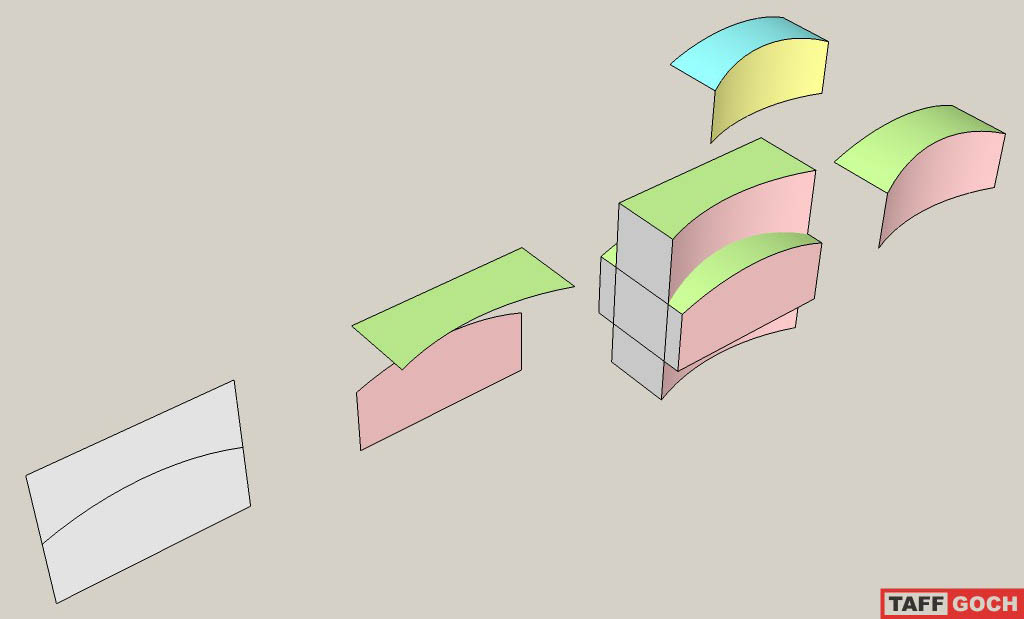
If you fold along a curved line, neither of the 'new' surfaces will be flat. Both will be curved, and won't be curved along a circular arc. To see what I mean, simply print out a full sheet of paper, having a circular arc drawn upon it. If you fold along this arc, the problem becomes apparent.
While the new surfaces appear to be circular curves, from what I can tell, each more closely approximates a parabola, or a section cut from an ellipse. (Can't quite tell which.)
A 3D model can easily approximate the appearance by using intersections, but it's not quite "real world" (although, it may be close enough for your purposes.)
To "accurately" model the true surfaces, I sub-divided and rotated individual faces, using the original curve segments as axes of rotations. This took a while, using incremental approximations (over-and-over, again....) to 'sneak up' on the true surface shape. It's a pain in the butt, it's still not perfect, but it's pretty darn close. (Cyan/yellow group.)
If you compare the two end results (stack one upon the other,) you'll see that they're not exactly the same. You should compare rectangle edge lengths with the new curved surface edges. Also compare the length of the original curve with the corresponding curves in the end results. See what you think.
Taff
Chris,
SketchUp can be used to make such a model & export/print images, but you're going to have to 'manually' supply the groupings and moves. The 'explode' command in SketchUp doesn't do the work for you. (In fact, that SketchUp command is unrelated to what you're after.)
The authors over at 'Design.Click.Build' often produce exploded views.

See the online article from which the above image was copied:
Creating a Project Plan in SketchUp
Regards,
Taff
SA,
Don't select any geometry before you try the move (as Wo3Dan intimates.) If you switch to the 'Move' tool with no entities selected, individual entities will 'highlight' as you pass the cursor over them -- with one great big PLUS! -- Endpoints can be highlighted and moved!
Normally, you can't select endpoints, but using the 'Move' tool, you can. It looks like, from Patrick.H's instructions, that he is moving individual endpoints to 'eyeball' a new location. Along with Wo3Dan's axis-locking tip, you can play with endpoint positions to create and fine-tune curved lines and surfaces.
See the 'Move' tool description here, for an animated depiction of the technique:
http://groups.google.com/group/SketchUp/web/faqs-for-learning-more-advanced-tips-and-techniques#TweakSculpt
Regards,
Taff
@gaieus said:
You didn't use to be rolling like that
'Tis true -- but note anti-clockwise animation, to fit my contrarian nature 
FifthTexas,
Generally, the method you describe produces about what you'd expect -- a rough outline of the basic shape.
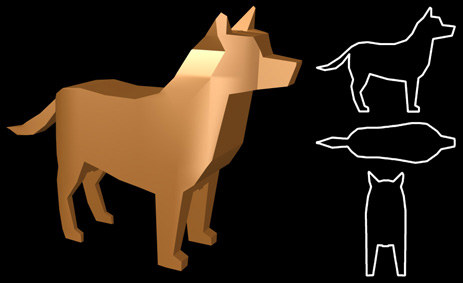
That may be a great starting point for a wood-carver, but it's not much use in modeling rounded shapes in SketchUp. You're definitely NOT going to automatically generate something like this:
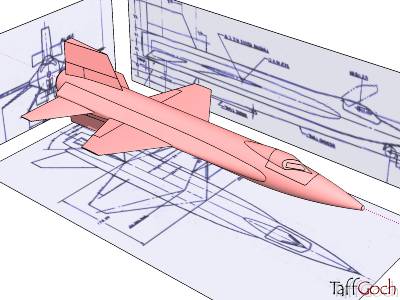
The 3-view method is useful, but only as a reference. You can use it to isolate and measure 3D-coordinates of important geometry, such as wingtips, etc.
To generate a rounded fuselage, or hull, you're going to have to use combinations of modeling techniques. Rounded shapes can be generated with the 'follow me' tool. Transitions, or irregular surface curves are likely best modeled by hand-stitching. Here are some SketchUp models from the 3D Warehouse that demonstrate these techniques:
http://sketchup.google.com/3dwarehouse/details?mid=bfe2089b01555507802d4395fd3064f8
http://sketchup.google.com/3dwarehouse/details?mid=73d4121a922fcd2afc3f4fe6b3c2c221
http://sketchup.google.com/3dwarehouse/details?mid=6d50fae225b9a37d3783bb821a0d6b6c
If you don't need precision, but want to only 'represent' the shape, you can start with what you originally produced, then apply a couple of SketchUp plugins:
SketchyFFD
http://www.sketchucation.com/forums/scf/viewtopic.php?f=180&t=6029
Subdivide & Smooth
http://www.sketchucation.com/forums/scf/viewtopic.php?f=180&t=5687
http://www.sketchucation.com/forums/scf/viewtopic.php?f=80&t=9224
Here's some fun examples of what can be done with such tools:
http://www.sketchucation.com/forums/scf/viewtopic.php?f=81&t=9675
Regards,
Taff
I don't know, ELYSIUM, my method is pretty tedious. While it's precise, it can take a lot of work. (My tutorial model was really an exercise to demonstrate the capability of SketchUp ... and somebody dared me!)
For quick representation of a rope, I'd try the textured method suggested by remus.
For quickly producing an actual twisted construction, I'd use the "Follow me rotate" plugin. See this discussion:
http://www.sketchucation.com/forums/scf/viewtopic.php?f=180&t=12965
So, Casey, now you've got several options!
(...and we haven't even gotten into the catenary-sag issue, yet.) 
Taff
Larry,
I agree. I'm greatly pleased about the driver support nVidia has been providing. For those seeking an updated nVidia driver, this page will get you a list of drivers to test:
http://www.nvidia.com/Download/Find.aspx?lang=en-us
Regards,
Taff
wanderer...
Oooh -- The infamous Intel built-in GPU & graphics chipset!
Unfortunately, the drivers for Intel graphics are notorious for not supporting OpenGL very well (...although, I've heard that they've recently expressed interest in improving their drivers.)
As long as your CPU is very fast, SketchUp can operate fairly quickly, even without GPU hardware support. As long as you're satisfied with the performance, that's what counts.
I'm glad we could help. (And keep an eye out for those potentially-improved drivers.)
Taff
Another discussion in the SCF,...
http://www.sketchucation.com/forums/scf/viewtopic.php?f=18&t=9652
...with a tutorial model demonstrating the use of SS&B (Soap, Skin & Bubble)
...and a couple of external programs for hull design, producing results that can be imported into SketchUp:
http://www.sketchucation.com/forums/scf/viewtopic.php?f=169&t=14719
Captain,
"Tom" has a couple of demonstration models in the 3D Warehouse, on how to "stitch" together a boat hull, using cross-sections:
http://sketchup.google.com/3dwarehouse/details?mid=c0806816ff7970c6371328a2aef066d1
http://sketchup.google.com/3dwarehouse/details?mid=730bf0073f4c6cb99d5720350d3897f5
Aircraft fuselages are often modeled with the same technique:
http://sketchup.google.com/3dwarehouse/details?mid=6d50fae225b9a37d3783bb821a0d6b6c
http://sketchup.google.com/3dwarehouse/details?mid=bfe2089b01555507802d4395fd3064f8
Alternately, you can use the "SketchyFFD" (Free-Form Deform) plugin to shape the hull, starting with a gridded rectangular block, similar to the image Pilou posted here:
http://www.sketchucation.com/forums/scf/viewtopic.php?f=180&t=6029&start=195#p113383
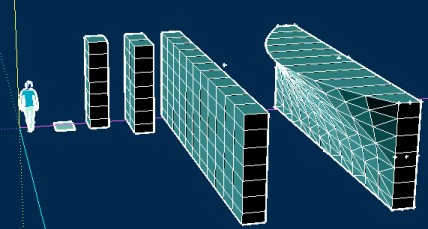
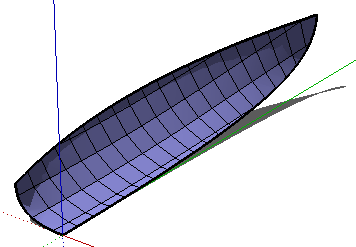
...and there is the "Soap, Skin & Bubble" plugin, to which amsterdam refers:
http://www.tensile-structures.de/sb_examples.html
(example step-by-step boat hull images)
Regards,
Taff
Brian,
The best I've been able to do, thus far, is static representations of select direct/reflected rays, using transparent colors:
http://sketchup.google.com/3dwarehouse/details?mid=c63b8d66ebe146e5b2174b2fd0759d18

As Gaieus wrote, the sun-tracking feature of SketchUp is perfect for this kind of study. You can demonstrate hour/date changes, as well as the effect of changing the latitude/longitude for different locales.
Regards,
Taff
Mike,
Intersecting surfaces will do the trick. Chair back construction/modeling (in SketchUp) has been a topic of interest over at Fine Woodworking's "Design.Click.Build" blog.
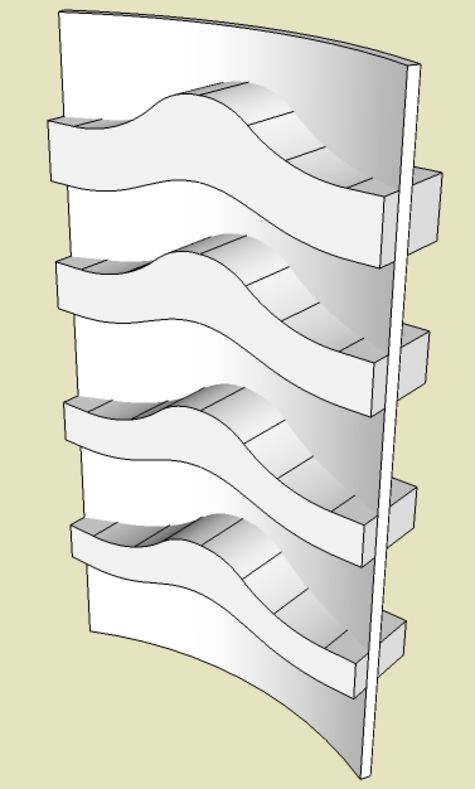
Be sure to check the other articles and the archive, for many articles on chair modeling (ladder-back and windsor.)
Here's a second "Design.Click.Build" article, showing the construction process in more detail:
Drawing Pieces with Complex Curves
Regards,
Taff