Matte, e-mail it to me.
Susan.sorger [at] entouragearts.com
Matte, e-mail it to me.
Susan.sorger [at] entouragearts.com
I'm assuming that when you sample the image you are not getting it to paint properly on the other side? Is that the problem?
Right click on the surface of the existing image. From the context menu find the "texture" menu item. It has a sub menu and the last item is "projected" If it is checked, do nothing, if it isn't checke then click on it so that it becomes checke. Using the eyedropper from the Material Browse sample a VERTICAL SECTION OF THE SURFACE that has the image painted on it. You have now sampled a "projected" texture.
Using the paint bucket, paint the side you need to be painted with the "projected" texture.
I hope that is what you were after.
Unless of course all you want to do is "mirror" the image on the same surface?
Then right click on the image, and frome the "texture" menu, submenu: position, sub sub menu "flip image"
Actually I am still having this problem. I read on the web that it has to do with non-Microsoft shell extensions in the registry. I was supposed to disable all of them and then enable one by one to find which one is causing the problem. Well I disabled all of them and I was still having the problem so I reckon the issue is NOT the shell extensions.
Anyone else have any ideas.
The problems started in mid October. I don't recall if I had downloaded or added or made any particular changes at the time. I was travelling and I noticed it in my hotel room. Any ideas would be much appreciated.
Doh, I understand now. thanks so very much. Of course, it is totally obvious when someone else has thought of it. Thanks again.
Well, I know about how auto fold works, I just couldn't figure out where in the process you need the auto fold? Still can't quite figure out where you would use it?
PS> way more than 45 components. Something in the order of 7 x12 = 84 plus another 4 or 5 I think. 7 different arcs each with 12 segments. all needing to be rotated on a slightly different angle before being lifted in postion. then they would all need to be stitched in postion. Not a good use of time to my way of thinking. Wouldn't want to pay one of my employees to do it. Unless it was for a shop drawing I guess, but then I would have started with something a little more accruate from AutoCAD or whatever I guess.
So kind of you Tom to continue the explanation. As I said, I did try that as well, but there were far too many components that then needed to be rotated to the appropriate sloped angle, far too many too lift into place because the slope was inconsistent and a copy rotate was just not possible and then the segmentation did not match the segmentation of the elevation view, they were segmented differently. It would have been different if I had created the plan and elevation views to carefully match. This was not the case. Another vote for planning things in SketchUp rather than AutoCAD.
Thank you again Tom. Didn't you say something about an "alt Move" though in your eplanation on the thread with Alan?
Actually, that is very helpful.Thank you. It confrims what I thought I rememebered about these. The opening is not always parallel with the ground. That is good to know. Thanks again.
All of these are great ideas to help along the way, but none of them work outright because of the way these have come in from AutoCAD and how the not matching segmentation.
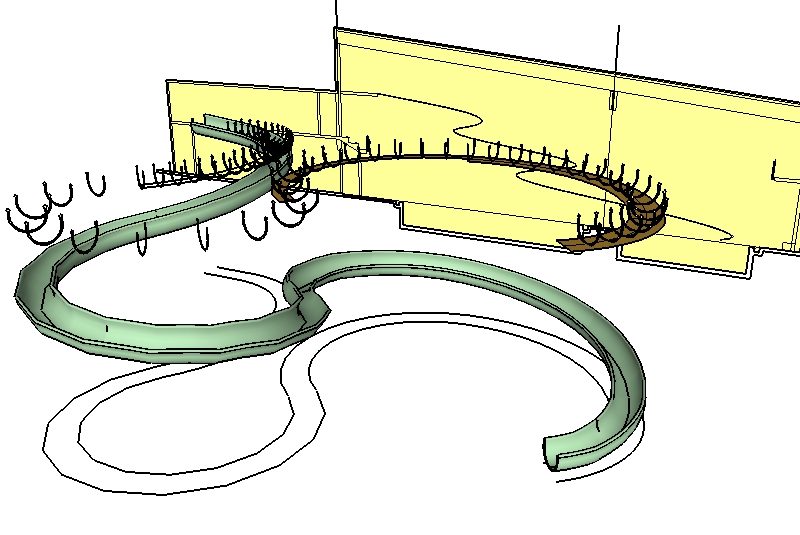
For instance, I found the centers of 7 distinct attached arcs that were used to describe the plan view shape. Each of those were cut into segements of 12 but the segment sizes were different for each of the distinct arcs. Therefore there would need to be 7 different components. However. the segmentation of the elevation view is different and none matching and not correctly accounting for perspective so we all agree there was a fudge factor. Even without the fudge factor the resulting path from the intersect with model just does not directly match the segmentation of the plan view path. Therefore the components once angled would still not sit in the correct space/length for the path. I tried a number of different things.
I thought to place the copy rotated grouped ribs at each segment above the sloping undulating path and the tried to use the "drop.rb" to make them drop to meet the path below. Drop won't work with just a segment. Scratch that. I tried push pulling the elevation view profile again and using drop.rb so that there is a surface to drop on and then see if I can correct the ones that are on the overlap. No good. I think it is because of the difference in the segmentation, but at any rate it wasn't stopping at the bottom vertex of the profile, it would stop at varying place along the side of the profile. So I tried to move them into place manually starting with the lowest one and again, I ran into the problem that when you move straight down in the blue axis, the segmentation just isn't the same and things don't meet at center.
I tried a just plain follow me to see what I would get. Some of the lins need to be hidden because softening isn't enoug on them. But I have to say that it doen's look too bad other wise. I've been on these things and if I recall correctly, the opening is not always straight up. It does curve with the curve. What do you think? Is this good enough or will someone look at this and say no way. can't be right? To get this so that the opening is always facing up would require an enormous amount of work and fiddling. There aren't too many shortcuts available with this one.
I attach a jpg. No matter how I cut it down, the skp is too big.
I've also attached a jpg of one where the bad segments have been hidden and some people added for scale and context. I assure you the people are at a correct scale and I imported this accroding to the units given me for the ACAD file, so the slide really is very large.
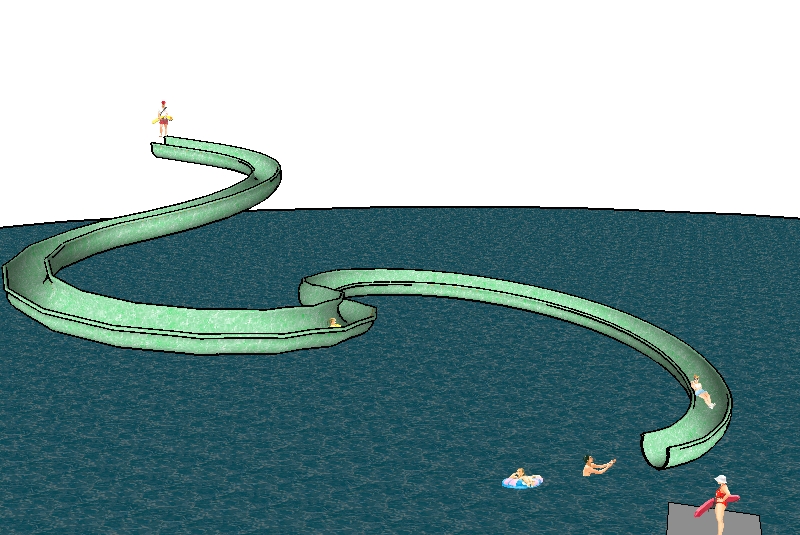
When you create something from your imagination or from a photo, you can ensure that segments are a consistent length and otherwise simplify the project. Because of the different segmentation of the plan and elevation views and because of the nature of the curve, the segments of the path are all different lenghs, so a single component will not easily fit all around. Bummer.
Tom, I need a more detailed explanation about the Alt Move which is usually "autofold" What exactly did you auto Fold? Can you do a little tut pretty please?
Jackson, I have your solution, now how did you get there. You couldn't use follow me so what did you use.
Bruce, try that at the other end. where the slide is at it lowest point.
Yeah, that's why I took it on. I've got it a bit further along now. The push pull through each other is a good start. But once I push pull up from the plan view, I delete the outer wall thickness and end up with only the center plane. Then when I push pull the elevation view through it, it does a better job of lining up. But there is some "noodling" to do.
I offered to help someone out with this and they gave me a dxf which I imported in.
I was told that the elevations were placed correctly in relation to the plan view of the slide. The elevation view doesn't really represent the slide shape correctly I think, it appears only to provide a "path", don't you think? Something doesn't sink up for me. For instance the outermost extreme edge of the slide at the bottom doesn't line up with the outermost extreme represented on the elevation view. I guess that would make sense if the elevation view is represeting only the path of the slide, but then it doesn't line up with the outermost extreme of the centre line of the waterslide either. I think there is missing info that I need but I have asked for it 3 times now and I get only a few lines cleaned up and nothing more.
I've push pulled the profile from the eleveation view through a push pulled profile of the plan view, but I get nothing logical at the intersections. Any ideas on how to approach this
Okay, I've done an example for you using your starting point. I'm not altogether sure what it is you want to accomplish so I hope I assumed correctly.
I also created a few scene tabs with the open and closed door layers visible and not visilble as required.
Note that all this was done without any door thickness and NOTE: You cannot create a cutting component that cuts through a wall thickness. You will need to place 2 cutting components back to back each on it's respective surface to cut the 2 wall thicknesses.
I am the queen of components that don't cut. I could write a Master's thesis on all the things to avoid to prevent the loss of cutting/gluing behaviour. I've done all the wrong things so I know better now finally.
As my friend just above mentioned:1. Never create a component on an edge. SketchUp will not know where you intend the gluing/cutting plane to be: on the face or on the plane on the other side of the edge, so it simply creates the axis the wrong way : it will not be a gluing/cutting component.
2. This can also be a problem when any portion of the component is placed over an segment that is not part of the component. For instance if you have a line dividing the upper portion of a wall from the lower portion because there is a chair rail molding and/or the top material is different from the botttom material. Even a cutting/gluing component will not cut properly when placed over an area that traverses that line. You will need to punch a rectangular opening of the right size to accomodate your window component.
3. Always create your cutting/gluing components on a surface. IF you build them in white space, the component will not have the right sort of axis ( the blue is a little "X" at the corner of the red & green axis ) to be a cutting/gluing component. It wont be. Build it on a wall, make the component. If you wish to save the component to use in other models , then from the right click context menu you can "save as" and save just the component to some component library folder that you keep. (this is a very different "save" than the save from the "file menu" which will save the entire model> The window will be saved as an skp without the wall that it was built on, but sketchUp will "know" that it was built on the wall and behave accordingly when you import the skp into another model or when you add the library to your component browser and bring it in from your component browser
4. Never bring a cutting/gluing component out of the component browser, park it temoporarily in mid air and then bring it to a surface and still expect it to cut. It will have lost its cutting properties.
In the bit -meof the Pro Forum that we lost, we had a discussion going about making a square handrail using "follow-me" and how the surface would not lie parallel to the ground. Someone had started working on a ruby scirpt to make that work. I think it was mostly done and posted, no. I have no recollection of what it was called and where to find it. Can you guys help me out.
Also, to make something like a curving handrail or a curving childs slide, would there be a good ruby to use to set the curves. Helix?
I see. I have never really worked with AutoCAD but I'm teaching people who do and I didn't really understand what it is that they needed to have a face. I thought that they wanted a face even on a cavernous interior section cut. So I couldn't figure out why there was no face at all in an interior. Now I understand. Thank you.
ahh thanks, down arrow within window, not in drop down list. Go it.
Now about the faces??
but there is space all around the doorway. Why is there no face in that space?
I thought the script fills in a face everywhere