Oops, your profile's looking a bit empty! To help us tailor your experience, please fill in key details like your SketchUp version, skill level, operating system, and more. Update and save your info on your profile page today!
Urasik Extensions | Lots of new extensions to check out Learn More
Posts
-
RE: It's Official... I love you guys!
Hi Craig, hi folks.
Great new

Good for you, good for all of us

 for Google.
 -
RE: Empty Groups Disappear?...Oh, and Hello Again!!!
Hi folks.
You may also have a minimalist group if you use only a Center Point obtained by right clicking on a circle, a polygon or an arc. Delete the circle, polygon or arc then group the remaining single point. You may even hide it if required.
Just ideas.
-
RE: Text editing
Hi folks.
I also use this trick with dimensions to get an line with an arrow at each end to illustrate aligments for example. I edit the dimension text and use a simple space for it.
To avoid a break in the dimension line, I use an "outside" or "above" alignment instead of the "centered" alignment. Use Menu Window --> Model Info --> Dimensions.
Just ideas.
-
RE: Smoothing issue?
Hi folks.
If you want your splitting plane to be parallel the any standard plane (red-green or red blue or green-blue), you may rotate the circle (before extrusion) or cylinder (after extrusion).
Use 7.5° if the circle has 24 segments.
The formula is 180 ÷ number of segments.
Just ideas.
-
RE: How to Set the axis of rotation for a component?
Hi Chippwalters, hi folks.
I posted the following in another SU forum to help someone understand the Rotate Tool so all of this dont necessarily apply to your case:
If you read SU help about the Rotation Tool, you will see, near the
end, an explanation about folding along an axis using the Rotation
Tool.First, lets go with the definition of a mouse button click. It is a
press of the button and then a release of the same button. This seems
obvious but with SU (and some other software) some actions require you
to press the button AND HOLD IT DOWN while doing some other
manipulations. Many users gets frustrated because they "click, move,
click" while the sequence is press (AND HOLD DOWN), move, release.In other instances they use "press, move, release" when the proper
sequence is "click, move, click". Like in using the Measuring Tape to
get a measure or to resize a model, a group or a component.After stating that, lets proceed with some explanations.
Normally, with the Rotation Tool, you use these steps:
1 - Select the object to rotate.
2 - Select the Rotate Tool.
3 - Select the plane of rotation (more on that below).
4 - Click to set the center of rotation.
5 - Grab some point on the object to be rotated (click on some point,
line, surface, whatever)6 - Rotate either freely or by angle increment if the cursor is kept
on the protractor graduations or by snapping to some other geometry or
by specifying the exact angle in the VCB.7 - Complete the rotation with a click if rotating freely or by
increments or by snapping or by using the RETURN key or the ENTER key
to validate an angle entered in the VCB.
Alternatively, you may use these steps:
1 - Select the object to rotate.
2 - Select the Rotate Tool.
3 - Press (dont click, keep it pressed) the left mouse button (LMB) to
set the center of rotation.4 - Move the cursor along the axis of rotation. The protractor will
then be on a plane that is perpendicular to this axis. If the
rotation axis is parallel to any of the standard axes, the protractor
will use this color (red, green or blue). Otherwise it will be black.5 - Release the LMB.
6 - Perform the rotation as per steps 5 to 7 of the previous
procedure.
How to specify the plane of rotation if you cannot, or dont want to,
specify the axis of rotation:1 - Draw any face in the required orientation.
2 - Choose the Rotation Tool.
3 - Position the cursor over it.
4 - With the rotation protractor correctly oriented, press and hold
down the SHIFT key to lock the orientation.5 - While still holding the SHIFT key, move the cursor to the center
of rotation.6 - Click to set it.
7 - You may now release the SHIFT key.
8 - Proceed as previously to do the rotation.
Please note that the rotation protractor can be forced to align with
all three standard planes:-
red-green plane with a blue protractor;
-
red-blue plane with a green protractor;
-
green-blue plane with a red protractor.
To do that you may orient the view (with the Orbit Tool) so that the
wanted plane is mostly facing you. Or use any of the standard views
(top, right, front, etc).You may also observe that in an Iso view or any 3D view that is not
showing mostly the horizontal plane, after you select the Rotate Tool,
if you place the cursor in the bottom two third of the screen, the
protractor is blue, if you move the cursor near the top of the model
window and to the left of the blue axis, the protractor is red and if
you move to the top and the right of the blue axis, the protractor is
green.Remember that, whatever the method you use to get the correct
orientation, you can lock it with the SHIFT key.Remember that this orientation trick will also work with polygon and
circles.Remember that you can zoom, orbit, pan, change scene, change viewing
mode, etc right in the middle of many operation like rotation, move,
drawing, scaling, etc.I got most of these tips by watching all video tutorials. I strongly
suggest that you watch all the one for version 5 as well since the
basic functions are the same and are not necessarily covered by the V6
tutorials. Pay atention to the commentaries, they are a gold mine of
informations. The downlodable PDF manual is also very usefull. Of
course, the help is the very first ressource you must turn to.
For ideas about modeling a sphere, see attached SU file.
-
-
RE: Elevations
Hi Perk, hi folks.
Right click on any face and choose "Align view" in the contextual menu.
For curved face, show hidden geometry and right click on the facet that you want facing the viewer.
Just ideas.
-
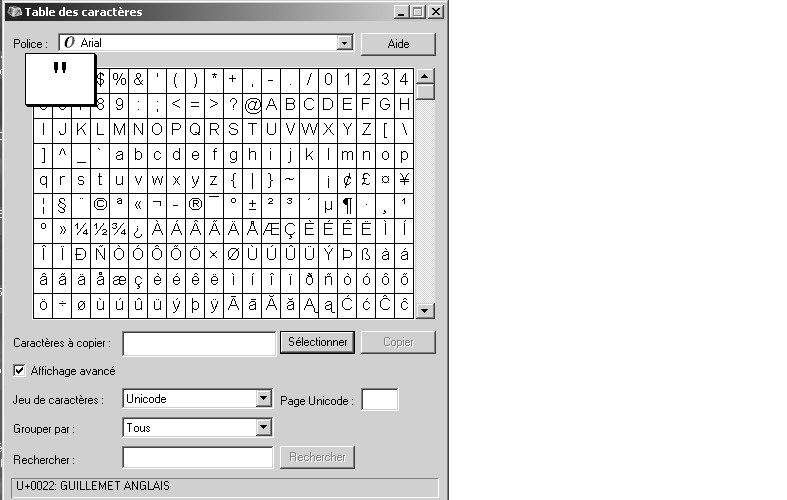
RE: How to Scale using inches in the VCB?
Hi Masta, hi folks.
On my Mac keyboard, SHIFT-2 is like you, the @ character. The " is SHIFT-. or SHIFT Dot.
I think that SU recognise only the character that has the ASCII code 34 (decimal) or 22 (hexadecimal). If you have the character table available (for Windows), try to find the key that generates this code.
See attached JPG file for ideas.
-
RE: 2 very quick questions :-)
Hi J. Forrester, hi folks.
For your second question, see attached SU file for ideas.
Of course, in the two examples, you can ungroup the lines when the job is completed.
-
RE: How to Scale using inches in the VCB?
Hi folks.
Use the straigth quote symbol like this ", not the curvy ones. It is SHIFT-2 on my PC with a French Canadian keyboard definition.
I think that, for a future version of SU, Google should consider allowing the use of ft for feet and in for inches like the actual use of m for meters, cm for centimeters and mm for millimeters when using the Scale Tool.
Just ideas.
-
RE: [Tutorial > Modeling] Hidden Seam Tutorial
Hi folks.
Good stuff Boofredlay.
If, for any reason, you want to retain the offending internal face that is showing trough the sides, you may hide it instead of deleting it.
Just ideas.
-
RE: Open new window option
Hi folks.
With SU not running, I copied a SU file in the directory pointed by Dylan, which is:
C:\Program Files\Google\Google SketchUp 6\Resources\en-US\selfpacedtutorials
Then, I started SU and by going to "Menu Help --> Self Paced Tutorials", the file showed with the Introduction, above the separator line. The choice below that separator is still "Get more tutorials" which brings you to the web site.
Notice that the added SU files dont show up in the Help menu but instead in the submenu "Self paced tutorials" which makes sense to me.
Just ideas.
-
RE: Textures
Bonjour.
Peux-tu télécharger le fichier fautif ou à tout le moins l'objet contenant la face en question ?
Quelqu'un pourra certainement y jeter un coup d'oeil et peut être identifier le problème.
Salutations.
-
RE: Some more questions
Hi Chipwalter, hi folks.
Menu Edit --> Close Group/Component.
-
RE: Reinforcement Rib
Hi folks.
See attached ZIP file for ideas.
The ZIP file contains a 768 K SU file.
-
RE: Newbie help
Hi Dan, hi folks.
See attached SU file for another way of doing your model.