thanks, shawn.
it is a curious name for a design as it means passion in portuguese. it can also be a fairly common surname.
regards.
thanks, shawn.
it is a curious name for a design as it means passion in portuguese. it can also be a fairly common surname.
regards.
kris,
let me know where to find Paixao...
hi kris,
this tutorial is a great input for most people, I am sure. thanks a lot for your generosity.
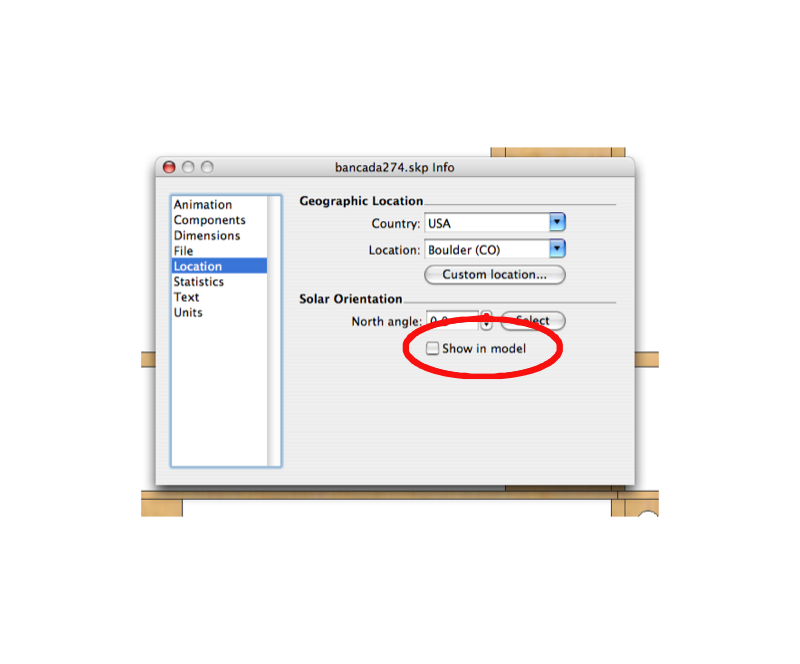
uncheck it and the sun's direction will not show.
juju, sorry about that. let me try again.
i imported the plan and scaled it, ok? then i drew a larger rectangle close to it and copied the scaled plan onto it. since the rectangle was bigger than the image there ensued a tiling effect. in trying to get rid of the tiling (by using Texture>>Position) i threw the plan off scale. so i ended up with two plans side by side, one scaled correctly and the other slightly bigger while all the tutorial suggested was to have one scaled plan "textured" on the plane.
i hope it makes some sense to you now.
edson
hi juju,
i did step 2 exactly as told and got the plan scaled right. my mistake was probably having used the texture tool to make the image fit the larger rectangle.
from what you said the plane under the picture helps keep things straight and plumb. would not that happen if i traced the plan that is not on the rectangle?
thanks.
edson
hi kris,
i am following your two tutorials with great interest and have a couple of questions to make you.
are you starting from the assumption that there is no plan in dwg or dxf format for one to start with and that all there is is some image scanned from a mag or some other source? i ask that because tracing over a picture is not that easy, as there are no edges or endpoints to grab on to.
what is the point of applying the plan as material on the larger rectangle? you suggest one to use proper thicknesses but the larger plan is out of scale. please explain this.
why not trace the plan over the rightly scaled plan and then make copies of it to put on other layers as you suggest?
please continue this amazing thread. regards.
edson
good work, ross. and good idea to get things moving. i think the mods have been busy moving and most members have not digested the move yet. but we will get back to normal soon.
cheers.
great job, jason. it is in itself a xmas gift. i am sure people who get it will be very happy.
i would also have a look at the videos by the guys at go-2-school (http://go-2-school.com/). at least a couple are on photomatch.
@arqpadao said:
Porque alguns identificam o autor e outros não, e também alguns aparecem como sendo de tua autoria, quando não são? não é bronca, só querendo entender.
Bugs da mudança?
abraços
Padão
oi fernando,
o problema é que não é possível atribuir a postagem ao seu verdadeiro dono enquanto ele não se registrar. não se pode registrar uma pessoa sem que ela tome a iniciativa.
fizemos duas coisas para evitar confusões: criamos um membro chamado "not registered yet", ao qual atribuimos todas as postagens órfãs, tomando o cuidado de colocar o nome do autor entre colchetes. as tuas ficaram assim até que tu te registraste.
por isso, não creio que ainda existam postagens com o meu nome que não sejam minhas. se encontrares alguma, por favor me avisa que eu mudo na hora.
tudo isso está sendo feito MANUALMENTE. não podes imaginar o trabalho que dá.
i wish there was some place from which to buy styles from. yes, i know that formfonts sell them but you have to pay a yearly subscription to have access to them. it becomes very expensive if all you are interested in at a given moment is a couple of styles.
what i would like to find is something similar to smustard: you pay by the stuff you buy.
does anyone know of a setup like i am referring to?
frv,
i have been on mac forever and that never happened to me.
I would not mind if some generous soul decided to share a couple of styles with the rest of us. not at all.
regards.
edson
prezados amigos que falam português,
tivemos sucesso em mudar o nosso forum para esta nova casa, o que foi necessário por razões de segurança e estabilidade.
espero que continuem frequentando este e os demais forums em busca de aperfeiçoamento e trocas com os demais usuários do sketchup.
contem comigo para o que for possível.
yes, i had been there before and watched several of them but somehow the banana was overlooked (although it is one of my favourite fruit!).
just the same, it is better to watch them again now when i know much more about SU. when you are a novice many important things escape your understanding.
coen, you are on a roll!! i see tuts by you everywhere i look!
@krisidious said:
here is an example from NickW,with some sweet little roof details.
are there more where these came from? where does nick store his jewels?
gai,
now you are talking! as clear as crystal. very clear explanation.
perhaps instead of additional shots you could just add the written explanation to the ones you already have (and then replace the file).
congratulations.
edson
gai,
useful tut, thanks. my teacher experience asks me to question a few things, though. for ease of understanding's sake, that is. steps 4 and 5 are the crucial ones but they are not easy to grasp. perhaps my own limitation but i may as well tell you.
would you explain step 4 better? what exactly goes on there? you drew an arc joining 2 points at different heights, right? and then, what? i do not understant what you mean by snap and rotate.
step 5: i could not quite get what the text implies.
cheers.