sketchucation logo sketchucation
    • Login
    1. Home
    2. dedmin
    3. Posts
    ℹ️ Licensed Extensions | FredoBatch, ElevationProfile, FredoSketch, LayOps, MatSim and Pic2Shape will require license from Sept 1st More Info
    D
    Offline
    • Profile
    • Following 0
    • Followers 0
    • Topics 79
    • Posts 923
    • Groups 1

    Posts

    Recent Best Controversial
    • RE: [Preview] UVTools 0.2

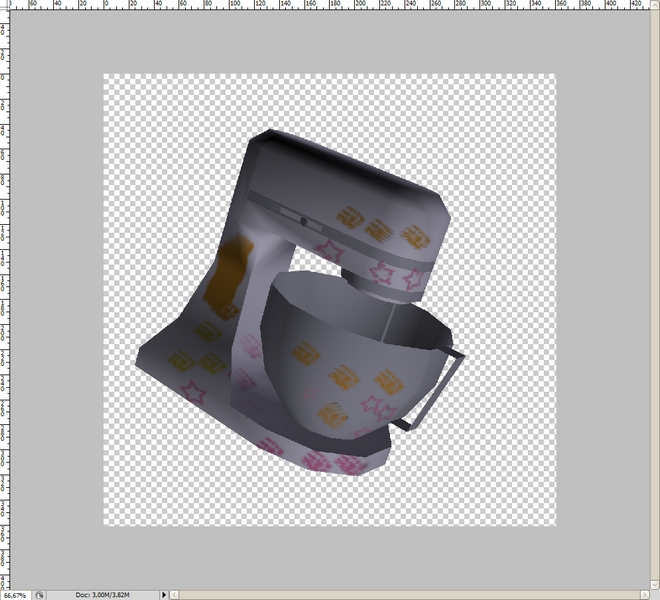
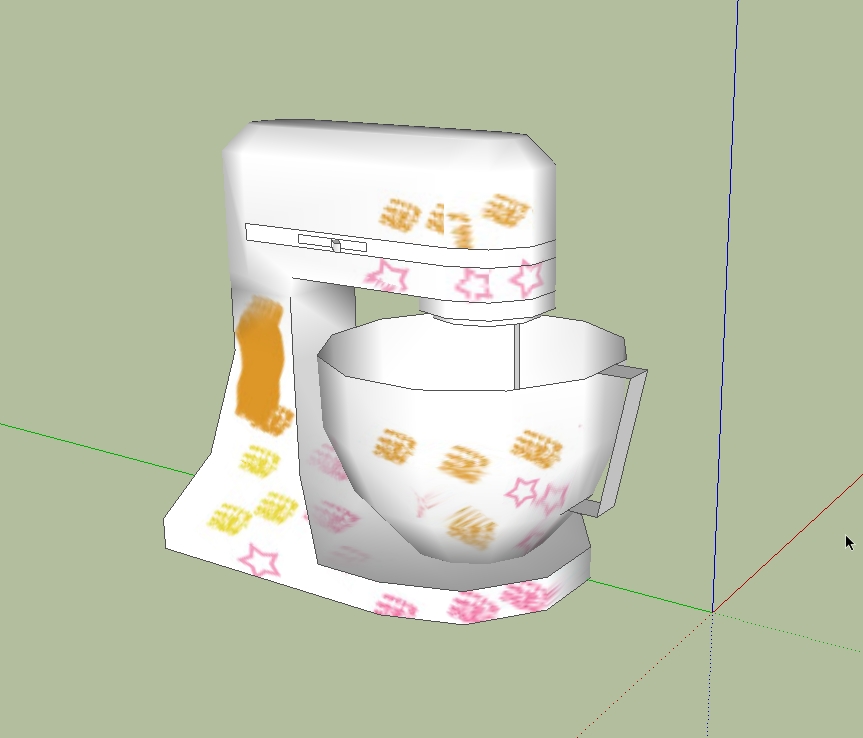
      PhotoshopCS4 can open .kmz files and you can paint the surfices and then export again to .kmz and open in SketchUP. Here a quick try

      2009-11-13_182043.jpg
      2009-11-13_182111.jpg

      posted in Plugins
      D
      dedmin
    • RE: Internal Kitchen Render - Twilight Easy Low+

      I see - thanks. Here we are using melamine faced boards and also send cutlists to the big guys to cut the panels for us. But we need detailed models of the furniture to have exact dimensions of all the parts.

      posted in Gallery
      D
      dedmin
    • RE: New Cabinet making plugiin being developed

      Yes, it's gonna be more useful in Europe, where we are heavily using melamine faced boards, MDF and the like.

      posted in Woodworking
      D
      dedmin
    • RE: Internal Kitchen Render - Twilight Easy Low+

      @dermotcoll said:

      Bytor

      Thanks so much for the comments. Really love the NPR render finish- have tried to do that myself but didnt work so I didnt post. Can you re upload your finished model so I can see what you did and how you did it?

      I see You don't make full detailed models of the furniture. Don't You use SketchUp to make cutlist?

      posted in Gallery
      D
      dedmin
    • RE: [Preview] Skabinet (make cabinets with Sketchup)

      @newone said:

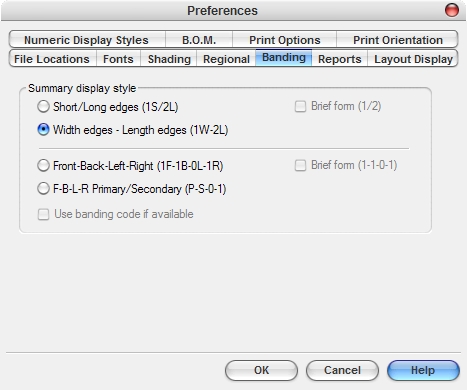
      to dedmin: Only some of cutlist optimizing software accept automatic input of edging. As you may know, CutMaster 2D http://www.cutmaster2d.com/ doesn't accept this, but it accept manual input of edge banding. What software is that, of window which you are displaying?

      to TIG: thanks for your appreciation. I learned a lot from sketchucation and you (and others) helped me in the process.

      to utiler: I'm waiting for your list! πŸ˜„

      This is a CutList Plus software. To export my data from SketchUP to CutList Plus I'm using CutList plugin. CutList Plus supports import of cvs or txt files. It recognizes four types of banding information:
      2009-11-13_110616.jpg

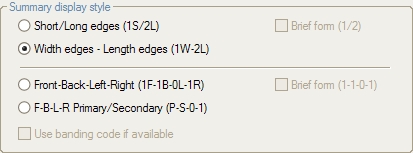
      I'm using the second format and attach banding information to the name of the component using ; as a delimiter:
      2009-11-13_111022.jpg

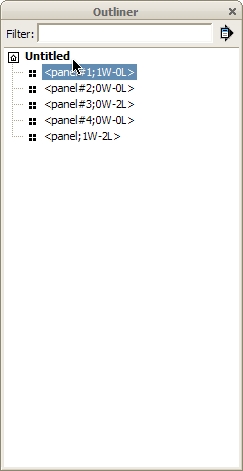
      Here is the cvs file created by the CutList plugin to be imported in CutList Plus: Untitled_CutListPlusImport.zip

      posted in Plugins
      D
      dedmin
    • RE: [Preview] Skabinet (make cabinets with Sketchup)

      Ha, we are neighbors! Hello from Bulgaria and Donau river! Great idea! Vote for the banding - especially in CutList format. We need a column for each part with one of the several banding formats that CutList can use:

      2009-11-12_234020.jpg

      posted in Plugins
      D
      dedmin
    • RE: [REQ] Rounded stones tileable texture??

      http://www.lenagold.ru/fon/kam/kampl/chb.html

      posted in SketchUp Components
      D
      dedmin
    • 3DS Max 2010 - Extensive Connectivity with Google SketchUP

      3ds_max_stretchup_800x480

      favicon

      (download.autodesk.com)

      posted in Extensions & Applications Discussions extensions
      D
      dedmin
    • RE: Any in Depth Tutorial on Components

      The best book for advanced SketchUp users. There is a very good chapter about components:
      http://oreilly.com/catalog/9780596155100

      Table of Contents

      1. Chapter 1 Making Multiple Copies
        1.
        Copying in Linear Arrays
        2.
        Creating Linear Internal Arrays
        3.
        Building a Nonorthogonal Linear Array
        4.
        Copying in Circular Arrays
        5.
        Creating Circular Internal Arrays
      2. Chapter 2 Following Paths with Follow Me
        1.
        Extruding a Follow Me Face to Cut Volume Along a Path
        2.
        Using Follow Me to Add Volume Along a Path
        3.
        Keeping Original Objects Intact During Follow Me
        4.
        Using Follow Me When Faces and Paths Are Not Adjacent
        5.
        Creating Objects in the Round
        6.
        Creating Spheres
        7.
        Using a Follow Me Path in 3D
      3. Chapter 3 Intersection Edges: Cutting and Trimming
        1.
        Trimming an Object
        2.
        Cutting All Intersected Objects
        3.
        Using Groups or Components to Create Cutting Objects
        4.
        Intersecting with Groups and Components, Without Exploding
        5.
        Intersecting with Both Intact and Exploded Components
        6.
        Intersecting Only Selected Objects
        7.
        Intersecting Within a Group or Component
        8.
        Using Intersect to Trim Components with Themselves
      4. Chapter 4 Advanced Intersect and Follow Me Techniques
        1.
        Creating Temporary Faces for Follow Me
        2.
        Rounding Corners
        3.
        Creating Lathed Shapes
        4.
        Roofing with a Uniform Slope
        5.
        Creating "Dummy" Follow Me Paths
        6.
        Extending Follow Me Paths
        7.
        Using Intersect to Create a 3D Follow Me Path
      5. Chapter 5 Roofs: Constraints and Inferences
        1.
        Creating an Overhanging Roof
        2.
        Creating Dormers
        3.
        Working with Roof Intersections
        4.
        Creating Overhangs with Autofold
      6. Chapter 6 Groups: Protect and Defend
        1.
        2.
        Ungluing Faces
        3.
        Unsticking Edges
        4.
        Protecting from Edits
        5.
        Cutting and Slicing
        6.
        Two-Sided Coloring
        7.
        Locking a Group
      7. Chapter 7 Components: Efficiency in Repetition
        1.
        Creating a Component
        2.
        Using the Components Window
        3.
        Inserting a Component
        4.
        Editing or Exploding a Component
        5.
        Renaming a Component
        6.
        Saving a Component in Its Own File
        7.
        Accessing Local Components
        8.
        Painting Components
        9.
        Repeating Objects with Different Sizes
        10.
        Aligning and Gluing
        11.
        Using Components for Symmetric Models
        12.
        Placing Windows in 3D Walls
        13.
        Reloading Components
        14.
        Replacing Components
        15.
        Working with the Outliner
      8. Chapter 8 Painting, Materials, and Textures
        1.
        Finding Materials and Images
        2.
        Getting Images into Your Model
        3.
        Creating Material Collections
        4.
        Painting Multiple Faces
        5.
        Changing Material Size and Color
        6.
        Copying a Material
        7.
        Using Translucent Materials
        8.
        Painting Edges by Material
        9.
        Positioning Textures: Fixed Pins
        10.
        Positioning Texture on Round Faces
        11.
        Creating and Editing a Unique Texture
        12.
        Using Alpha-Transparent Images
      9. Chapter 9 Modeling with Digital Photos
        1.
        Positioning Textures with Free Pins
        2.
        Editing a Photo
        3.
        Adding Faces to Patch an Image
        4.
        Using Images to Make Face Camera Components
        5.
        Using Free Pins and a Single Image to Paint a 3D Object
        6.
        Using Photo Match to Model a 3D Object
        7.
        Using Photo Match to Paint an Existing Model
      10. Chapter 10 Modeling with Exact Dimensions
        1.
        Working with Lines
        2.
        Working with Rectangles
        3.
        Working with Circles and Polygons
        4.
        Working with Arcs
        5.
        Importing Graphics
        6.
        Using the Tape Measure for Construction Lines and Points
        7.
        Measuring and Marking Angles
        8.
        Finding the Area of Faces
        9.
        Creating a Grid
        10.
        Measuring Lengths and Resizing
        11.
        Resizing Models with Groups and Components
        12.
        Resizing Parts of Your Model
        13.
        Resizing a Model in Multiple Directions
      11. Chapter 11 Presentation: Showing off Your Model
        1.
        Working with Layers
        2.
        Working with Scenes
        3.
        Working with Shadows
        4.
        Sectioning Your Model
        5.
        Using Layers and Scenes to Control Displayed Objects
        6.
        Using Layers, Scenes, and Groups for Different Design Scenarios
        7.
        Studying Shadow Movements
        8.
        Walking Through Your Model
        9.
        Creating Animated Sections
        10.
        Creating Staged Sectioning Animation
      12. Chapter 12 Displaying Your Model
        1.
        Hiding and Softening Edges
        2.
        Changing the Style
        3.
        Creating a New Style
        4.
        Saving Styles
        5.
        Saving a Style As a Template
        6.
        Mixing Styles
        7.
        Adding a Watermark
        8.
        Creating a Sketchy Edge Style
        9.
        Using Styles in a Presentation
      13. Chapter 13 3D Warehouse and Google Earth
        1.
        Finding Models in the 3D Warehouse
        2.
        Refining Your 3D Warehouse Search
        3.
        Uploading Models to the 3D Warehouse
        4.
        Creating Collections in the 3D Warehouse
        5.
        Controlling Model or Collection Privacy
        6.
        Adding Models or Collections to Your Collections
        7.
        Taking Credit for Your Model
        8.
        Manually Georeferencing Your Model
        9.
        Georeferencing Your Model by Using Google Earth
        10.
        Getting Your Models into the 3D Buildings Layer
        11.
        Creating a Placemark in Google Earth
        12.
        Relocating a Georeferenced Model
        13.
        Downloading Buildings That Appear in Google Earth
      14. Chapter 14 Dynamic Components
        1.
        Finding Dynamic Components
        2.
        Interacting with Dynamic Components
        3.
        Investigating Dynamic Component Options
        4.
        Scaling Dynamic Components
        5.
        Modifying and Replacing Dynamic Components
        6.
        Sizing by the Reference Point
      posted in SketchUp Discussions
      D
      dedmin
    • RE: [Plugin] Wood working rubys Update

      I agree 1000% with you guys! I been using AutoCAD, TopSolid and the like, but while powerful I find myself working with the program rather than thinking about furniture design! For woodwork.rb i have another idea - can we get measurements directly from the model while making boards?

      posted in Plugins
      D
      dedmin
    • RE: Vray problem

      Too bad - the CutList plugin uses the component's material for calculations.

      posted in V-Ray
      D
      dedmin
    • RE: Vray problem

      Maybe a components texture problem. But if we have textures applied separately to all faces in a component and a texture to the component itself is the bug still a fact?

      posted in V-Ray
      D
      dedmin
    • RE: Components, Layers and Component Collections

      sketchup.jpg

      posted in SketchUp Discussions
      D
      dedmin
    • RE: Woodworking ruby.

      Using it - loving it! Thanks a lot! πŸ‘ πŸ‘

      posted in Woodworking
      D
      dedmin
    • RE: Alternatives to Bloatware

      The best for me so far with very good Firefox integration
      http://www.docu-track.com/home/prod_user/PDF-XChange_Tools/pdfx_viewer
      I prefer portable software - see this place for alternatives

      Just a moment...

      favicon

      (www.portablefreeware.com)

      posted in Hardware
      D
      dedmin
    • RE: Bedroom

      @newone said:

      Since a while I'm working on a plugin which will make cabinets drawing more easier, it will make materials report, drawers, doors, and I'm planning to implement edging too... But I still have a lot of work on it.

      I'm very interested in this! I can help with ideas and my experience using other furniture software. However, all specialized furniture software are somehow restrictive and too expensive - that is why i choose SketchUP. With the FredoScale plugin the biggest drawback of parametrization lacking had been eliminated. What is needed is way to implement banding and calculate drawer's sizes. I made ready drawers that can be re-sized to fill inside of a cabinet - here a plugin to calculate this will be very handy! The same technique i use with cabinet carcassClipboard-1.jpg 
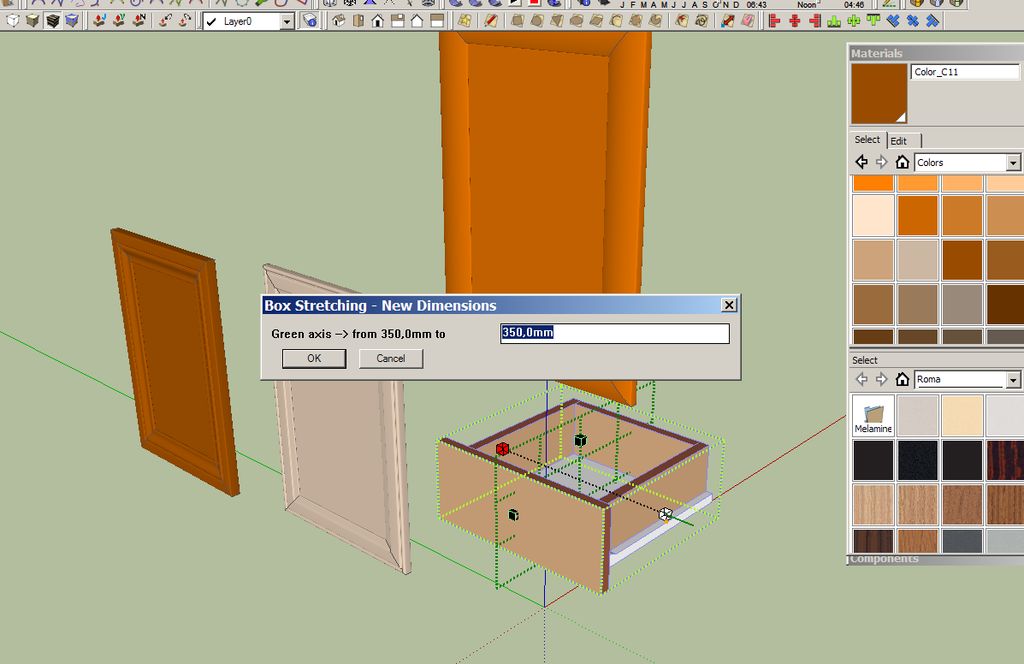
and frame doors and stretch with FredoScale - fast, easy and freely customizable.

      posted in Gallery
      D
      dedmin
    • RE: Bedroom

      @dermotcoll said:

      Dedmin

      I have dynalog and use it for positioning runners and hinges on bespoke cabinets with internal drawers etc. Never knew you could export to autocad - thanks for the heads up. Dont think I will ever need to model to that level of detail on the inside of a cabinet however!!!

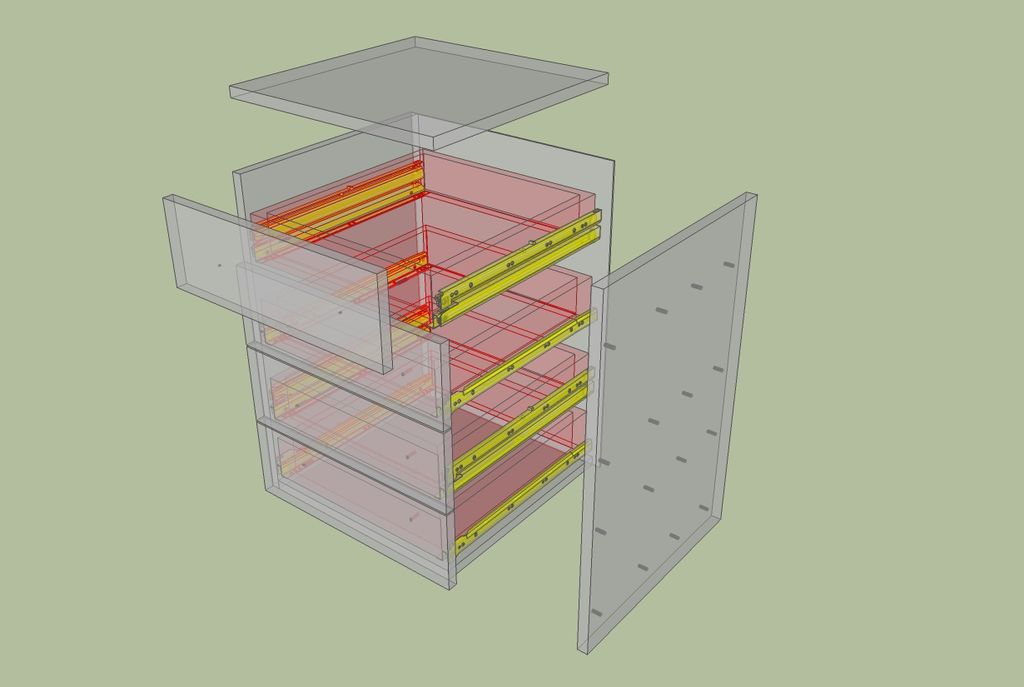
      Yes, this is rarely needed. However, the power of this work flow is that You can combine everything in SketchUP - when making kitchen draw the cabinets in Dynalog, import them in SketchUP and add worktops, handles, legs etc. All the parts from AutoCAd imports as groups that can be renamed, converted to components, push-pulled, resized and used in CutList for exporting to excell or cutting software. You know how hard is to manually calculate sizes for drawers, cabinet doors and the like.

      posted in Gallery
      D
      dedmin
    • RE: Bedroom

      Blum's documentation is very helpful and detailed. However, it is not very easy to implement all this in SketchUP by hand. So, there comes BlumDynalog - a software to build cabinets with Blum's hardware - it gives cutlist, BOM, drawings and connections with AutoCAD. From AutoCAD to .dwg and then import in SketchUP - here we go

      Untitled.jpg

      posted in Gallery
      D
      dedmin
    • RE: Bedroom

      @newone said:

      @dermotcoll said:

      Very nice - just wondering from a woodworking point of view why the drawer front on the bedside locker seems to project above the top surface?

      I dont like to nit pick as I can only dream of this quality of model / render.

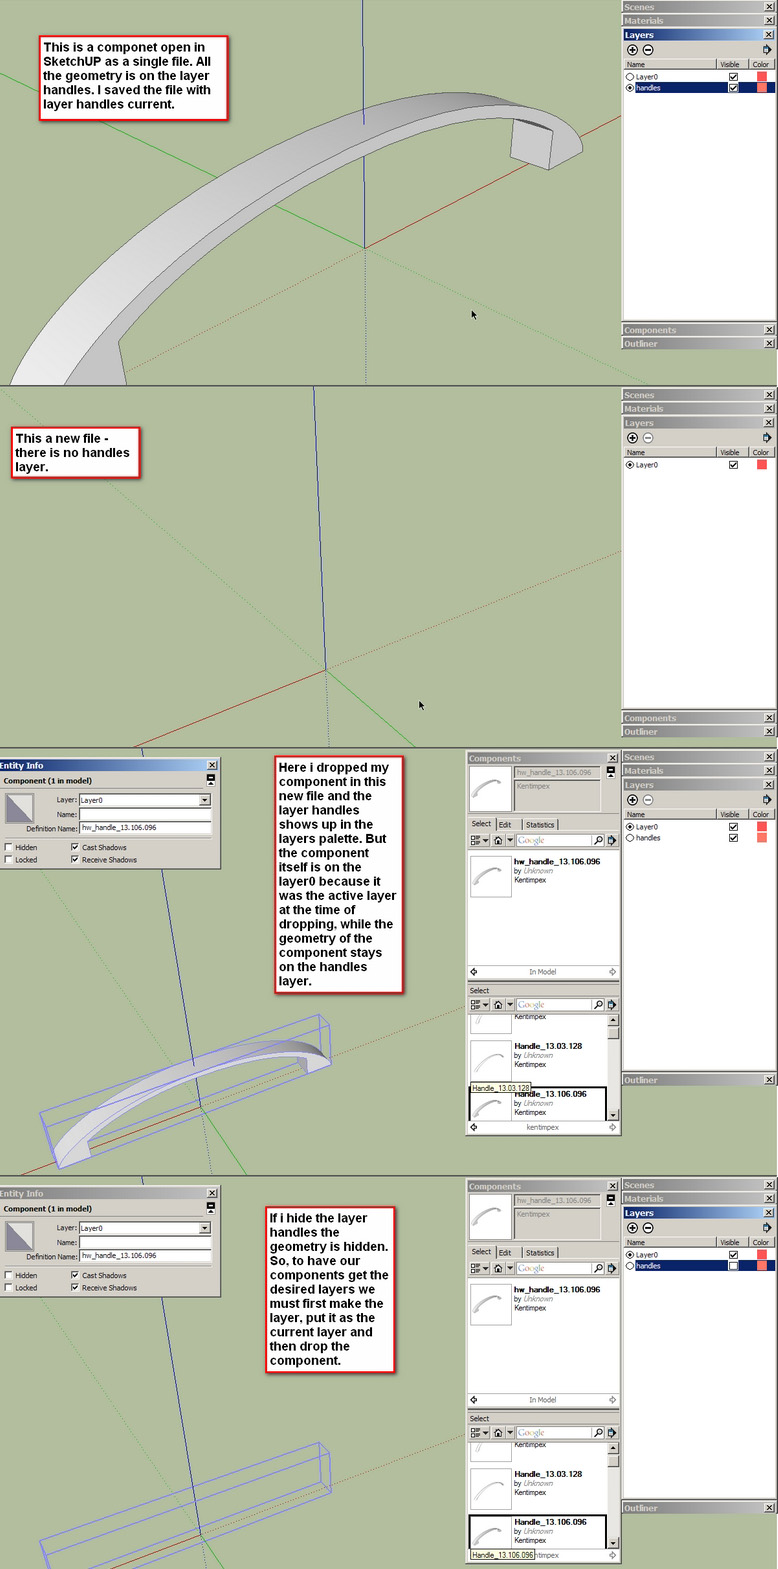
      Well, if I understand correctly, this is what you say (see image). And the answer is simple: To not use handlers πŸ˜„ You can grab each drawer from the edge that goes over the box bounds.
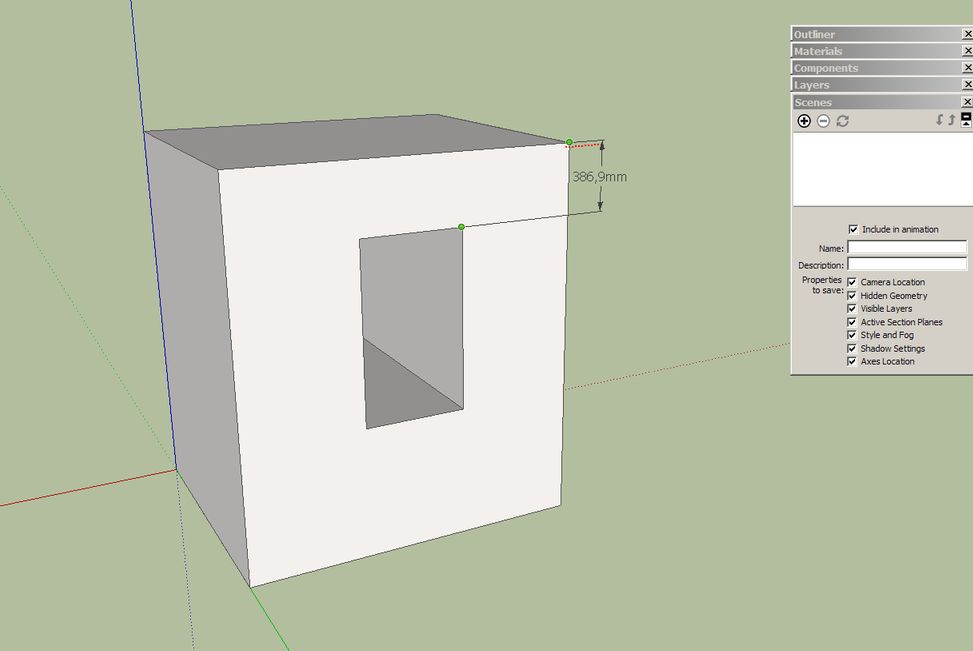
      301 Moved Permanently

      favicon

      (www.blum.com)

      posted in Gallery
      D
      dedmin
    • RE: Difficulty with Dimensioning

      @johnt said:

      Hi,
      I'm new to SketchUp having come from a SolidWorks background. If you look at the screen shot attached you will notice that at the cursor there is a dimension of 5" from the top of the square hole to the top of the part. It appears SketchUp will not place this dimension here! I can't see what is wrong with this. Instead it wants to dimension from the left side of the part to this point -- -- with a dimension of 10" parallel to the horizontal axis instead of 5" up and parallel to the z like I asked it to. πŸ˜’

      It's causing Dimensioning Dementia

      I tried it - You have to click on the right vertex to get the dimension

      Clipboard-1.jpg

      posted in Newbie Forum
      D
      dedmin
    • 1 / 1