I think it looks alright but forget the file. Get some sandpaper and get busy. You can work it while watching the telly or something. I imagine it would be a fairly delicate piece considering the short grain. A drum sander might grab it and break it.
Oops, your profile's looking a bit empty! To help us tailor your experience, please fill in key details like your SketchUp version, skill level, operating system, and more. Update and save your info on your profile page today!
Check out Febhouse | New extensions for Shadow Analysis in SketchUp Download
Posts
-
RE: Present/experiment
-
RE: BlackWatercolor
I've finally uploaded the file. See the original post.
-
RE: [Plugin] Skin.rb
@mike d said:
i could not figure this one out
What are you having trouble with. If you'd like help, give us something to go on.
-
RE: Wall cabinet designed by Martin McCarthy
Nice work Jean-Franco. You've come a very long way since our first e-mails. It's good to see. Keep it up.
-
RE: Joint Push Pull Classic (Old version) - v2.2a - 26 Apr 17
Thanks Fredo.
He has the updated version and all is well.
Cheers,
Dave
-
RE: Joint Push Pull Classic (Old version) - v2.2a - 26 Apr 17
A friend of mine just downloaded Joint Push/Pull from Didier's site. Now when he opens SketchUp he gets the following:
@unknownuser said:
Error Loading File jointpushpull.rb
C:/Program Files/Google/Google SketchUp 6/Plugins/jointpushpull.rb:2356: syntax error
menu.add_item(Traductor[DLG_MnuRedo) { JointPushPull.redo }
^
C:/Program Files/Google/Google SketchUp 6/Plugins/jointpushpull.rb:2356: syntax error
C:/Program Files/Google/Google SketchUp 6/Plugins/jointpushpull.rb:2378: syntax errorAny ideas of what needs to change?
-
RE: [Obsolete] Offset On Surface (v1.0)
Thank you very much Fredo. This, along with JPP is very useful. Just for fun I did a little demo. Also used the Skin plugin, too. If you're interested, here it is. Sorry about the low resolution.
-
RE: Cordless Drill
I have a DeWalt 14.4V with NiCd batteries. I bought it because we have several of them at work where we do everything from driving screws to drilling stainless steel. Always good service from the tools.
I've considered going to Li-ion power but it's hard to justify a change when the stuff I have works so well.
-
RE: Question for the Pros--Multiple Projects
Thanks all.
I do have TBD's Time Track which does work well when I can remember to start it.
I ended up buying a spiral bound pad of graph paper on which to take notes and make the little sketches I often do while talking on the phone. I also bought a multipocket pouch sort of thing to keep e-mails and other papers for the projects that are going currently. I'll file them away in a different place once I don't need them on my desk.
Thanks again.
Dave
-
RE: Variations On A Theme
@gidon yuval said:
I gotta tell ya, I'd also go for the second from left, bottom row.
Beautiful stuff, Dave.How did you make the picture? It's got such a beautiful "recently discovered DaVinci sketch" to it.
I hope you don't need Photoshop or anything like that. Can this be done purely in SU?Thank you Gidon. That was sort of the look I was after. In this case it is a combination of my Old Paper style which I posted in the Styles section and one of Ross' line styles from Form Fonts. the only post production was a bit of auto-contrast in Picasa to darken things up.
-
RE: Welcome to all woodworkers
@bart leetch said:
Just checking this place out I was directed to this forum from Sawmill Creek.
Bart
Hi Bart! Welcome. You ever build that china cabinet I drew up for you?
-
Variations On A Theme
On Friday my brother called and asked me to design a sort of Arts and Crafts style doorbell cover to replace the ugly plastic one he had. I sketched out a few otptions. Thought I'd show them here.
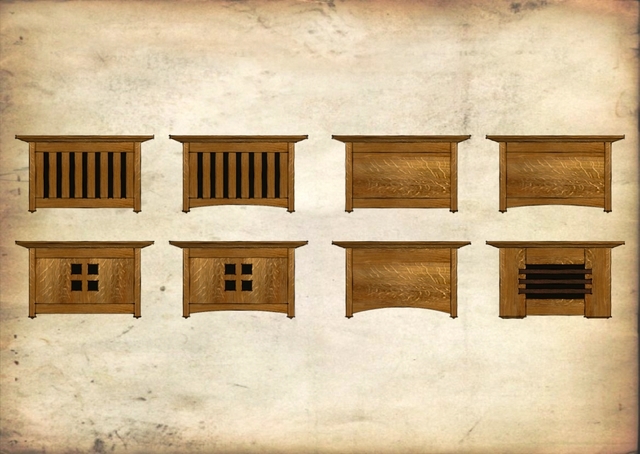
Larger version here.He built the one second from the left, bottom row. I like the one in the lower right corner.
-
RE: Total newbie: (Arc surface with round over corner)
To xupacabra: Is the radius of the roundover suppose to change over the length? What is your plan for cutting this in the wood? Thinking through the process as far as how you would make the roundover on the wood with tools might be helpful in figuring out how to draw it in SketchUp.
Assume for the moment you'd simply run a router along the edge with a bearing-guided roundover bit installed. The radius would be constant along the path. As Susan indicated, the path needs to be extended beyond the ends of the curve that you want radiused. The profile should be perpendicular to the first segment of the path. After completing the Follow Me operation, select all of the geometry of the "board" and the Follow Me extrusion and run Intersect with Selected. Then delete the waste at the ends. Think of this as turning on the router before the bit is in contact with the wood and shutting it off after you've completed the cut.
The missing faces could be due to the small face phenomenon. SU doesn't like to make tiny faces. You can avoid this problem by using few segments for the arc defining the roudover. for something that small, 3 or 4 segments would be plenty. You could also temproarily scale the model up by, perhaps, a factor of 100 prior to running the Follow Me operation. After you've completed that and the clean up after the Intersect, you can scale back down. the easy way to do that is to draw a line 1" long someplace in the drawing window. Then measure it with the Tape Measure tool, clicking at each end. The VCB will display the length as 1". Type 100 and hit Enter. You'll be asked if you want to resize the model. Choose Yes and then hit Zoom Extents so you can see the whole model. When you've completed the roundover, scale back down by repeating the previous. When you measure the line again, SU will report it at 100" long. Type 1 and hit Enter. Again, you'll be asked if you want to resize the model. Click Yes and zoom Extents and you're back to where you were.
If the roundover is very small, you might choose to insinuate that it is there rather than draw it. You can do this by selecting the long arc on the side of the bookcase, then the Offset tool. Click on the arc and drag in on the face maybe 1/4". Extend the ends of the arc to intersect with the top and bottom of the bookcase side. Select the original arc again and copy (Ctrl+Move) it along the curved face, again, 1/4" down. In woodworking terms, think of running a marking gauge set at 1/4" along that arc.
Now, hold Ctrl while using the Eraser to soften the original arc line. Then use Shift to hide the offset arc and the copy of the arc. Those last two curves form limits for the softening. While this doesn't put a real radius on the edge, it can be convincing when view the overall piece. It is usually faster to do this and it doesn't have nearly the impact on file size that a real roundover would have.
As an example of this, take a look at the image at this link. It's too large to post here and reducing it will make it difficult to see the details. The second rail from the bottom shows the effect of what I describe here. Compare it to the second from the top.
-
RE: Another use of the balustrade with componets
Nope. The only response I get is if I try to run the script without selecting anything first.
-
RE: Another use of the balustrade with componets
I thought I'd give this a try and instaled the plugin. If I don't have a line/edge selected I get the "No selection, Select lines please" message. If I do have a line or two selected, nothing pops up. What am I missing?
-
RE: PathCopy not showing
Edson, On my PCs, the PNG file is in a folder under Plugins called Icons. I imagine it should work the same way for the Mac but I haven't tried that.
-
RE: [Tutorial > Modeling] Even Spacing of Slats on a Curve-Updat
Thank you gentlemen. I appreciate hearing (reading) that sort of stuff.

