Oh, didn't know it could do that. I've downloaded it before but then forgot to try it out. Works great! 
Thanks Didier!!
Oh, didn't know it could do that. I've downloaded it before but then forgot to try it out. Works great!
Thanks Didier!!
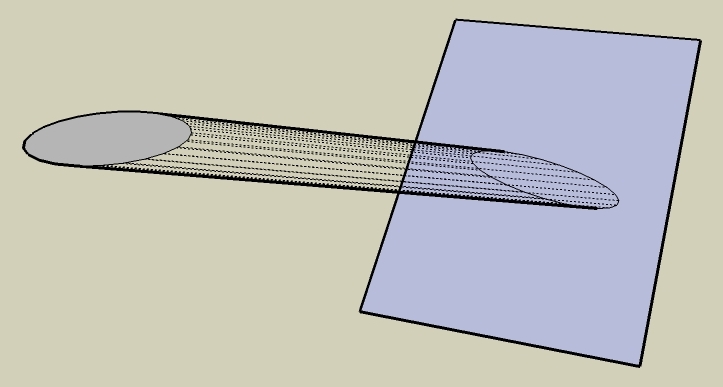
Hey everyone, I was wondering if anyone of our awesome ruby scripters could make some tool which would work like the drape tool, but on any plane, I mean, doesn't have to drape straight down, but just drapes onto the selected mesh according to the mesh's relative position to it? Maybe use a vector to specify the direction in which to drape.
Here's an illustration of what I mean. Here the circle is draped onto the rectangle.
I don't know how you're going to do it in ruby, but here's how I do it in sketchup, it might help: I draw whatever shape I want to drape, then push-pull it along a vector pointing towards and into the mesh on which I want to drape (if it's a closed loop), or project it along a vector (if it's not a closed loop), and then intersect it with the model.
Can that be done in ruby?
Thanks a lot.

Like...WOW!!
No, seriously, WOW man, I can't believe that's sketchup! And the render, aw man!!
You know I originally came to the gallery to post an image of a vase I just made, but now that I've seen this, I just can't stop laughing whenever I look at my vase!! 
What Dale's plugin does is called a catmull-clark subdivision. Google it and you'll find lots of pages explaining the algorithm. It's not that hard to understand once you've went through it a couple of times.
@simon le bon said:
-use eraser tool to select easily a bunch of lines:
Quick select edges using the eraser tool!
Wow!! I actually said something useful?!!
Great job simon. Looks perfect!
Hey, I tried this tutorial a while ago and liked it a lot. Then just today I thought: Hey! let's see what Chris' SketchyFFD can do with this. So I used it to make the skirt a little thinner at the middle, and give it a little whirl, and here's the result:

First I had to rotate it 90 degrees, then drape a few parallel lines over it, then rotate it back up again. This is in order to make it "sliced" transversely several times, so that SketchyFFD would work. This same slicing can be also done by intersecting the skirt with some horizontal planes on top of each other (I don't know why I always forget I can do that), or with Dale's knife tool included in his SDS plugin, but I don't have it yet  .
.
@whaat said:
Haha...The plugin already has this exact feature! I just never demonstrated it in the tutorial.
Wow! You read my mind! I mean... I read your mind! I mean... oh never mind!
@RayOchoa: Yeah I have the weld plugin, but it doesn't always work everytime. Besides, that way you'll have no control over the vertices. But fortunately whaat already has it covered!
Hey whaat, I have a suggestion which I think might be useful. Instead of having to click each of the edges or vertices to be creased, why don't you let the user select all the edges he wants, then click a button (crease), and a dialog pops up, asking the user whether he wants to crease edges, vertices (those at the intersection of selected edges), or both.
That should make it a lot easier, especially in the case of curved edges that become broken up so you'd have to click each little line.
It's just a suggestion though, the plugin's still great as it is.
Edit: And maybe the same thing to de-crease (  ) the edges. Select them, press a de-crease button, etc.
Can't... wait... any... more...
must... have... plugin... 
Well, here it is. Nothing fancy, I'm not that great a modeler .
Another picture:
Tweaking the body would have been a lot of work. Your script makes it a breeze!
Well, it's still not finished, but if it looks good when I'm done (hopefully!) I'll post it!
Update: instead of all the right click thingy, you can just press any shortcut key (e.g. space for the select tool) before releasing the LMB. That'll still keep your edges selected.
I saw this in a thread somewhere in the forums, but by the time I thought I'd add it here, I'd forgotten where I saw it, so if you know who it was please post his name here  .
.
I just wanted to say that your script is greaaaaaaaat Chris! Really! I was actually looking for something like this.
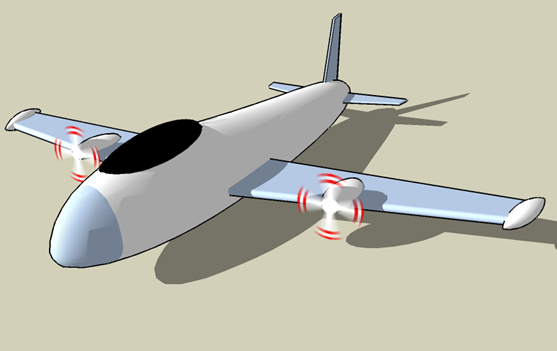
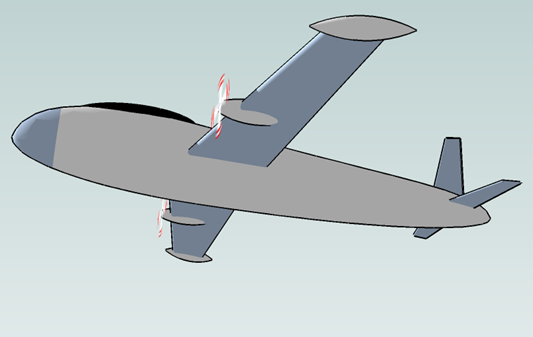
I was messing around trying to model an airplane, and I was trying to make the front end of the body wider, but I couldn't do it with the sketchup scale tool. I kept googling for "sketchup distort tool plugin" with no success, till I remembered coming across this thread before, so I looked for it, downloaded the script, and it WORKS LIKE A CHARM! Really great!
They should really be adding this to the functionality of the scale tool in sketchup 7. Like with a modifier key or something. You know, something like: "Alt to distort" or something like that.
Yeah I know a second iteration wasn't necessary, I just wanted to test the performance of the script on a high-poly model.
The first one took you 15 seconds though??! My machine's gotta be real slow  . Gotta get me a new one!
Thanks for the quick reply Rick, and your script's great too man. All of them actually .
And waiting for that amazing script of yours whaat!
I tried out Rick's script. Is it just me or is it real slow?! I tried it on the pillow example so I can compare with whaat's time; the first iteration took like 2.5 minutes, and the second iteration made sketchup go unresponsive for over 10 minutes till I had to terminate it.
Maybe it's my machine; I'm on a pentium 4 2.4 GHz processor with 512 Mb of RAM. I was wondering what machine you're on whaat?
@solo said:
Not gonna coment on the design as that is for later when we judge
Not even a teeny tiny hint?
Well, here's my attempt at a logo.
I tried to make the logo show what sketchup is all about, you know: a sketchy "sketch", and a pushed up "UP". The push pull tool is shown too, as if the artist just pushed up the "UP" after sketching it.
Hope you like it!
This is a large version:
![]()
This is the 136x88 version:
![]()
This is the same with a white background. Couldn't make up my mind as to which one's better :
![]()
Go ahead man, it's all yours!
