Thanks!
I only wanted to show the "hands up" thing for HornOxx...
Oops, your profile's looking a bit empty! To help us tailor your experience, please fill in key details like your SketchUp version, skill level, operating system, and more. Update and save your info on your profile page today!
Urasik Extensions | Lots of new extensions to check out Learn More
F
Offline
Posts
-
RE: Winged Corkscrew
-
RE: Winged Corkscrew
Thanks!
I couldn't resist making the corkscrew even more lively and deceitful. The high-resolution and perfectly rendered animation will eventually land on YouTube.

-
RE: Camera Simulation with MSPhysics
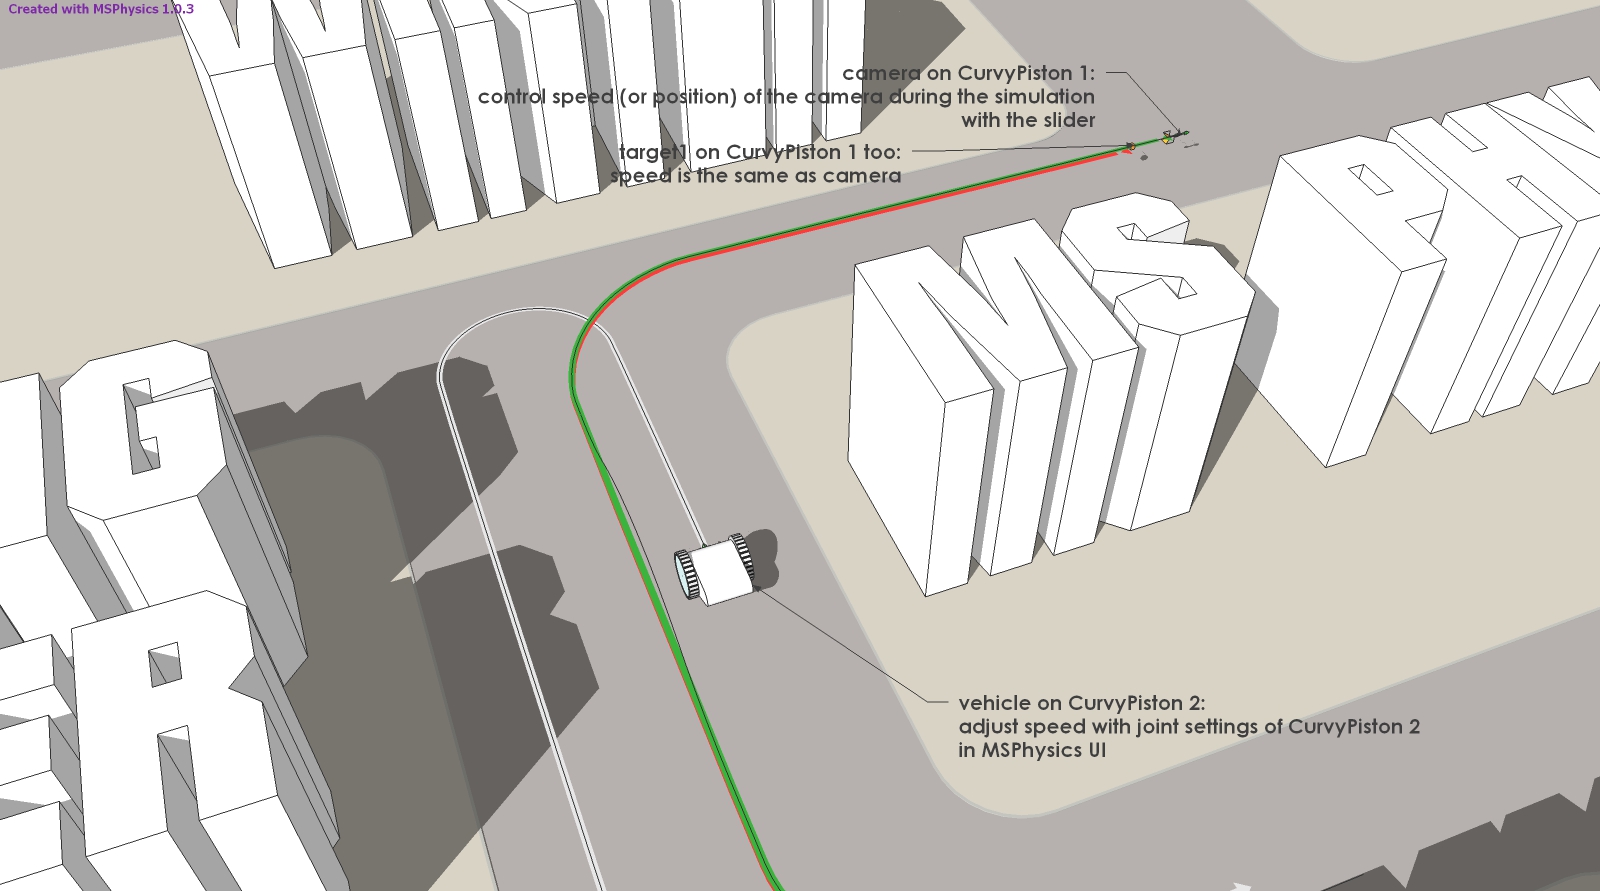
Example 6: Camera and target on the same line - fly through animation.
The same movement paths is defined for the camera and the target object.
The speed of the camera is controlled with Slider Controller.
The target speed is automatically the same.
You can test it with the attached file again.
MSP-Tut_Cam&Target_on_CurvyPiston_P6.skp
-
RE: Animation ACT camera positionning plugin?
Examples of camera simulations with MSphysics can be found here:
http://sketchucation.com/forums/viewtopic.php?f=323&t=68975
You can connect a target object with the same polyline/curve (Curvy Piston) in front of the camera object to get a parallel view. -
RE: Winged Corkscrew
Thanks Mike.
Here's a little fall exercise and a quick and dirty rendering.
Most of the time I needed for the set and the render and video settings.
Dear children, please don't imitate this experiment in your parents' living room....
-
RE: Goldfinger _ Finished
A laser corkscrew....
I don't want to lie on the slide....
The menacing mood comes across quite well at this stage.
-
RE: Winged Corkscrew
Thank you HornOxx and thank you Tuna1957 for the detailed corkscrew. It works really well... The picture has replaced the dandelion as wallpaper so that I can now dream of drinking wine while working...
-
RE: Winged Corkscrew
I couldn't resist. The builder and my boss only see pure SketchUp output and no corkscrew... They may still think I don't have anything to do...


-
RE: SketchyPhysics 3.7.4
I'm not sure if anyone is developing SketchyPhysics any further. But if I remember correctly, you can achieve the same result by pausing the simulation and saving a copy of the model during the pause. The state of the model is then frozen in this copy.
-
RE: MSPhysics 1.0.3 (16 October 2017)
Nothing could be easier. Examples of camera simulations with MSphysics can be found here: http://sketchucation.com/forums/viewtopic.php?f=323&t=68975
You can connect the moving parts of the crane with MSPhysics Joints, place the crane on rails and control everything with sliders, keyboard or scripts. -
RE: Animation Rendering Software?
I recommend the SketchUp plugin MSPhysics as a simulation and animation tool in combination with Twilight Free (Pro approx. 99 €) or Indigo RT (approx. 145 €). Single frame sequences, rendered and/or in SketchUp style, can be easily combined with video software to create movies and superimposed for the desired look.
-
RE: Camera Simulation with MSPhysics
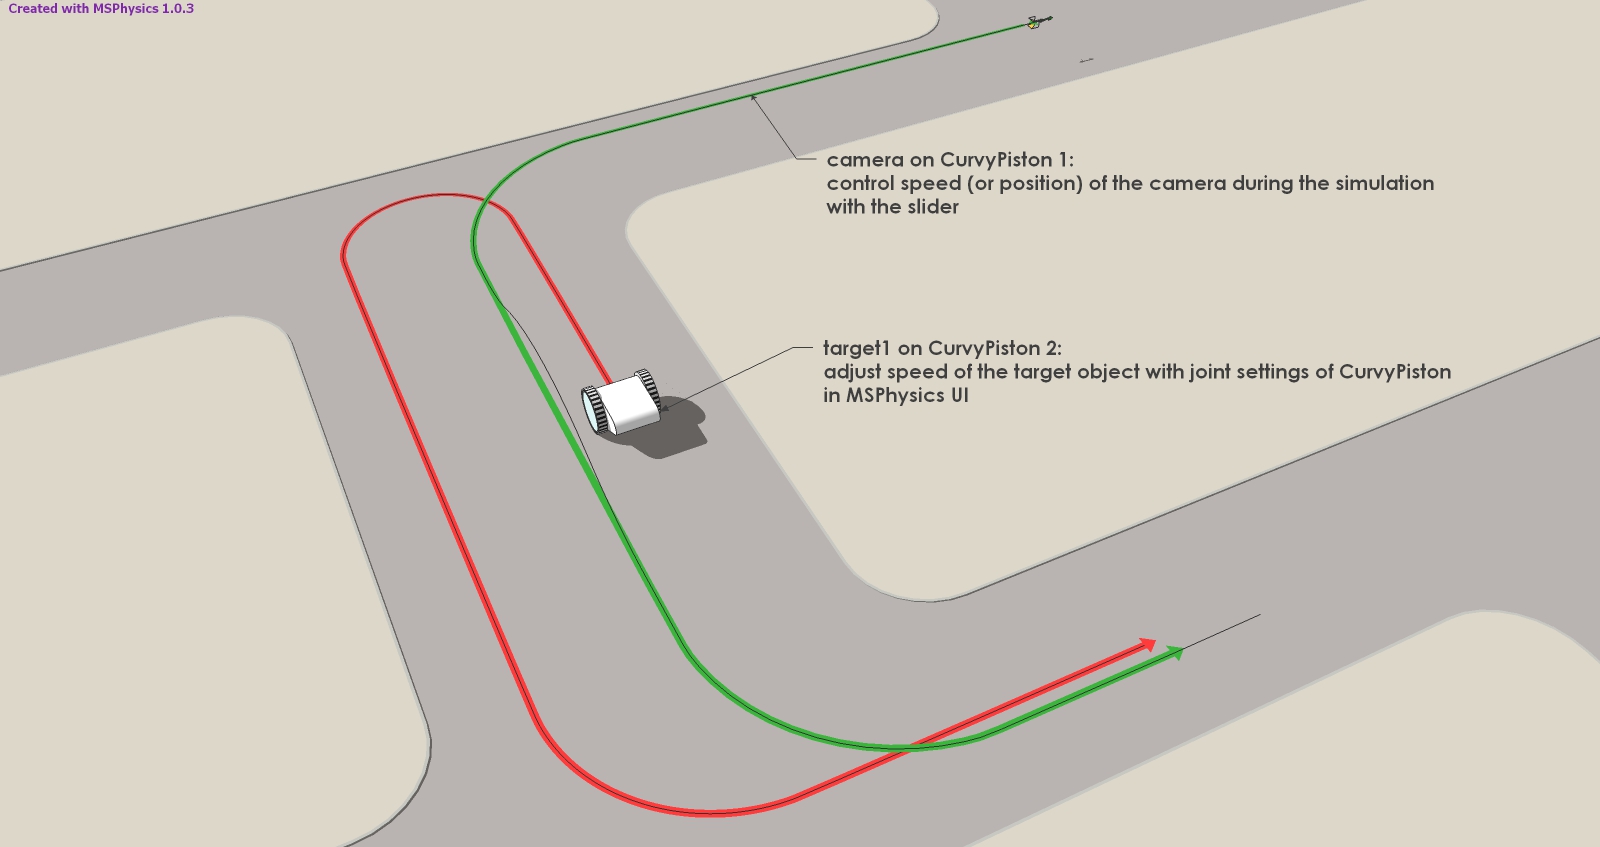
Example 5: Camera and target movement.
Different movement paths are defined for the camera and the target object.
The speeds of the camera is again controlled with Slider Controller.
You can test it with the attached file.
MSP-Tut_CamCurvyP_MovingT_P5.skp
-
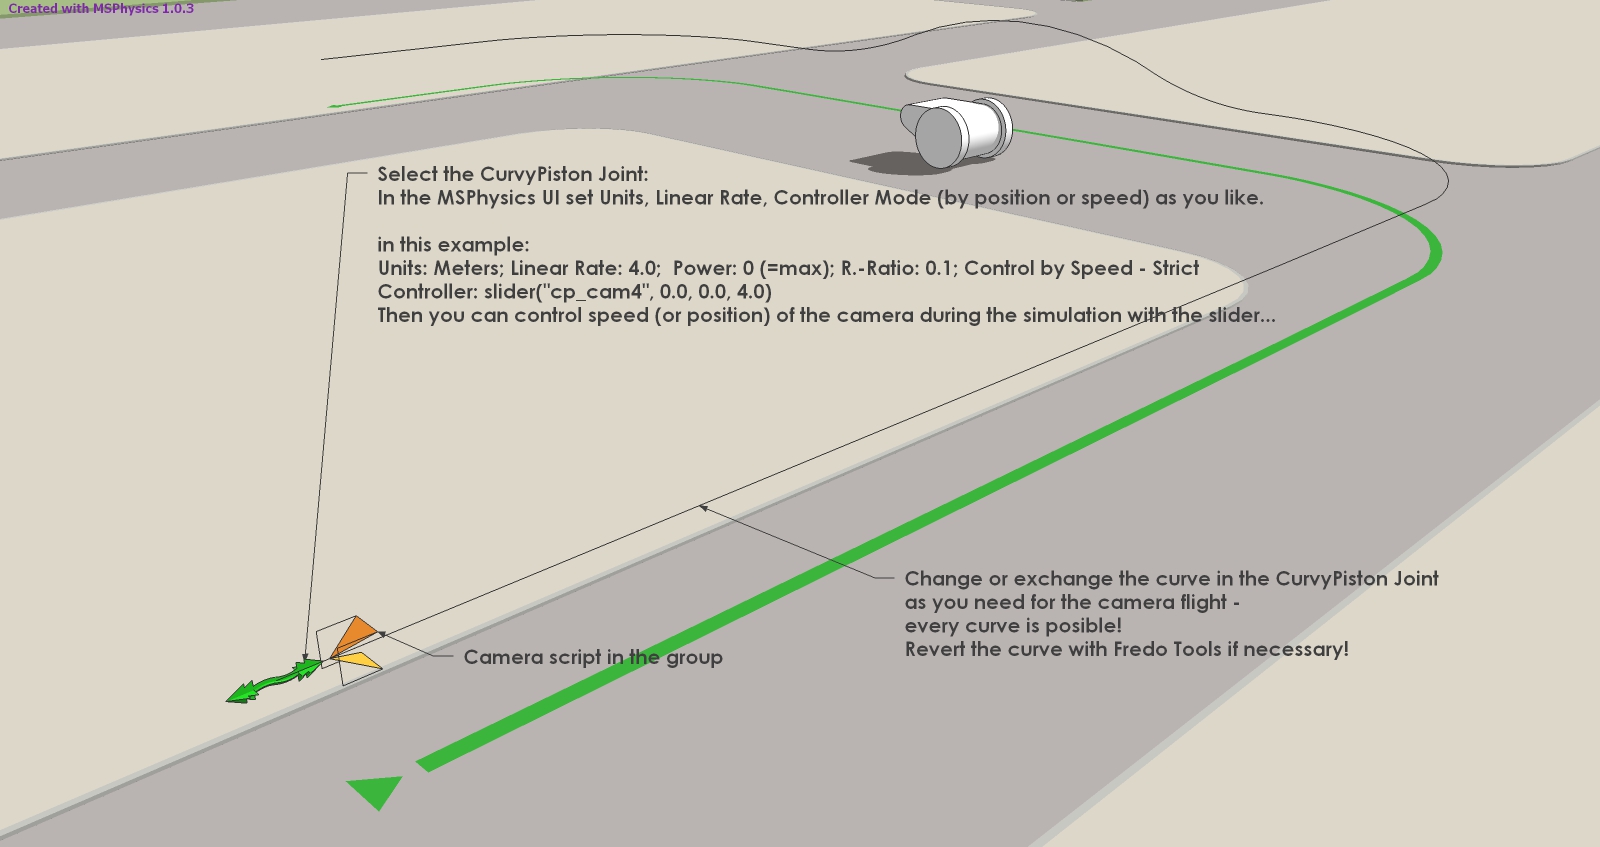
RE: Camera Simulation with MSPhysics
Example 4 of the camera motion simulation could be the basis for path bound camera flights.
Again controlled with a "Slider Controller" in the "MSphysics Control Panel".Add a CurvyPiston joint at a position you like to start the flight of the camera.
Place the camera object at the desired camera start position (near the Piston joint).Connect camera and joint as described in the posts above.
Everything is prepared in the attached file.
The CurvyPiston joint moving the camera is already equipped with a Slider Controller.
Have fun trying it out!
-
RE: Camera Simulation with MSPhysics
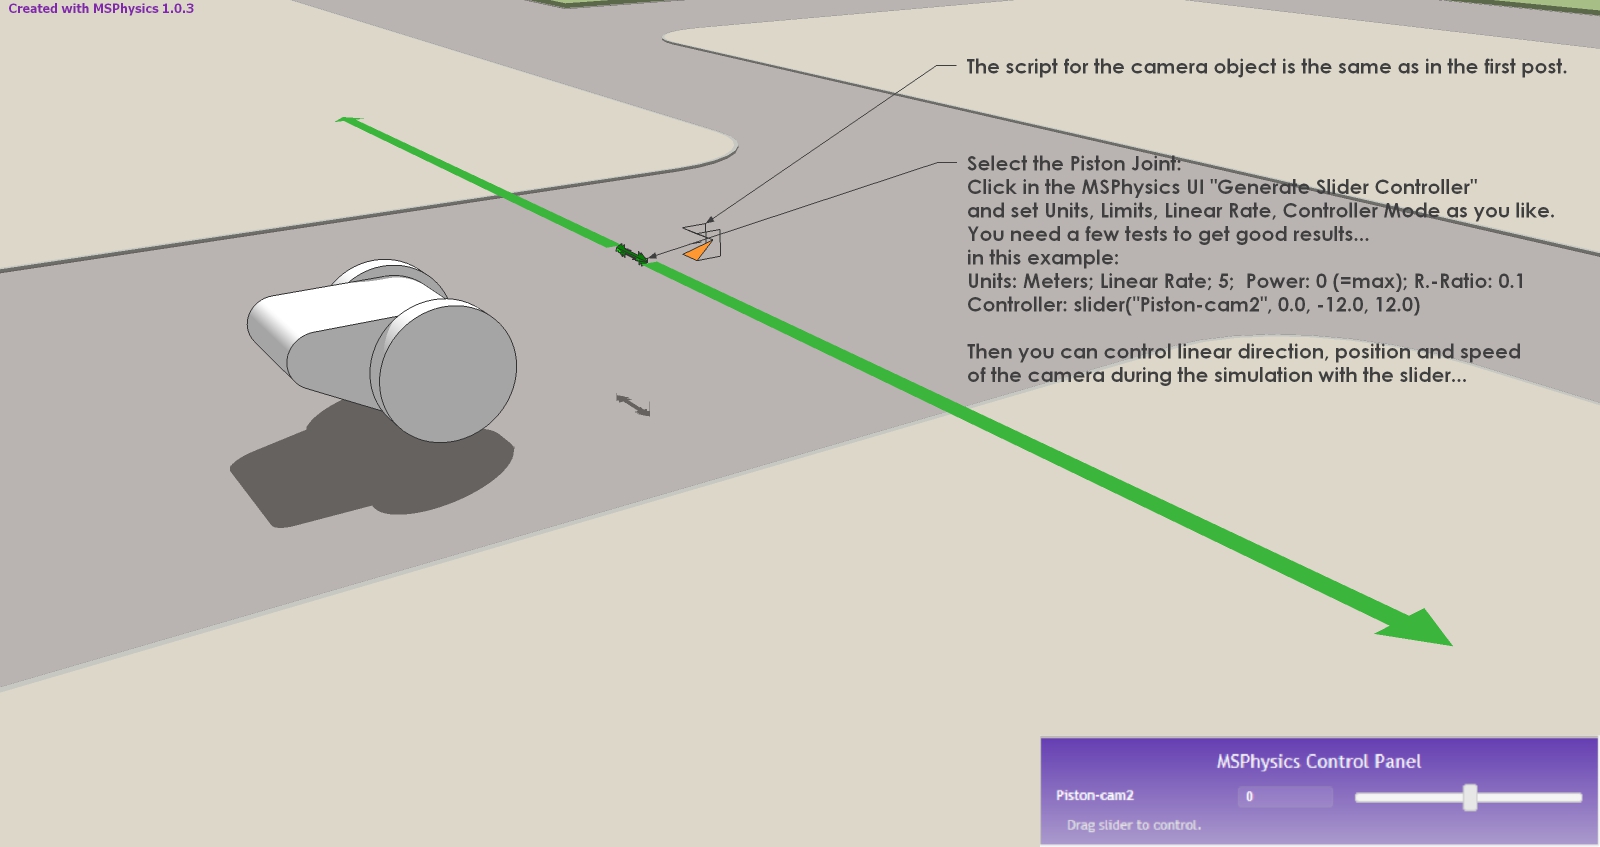
Example 3 of the camera motion simulation: linear camera motion -
controlled via a "Slider Controller" in the "MSphysics Control Panel".Add a "Piston" joint at a position you like to start the linear movement of the camera.
Place the camera object at the desired camera start position (near the Piston joint).Delete the Motor joint or disconnect it from the camera object if it still exists.
Connect the Piston joint to the camera object with the MSPhysics "Joint Connection Tool":- click on the "Joint Connection Tool" in the MSP Toolbars
- select the Piston joint with the green arrow
- press the "+" key and add the camera object to the selection ("-" key to disconnect a joint).
In the attached file the Piston joint moving the camera is already equipped with a Slider Controller.
Now it is possible to control the linear movement of the camera during the simulation with the slider.Record, Play and Export with MSPhysics Replay functions if you want.
MSP-Tut_CamLinFix_Slider_P3.skp
-
RE: Camera Simulation with MSPhysics
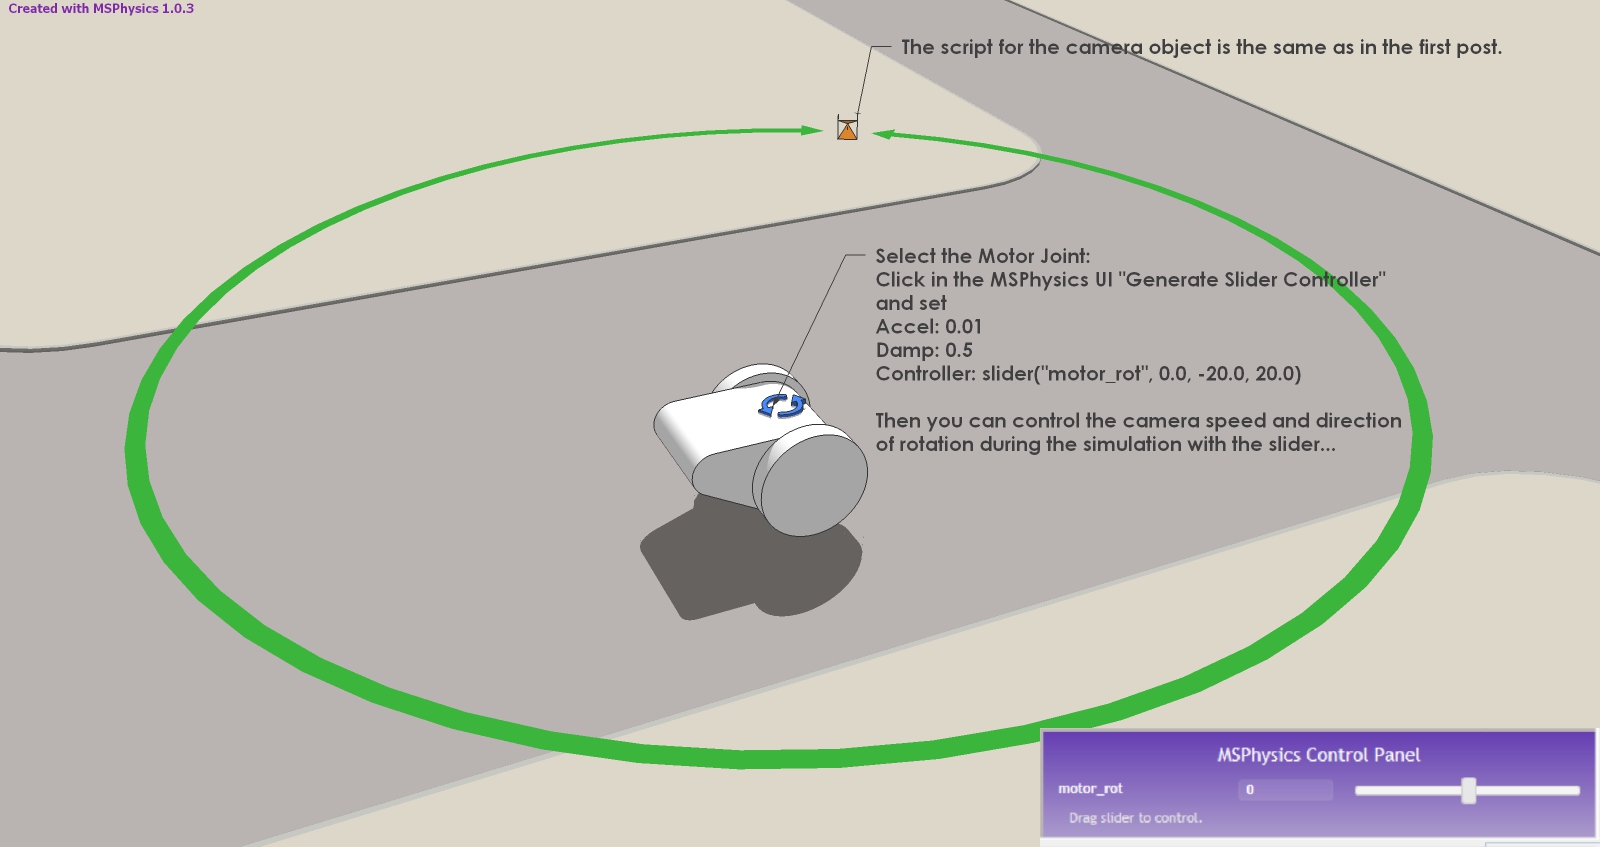
Example 2 of the camera motion simulation: control via a "Slider Controller" in the "MSphysics Control Panel":
In the attached file the Motor-Joint moving the camera is extended by a Slider Controller.
Now it is possible to control the speed and direction of rotation during the simulation with the slider.
MSP-Tut_CamRotFix-Slider_P2.skp
-
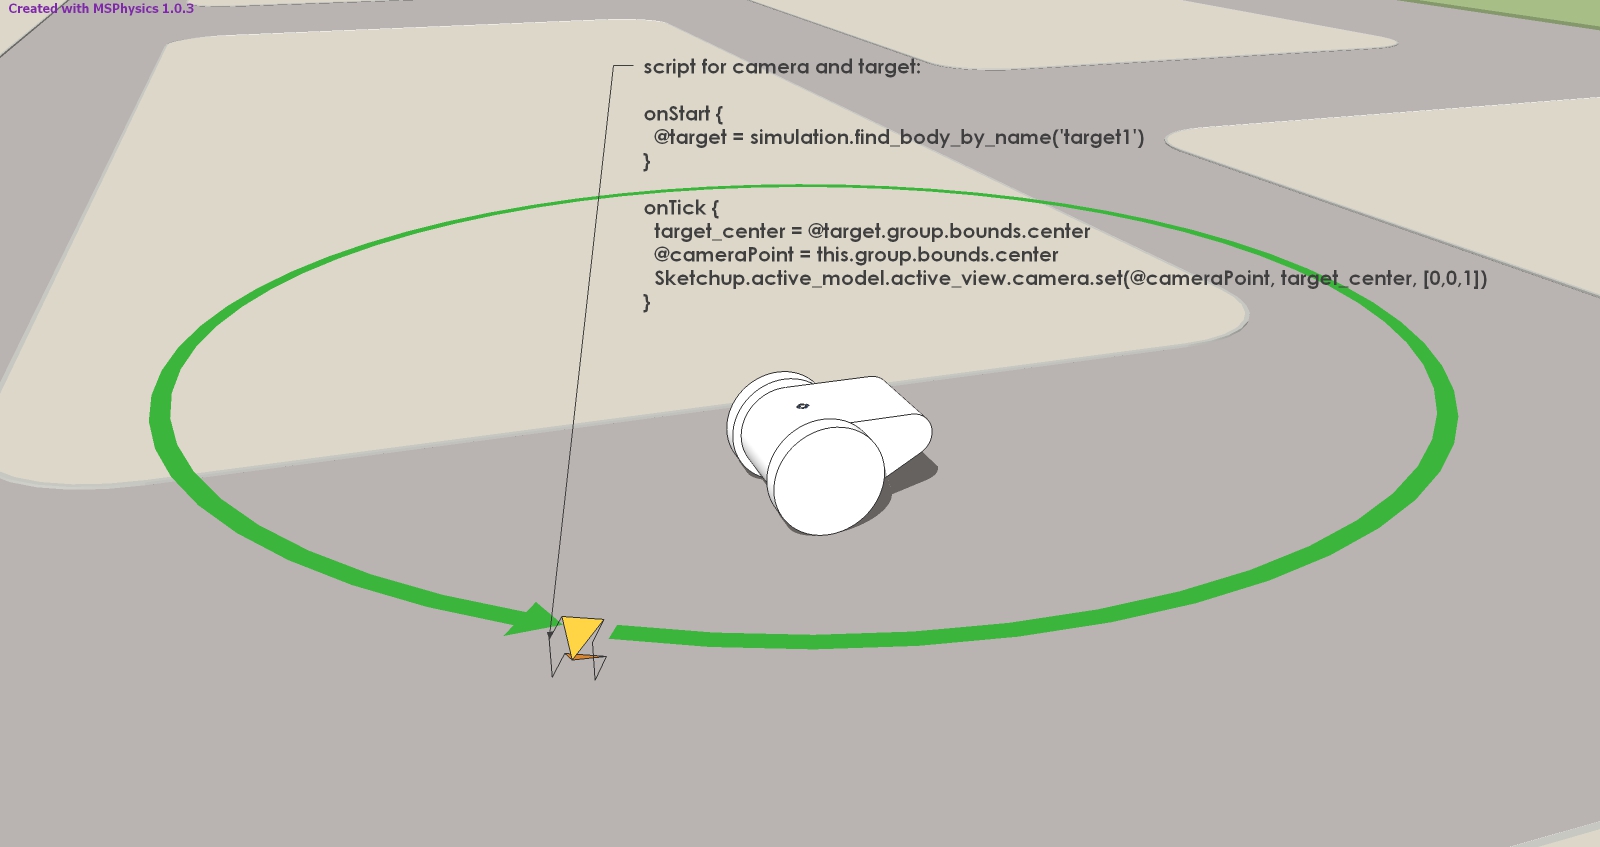
Camera Simulation with MSPhysics
Since almost everyone who develops 3D-models wants to simulate sometime a pivoting camera,
scenic flights, over flights, or a flight-through, here are some solutions with the current
plugin MSPhysics by Anton Synytsia.
MSPhsics does a lot more, of course, but camera simulation is a good way to get started.
And with some model and script examples it is no problem...
MSphysics makes it easy to simulate and record camera and target point movements.
The generated single images can be used to create films in all SketchUp styles or in photorealistic rendering quality.Let's start with a simple circular movement of the camera around a fixed object.
A simple motor-joint with a controller is sufficient.Important: In this post, I'm only giving the information necessary for the camera simulation. For the basic preparation of MSPhysics models there are descriptions of Anton S. in his posts about his plugin, there are tutorials from PituPhysics and Samuel Ketner on YouTube.
For advanced users: Some examples of complex models and scripts for camera simulation can be downloaded from the 3D Warehouse (PituPhysics).If you haven't installed the plugin yet, then follow the installation instructions in the MSPhysics main post of Anton S.
Load the model you want to simulate.
Select all groups and components except the target object and set them in context menu -> MSPhysics -> State -> Ignore.
Set the state of the target object in the MSPhysics UI to "static" and its shape to "box".
Give the target object the instance name "target1".
Add a motor joint on top of the target object.
Place a camera object as a group at the desired camera start position.
At the beginning it is best to simply copy the camera object from my file.
The script is already included in the object.
Assign the camera object to a layer that you can turn off for the simulation.
Connect the motor joint to the camera object with the MSPhysics "Joint Connection Tool":- click on the "Joint Connection Tool" in the MSP Toolbars
- select the Motor Joint with the green arrow
- press the "+" key and add the camera object to the selection.
Activate the MSPhysics icons "Toggle Camera Replay" and "Replay", press "Play" and run the
simulation.
To stop the camera simulation press the "Reset" icon.
You can then export the animation in the pull-down menu under MSPhysics - "Export Replay To Images".
(examples in the GIF are from 3D-Warehouse)
-
RE: MSPhysics - Experiments & Examples
And here's a late but warm Christmas greeting for all SketchUp and MSPhysics friends. Take good care of your candles!
