sketchucation logo sketchucation
    • Login
    Oops, your profile's looking a bit empty! To help us tailor your experience, please fill in key details like your SketchUp version, skill level, operating system, and more. Update and save your info on your profile page today!
    ⚠️ Update | Sketchucation Tools 5.0.8 released with licensing improvements and bugfixes Download

    [Tutorial > Modeling] Arch in a curved wall.

    Scheduled Pinned Locked Moved SketchUp Tutorials
    sketchup
    32 Posts 14 Posters 13.4k Views 14 Watching
    Loading More Posts
    • Oldest to Newest
    • Newest to Oldest
    • Most Votes
    Reply
    • Reply as topic
    Log in to reply
    This topic has been deleted. Only users with topic management privileges can see it.
    • GaieusG
      Gaieus
      last edited by

      thanks, that was helpful.

      Gai...

      1 Reply Last reply
      Reply Quote 0
      • Paul RussamP
        Paul Russam
        last edited by

        We need an emote for 'bangs head of desk'

        I never knew we could do this in SU, I've been selecting faces and picking soften/smooth edges from the context menu. 😮

        This is what I love about SU and here, always something new or a new way to do something.

        Paul Russam
        English doesn't borrow from other languages. It follows them down dark allies, knocks them over, and goes through their pockets for loose grammar.

        1 Reply Last reply
        Reply Quote 0
        • GaieusG
          Gaieus
          last edited by

          Hehe...
          I learn so many things every day... 😄

          Additionally, the modification keys (in Win) for the Eraser tool:

          Ctrl+Eraser = soften
          Shift+Eraser = hide
          You can soften a hidden line with this but cannot turn a softened line into hidden.

          Ctrl+Shift+Eraser = unsoften / turn a softened line hidden (works only with hidden geometry on of course)

          Gai...

          1 Reply Last reply
          Reply Quote 0
          • N
            not registered yet
            last edited by

            I seem to be having a problem with Step (Scene) 7.

            I draw my arc then attempt to push/pull through the face but I am getting an "Offset limited to ~7 3/8" message.

            Any suggestions?

            Thanks much.

            Marc

            (Elmarq)

            1 Reply Last reply
            Reply Quote 0
            • boofredlayB
              boofredlay
              last edited by

              Welcome Marc.

              Go ahead and push it to that offset limit. Then push it again and it should go through. If not, push it to that limit then hold ctl while pushing again, creating a copy. This should go through.

              Let me know if it works.

              http://www.coroflot.com/boofredlay

              1 Reply Last reply
              Reply Quote 0
              • GaieusG
                Gaieus
                last edited by

                Also, if you group either the curved face or the arch, it will not "report" this limit (in the latter case you need to edit it to be able to P/P). You can then explode the group and intersect.

                Gai...

                1 Reply Last reply
                Reply Quote 0
                • N
                  not registered yet
                  last edited by

                  Thanks for the tips! That did the trick.

                  Marc

                  (Elmarq)

                  1 Reply Last reply
                  Reply Quote 0
                  • P
                    PKast
                    last edited by

                    There was a good tip recently that relates to this tutorial. By using the "from Countours" tool from the "sandbox group" you can quickly and automatically stitch the area at the bottom of the arch.

                    Select the two arcs that define the curve, select the "from Contours" tool and the curves become stitched. Clean up the excess stitching, and finish by smoothing the surface.

                    1 Reply Last reply
                    Reply Quote 0
                    • K
                      Katies29f
                      last edited by

                      I cannot download this tutorial the link is busted

                      1 Reply Last reply
                      Reply Quote 0
                      • GaieusG
                        Gaieus
                        last edited by

                        @katies29f said:

                        I cannot download this tutorial the link is busted

                        Yes we had some problem yesterday but it's fixed now.

                        Gai...

                        1 Reply Last reply
                        Reply Quote 0
                        • J
                          Julius
                          last edited by

                          very useful tutorial, but...how did you stitch together in scene 11?

                          1 Reply Last reply
                          Reply Quote 0
                          • zx10r_GazZ
                            zx10r_Gaz
                            last edited by

                            @not registered yet said:

                            I seem to be having a problem with Step (Scene) 7.

                            I draw my arc then attempt to push/pull through the face but I am getting an "Offset limited to ~7 3/8" message.

                            Any suggestions?

                            Thanks much.

                            Marc

                            (Elmarq)

                            Hello Marc,

                            I think you will encounter this problem if you do not delete the "construction lines" from the arch to where you draw your arc. Delete these before you push/pull and it will work fine.

                            Gaz...

                            1 Reply Last reply
                            Reply Quote 0
                            • boofredlayB
                              boofredlay
                              last edited by

                              @julius said:

                              very useful tutorial, but...how did you stitch together in scene 11?

                              Basically I just drew points from each endpoint to another, triangulating the surfaces until they "Fill In". Nothing automated there, just drawing.

                              http://www.coroflot.com/boofredlay

                              1 Reply Last reply
                              Reply Quote 0
                              • J
                                Julius
                                last edited by

                                ok, so you drew lines, thank you!

                                1 Reply Last reply
                                Reply Quote 0
                                • GaieusG
                                  Gaieus
                                  last edited by

                                  Julius,

                                  You can also use Darrel's "Skin.rb" plugin for this.


                                  Marc,

                                  Whenever you encounter such a problem (the PP tool not intending to push further), you can group any of the entities (either what you want to push or the one you want to push trough) and you can do the operation. Then you can just simply explode the group.

                                  Gai...

                                  1 Reply Last reply
                                  Reply Quote 0
                                  • J
                                    Julius
                                    last edited by

                                    wow, great script! thanks gaieus and thanks darrel!

                                    1 Reply Last reply
                                    Reply Quote 0
                                    • T
                                      trillium
                                      last edited by

                                      hi Gaieus, when you have time would you post a tutorial or quick steps list to show us how you did this one? it's beautiful!!

                                      1 Reply Last reply
                                      Reply Quote 0
                                      • GaieusG
                                        Gaieus
                                        last edited by

                                        Well, to tell the truth, I'm no longer sure how exactly it was modelled but what I'm sure about is that I'd definitely do it somehow else now.
                                        I remember suffering a lot with it (back then when I also have just started using SU) but now we have so many useful plugins that would make life easier that. Anyway, here's the model if you're interested (last year I re-uploaded it to the WH when we were going to test some new features there).

                                        Surely it would be worth a tutorial although it would probably be a bit lengthy. 😉

                                        Gai...

                                        1 Reply Last reply
                                        Reply Quote 0
                                        • charly2008C
                                          charly2008
                                          last edited by

                                          Hi Scaba,

                                          a like such models. I tried also to construct such details but i was not so successfull like you.

                                          Karlheinz
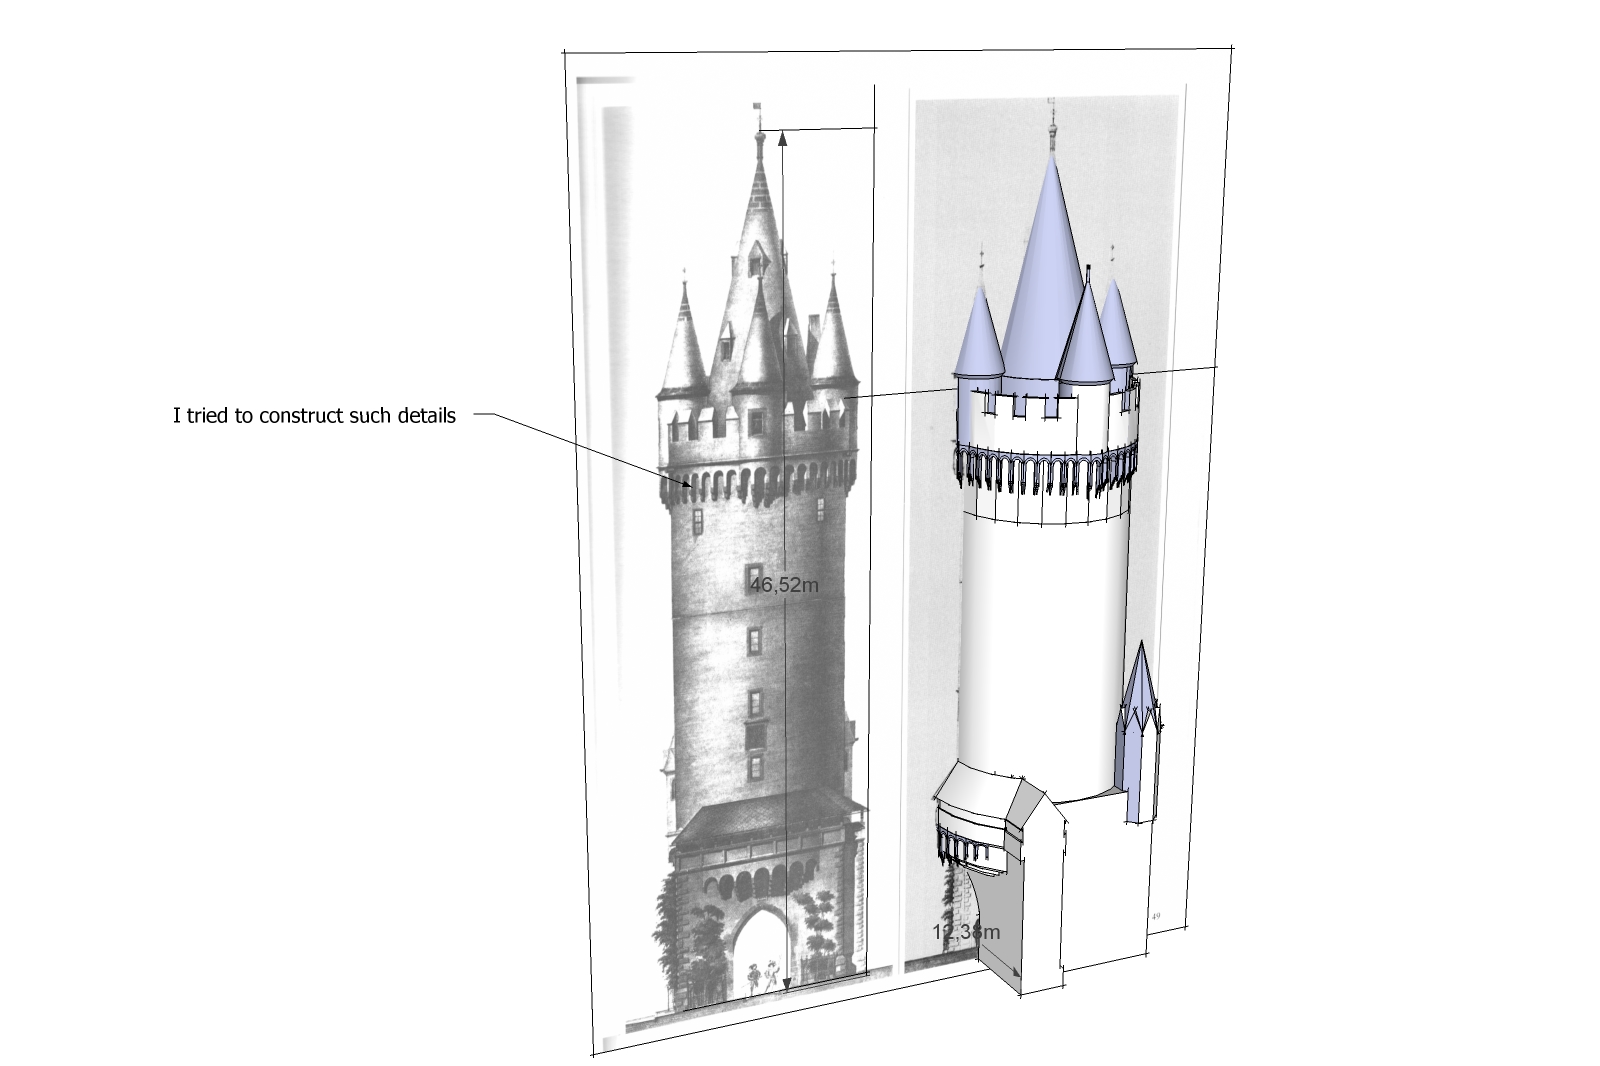

                                          Esch.jpg

                                          He who makes no mistakes, makes nothing

                                          1 Reply Last reply
                                          Reply Quote 0
                                          • GaieusG
                                            Gaieus
                                            last edited by

                                            You always have to take into consideration that those SU surfaces though look curved, are actually faceted and then adjust your "mini galleries" (or what they're called) that way. Made from straight segments. I'm sure however that if you download my model, you'll find lots of mistakes in it (as I'm sure there are as as I said,it was a very early challenge for me, too). 😉

                                            Gai...

                                            1 Reply Last reply
                                            Reply Quote 0

                                            Hello! It looks like you're interested in this conversation, but you don't have an account yet.

                                            Getting fed up of having to scroll through the same posts each visit? When you register for an account, you'll always come back to exactly where you were before, and choose to be notified of new replies (either via email, or push notification). You'll also be able to save bookmarks and upvote posts to show your appreciation to other community members.

                                            With your input, this post could be even better 💗

                                            Register Login
                                            • 1
                                            • 2
                                            • 2 / 2
                                            • First post
                                              Last post
                                            Buy SketchPlus
                                            Buy SUbD
                                            Buy WrapR
                                            Buy eBook
                                            Buy Modelur
                                            Buy Vertex Tools
                                            Buy SketchCuisine
                                            Buy FormFonts

                                            Advertisement