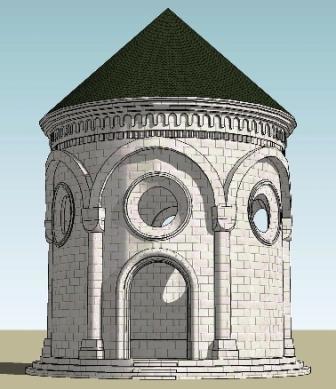
[Tutorial > Modeling] Arch in a curved wall.
-
Here is a tut I created for modelling an arch in a curved wall.
I have to do a number of these on a project next week (hopefully)
and I wanted to see if I could do it. So here is my stab.
I used an extreme example. The arches I will be doing will
be a bit more subtle.
-
Nice one, Eric, really!
A little different approach though but I also had to modell something with curved arches (please, don't look at the "non-arched" material of the arches now )
)

-
That's beautiful Gaieus.
-
Eric,
That was easy, thanks.
the only tedious step was to 'soften/smooth' the stitching, I had to right click each stitch, one at a time, and select 'soften'. is there easier/quicker way?
-
Just simply use the Ctrl+Eraser tool to do a "smear" of softening edges on a surface by hand.
(Plus make sure you have the same faces facing outside - in your pic there are front and back (white and blue) faces mixed). -
Well, James, that's another way of saying the same...

-
Oh, sorry James, I didn't mean to!
But at least Sean can make sure that the same info from two sources must work.

-
titmas, just hold down the ctl key while erasing. This will smooth the edges very quickly.
Oh wait... did someone already say that

-
thanks, that was helpful.
-
We need an emote for 'bangs head of desk'
I never knew we could do this in SU, I've been selecting faces and picking soften/smooth edges from the context menu.

This is what I love about SU and here, always something new or a new way to do something.
-
Hehe...
I learn so many things every day...
Additionally, the modification keys (in Win) for the Eraser tool:
Ctrl+Eraser = soften
Shift+Eraser = hide
You can soften a hidden line with this but cannot turn a softened line into hidden.Ctrl+Shift+Eraser = unsoften / turn a softened line hidden (works only with hidden geometry on of course)
-
I seem to be having a problem with Step (Scene) 7.
I draw my arc then attempt to push/pull through the face but I am getting an "Offset limited to ~7 3/8" message.
Any suggestions?
Thanks much.
Marc
(Elmarq)
-
Welcome Marc.
Go ahead and push it to that offset limit. Then push it again and it should go through. If not, push it to that limit then hold ctl while pushing again, creating a copy. This should go through.
Let me know if it works.
-
Also, if you group either the curved face or the arch, it will not "report" this limit (in the latter case you need to edit it to be able to P/P). You can then explode the group and intersect.
-
Thanks for the tips! That did the trick.
Marc
(Elmarq)
-
There was a good tip recently that relates to this tutorial. By using the "from Countours" tool from the "sandbox group" you can quickly and automatically stitch the area at the bottom of the arch.
Select the two arcs that define the curve, select the "from Contours" tool and the curves become stitched. Clean up the excess stitching, and finish by smoothing the surface.
-
I cannot download this tutorial the link is busted
-
@katies29f said:
I cannot download this tutorial the link is busted
Yes we had some problem yesterday but it's fixed now.
-
very useful tutorial, but...how did you stitch together in scene 11?
-
@not registered yet said:
I seem to be having a problem with Step (Scene) 7.
I draw my arc then attempt to push/pull through the face but I am getting an "Offset limited to ~7 3/8" message.
Any suggestions?
Thanks much.
Marc
(Elmarq)
Hello Marc,
I think you will encounter this problem if you do not delete the "construction lines" from the arch to where you draw your arc. Delete these before you push/pull and it will work fine.
Gaz...
Advertisement


