SubD examples and models
-
There is no question that Quad Face and SubD tools have awesome potential, but (at least for me) they represent a pretty major new direction for us long-time, main-stream SU users.
As a follow-on of ntxdave's comments:
Before I retired, part of my engineering job was getting experienced technicians and engineers to write procedures for doing industrial processes and testing. One of the major reasons for the new procedures was to allow new people to run the tests when the experienced people were unavailable. A big problem was convincing the writers to put in every step of the process.
They were used to doing the tests themselves and knew the “small steps inbetween” the major steps, so they didn’t think to put them in the procedure. But without knowing about those “between” steps the new people were unable to do the tests.
The same situation exists when people take the time to make a tutorial (thank you, thank you, thank you). They often turn out to be “see what I can do with this plugin”, and whiz through the steps too quickly for the new user to follow. Unfortunately, not everyone trying to learn how to use the new tool has the same level of experience and/or can intuit what was done to get the results shown.
Essentially what I’m trying to say is that. ideally, tutorials would be with audio explanations and/or clear, slowly-executed zoom-in cursor movements.
I know that the last thing anyone wants to do is to document what they have created, but unless time and care are taken, the tutorial devolves into show and tell rather than teaching us “noobs” to make use of the tools that have taken so much time and effort to create.
-
@bob james said:
There is no question that Quad Face and SubD tools have awesome potential, but (at least for me) they represent a pretty major new direction for us long-time, main-stream SU users.
For me they represent "hey, I can finally do that".

@bob james said:
As a follow-on of ntxdave's comments:
Before I retired, part of my engineering job was getting experienced technicians and engineers to write procedures for doing industrial processes and testing. One of the major reasons for the new procedures was to allow new people to run the tests when the experienced people were unavailable. A big problem was convincing the writers to put in every step of the process.
They were used to doing the tests themselves and knew the “small steps inbetween” the major steps, so they didn’t think to put them in the procedure. But without knowing about those “between” steps the new people were unable to do the tests.
The same situation exists when people take the time to make a tutorial (thank you, thank you, thank you). They often turn out to be “see what I can do with this plugin”, and whiz through the steps too quickly for the new user to follow. Unfortunately, not everyone trying to learn how to use the new tool has the same level of experience and/or can intuit what was done to get the results shown.
Essentially what I’m trying to say is that. ideally, tutorials would be with audio explanations and/or clear, slowly-executed zoom-in cursor movements.
I know that the last thing anyone wants to do is to document what they have created, but unless time and care are taken, the tutorial devolves into show and tell rather than teaching us “noobs” to make use of the tools that have taken so much time and effort to create.
The major reason why I started doing what I did with my model (after hearing someone tell me about SketchUp) what Rich O'Brien's You Tube video of how he made his face using Thom Thom's Vertex Tools. Thom Thom included this video in his set of you tube videos explaining Vertex Tools, so I was already looking at his Vertex Tools, among other things-- then I saw the one by Rich O'Brien, and that clenched it for me. I must have watched it 7-12 times, until I understood the way I had to do it and off I went. The main part of my model is the "human face" that I built from scratch. Nothing is as hard as that part.
But I always take time to watch every video I can find, starting with any videos made by the person who made the tool set, and then watching every other version I can find. With SubD, this is especially important because there are so many different ways that you can use it. One particular video that is excellent at "teaching" this is http://www.youtube.com/watch?v=ywcGDYioZDM, it looks at building a tree out of SubD (helps me tremendously with one particular part of my model). Another one that is totally different is Fleur-De-Lieux (okay, might have got the spelling wrong). The spoon one is another one. All three of these techniques are drastically different uses of SubD, but all of them I will use. The tree one really brought that whole value of quads and SubD together in my mind to where I now feel confident that I can use those type of things in my project.
And to be honest, when I need help, which is a lot, because I end up doing things that are so contrary to what SketchUp was made for, I ask for it. You guys are awesome in helping me!
I went even further and enlisted the help of an older architect who learned like I did, but then taught himself CAD and gradually moved over to SketchUp. He helped me with all of the "little things" that I should have "just known"
 but "didn't".
 -
Maybe Sketchup is not the more easy and speedy tool for make a human face ?

If you want absolutly "modeling" that try the free Sculptris, and if you don't want modelize for win some time (life is too short) try the free Make Human.
Then free to you to import the result inside SketchUp with some tricky plugings by Tig!
-
@pilou said:
Maybe Sketchup is not the more easy and speedy tool for make a human face ?

If you want absolutly "modeling" that try the free Sculptris, and if you don't want modelize for win some time (life is too short) try the free Make Human.
Then free to you to import the result inside SketchUp with some tricky plugings by Tig!
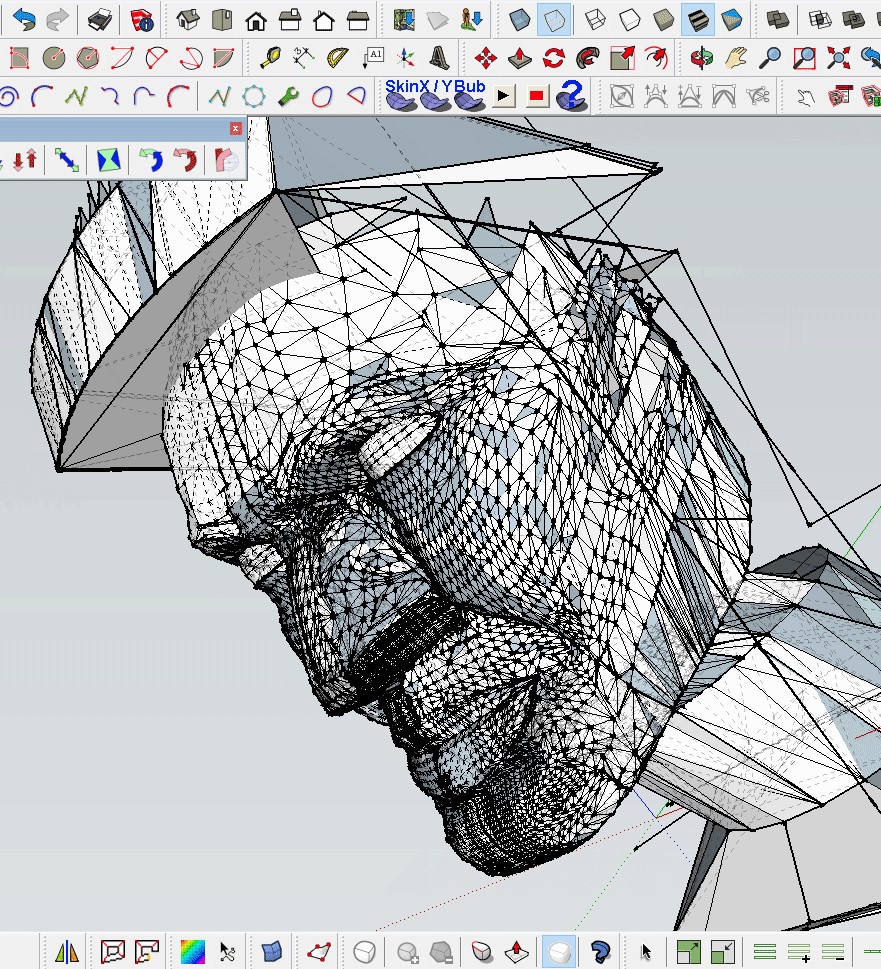
No, I can show you just how successfully I did make a human face using Thom Thom's Vertex Tools. I made half of the face and then "duplicated" or "flipped" to get the other side (following Rich O'Brien's Video that Thom Thom included in his Vertex Tools You Tube Videos). Of course, that part of the model was ages ago and doesn't reflect the many other additions, which I really did need SketchUp for, and the other parts of the "human face" that I have gone back and retouched up, like turning all the "faces" so they are in the correct order, and smoothing out the whole thing. My architect mentor pointed that out. Remember, I was trained in architecture, and though I have a model that doesn't use many straight lines at all, I'm still an architect at heart. So I will still go through that "human face" once more and get everything done exactly right.
I will say this was the first thing I did. I saw Rich O'Brien's video and that convinced me the person who suggested that I look into SketchUp was absolutely correct. Of course, the human face is surrounded by other parts of a helmet, which I took out of the image to show you. Like I said, this was a long time ago, it has gone through modifications since then.
Since I used Vertex Tools, I also had to dabble a bit in using Quadface Tools. So now, I'm excited with SubD coming out. My trifecta of what will end up being the main Tools for my model. Thank you, Thom Thom!
Also, when I talk about having a "model", I am really talking about a full-blown, honest-to-God like what I did in my upper level studio classes, model. One part all the way from the first day of class until the final jury presentation. Intricate pieces all put together to make one thing.
So, I'm not kidding when I have said I knew nothing when I started, and relied on you guys, and on videos, and on reading to figure these things out. It is hard, in one sense, because there are steps that you're expected to know how to do, yet no one tells you how to do them. If it hadn't been for the fellow architect, I would still be stuck on one particular area not knowing what to do next.
-
@ntxdave said:
@FrellMeDead - this was a very interesting (and revealing) post. My education is in accounting.
I fully comprehend that not all things can, or necessarily should be, written or explained at an elementary level. However, I do think that particularly when people write tutorials there is an assumption that your are writing a tutorial to explain how something works or how it should be done. A tutorial means that the emphasis is on "teaching". I think that the author should spend a little more time in understanding who their audience is and at what level things should be explained.
Again, I appreciate and really admire your candor. Thanks for sharing.........

I think when someone like Thom Thom puts out a set of tools, he puts out the written forms, as well as making you tube videos, plus all the other you tube videos, you can get a good basic idea of how things work even if you are a beginner. When I made the human face, that was my first foray into any type of computer aided design (it's a bit ripped away in the shot of it because there are other parts that I just deleted before putting it up there).
But, literally, my next thought after the human face was, "Wow, what the heck do I do next (with SketchUp)?"
I had my design all worked out in my head, and scribbled out on a single sheet of paper (I actually did come across it, when I was looking for something else on my desk). Just a side view, with no measurements. But I did use that image because it showed everything in relation to the human face.
So, I ordered a book, which helped some, but was mostly useless. Because by the time I waited on it, I watched the videos and read the "Help" section. Of course, the videos and Help section are expanded now from then, especially the part on the Sandbox Tools, because like I mentioned earlier I turned them off in the "View>Toolbar" and forgot they were there. Dumb. Dumb. Dumb. I have no excuse. (When I looked in the part this time, Sandbox Tools was greatly expanded upon, and I could see sections where I could have used Sandbox Tools and be so far ahead). But, what can you do now?
Meanwhile, I forged ahead with what I had learned. Slowly, a model started to take shape. It would be almost done by now, except for 1/2 of it won't allow me to push/pull certain shapes. So, I've got to change it. But, I'm trained as an architect, and I don't know half the things that are mentioned here.
-
comfy.....

-
Rich, got to love the "comfy".

 Man your killing me with the stuff your posting.
now to bring the bar back down to the level of us mortals......
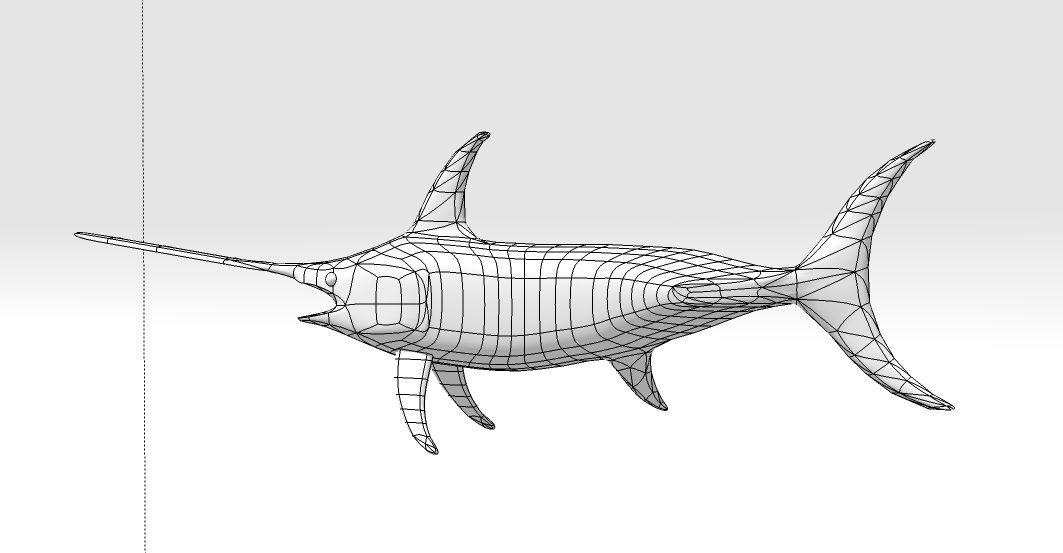
needed a swordfish model for a presentation today. Knocked this guy out yesterday afternoon. Decided to give subD a whirl instead of my usual approach. I'll admit I cheated a little , modeled the pec fins separate from the body and plugged them in place and left some small finlets back by the tail off. So beat me, I was in a hurry. Still not bad , impressed them in the meeting but hey their not hard to impress....


-
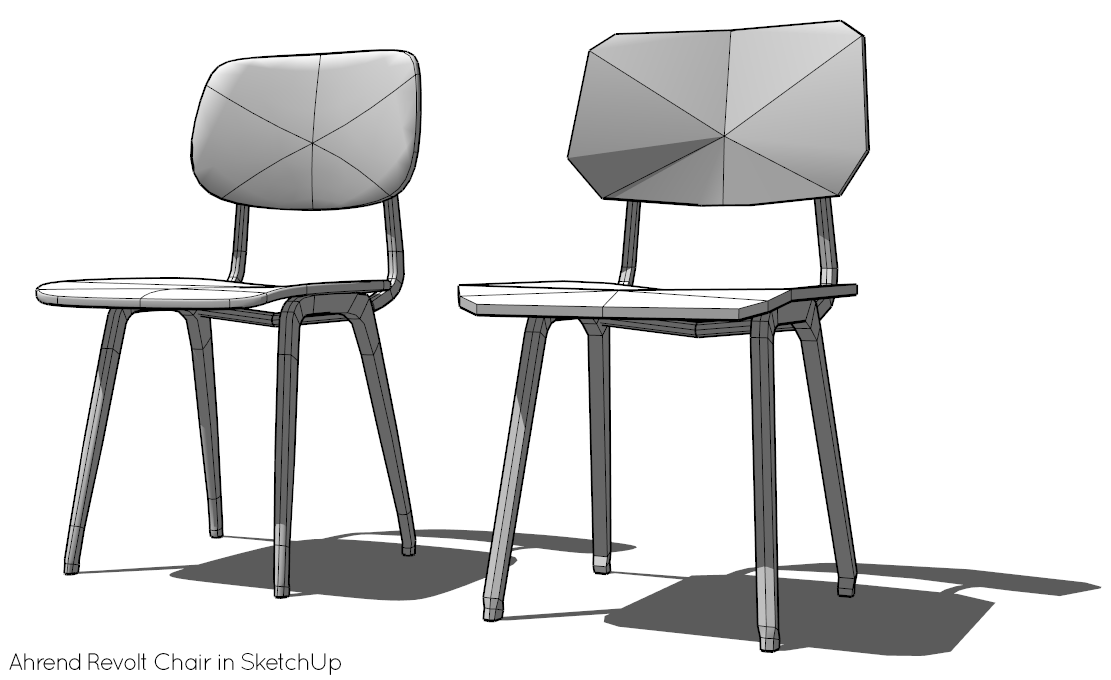
Ahrend Revolt Chair
-
Here's an example of how to make a very quick printable box.
There's not much point me giving you the incredibly complex proxy.
-
Box, this is a great video. The right side is cut off a little and in a couple of places it is a little hard to see what you clicked but it really shows how to take advantage of SubD and Fredo's tools.
Thanks for sharing........
-
Proxy on steroids...
-
@box said:
Here's an example of how to make a very quick printable box.
There's not much point me giving you the incredibly complex proxy.Very clever approach

-
@box said:
Here's an example of how to make a very quick printable box.
There's not much point me giving you the incredibly complex proxy.
So you used joint push pull to create (skins) thickness to the object?
-
garydorn, that's the JPP toolbar in the upper right corner of Box's giff. You can see him select right before the pull.
Hey Box, having some trouble I think I need the proxy
 Great tut.
-
Box in the box!

-
@tuna1957 said:
Nap Time........
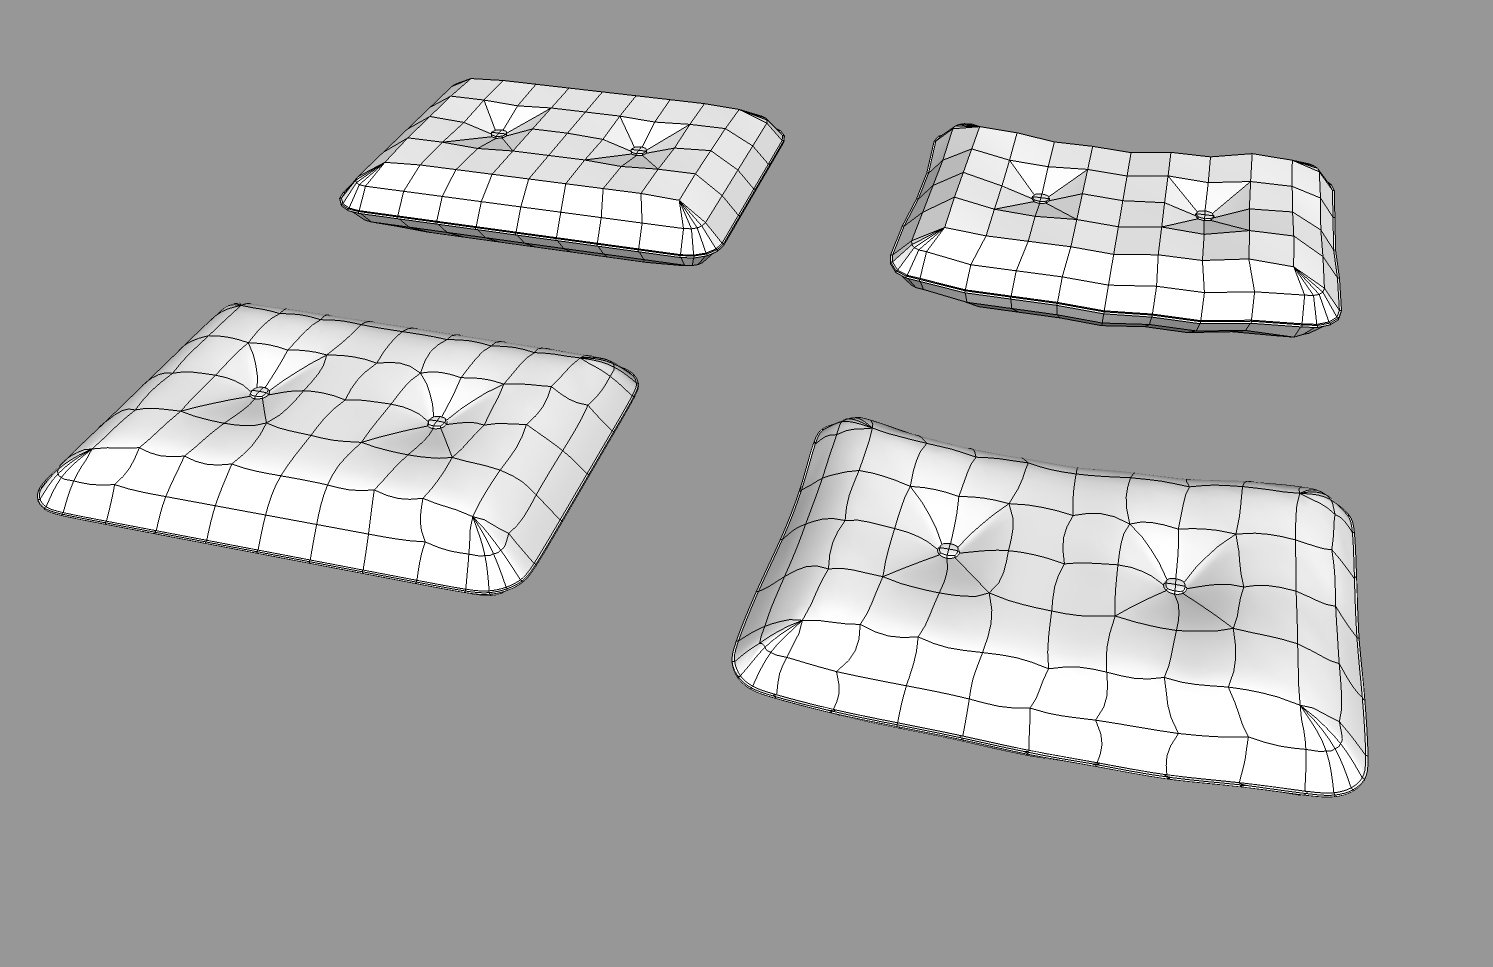
Posting this for newer sketch-upper's like me just starting to wrap your brain around SubD. A nice size sofa type pillow. In the pic the proxies are in the back row. Pillow on left is "factory fresh". Pillow on right , I manipulated with the gizmo tool in Vertex tools to give it a more natural used look.
The subdivided mesh looked to have some odd curves and bulges in the mesh. I opened the file and used QuadFace Tool's Analyse tool to visualize quads vs triangles (green vs blue):
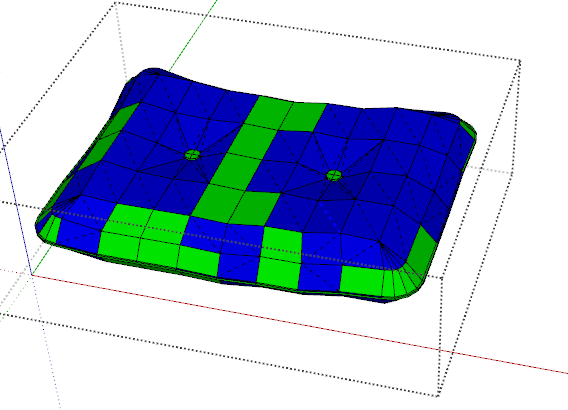
I turned on hidden geometry and found that the "quads" did not have the cast-shadow property turned off - so for a lot of it the mesh got treated as triangles.
I used the Sandbox Quads to QFT Quads function to clean them up:
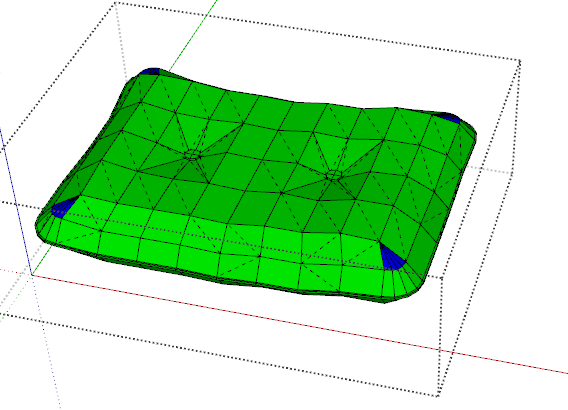
Then you can see the subdivided result retain it's structure with less bulges:
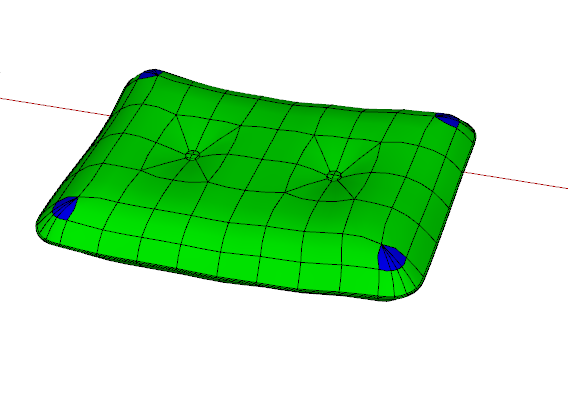
-
Thomas, thanks for the tips. still struggling with learning the proper functions of your various tools. QuadFace tools has been the most difficult for me for some reason. A lot of going back and forth, practicing and watching your various videos and tutorials. Still struggling along with figuring out "best practices". Thought I'd turned out a reasonably decent model.... egg on my face...
 well gonna keep plowing forward and I'll get there eventually.
 -
Yea, QFT need better documentation. It's on my list to create a dedicated site for that with examples, guides and videos.
-
Thomas, not knocking your docs. at all. Got into the whole computer thing pretty late in life and have jumped into they deep end with no life jacket and I'm bound to sink to the bottom once and a while. I'm just really grateful you and others keep pushing to develop super tools for SU.
-
Nap Time........
Posting this for newer sketch-upper's like me just starting to wrap your brain around SubD. A nice size sofa type pillow. In the pic the proxies are in the back row. Pillow on left is "factory fresh". Pillow on right , I manipulated with the gizmo tool in Vertex tools to give it a more natural used look.
I think these kind of objects are good learning exercises after playing around with super simple shapes at first and you end up with a nice model for your library.
Posted the .skp file. It just has the proxies to keep file size down. Creases are already set. Just make a copy and SubD it. In the pic I only ran one iteration of SubD and got a nice result.
A tip for newer users like me. If your going to deform a proxy with the gizmo, make an extra copy and stick to the side. When your learning to bend and twist with the gizmo you can wreck things sometimes. Don't ask how I know this ! It doesn't hurt to have a fresh copy off to the side. Last thing I'm not sure I"m building my corners the best but it seems to be working.
My fellow newb's, download , check em out and have a play...
Oh noooo... ThomThom pointed out some problems in my original model I posted. Shame on me
 , cleaned it up and reposting. Maybe now it's a nice pillow . Still think the unbent proxy would be a good sample to practice bending and squishing around on with the gizmo.
Advertisement


