Problems with a half-torus
-
@dave r said:
Pilou,it's long past time for you to catch up to the rest of the world.

Pilou, doesn't your computer run 2015? Before I even start using some versions, I get a copy of the latest just so I can open files from others (and also to try it out some). I then back-save a file myself if I really want to play with it, using my current plugin and setup.
-
@teig said:
I've been trying for three hours now to put an arc under the bellmouth!

You could use JointPushPull plugin to thicken a curved surface, but starting with a new profile is much cleaner and probably faster.
-
I eventually got it sorted (hope), thanks to you folks. It really does look like the perfect bellmouth now - I couldn't sleep last night I was so excited

I'm at work now; I'll put the (v6) .skp up later.
-
Nice!

-
Nearly there...
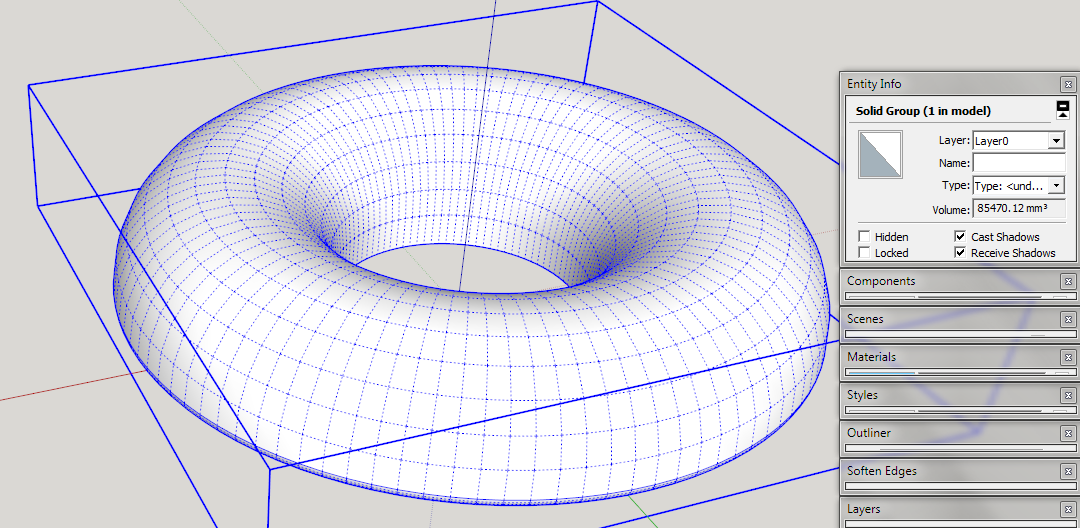
I purged the model [Model Info > Statistics...]
I erased all guides.
I then regrouped the geometry.
It reported as a non-solid.
I suspected some un-faced edge[s] have been left hanging around...
I ran SolidSolver on it and it removed some 101 Un-faced or Coplanar edges.
Then it reported as a solid.
Simply using CleanUp would probably have made it a solid too...It is now suitable for 3d printing...
-
I know it's not sensational or a spectacular Sketchup item but it's big to me
Here it is in all its glory:It's not solid and I don't know why, its in 4506 'entities'! I'm not bothering with the vents and mounting holes now; I can do them later on the milling machine and lathe, what does it need for 3D printing?
I've added the rounded lip on the edge of the bell mouth as an afterthought but I can't get rid of the joining lines; how do erase them?
-
@tig said:
Nearly there...
I purged the model [Model Info > Statistics...]
I erased all guides.
I then regrouped the geometry.
It reported as a non-solid.
I suspected some un-faced edge[s] have been left hanging around...
I ran SolidSolver on it and it removed some 101 Un-faced or Coplanar edges.
Then it reported as a solid.
Simply using CleanUp would probably have made it a solid too...It is now suitable for 3d printing...
When I can figure out how to install those extensions I'll do mine then
 Or do you mean I can click on it and download it from my previous post? You have facility for interactive editing then? WOW
-
@tig said:
Nearly there...
I purged the model [Model Info > Statistics...]
I erased all guides.
I then regrouped the geometry.
It reported as a non-solid.
I suspected some un-faced edge[s] have been left hanging around...
I ran SolidSolver on it and it removed some 101 Un-faced or Coplanar edges.
Then it reported as a solid.
Simply using CleanUp would probably have made it a solid too...It is now suitable for 3d printing...
I'm trying to work my way through that list but can't get rid of this guide. I went inside the mounting flange to try to erase it from the inside, no luck

-
@teig said:
@tig said:
Nearly there...
I purged the model [Model Info > Statistics...]
I erased all guides.
I then regrouped the geometry.
It reported as a non-solid.
I suspected some un-faced edge[s] have been left hanging around...
I ran SolidSolver on it and it removed some 101 Un-faced or Coplanar edges.
Then it reported as a solid.
Simply using CleanUp would probably have made it a solid too...It is now suitable for 3d printing...
I'm trying to work my way through that list but can't get rid of this guide. I went inside the mounting flange to try to erase it from the inside, no luck
Of course, thanks to the folk who've contributed
-
@unknownuser said:
When I can figure out how to install those extensions
So simple!
Goto the PluginStore (up right page corner)
Put the name of the plugin inside the engine research
When you have find it, load it in your computer
Launch SU
Menu Windows /Preferences/ Extension/Install Extension
That 's all!
You can use the plugin directly!
Thx for the V6!

Advantage of old versions is that you can use Plugins who are maybe not adapted to the last version!(Ps @ Pbacot
I have for habit to wait 6 month before use a new version!
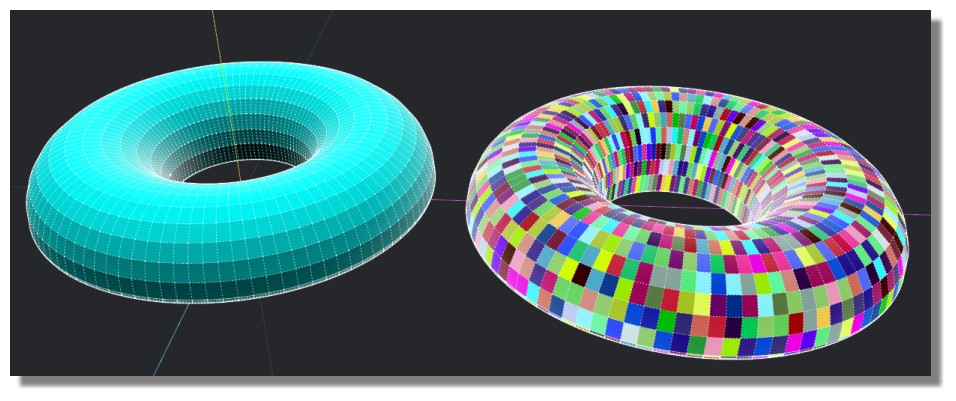
Color by Z and Random Painter by Chris Fullmer (don't know if they works inside the 2015 !
-
@pilou said:
@unknownuser said:
When I can figure out how to install those extensions
So simple!
Goto the PluginStore (up right page corner)
Put the name of the plugin inside the engine research
When you have find it, load it in your computer
Launch SU
Menu Windows /Preference/ Extension/Install Extension
That 's all!
You can use the plugin!Thx for the V6!
Advantage of old versions is that you can use Plugins who are maybe not adapted to the last version!(Ps @ Pbacot
I have for habit to wait 6 month before use a new version!
Color by Z and Random Painter by Chris Fullmer
[attachment=1:2yrxtti7]<!-- ia1 -->donutsv6.jpg<!-- ia1 -->[/attachment:2yrxtti7]You're welcome Pilou and thank you so much, it's so easy when you know how
The bell mouth has reported as solid!Edit: i went back into it and tried it, it wasn't solid anymore
 I've rerun SolidSolver and renamed it: [attachment=0:2yrxtti7]<!-- ia0 -->Sub Stack11v6solid.skp<!-- ia0 -->[/attachment:2yrxtti7]
-
To remove ALL guide lines and points use the menu item:
Edit > Delete GuidesWhile they don't directly affect an object's solidity they are best removed...
With that you have a solid...
-
Teig, I would encourage you to finish the model in Sketchup so there is no more work after 3D printing. You almost had it there once, you can do it again.
The beauty of 3D printing is a finished model, straight off the printer.What kind of machine will you be printing it with?
-
I have no idea what machine it is, all I know is that it is my mate's brother's printer and he got it as an unfinished kit.
I (think) I know what I'm doing now so I'll do the vents later. You're right, it is far easier to do them at this stage. -
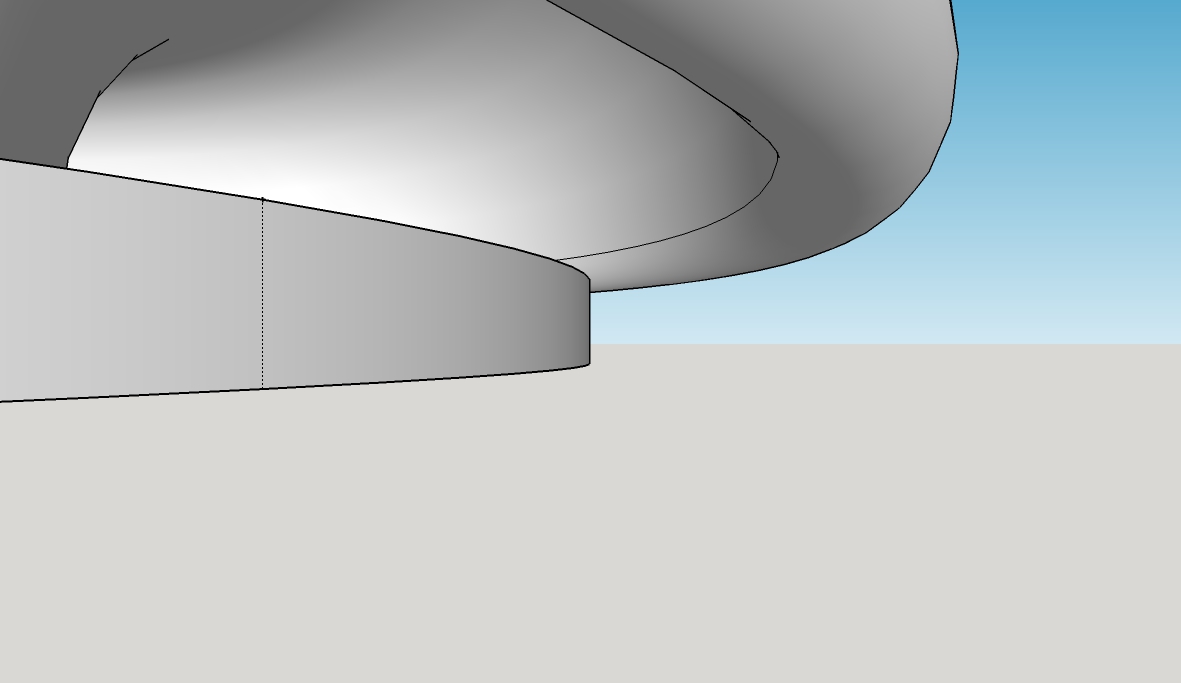
Ok, so it's a desktop printer. The reason I asked is on that kind of printer, the printer will need some kind of support to hold up the bell shape while printing. The support material is made of the same plastic, and you'll have to remove it by hand.
You should be aware of this, as you may need to make your design to take support removal into account. Here is an image of a T-rex head with support material:

...and the same model with the support material removed.

The gap under your bell shape is pretty small, and if it needs to be cleaned out you may be better off making the base and the bell shape in two different pieces that snap together.
If you were making this on a commercial powder printer, you could just remove the support powder with compressed air...easy peasy.

-
@d12dozr said:
Ok, so it's a desktop printer. The reason I asked is on that kind of printer, the printer will need some kind of support to hold up the bell shape while printing. The support material is made of the same plastic, and you'll have to remove it by hand.
You should be aware of this, as you may need to make your design to take support removal into account. Here is an image of a T-rex head with support material:
The gap under your bell shape is pretty small, and if it needs to be cleaned out you may be better off making the base and the bell shape in two different pieces that snap together.
If you were making this on a commercial powder printer, you could just remove the support powder with compressed air...easy peasy.
OK... that's a curve ball...
What are the rules for support material then? I think it's fairly obvious I know zilch about 3D printing.But... the snap-together idea would make it easier to assemble, on the car, hunched over, in a tight space (this is designed to go on a 1976 mini car). I imagine there is some kind of template for clicky catch arrangement?
-
Do yourself a favor and learn a little...watch the videos on this page, or at least the Filament printing one. Heck, spend $5 and get the ebook in my signature. #ShamelessPlug In a few hours you'll understand a lot more about how the process works, and how models need to be made in order to be printable, and you can keep all of your hair

There's not a template for making a snap fit, but here's a hint. You'll want to leave a ~0.3mm gap in between the parts to allow the parts to fit tightly, but not so tight they won't fit together.
-
@pilou said:
I have for habit to wait 6 month before use a new version!
Color by Z and Random Painter by Chris Fullmer (don't know if they works inside the 2015 !
[attachment=0:2dlsulxo]<!-- ia0 -->donutsv6.jpg<!-- ia0 -->[/attachment:2dlsulxo]Eh Pilou! Looks like you like colours
-
@d12dozr said:
Do yourself a favor and learn a little...watch the videos on this page, or at least the Filament printing one. Heck, spend $5 and get the ebook in my signature. #ShamelessPlug In a few hours you'll understand a lot more about how the process works, and how models need to be made in order to be printable, and you can keep all of your hair
There's not a template for making a snap fit, but here's a hint. You'll want to leave a ~0.3mm gap in between the parts to allow the parts to fit tightly, but not so tight they won't fit together.
Well I bit the bullet and bought your book for the grand sum of less than a pint of beer
I've had another thought: If I made them screw together it would make it easier for assembly and disassembly. Time for a look into creating threads in SU do I set the same kind of ~0.3mm tolerance for threads? I'll go look around. -
@d12dozr said:
Do yourself a favor and learn a little...watch the videos on this page, or at least the Filament printing one. Heck, spend $5 and get the ebook in my signature. #ShamelessPlug
Just bought it also. Looking to buy a small 3d printer soon so finding your book came just at the right time, thanks


Advertisement