[Plugin][$] Curviloft 2.0a - 31 Mar 24 (Loft & Skinning)
-
wow,what a plugin fredo!
I should have joined this forum earlier.
 I never knew about it. What a cool collection of plugins is present here!!
 -
Hi Fredo,
Can you look at this file?
Using 'Skinning of Shapes' but slight errors appear?
-
@unknownuser said:
[attachment=2:o25qv8mt]<!-- ia2 -->CurviLoft_Helix.skp<!-- ia2 -->[/attachment:o25qv8mt]
Using 'Skinning of Shapes' but slight errors appear?
you have to switch the properties..
for instance, try the same thing with tig's extrude edges by rails.. use the helix lines as the rails and the little shorties as profiles (well, make them curves first).. you'll see a similar though actually worse error.. then, do it again but choose the helix as profiles and the little lines as rails.. all is better.
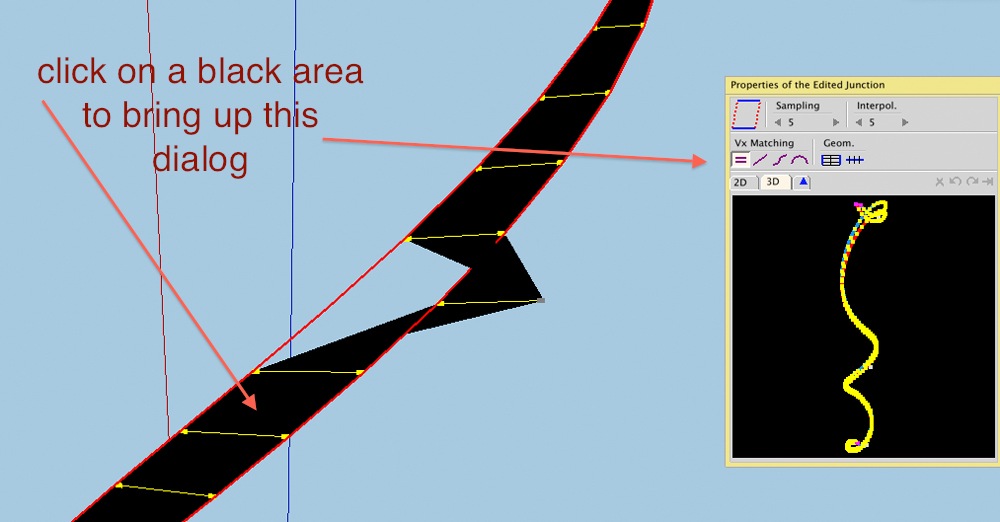
to do that in curviloft, click in a black area of the preview skin to bring up this dialog:
[attachment=1:o25qv8mt]<!-- ia1 -->001.jpg<!-- ia1 -->[/attachment:o25qv8mt]
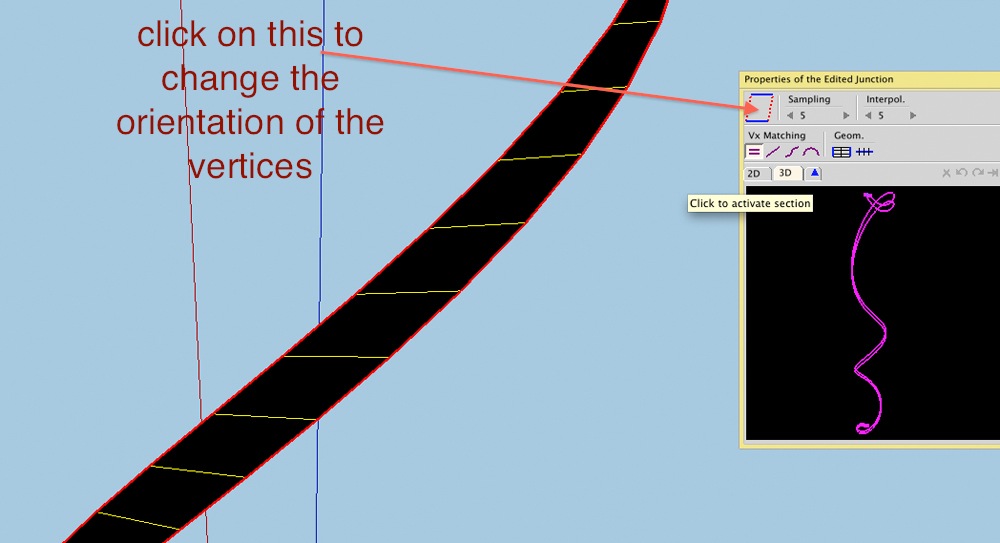
then use the top left button to re-orient
[attachment=0:o25qv8mt]<!-- ia0 -->002.jpg<!-- ia0 -->[/attachment:o25qv8mt]


-
Thanks Jeff.
Strangely I did use TIG EebyR it it worked perfectly. Though I used one shawty as both 'Profile' and 'Melding Profile'. Didn't try it with separate profiles.
Anyway thanks for the fix

-
hi ,
i have deleted curviloft icons by accident.
could you please tell me how to restore them in sketchup 8 pro
thanks -
@tibet said:
hi ,
i have deleted curviloft icons by accident.
could you please tell me how to restore them in sketchup 8 pro
thanks
Go to the first post in this thread and download the files and install them as instructed. The icons will be restored and some other scripts etc will be overwritten - but that doesn't matter...
However, if you don't mean you've actually thrown away the files but you mean you've 'closed the toolbar' or 'deactivated the extension' then simply reactivate the extension through Window > Preferences > Extensions and/or switch on the toolbar through View > Toolbars... -
-
Super LOL~!!

-
thanks fredo6
 one of the best of all su plugins ! well done!
thanks Karl (Charly)
 great works by you motivates me...good luck.

-
Joel,
Can you post the model or a typical case, because I am not clear on the issue you face
Fredo
-
I may be doing something wrong, but there is a very simple curve that Curviloft (CL) seems to have a problem with.
If I have 2 surfaces that I punch a hole in, say a round airplane fuselage that I put a round window or door opening in, CL won't face the rim of the opening.
After I delete the 2 wall bits in the opening, I select the 2 perimeters and call CL to do its magic. In effect, create the rim or ring. All I get are magenta lines.
If I join 1 pair of verticies, still no go. I have to draw 2 joiners (close together), and deselect the lines of the perimeter between the 2 joiners and CL does its magic in a flash.
This happens even to 2 rings in free space, unconnected to anything. I have to break both rings, then rejoin them after CL makes the curve.
Yet yesterday I made a large complex curved door, and CL rimmed it perfectly in 5 seconds, compared to 20 minutes or more to my making the perimeter manually. So I'm NOT complaining.
Fredo, as requested. The model I discovered this is way too big to upload, so I made an example.
I drew 2 rings offset in X, Y & Z axis.
Select 2 rings alone and CL will not form a rim.
Join rings with only 1 line, select all and CL creates a twisted rim.
Join rings with 2 lines and select all, no rim forms.
Deselect 2 bits of ring segment and CL forms proper rim. -
I am getting a lot of error messages on the Fredo6 plugins at startup of Sketchup 8 Pro:
please help
Error Loading File H:/programmas/google/Google SketchUp 8/Plugins/CURVILOFT_Dir_10/CurviloftAlgo.rb
uninitialized constant Curviloft::T6Error Loading File H:/programmas/google/Google SketchUp 8/Plugins/CURVILOFT_Dir_10/CurviloftCurveMover.rb
uninitialized constant Curviloft::T6Error Loading File H:/programmas/google/Google SketchUp 8/Plugins/CURVILOFT_Dir_10/CurviloftLoader.rb
uninitialized constant Curviloft::T6Error Loading File H:/programmas/google/Google SketchUp 8/Plugins/CURVILOFT_Dir_10/CurviloftPalette.rb
uninitialized constant Curviloft::T6Error Loading File H:/programmas/google/Google SketchUp 8/Plugins/CURVILOFT_Dir_10/CurviloftTool.rb
uninitialized constant Curviloft::T6Error Loading File H:/programmas/google/Google SketchUp 8/Plugins/CURVILOFT_Dir_10/__loader.rb
undefined methodeffective_load' for nil:NilClassError Loading File H:/programmas/google/Google SketchUp 8/Plugins/CURVILOFT_Dir_11/CurviloftAlgo.rb uninitialized constant Curviloft::T6Error Loading File H:/programmas/google/Google SketchUp 8/Plugins/CURVILOFT_Dir_11/CurviloftCurveMover.rb uninitialized constant Curviloft::T6Error Loading File H:/programmas/google/Google SketchUp 8/Plugins/CURVILOFT_Dir_11/CurviloftPalette.rb uninitialized constant Curviloft::T6Error Loading File H:/programmas/google/Google SketchUp 8/Plugins/CURVILOFT_Dir_11/CurviloftTool.rb uninitialized constant Curviloft::T6Error Loading File H:/programmas/google/Google SketchUp 8/Plugins/CURVILOFT_Dir_11/__loader.rb undefined methodeffective_load' for nil:NilClassError Loading File H:/programmas/google/Google SketchUp 8/Plugins/CURVILOFT_Dir_11/bootstrap_Curviloft.rb
uninitialized constant Curviloft::T6Error Loading File H:/programmas/google/Google SketchUp 8/Plugins/FREDOSCALE_Dir_21/__loader.rb
undefined methodeffective_load' for nil:NilClassError Loading File H:/programmas/google/Google SketchUp 8/Plugins/FREDOSCALE_Dir_21/bootstrap_FredoScale.rb (eval):1: uninitialized constant FredoScale::T6Error Loading File H:/programmas/google/Google SketchUp 8/Plugins/FREESCALE_Dir_10/FreeScale_Common.rb uninitialized constant FreeScale::T6Error Loading File H:/programmas/google/Google SketchUp 8/Plugins/FREESCALE_Dir_10/FreeScale_Tool.rb uninitialized constant FreeScale::SU_MAJOR_VERSIONError Loading File H:/programmas/google/Google SketchUp 8/Plugins/FREESCALE_Dir_10/__loader.rb undefined methodeffective_load' for nil:NilClassError Loading File H:/programmas/google/Google SketchUp 8/Plugins/GHOSTCOMP_Dir_10/GhostCompAlgo.rb
uninitialized constant GhostComp::T6Error Loading File H:/programmas/google/Google SketchUp 8/Plugins/GHOSTCOMP_Dir_10/GhostCompLoader.rb
uninitialized constant GhostComp::T6Error Loading File H:/programmas/google/Google SketchUp 8/Plugins/GHOSTCOMP_Dir_10/__loader.rb
undefined methodeffective_load' for nil:NilClassError Loading File H:/programmas/google/Google SketchUp 8/Plugins/HOVERSELECT_Dir_11/HoverSelect_Palette.rb uninitialized constant HoverSelect::T6Error Loading File H:/programmas/google/Google SketchUp 8/Plugins/HOVERSELECT_Dir_11/HoverSelect_main.rb uninitialized constant HoverSelect::T6Error Loading File H:/programmas/google/Google SketchUp 8/Plugins/HOVERSELECT_Dir_11/__loader.rb undefined methodeffective_load' for nil:NilClassError Loading File H:/programmas/google/Google SketchUp 8/Plugins/ROUNDCORNER_Dir_22/__loader.rb
undefined methodeffective_load' for nil:NilClassError Loading File H:/programmas/google/Google SketchUp 8/Plugins/ROUNDCORNER_Dir_22/bootstrap_RoundCorner.rb uninitialized constant RoundCorner::T6Error Loading File H:/programmas/google/Google SketchUp 8/Plugins/TOS_Dir_18/EraserOnSurface.rb uninitialized constant SUToolsOnSurface::T6Error Loading File H:/programmas/google/Google SketchUp 8/Plugins/TOS_Dir_18/FreehandOnSurface.rb uninitialized constant SUToolsOnSurface::T6Error Loading File H:/programmas/google/Google SketchUp 8/Plugins/TOS_Dir_18/LibOnSurface.rb uninitialized constant SUToolsOnSurface::T6Error Loading File H:/programmas/google/Google SketchUp 8/Plugins/TOS_Dir_18/LineOnSurface.rb uninitialized constant SUToolsOnSurface::T6Error Loading File H:/programmas/google/Google SketchUp 8/Plugins/TOS_Dir_18/OffsetAlgoOnSurface.rb uninitialized constant SUToolsOnSurface::T6Error Loading File H:/programmas/google/Google SketchUp 8/Plugins/TOS_Dir_18/OffsetOnSurface.rb uninitialized constant SUToolsOnSurface::T6Error Loading File H:/programmas/google/Google SketchUp 8/Plugins/TOS_Dir_18/PaletteOnSurface.rb uninitialized constant SUToolsOnSurface::T6Error Loading File H:/programmas/google/Google SketchUp 8/Plugins/TOS_Dir_18/PolylineOnSurface.rb uninitialized constant SUToolsOnSurface::T6Error Loading File H:/programmas/google/Google SketchUp 8/Plugins/TOS_Dir_18/__loader.rb undefined methodeffective_load' for nil:NilClassError Loading File H:/programmas/google/Google SketchUp 8/Plugins/TOS_Dir_18/bootstrap_OnSurface.rb
uninitialized constant SUToolsOnSurface::T6Error Loading File H:/programmas/google/Google SketchUp 8/Plugins/TT_Lib2/arc.rb
uninitialized constant TTError Loading File H:/programmas/google/Google SketchUp 8/Plugins/TT_Lib2/attributes.rb
uninitialized constant TTError Loading File H:/programmas/google/Google SketchUp 8/Plugins/TT_Lib2/babelfish.rb
uninitialized constant TTError Loading File H:/programmas/google/Google SketchUp 8/Plugins/TT_Lib2/bezier.rb
uninitialized constant TTError Loading File H:/programmas/google/Google SketchUp 8/Plugins/TT_Lib2/binary.rb
uninitialized constant TTError Loading File H:/programmas/google/Google SketchUp 8/Plugins/TT_Lib2/bounds.rb
uninitialized constant TTError Loading File H:/programmas/google/Google SketchUp 8/Plugins/TT_Lib2/color.rb
uninitialized constant TTError Loading File H:/programmas/google/Google SketchUp 8/Plugins/ruby/singleton.rb
undefined methodextend_object' forSingleton' -
Frank
Sounds like you haven't got all of the files installed in the right places ?
Please reread the installation instructions.
Also see this thread for help on extracting zipped files and keeping their subfolder structure with Plugins etc http://forums.sketchucation.com/viewtopic.php?f=323&t=35746
Also if you have inadvertently put files directly into Plugins that ought to be within a subfolder, then please remove them as they might cause unexpected results as they will then auto-load at startup rather than when the main tool wants them to... -
@unknownuser said:
Joel,
Can you post the model or a typical case, because I am not clear on the issue you face
Fredo
Fredo
I did! I appended it to my post, but so far no reply.
-
@jgb said:
@unknownuser said:
Joel,
Can you post the model or a typical case, because I am not clear on the issue you face
Fredo
Fredo
I did! I appended it to my post, but so far no reply.
i can skin that thing with zero problems.
i think you might be using the wrong tool.. i think you're trying to use curviloft's Skinning when you should be using regular Loft (the first of the 3 icons in the toolbar)just select the two rings then click on the Loft icon.
-
@tig said:
Frank
Sounds like you haven't got all of the files installed in the right places ?
Please reread the installation instructions.
Also see this thread for help on extracting zipped files and keeping their subfolder structure with Plugins etc http://forums.sketchucation.com/viewtopic.php?f=323&t=35746
Also if you have inadvertently put files directly into Plugins that ought to be within a subfolder, then please remove them as they might cause unexpected results as they will then auto-load at startup rather than when the main tool wants them to...I have reinstalled everything as per the instructions
then ran duplicate cleaner 2.0 to find any .rb leftovers from the previous installation directly into plugins folder and erased themthe problem remains
should I be looking for other files than with the .rb extension and erase these duplicates too?
Frank
-
Please don't start removing files willy-nilly.
Only the the files inside the subfolders that have equivalents wrongly installed in Plugins are to be removed - it's recommended that these put into a 'disabled folder' [erasing them is a little drastic - especially when you are not sure what you are doing - at least that way they can be moved back if you've messed up !]. There will also be .rb files in Plugins installed by other tools that you still need! AND of course there are .rb files installed as 'loaders' to run files inside subfolders that come in the zip file 'loose' rather than in a subfolder of Plugins...If you are getting similar error messages then are you sure the files and files in relative subfolders are installed properly. I noticed that you have a drive with an unusual path - H:/programmas/google/Google SketchUp 8/Plugins/ - the default is something like C:/Program Files/Google/Google SketchUp 8/Plugins/
Please type this in the Ruby Console + <enter> and post the results$LOAD_PATH
It should include your H: folder Plugins path.
With Vista/Win7 there can be a 'Compatibility Files' issue [¿Archivos de Compatibilidad?]... which happens if you don't have full security permissions to read/write/etc to the the Plugins folder and/or its subfolders and/or files. It looks like you have done it OK, and there are no error messages... but really the OS has put the new things in a separate subfolder to protect you from yourself! In these cases there's a 'Compatibility Files' button added to the top of the window of the affect folder[s] - you click on that to see what's messed up... Fix your permissions under properties, security as an admin...Can you post a screen-shot showing your Plugins folder structure etc if none of this is working...
-
@tig said:
Please don't start removing files willy-nilly.
Only the the files inside the subfolders that have equivalents wrongly installed in Plugins are to be removed - it's recommended that these put into a 'disabled folder' [erasing them is a little drastic - especially when you are not sure what you are doing - at least that way they can be moved back if you've messed up !]. There will also be .rb files in Plugins installed by other tools that you still need! AND of course there are .rb files installed as 'loaders' to run files inside subfolders that come in the zip file 'loose' rather than in a subfolder of Plugins...If you are getting similar error messages then are you sure the files and files in relative subfolders are installed properly. I noticed that you have a drive with an unusual path - H:/programmas/google/Google SketchUp 8/Plugins/ - the default is something like C:/Program Files/Google/Google SketchUp 8/Plugins/
Please type this in the Ruby Console + <enter> and post the results$LOAD_PATH
It should include your H: folder Plugins path.
With Vista/Win7 there can be a 'Compatibility Files' issue [¿Archivos de Compatibilidad?]... which happens if you don't have full security permissions to read/write/etc to the the Plugins folder and/or its subfolders and/or files. It looks like you have done it OK, and there are no error messages... but really the OS has put the new things in a separate subfolder to protect you from yourself! In these cases there's a 'Compatibility Files' button added to the top of the window of the affect folder[s] - you click on that to see what's messed up... Fix your permissions under properties, security as an admin...Can you post a screen-shot showing your Plugins folder structure etc if none of this is working...
I have installed Sketchup 8 pro on an external disk so I can easily take it with me
my other plugins work fine? Only the the files inside the subfolders that have equivalents wrongly installed in Plugins are to be removed ?
would it not be the other way round?
I removed the equivalents in the plugins folder and left the ones in the subfoldersH;\programmas\google\Google SketchUp 8\Plugins\ 2DTools\ AutoCenterPoint\ clf_simple_loft\ ctsMaker\ CURVILOFT_Dir_11\ DEFPARAM_Dir\ Dom_brevenchatij\ DoorTools\ DWGExport\ Examples\ FREDOSCALE_Dir_21\ FREESCALE_Dir_10\ GHOSTCOMP_Dir_10\ HOVERSELECT_Dir_11\ JPP_Dir\ JPP_Dir_15\ Layer Manager\ layers\ ldd\ LIBFREDO6_Dir_37\ Ocean\ Projection\ RDE_Dir\ ROUNDCORNER_Dir_23\ ruby\ skin\ SoapSkinBubble\ TIGtools\ TOS_Dir_18\ TT_Lib2\ Utilities\ WindowTools\ 0.skb 1.skb 2.skb 2D#.rb 3.skb AddVertex+.rb Align User Guide.pdf align_2D.rb align_tool.rb AllowDWGImportInSketchUp7.msi arc_centerpoint.rb auto_centerpoint.rb Big_32.png BzRoundEdge.rb cadspan.rbs calc.rb CenterPoint.rb Chamfer_Along_Path.rb clf_color_by_slope.rb clf_simple_loft_loader.rb closeopens.rb closeopens_icon.png Cloud Quick Tutorial.pdf Cloud V6.pdf cloud_v6.rb co_tool.html co_toola.rb ComponentReporter+.rb config-thumb.jpg ConstructFaceNormal.rb curve_maker.rb curvestitcher.rb deBabelizer.rb delauney2.rb demeter-main.rbs DoorTool.txt DoorTools.rb DWGExport.rbs engineeringtoolbox.rb examp_les.rb example.dat examples.rb extrudeEdgesByEdges.rb f2f.rb f2f_cursor.gif faceFlattener019.rb file.php FilletTool.rb fixSolid.rb flightpathtool.rb GetCentroid.rb GetDimensions.rb hide_faces_edges.rb hideall.htm hidetool.rb jf_follow_this.rb jf_spheretool.rb jointpushpull.rb kml_mesh_exporter.rb ky_Delete_Interior_Faces.rb ky_Group_PushPull_2DFaces.rb Layer Manager v6.pdf layer_manager_extension_v5.rb layer_manager_extension_v6.rb Layer_manager_install.jpg layer_manager_v5.txt layerbymaterial.rb layers.rb layers_materials.rb layers_show_hide_all.rb ldd.rbs LibFredo6.rb LibTraductor.def LibTraductor.rb Lines2Components.rb load_sketchapps.rb lsystem.rb makefaces(2).rb makefaces.rb makeNamedGroup.rb manifold.rb massmaterialimporter.rb Mirror_31.rb move_to_origin.rb move_to_origin_and_center.rb moveit.rb new.txt nudge.rb numbered_grid.rb ocean_extension.rb Organizer.rb organizerEdit.log pageLayers.rb Paint_back_faces v2.0.rb parking.rb pathcopy.rb perp_line_plane.rb PipeAlongPath.rb plugins_help.rb plugins_help_TIG.rb pnts2mesh.rb points_cloud_triangulation.rb ProgressBar.rb.htm Projection Documentation.pdf Projection.pdf projection_extension.rb PurgeAll.rb push_pull_vector.rb PutOnLayer_bmw.rb PutOnLayer_ForPublicRelease.rb rci.png read_me.txt reglue.rb rename_comp_inst.rb repaint_face.rb repair_broken_lines.rb Roof.rb roofplanfollower.rb rot90.rb rps_texturewrite.rb scene_rename.rb sceneExporter.rb screw_21.rb script_loader.rb SectionCutFace.rb simplify.rb SimplifyContours.rb skin.rb Small_16.png SmustardOrganizerExcludeFolders.txt SoapSkinBubbleTools.rb Srub.rb stair_maker062.rb stitcher.rb stock_maker.rb stray_lines.rb sublend.rb taper_maker.rb Terrain Reshaper User guide.pdf terrain_reshaper.rb TextTag14.rb tf.rb toolbar.rb trim_extend.rb tt_cleanup.rb tt_solid_inspector.rb unfoldtool.png unfoldtool.rb unhide_all.htm unhide_all.rb utilities.rb utilities_10.rb vector.flat_angle.rb viewMemory.rb VolumeCalculator21.rb weld.rb Win32API.so WindowTools.rb ZLoader__OnSurface.rb zone.rb zoom_selection.rb Zorro.rb -
@hygicell said:
my other plugins work fine
WindowTools.rb
ZLoader__OnSurface.rb
zone.rbaccording to that list, all your other plugins aren't working fine..
you're missing the ZLoader files that come with many of fredo's plugins.. the only one you have is tools on surface but i suspect your round corner, curviloft, and fredoscale aren't working either (amongst others?)

-
First:
Only the the files inside the subfolders that have equivalents wrongly installed in the Plugins folder are to be removed... from the Plugins folder...
What you did is correct.Second:
You do seem to have several Zloader .rb files missing from that Plugins folder - likeZloader_Curviloft.rb- this might be the root cause of your problem - do you perhaps have them in another folder that might also be on your$LOAD_PATH?
And then they can't load other files are the paths gets tangled up...
Did you get the$LOAD_PATHin the Ruby Console ?
Mine says["C:/Program Files/Google/Google SketchUp 8/Plugins", "C:/Program Files/Google/Google SketchUp 8/Tools"]yours should also include the H: path ?..\Plugins\LIBFREDO6_Dir_37\Lib6Core_37.rb; line#225;txt = "T6 = Traductor::T6Mod.new(#{hmod}, '#{path}', '#{rootname}') "
line#226;hmod.module_eval txtThis is the code that sets the constant
T6to have a certain value and typing in the Ruby Console
Curviloft::T6
should show this, which is aTraductor::T6Modobject used to translate between languages; it is complex looking list of code, elements, hashes etc...It seems that ..\Plugins\LIBFREDO6_Dir_37\Lib6Core_37.rb is not being run properly...
Does the file exist ?
If so are it's properties set so 'you' can see it and read it etc...?
Trying typing loadLIBFREDO6_Dir_37\Lib6Core_37.rb+ <enter> into the Ruby Console and see if it returns true and if CurviLoft then works... it'll only be a temporary fix but at least we then step on one pace...If you type this in the Ruby Console +<enter> what is returned ?
Sketchup.find_support_file("Plugins")
I get
C:/Program Files/Google/Google SketchUp 8/Plugins
You must include the H: path to your Plugins... otherwise Fredo'sLibFredo6.rbwill fail at lines#26/27
require 'LibTraductor.rb' if Sketchup.find_support_file( 'LibTraductor.rb', "Plugins" )#Compatibility require 'TOS_Dir_13/LibTraductor_20.rb' if Sketchup.find_support_file( 'TOS_Dir_13/LibTraductor_20.rb', "Plugins" )#Compatibility
Otherwise when it doesn't find these files they are not loaded and so the T6 constant never gets defined...
You could rewrite those two lines using a plain-test editor like Notepad[++].exe - as
require 'LibTraductor.rb' if File.exist?(File.join(File.dirname(__FILE__), 'LibTraductor.rb'))#Compatibility require 'TOS_Dir_13/LibTraductor_20.rb' if File.exist?(File.join(File.dirname(__FILE__), TOS_Dir_13, LibTraductor_20.rb)#Compatibility
I think the second one is not important as the first one gets loaded anyway...
Now it will always load the files found relative to it even on some obscure drive, rather than the default C:...
Advertisement


