[Plugin] Extrude Edges by Rails
-
@ionandre said:
Dear Tig,
what do you think about implementing the possibility to select a single line as well for the profile and not only a curve.
This would be very helpful for the creation of complex models like cars for example. In such cases the division of the line in two segments*** is really undesired and would generate too many poligons.
Ionandre***A Curve CAN have one Segment.
You can just make one...
Draw the required single Line profile [or rail].
Draw another short piece of random Line off one end of it.
Select both Lines.
Use 'Weld' to make them into a Curve [Weld.rb is an invaluable script and very quick if you set e.g. J as your shortcut for this =Join].
Draw another piece of short temporary Line off the new Curve's centre-vertex and it'll split the Curve into individual Segments.
Erase the unwanted Curve Segment then the temporary Line.
Now you have a one Segment Curve to use as you will...My 2D Tools lets you draw Polylines as a toggled option [Alt] in the Line Tool - these can also be a single Segment long - however the default is for them to be flat in 2D, although you can reset the Z-height as you go I think there are better ways of making these single Segment Curves...
Some other tools like the BZ-toolbar let you draw 'Polylines' in 3D - these can also be just one Segment long, but are still 'Curves' and work in EEbyRails.
If you want several separate Line Segments then I suggest this BZ-Polyline method is the quickest - just drawing individual pieces as needed...EEbyRails must have 3 curves picked in order - it would be too awkward to add lines into the mix... - but there are several easy ways to use one Segment Curves too...
-
It will be possible this plugin maneuvers to "two path X two rails "?
As an initial path and a final path for the two rails.
Which it would produce accuracy for the continuity of several meshes.
Iam spanish, pardon my English language. -
Here's my shot at using this tool. It took me quite a while to figure out the sequence of things that worked for me:
Draw the two paths using Bezier Splines.
Convert them using Polyline Segmentor to both have the same number of segment.
Use EEbR.I subsequently fixed the "seam" and the sharp transition near the front, but was too lazy to re-color it.
I never could figure out how to do the nose cap


-
I'm thinking about ExtrudeEdgesByRails2 but it's some way of...
-
Here's an example of making a 'nose-cone' with EEbyRails...
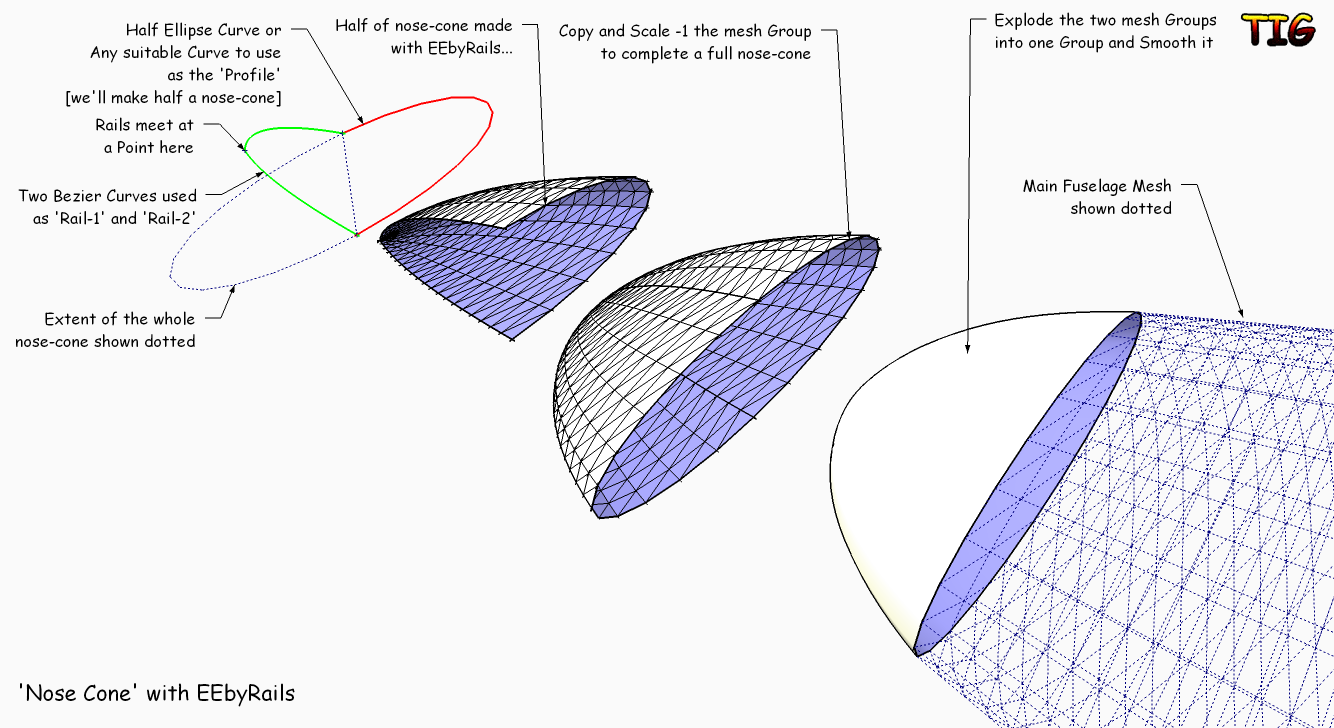 NoseConeEEbyRails.skp
 -
WOW!
-
@thomthom said:
Nice little tool.
But all the messageboxes, can't they instead be made into a single UI.Inputbox ?
I agree with thomthom - on both statements

and I think he didn't mean to complain about the few seconds it takes to klick yes or no several times - he is just searching for perfection!and I think he is right in thinking, that having all these questions together in one popup window would make sense.
I imagine all the options having a check-box to check/uncheck. settings for 'smoothing' or 'intersecting' will be saved throughout a SketchUp session. thus you don't have to deal with these questions again, when using the tool again.
alongside the 'OK' button you would have an 'Update' button. like that you can for example reverse the path direction, then update to view the changes, then maybe change back again and update once more... this would not only make workflow even quicker, but add another level of control to the tool (because you can try different settings over and over again...)oh, and TIG - the tool is absolutely fantastic!

-
@plot-paris said:
@thomthom said:
Nice little tool.
But all the messageboxes, can't they instead be made into a single UI.Inputbox ?I agree with thomthom - on both statements
and I think he didn't mean to complain about the few seconds it takes to klick yes or no several times - he is just searching for perfection!
and I think he is right in thinking, that having all these questions together in one popup window would make sense.
I imagine all the options having a check-box to check/uncheck. settings for 'smoothing' or 'intersecting' will be saved throughout a SketchUp session. thus you don't have to deal with these questions again, when using the tool again.
alongside the 'OK' button you would have an 'Update' button. like that you can for example reverse the path direction, then update to view the changes, then maybe change back again and update once more... this would not only make workflow even quicker, but add another level of control to the tool (because you can try different settings over and over again...)
oh, and TIG - the tool is absolutely fantastic!I'm currently looking at updating several of my extrusion tools and putting them onto a toolbar and giving them web-dialogs were appropriate... so be patient


-
Maybe Chris Fullmer will allow you to put "Bender" on the same toolbar. It would be a good fit.

J
-
Hi TIG and all, today I spent some quality time trying to achieve the result of this procedure with Extrude Edges by Rails plugin: http://www.youtube.com/watch?v=SUYN_Uqzvec.

Any idea if and how is possible to produce this kind of result?
Thanks in advance for the plugin and any help. -
@tig said:
I'm currently looking at updating several of my extrusion tools and putting them onto a toolbar and giving them web-dialogs were appropriate... so be patient
wow, sounds exciting. I will be as patient as I can manage


(@Gaieus**: see, with a Wave I would have been able to place this comment inline, where it belongs, instead of having to quote to make clear which post I am referring to...)**
-
@carrozza said:
Hi TIG and all, today I spent some quality time trying to achieve the result of this procedure with Extrude Edges by Rails plugin: http://www.youtube.com/watch?v=SUYN_Uqzvec.
Any idea if and how is possible to produce this kind of result?
Thanks in advance for the plugin and any help.As you found vanillas FollowMe isn't going to make a Fillet that touches the Leg and Arm properly...
Here is away of doing it with careful pre-planning, Groups, Copy/Paste-in-Place, Intersect and EEbyRails etc - however the Fillet that's made is very poly-intensive... BUT it is accurate to suit the facets of the cylinders... depends what you want - for detailed work OK but for massing just leave out the fillets as you'll barely see them!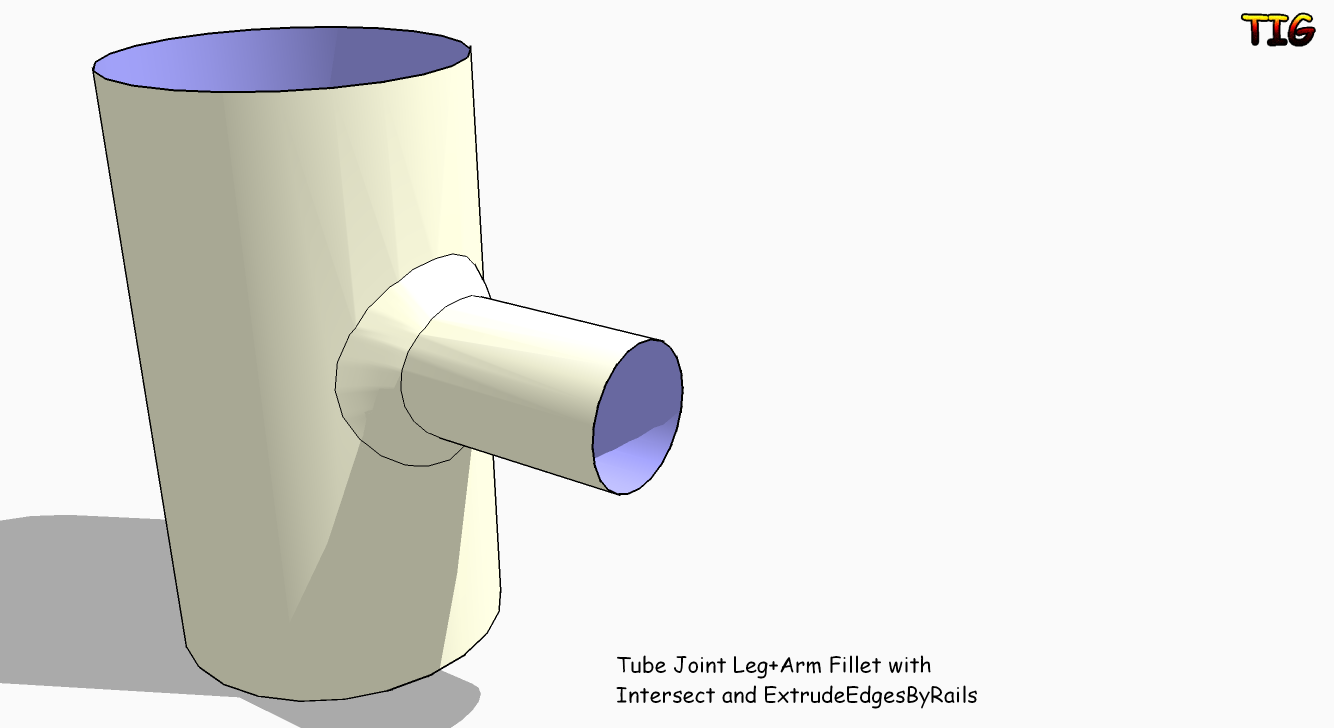 EEbtRailsFilletWeldForm.skp
 -
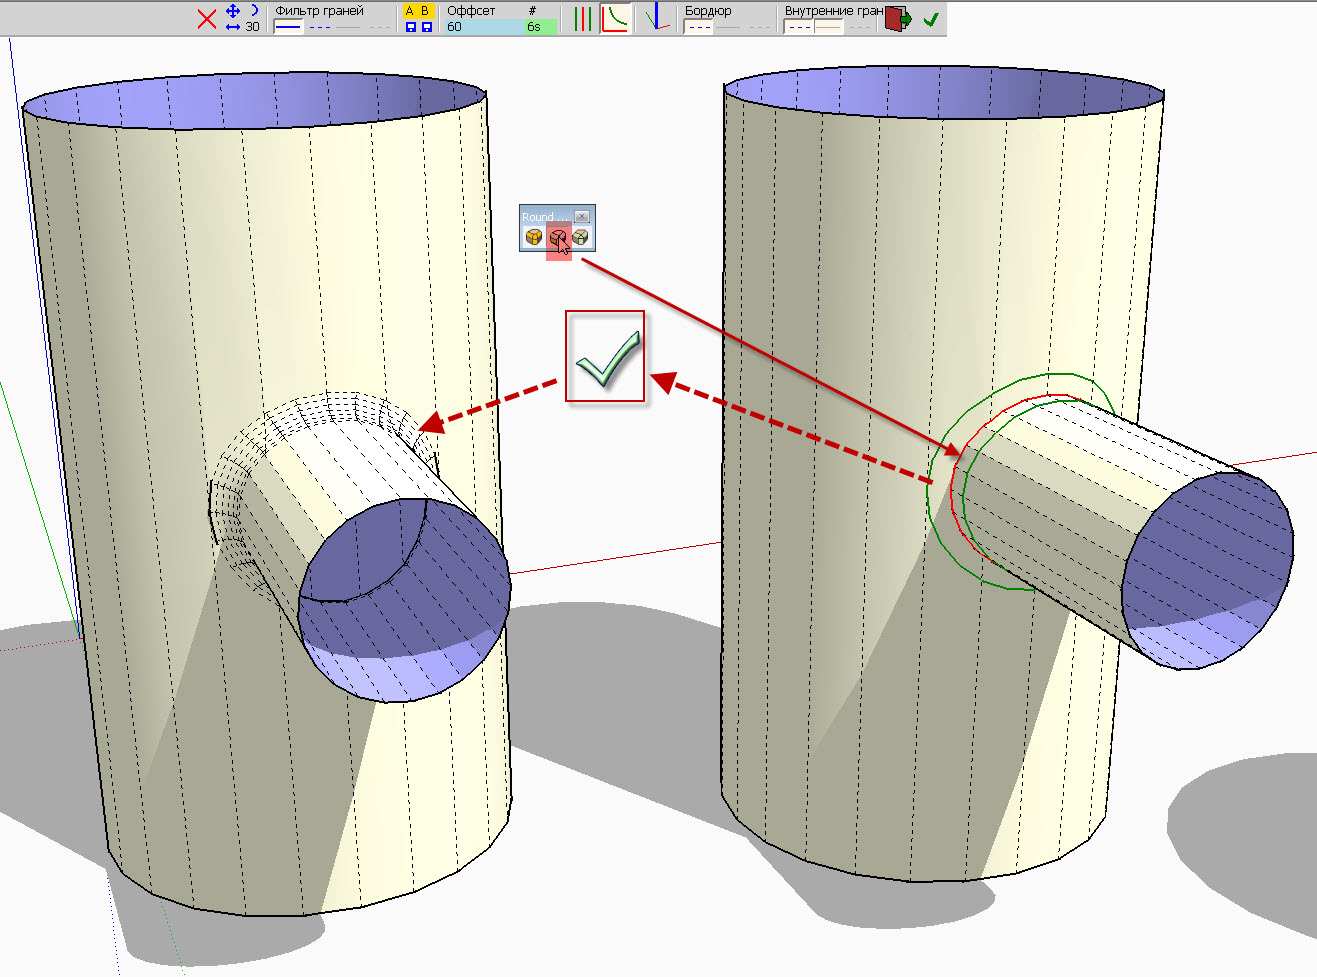
Hi TIG, thanks for your help. There's a problem with the fillet created this way, though: it doesn't revolve correctly around the "arm". See picture, taken from your kind example: on one side the arc points inward, on the other side points outward.

-
With the plug "Round Corner" by Fredo, you can do the welding seam.
-
@carrozza said:
Hi TIG, thanks for your help. There's a problem with the fillet created this way, though: it doesn't revolve correctly around the "arm". See picture, taken from your kind example: on one side the arc points inward, on the other side points outward.
You are right !
If you make it in 90 degree bits it's better...
BUT it should be like that - I'll look at the cause...
Perhaps the Fredo Rounded Option is the best ... see below ...
Blajnov - exactly did you do that I can't reproduce it ???
-
@tig said:
exactly did you do that I can't reproduce it ???
Top segment of horizontal pipe has to line up with a segment on the vertical pipe...look closely at his hidden geometry
-
Mamma mia, this is a great learning experience!
Thank you very much Blajinov and TIG for your help, is much appreciated!
-
@tig said:
Blajnov - exactly did you do that I can't reproduce it ???
I enclose a file with scenes of action
-
I see now...
So to recap: DON'T use EEbyRails for making Fillets between Rounded Legs and Arms etc - instead USE Fredo's 'Round Corners' - it's quicker and produces better results !
Blajnov - it might be best if you edit / retitled your SKP without reference to EEbyR, to avoid confusion -
Here's a way to make a Multi-Railed Mesh with EEbyRails by making sub-meshes and combining them...
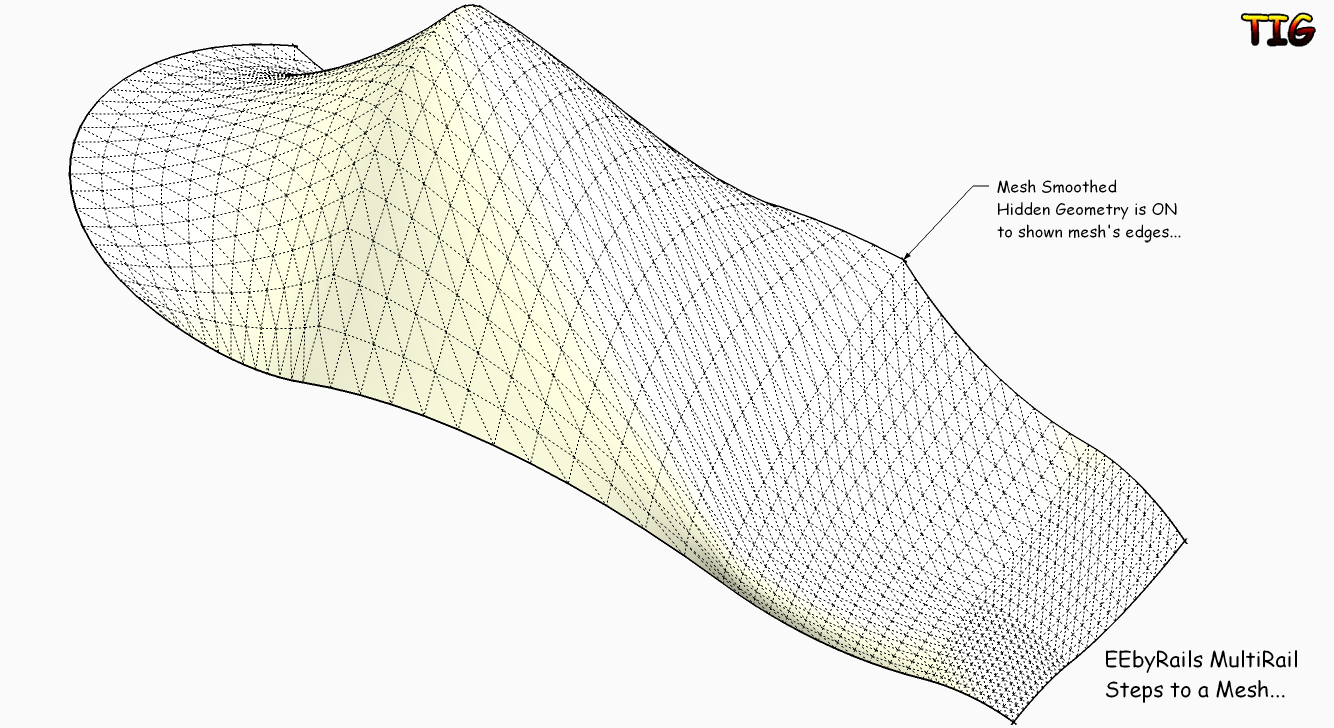 EEbyRailsMultiRailSteps.skp


Advertisement