Hi, this all looks fantastic! Fredo, could you send me the plug-in or are you still working on it?
Thanks!
Hi, this all looks fantastic! Fredo, could you send me the plug-in or are you still working on it?
Thanks!
Hi, I have tried it with the 10,000,000 but I'm still getting the same result.
Hi Anton,
Thanks for your work, this could really go somewhere. Unfortunately I am having the accuracy problem as you mentioned. Even on max accuracy the new model is always a little bit larger -- which makes this unworkable for my application. Also, when I use the plugin it appears to shrink-wrap the whole form as one hull rather than breaking it into several hulls. Do you have any other suggestions of what might fix these problems?
Thanks again.
Hi Anton, this all sounds great, thanks for your fast response.
@unknownuser said:
Should all generated convex hulls be top level groups or some should remain inside other groups?
Yes, I would need the hierarchy of groups to remain in tact.
@unknownuser said:
Does the SU to Hammer Exporter export textures and colors - should the newly generated convex hulls be colored?
If possible I would like the hulls to retain whatever materials they had originally.
Here is a link to the Valve Plugin:
Thanks again, I'm looking forward to hearing what you come up with.
-Matt
I use Valve’s plug-in to bring Sketchup models into Hammer.
It works well but the annoying thing about it is that I have to ensure that my SketchUp models are compatible with a BSP editor. This basically means that each object I make can’t have concavity. If I make a model from scratch, I can avoid this problem by the way I construct the building, but if I receive someone else’s model, there will always be a lot of concavity, and I have to fix it all manually. It would be great if there were a way to automate this process.

Each piece is its own grouped and enclosed object.
It would be even better if it were smart enough to miter corners.

Thanks for your interest.
I got everything on except for the "Creator Owner"
But yes, it appears to have disappeared into "VirtualStore". Thanks!
I still can't see it in explorer. It may be because I couldn't get the "Creator Owner" to get full permission. I check them but when I hit apply they clear away again.
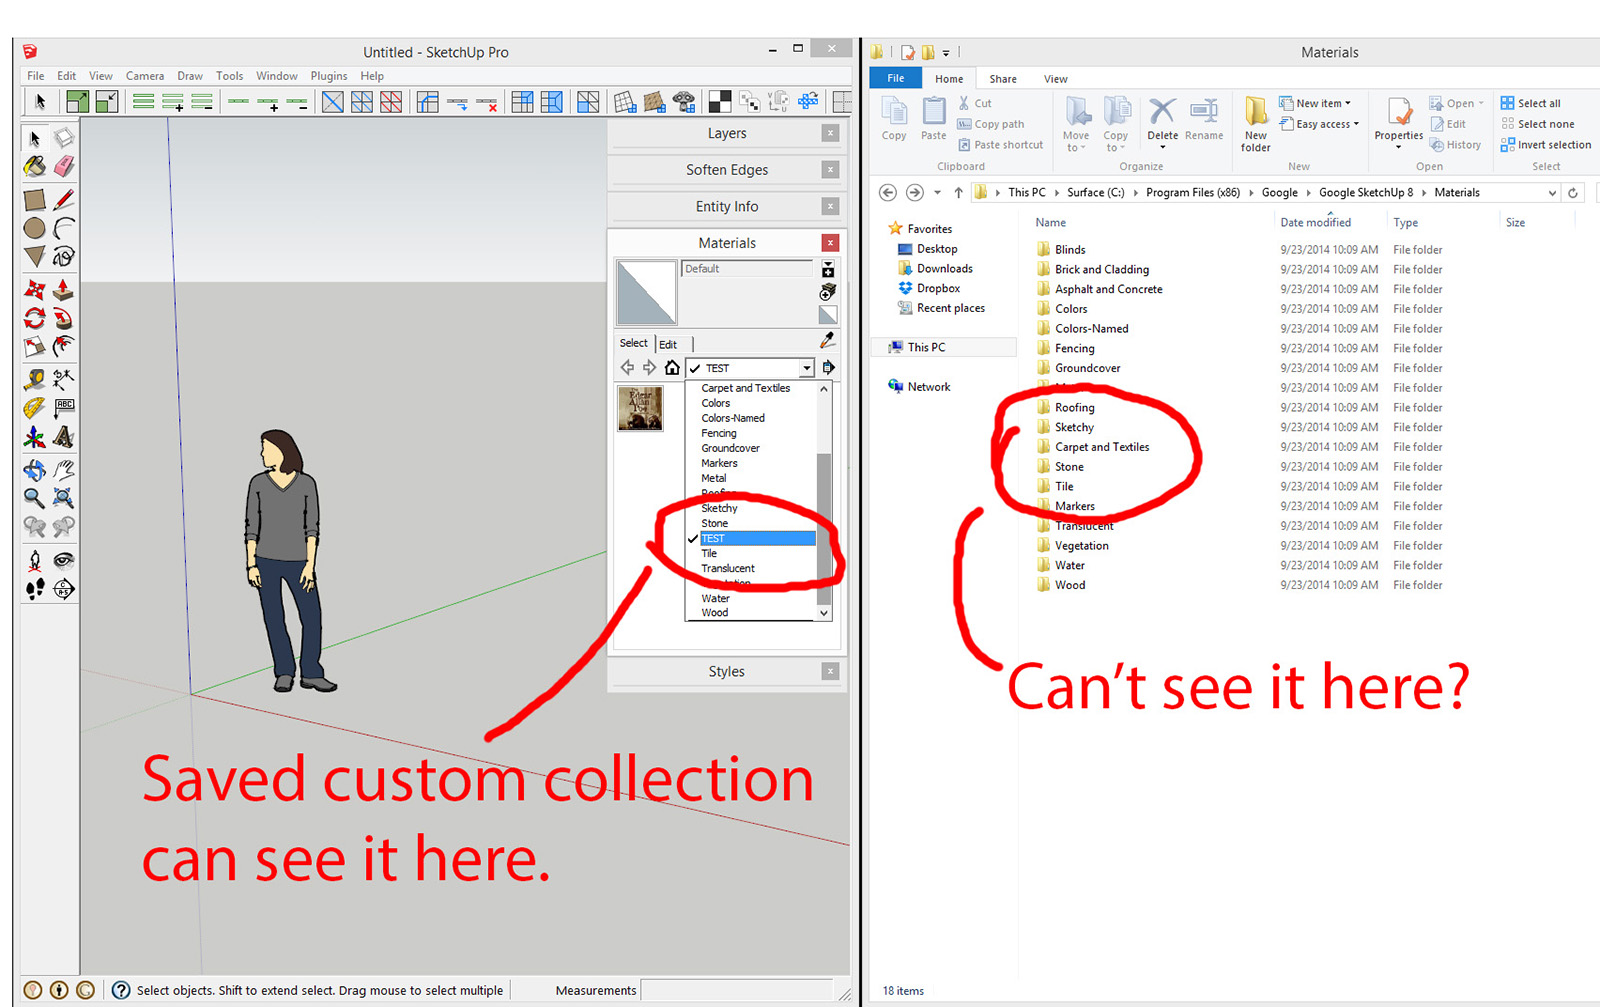
Yes, it was placed with all the other collections in the materials folder. In fact, if I try and save another collection I can see the "TEST" folder in the browse window (see image). For some reason the browse function can see something while windows explorer cannot.
See image.
I can make material collections with no problem but I can't find them in explorer.
I have "show hidden files and folders" on, and I still see nothing.
Any help would be appreciated, thanks.

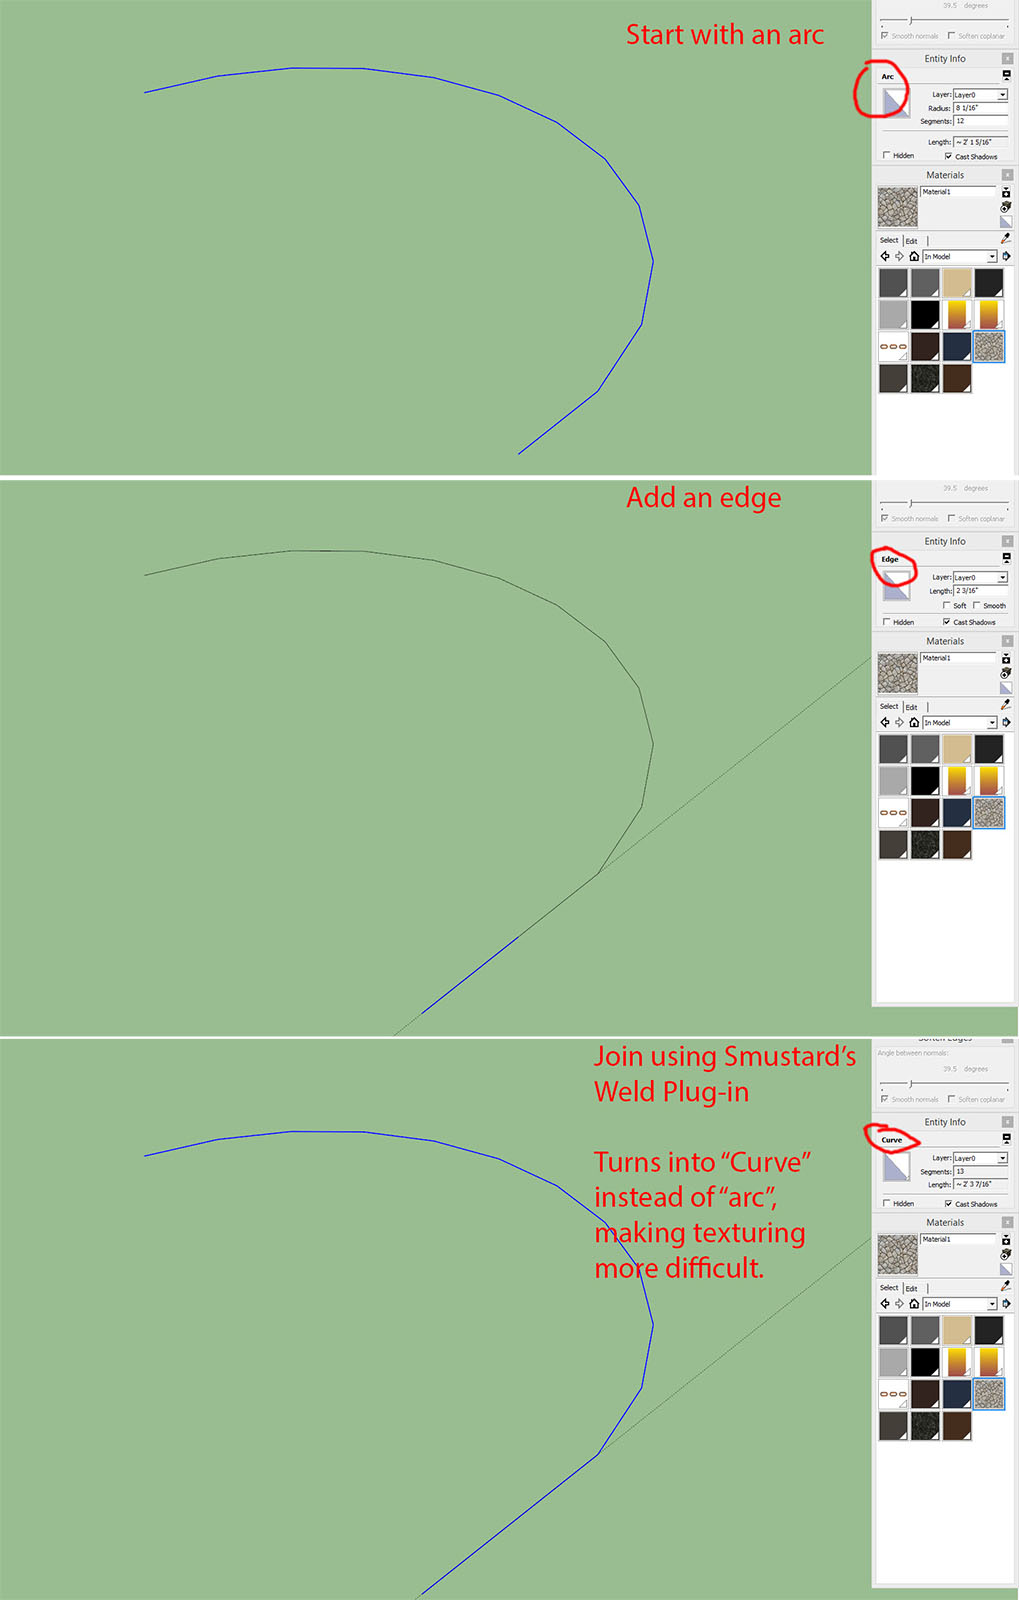
Yes, the extra segment is collinear. It looks like leaving the arc alone is what I'm going to have to do even if it does add some unnecessary tris.
It creates obvious seams on all the edges. Now if I keep the Arc part separate, it will work fine, but it means that the non-Arc part will require an extra quad. I will need many of these and am just trying to do what I can to keep the poly count down for optimization purposes.
Now I've used the Quad Tools Plug-in before which could also solve the problem, but I would rather use the default texture tools because I will have a bit better control over scale.
Hi. I'm having an issue with Arc geometry. I'm trying to add to an Arc without it loosing it's Arc properties and winding up as a "Curve".
See attached for a better idea of what's going on.
Any help would be appreciated.

Maybe I'm being stupid but when I get to the update page all the downloads are for the whole program, not updates.
Hey, my computer blew up yesterday and have since reformatted. I reinstalled everything and it appears to be functional now. I'm not really sure what was going on. Thank you though, and thank you for making the plugin, it's really been helping alot!
Yes. If nothing is selected I get an error reading "No textured material selected."
If I apply the material elsewhere it won't give an error, but only if I select the material in the "In Model" category. If I select it from my imported texture library it will give me "selected material is not in the model."
I also tried another method like what you did in one of your UV videos by dragging in a texture directly, exploding it, and using the eye dropper to select, but that didn't work either.
Sorry to be a pain but as I went to test that out I hit another problem.
I can't even get the texture to apply at all. I got it to work yesterday. I haven't updated anything in SketchUp. I still get the red and green lines but no texture gets applied. At first I thought it was being applied to the other side of the face but there's nothing showing up on either side. I rebooted, reinstalled Quadface tools, it's still the same. Updated to TT_Lib2-2.8.0, still the same.
Sorry, let me clarify. I want to control the texture right in SketchUp like this, where the texture goes past the face:

As you can see, It's easy enough to do with a square face, but I'm now trying to do this with arching textures. I realize this could be achieved by cropping the image beforehand, but given the nature of the project I'm working on, it would be so much better to do it right in SketchUp.
Is there any way to over-scale? I would like the stone texture to match (or at least get close to) the scale of the cube.

I'm still trying to texture stone aches like what you did for your UV Toolkit thread. Is it possible/easier to do with that plugin? I couldn't figure out how to do it.

That would be great! looking forward to it.