sketchucation logo sketchucation
    • Login
    1. Home
    2. gulcanocali
    3. Posts
    ⚠️ Attention | Having issues with Sketchucation Tools 5? Report Here
    G
    Offline
    • Profile
    • Following 0
    • Followers 0
    • Topics 11
    • Posts 72
    • Groups 1

    Posts

    Recent Best Controversial
    • Tgi3D SU Amorph's new Warp/Mould/Remorph (?) Tool

      Hi All,

      I wanted to show you what is cooking in Tgi3D kitchen. This new tool allows you too warp/reshape a volume in 3D. The algorithms are in place and we are working on UI interface and other issues like deciding on a name 😉, suggestions are most welcome 😄

      Below are the uncut, unedited videos to preview what is in the works. In the first video we reshape a thousand instances of a component together at once.

      [flash=480,385:kq31352r]http://www.youtube.com/v/3CE-YkryKK0?fs=1&hl=en_US[/flash:kq31352r]

      In the second and third videos, we warp volume with component hierarchy. The objects are textured. The textures can easily be "safeguarded and restored" as in the video. However, in the final version of the tool we intend to have it such that the texture adjusts as the object is reshaped (as is possible with all other Tgi3D commands).

      [flash=480,385:kq31352r]http://www.youtube.com/v/oZfMvDsgVMQ?fs=1&hl=en_US[/flash:kq31352r]

      [flash=480,385:kq31352r]http://www.youtube.com/v/DDYmBHZ44p4?fs=1&hl=en_US[/flash:kq31352r]

      This last video is a bit long, about 6 mins. We wanted to show that you can warp/reshape portions of a mesh for finer adjustments, sculpting, etc..

      [flash=480,385:kq31352r]http://www.youtube.com/v/lEjhiGfHuZw?fs=1&hl=en_US[/flash:kq31352r]

      Enjoy!

      posted in Plugins
      G
      gulcanocali
    • RE: Tgi3D SU PhotoScan's new Image Based Surface Modeler

      Thanks Bjorn! ☀

      Paolo,

      Tgi3D calibration tool can indeed provide a quite high level of accuracy. The actual level of accuracy obtained depends on several parameters including image resolution, image quality, vantage point distribution, calibration point placement care etc. With a modern 5+ megapixel camera under good conditions you can achieve better than 1 part in 2000 relative 3d distance accuracy, which translates to around 10 microns in a 2cm sized object, which is comparable to a digital caliper, or millimeter accuracy in a couple meter sized object which compares to better laser range-meters on the market. More importantly Tgi3D reliably reports the level of accuracy actually obtained.

      Regards,

      posted in Extensions & Applications Discussions
      G
      gulcanocali
    • RE: Tgi3D SU PhotoScan's new Image Based Surface Modeler

      Hi Marcus,

      @d12dozr said:

      How much time was spent on the model before this video? ...photo-calibrating, setting up the scenes, etc...

      Heeey, we don't include preparation time in Speed Modeling challenges... 😄

      Good question of course 😉 . Indeed we only show the modeling time in the video, as our intention was to showcase the power of the new "Image Based Surface Modeler" tool. The preparation contained the following steps with "approximate" times

      planning, approx 15 mins including setting the scene
      taking the photos of the toy rhino,  15-20 mins (?)
      calibration and export to SketchUp, 1-2 hrs
      

      Calibration step is the point where you would spend a lot of the time, especially at the beginning. The Calibration process does have a learning curve, but you quickly speed up as you get familiar with the process. Also if the pictures have a good number of features that are easily identifiable in multiple photos, like corners, etc. the calibration process is much easier. BTW, the black background remains from an earlier experiment, you don't have to segment the images.

      Also, keep in mind that in the video we are using only two of the photographs, but the calibration is done for all 15 photos. The total time would be much less for, say, 3 photographs.

      Regards,

      posted in Extensions & Applications Discussions
      G
      gulcanocali
    • Tgi3D SU PhotoScan's new Image Based Surface Modeler

      Hello All,

      A few weeks ago we have released new versions (v1.22 and more recently v1.23) of Tgi3D SU Amorph and Tgi3D SU PhotoScan. We have focused mostly on PhotoScan this time and included major improvements and innovations in both the Calibration and Metrology Tool and features in SketchUp plug-in part.

      The “automatic surface matching to photographs” feature has gone through a major change and transformed into the powerful Image-Based Surface Modeler Tool which includes Initial Estimate, Single-Segment Surface, Multi-Segment Surface, Refine-Estimate and Upsample Mesh commands with their own toolbar icons. We have included much better and faster algorithms that can process bigger sections at a time that can even include folds/occlusions. Below is an uncut video that shows the work in real-time.

      [flash=480,385:3d8qzpvc]http://www.youtube.com/v/740XUrYJAgM?fs=1&hl=en_US[/flash:3d8qzpvc]

      The Calibration Tool has also been updated for better usability with UI updates, additional features to enhance workflow and reduce errors. The updates include:

      • Powerful general calibration support for all point and shoot cameras.

      • Displaying and using 2D projections of the reconstructed 3D points.

      • Assignment of X, Y and Z axes and origin in the 3D viewer, which is preserved in exported files.

      • Sensor size estimation support.

      • Better detection of bad calibration points for safer calibration results.

      • Support for reducing image resolution in Sketchup exports.

      • Improvement in the UI for better usability.

      You can download 30-Day Trial Editions of both PhotoScan and Amorph, as well as a free Training Edition of Tgi3D SU Amorph from the downloads page on our website.

      Enjoy!

      posted in Extensions & Applications Discussions extensions
      G
      gulcanocali
    • RE: Modelling a big boat from reality.

      @bjornkn said:

      That's a job for Tgi3D PhotoScan !

      Thanks Bjorn 😄

      @bron;
      Yes, Tgi3D SU PhotoScan would be a good fit for your project. If you can take good pictures of the boat from different angles, covering as much detail as you want, you can get pretty accurate measurements. You can then draw the boat from the photographs in SU using PhotoScan's additional tools inside SketchUp.

      Calibration and metrology tool is the key. Take a look at the video about the Calibration Tool and later the process in SU.
      [flash=480,385:n522fn92]http://www.youtube.com/v/lt_ktccfHvo?fs=1&hl=en_US[/flash:n522fn92]

      There is a free 30-Day trial edition that is the same as the full version except that the license expires after 30 days. It should be enough for you to help with the current project. You can download the trial version from here.

      Should you decide to give it a try, please feel free to contact us about any questions you may have during the process.

      posted in SketchUp Discussions
      G
      gulcanocali
    • RE: How to transform a normal room into an Ames Room...?

      Hi Simon,

      Yeah, I do not know a way to quickly apply the same transformation to all items in the room.

      But, I still do not get why you need to apply the transformation to ALL the points. The way I see it, if you preserve the "normal" view from front, all you need to do is to make sure other objects in the room maintain some "reality" in other views, i.e. table legs should touch the ground, if there is a picture frame on the wall it should stay touching the wall, etc and that does not require to update all the points of the object as in table example before.

      Anyways, I must be missing a point.

      Good luck. Do tell, if you find a quick solution, I am curious now 😄

      posted in SketchUp Discussions
      G
      gulcanocali
    • RE: How to transform a normal room into an Ames Room...?

      Hi Simon,

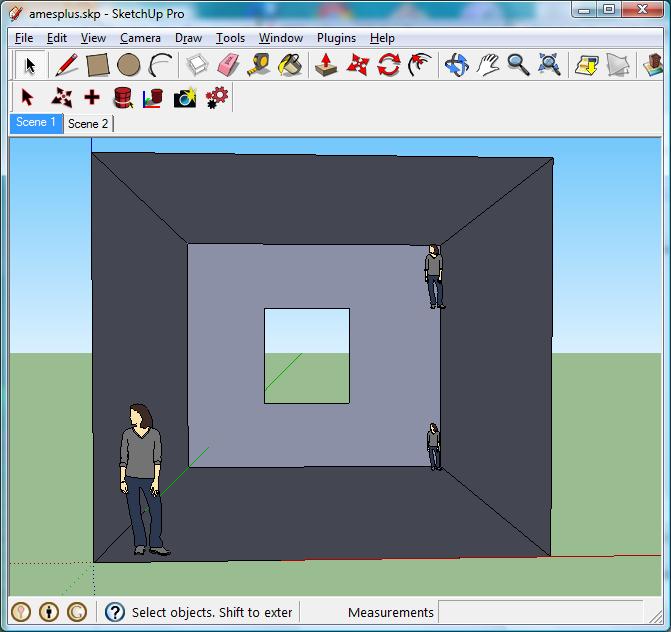
      No, you won't be able to apply the same transformation to the entire room at once. You would have to view lock all the vertices and then move each vertex one by one. And it turns out you do NOT actually need to adjust all the vertices. In the following example you would only need to adjust the table legs to "touch the ground".
      ames2.skp

      posted in SketchUp Discussions
      G
      gulcanocali
    • RE: How to transform a normal room into an Ames Room...?

      You can lock all the vertices from the same view by selecting the whole room first and from context menu (that pops when you hit right mouse button) perform the view lock operation. After seeing the explanation Ogan made a triple size Ames room, using Bjorn's procedure. To make the almost planar surfaces exactly planar he used idealize 'd' function of amorph.

      ames3.jpg
      amesplus.skp

      posted in SketchUp Discussions
      G
      gulcanocali
    • RE: How to do "ringcuts" (kind of)?

      Hi Alessandro,

      @surfingalien said:

      artisan (and eventually tgi3d) is something I'm consider to buy...

      Just FYI, cross section tool mentioned here is available unrestricted in the free Training Edition of Tgi3D SU Amorph.

      Regards,

      posted in Newbie Forum
      G
      gulcanocali
    • RE: How to make this?

      Oops, I forgot to mention that the video was sped up. 😳 It was more like 4+ mins. I sped up the video so that people would not get bored. That is how slow I model 😒

      posted in SketchUp Discussions
      G
      gulcanocali
    • RE: How to make this?

      Glad you liked it. Cross-section tool is one of the most favorite among the many features of Tgi3D SU Amorph.

      Nice renders. And your model looks way better than mine too 😄

      posted in SketchUp Discussions
      G
      gulcanocali
    • RE: How to make this?

      Hi cupko,

      You can use Tgi3D SU Amorph's cross section tool to draw the handle quickly. The good news is cross section tool is available and unrestricted in the Free Training Edition of Tgi3D SU Amorph 😄

      Below is a quick video to show how. I drew the initial shape with Follow Me and then used Tgi3D SU AMorph's cross section tool to re-shape it to the desired form.

      [flash=600,480:15hmun5f]http://www.youtube.com/v/R_5uO99_kRU?fs=1&hl=en_US[/flash:15hmun5f]

      posted in SketchUp Discussions
      G
      gulcanocali
    • RE: 3d curves

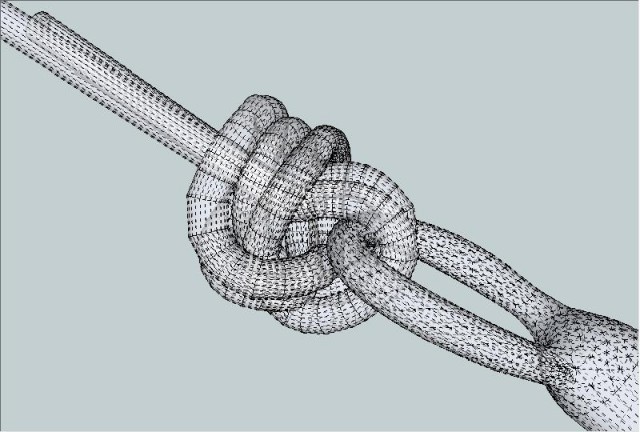
      Tgi3D SU Amorph's "view locking" feature also makes it very easy to draw curves in 3D. Simply draw the curve and "view lock" it from an angle you like and adjust the topology in other views. You can change the view lock to other views as you continue. Remember Ogan's palamar knot in the Speed Modeling Challenge #38 - Fishing? It would have been a lot harder to draw the initial topology of the knot without the "view locking" mechanism.
      palomar3.jpg
      Below is the video of how "view locking" works.

      [flash=480,385:3f72q944]http://www.youtube.com/v/0q4HLBfZCV8?fs=1&hl=en_US[/flash:3f72q944]

      posted in SketchUp Discussions
      G
      gulcanocali
    • RE: Modeling buildings from multiple matched photos

      @whiskeytangofoxtrot said:

      @gulcanocali said:

      Hmm.. That is weird... Could it be a scale issue? Did you scale the model properly, i.e. assign a distance between any two points, before exporting to SketchUp? SketchUp does not behave well when objects are very small.

      I thought it was, because the orbit tool was behaving the way it does when you are zoomed in really tight to the origin. I went back and scaled the model in the calibration program, and brought it back in. It didn't seem to solve the problem.

      One thing I did notice...the orbit problem only happens after I re-align the axes. I almost want to say it's still orbiting around the original origin point. I don't know, I'll have to play around with it further.

      OK, I am at a loss about the orbit problem you are experiencing at this point. We will continue to look further. It would really help if you could upload your model for us to take a look.

      @whiskeytangofoxtrot said:

      @unknownuser said:

      The quality of calibration is important as well, I am not sure if it would cause this problem specifically, but things sometimes do behave strangely if you open a badly calibrated model in SketchUp. Did you check the "point errors" tab in the Tgi3D SU PhotoScan Calibration Tool before exporting the model? Try to make sure that all the point errors are less than 1-2 pixels.

      Wow, 1-2 pixels? I was off by several, but I thought that was still good...before I got my camera issue straightened out, it was like hundreds to thousands 😄 Is that still realistic for big wide shots of buildings?

      The better the calibration the better the model matching the photos of course. But you can run the calibration with "Create calibration uncertainty information" option. After that you can check the distance between any two points and look at the uncertainty range provided. If the uncertainty range is acceptable for your application, you can use that calibration.

      posted in SketchUp Discussions
      G
      gulcanocali
    • RE: Modeling buildings from multiple matched photos

      Hmm.. That is weird... Could it be a scale issue? Did you scale the model properly, i.e. assign a distance between any two points, before exporting to SketchUp? SketchUp does not behave well when objects are very small.

      The quality of calibration is important as well, I am not sure if it would cause this problem specifically, but things sometimes do behave strangely if you open a badly calibrated model in SketchUp. Did you check the "point errors" tab in the Tgi3D SU PhotoScan Calibration Tool before exporting the model? Try to make sure that all the point errors are less than 1-2 pixels.

      If you still experience the problem, could you please send it to us by uploading it from the Support page on our website. Since it will have images, I assume it might be too big to upload here.

      posted in SketchUp Discussions
      G
      gulcanocali
    • RE: Modeling buildings from multiple matched photos

      @whiskeytangofoxtrot said:

      The sensor size info I found online is listed as "6.17mm x 4.55mm"...do these dimensions correspond to Length and Width, respectively?

      They correspond to width by height, respectively i.e.
      sensor width = 6.17mm
      sensor height = 4.55mm

      posted in SketchUp Discussions
      G
      gulcanocali
    • RE: Modeling buildings from multiple matched photos

      @whiskeytangofoxtrot said:

      also, the image info box, when I click on an image filename, has my camera make and model, and "6.5 mm" under focal length, and "35mm camera" under sensor size.

      The info I found online had my sensor size listed as 6.17 x 4.55mm, and my focal length as "equivalent to 35mm camera: 36-108mm"

      OK, I now figured out (I think) why it seems you could not save the sensor info. When you enter the sensor info into the camera info dialog box, you need to enter the camera make and model exactly as shown in the "Image Info" dialog (taken from EXIF info in the image file), because the make and model entered in the dialog box is compared with the camera make and model from the image EXIF info.

      The sensor size information (width and height) you see in the "Image Info" dialog box is a default "guess" value that the Calibration Tool tries to use when the camera is not found in its own database, but sometimes it is not a good guess for the actual camera, as is the case with your camera here.

      Now try to enter your camera information into the database one more time while making sure that camera make and model info is exactly the same as it is shown in the "Image info" dialog box. We will go over the warning message and the user interface here to make sure we provide better guidance and help to the user when we encounter a new camera that is not found in the Calibration Tool's own database.

      posted in SketchUp Discussions
      G
      gulcanocali
    • RE: Modeling buildings from multiple matched photos

      Hi wiskeytangofoxtrot,

      @whiskeytangofoxtrot said:

      So Im trying out the cgi3d photoscan product.

      👍 😄

      @whiskeytangofoxtrot said:

      Im having problems with the camera calibration tool. Once I set up all my matched points and try to run the camera calibration, it tells me that it doesnt recognize my camera sensor size, and prompts me to put it in manually.

      I do this, and click save on the camera settings dialog box - but it does not save the setting. The dialog box is blank again when I re-open it.

      Another way to see if the settings have been saved, is to double click on the image name in the “Photo Files” tab of the “Project” window and check the information on “Image Info” dialog box. Do you see the sensor size information there?

      If a camera is not found in the database, the user can add it to the local database using the camera info dialog box (Edit --> Camera Info...) which I believe you tried to do. In that case, please make sure that the local database file was created successfully by checking “User camera database:” file path from “Edit --> Preferences” in the preferences dialog box.

      @whiskeytangofoxtrot said:

      Also, when I calibrated the camera (apparently without saving my sensor size), and build the model in the calibration program, I get a warning that some points are "behind the camera", and this will cause inaccuracy.

      When you get this message, in almost 99% of the time it means that calibration has failed. Please make sure that you have enough matching points (roughly about 10 per photograph) and there are no matching inaccuracies, i.e. wrong points have been matched.

      After calibration check error information on the “Point errors” tab. This list gives you an idea about matching errors. It is possible to reduce the point errors by adding more points and adjusting the positions of the existing points. Big point errors usually mean that there is a mismatch of points, i.e. there is at least one point in one of the matched points group that does not belong in that group.

      @whiskeytangofoxtrot said:

      When I export the project and open it in SU, there is a weird axis alingment. The manual doesnt talk about how to align the axes once you import the project from the calibration program.

      Is this (axis alignment) supposed to be done via view locking?

      There are two ways to align axes:

      First one is, to assign x,y,z coordinates to some of the calibration points to make sure axes are aligned to the objects in the photos. You need to give coordinates to at least three points to be able to align all three axes. However you need to be careful that the relative coordinates of these points must be meaningful. The bigger the error in the coordinates the larger the calibration error. If you enter some really wrong coordinate values, calibration may fail altogether.

      Second method is what Rich quoted, i.e. to use SketchUp native "Tools --> Axes" command followed by "Edit --> Update Tgi3D page axes". In this method, you can guarantee exact alignment of only one axis.

      posted in SketchUp Discussions
      G
      gulcanocali
    • RE: Making Sphere

      FollowMe tool

      posted in Newbie Forum
      G
      gulcanocali
    • RE: Modeling problem (help appreciated)

      @marcell86 said:

      Hi gulcanocali
      First of all I would like to thank You for help 😄 it's really helpful. Now when I know what to deal with it I have one more question, how to pull pull such organic shape.
      I don't want to be so flat.
      Best regards,
      Marcell

      No problem. Glad if I was helpful. For push/pulling such organic shapes, JointPushPull plugin http://forums.sketchucation.com/viewtopic.php?f=323&t=6708&hilit=jointpushpull by Fredo6 would be very useful I think.

      posted in Newbie Forum
      G
      gulcanocali
    • 1 / 1