Flattery would be a surprisingly apt name for this plugin.
PS. Googled it and downloaded/installed it. Have to work with it a while and see if it fits me.
Thanks
Flattery would be a surprisingly apt name for this plugin.
PS. Googled it and downloaded/installed it. Have to work with it a while and see if it fits me.
Thanks
Forgive me I don't mean to be flip. That's the most succinct way to describe what I need.
If one draws an object using a single plane, such as one might make a pattern out of a single sheet of metal, is there a plugin that will render that drawing into a flat view that could be used to print and pattern?
I drew this very basic table lamp to be fabricated out of a single sheet of bent aluminum (blue). It utilizes a magnifying lens element and illuminated frame (in gray).
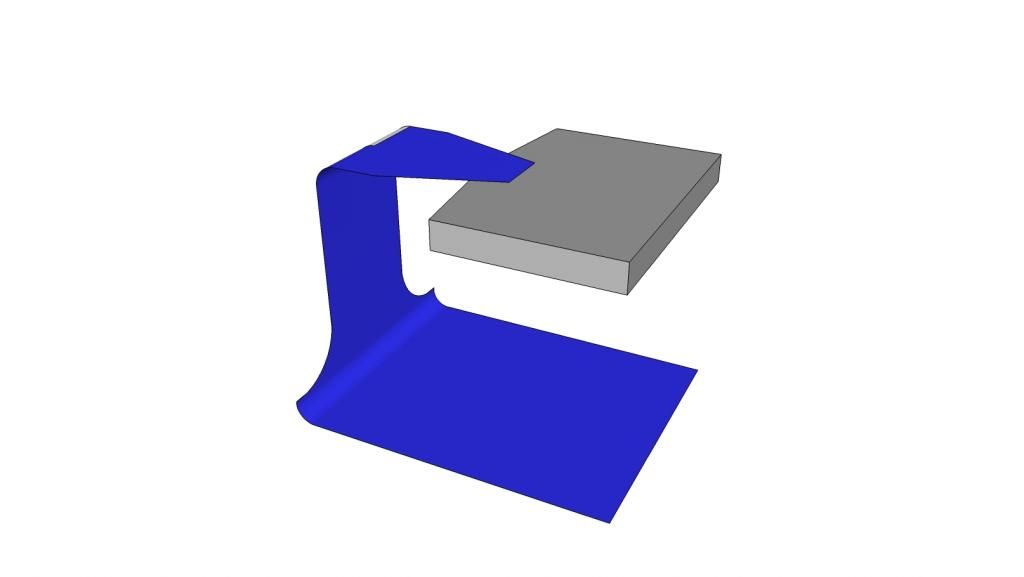
How can I take the blue section and portray it in one dimension in order to print to a useful scale and make my cuts/bends?
Thanks for any help,
Brad W
I've bent to the learning curve for a few years now and feel like I have an intermediate knowledge of Sketchup. It's a real pleasure to be able to move fluidly among the options, tools, and plugins to build models.
One small part of Sketchup that continues to bedevil me is the measuring tool. For the life of me I cannot understand how to defeat the "enter value to resize model" option when trying to lay a guide on my model. I've read the tutorials. I've posted here at least once in the past on the topic. I've fiddled with every possible iteration of the ctrl key while using the measure tool. It's just astonishing to me that it still defeats my understanding. 90 percent of the time Sketchup wants to resize my model. Occasionally I get the right key combination to simply lay a guide without being asked to resize my model. What the heck am I missing?
Will someone please provide a "Sketchup; Enter Value to Resize Model for Complete Imbeciles" tutorial for me?
Thanks so much.
Thank you very much for that Tech Dave 2.
I'm wondering if after all I should enroll in some CC course in CAD to get a few basics down. I literally cannot follow the recommendations here because so many rudiments are presupposed in the posts. Very often directions begin half a dozen steps into the user interface files with the assumption that the poster knows at least this much about his question. I often do not so I have to leave the thread midway and head off to google or sketchup help files. Often I still cannot find those rudiments. That's been a steady refrain of mine here.
In one of the links you sent Gaieus starts out explaining
@unknownuser said:
Here is where you find the edit component options on a PC after you go to the In model library and select one of the components:
This is supposed to bring up one of the screens you've shown. I tried every angle to determine what he was describing. I never was able to navigate to such a panel. I haven't the foggiest idea how you were able to rotate that speaker in line with the plane of one side of the rectanglular box. And I read your other woodworking posts as well. But finding those submenu panels, either by toolbar, top menu, or context menu, just escaped me.
This is near the point in other threads where others get frustrated with my obtuseness, irritation, and inability to follow instructions. But I've really promised myself to keep calm.
I really do enjoy playing and working with sketchup. I've been doing so on and off, I guess like others might play a video game for entertainment for over six years now. I like to draw semi complex models before attempting them, much the same as the woodworking community does. I've build a number of home theater speakers, installed my furnace, added a large gazebo, redesigned the garage, and dozens of other small things.
I genuinely do not believe that I lack the capacity for this. I lack a bit of patience at times. But this matter of trying to align two objects on the same screen/file seems like a mind bending oversight in Sketchup. Six users should not be speaking at often cross purposes to describe their 'favorite', and generally needlessly complex, method of doing this simple simple simple and common common common task. It ought to be a tool icon in the large tool set whereby one just joins two objects at desired point and then clicks/moves four more times to establish points adjoined in the remaining axes. The fourth click would simply join both components exactly where you wish, perfectly aligned, without a lot of fudging.
Hopefully I will find the panels/gui you're describing and go from there.
@unknownuser said:
Interesting bit of editing there. Nothing Freudian, simple sarcasm.
If you filled in your profile we might know what system you are using, But I'm guessing you haven't moved to SU13 so you are either SU7 or SU8 if so.
Click View on the top tool bar, move your mouse down ever so slightly till it hits the menu item, Toolbars,
Move the mouse over and down the list till it hits the one called QJSALIGN and click it
a new toolbar should have appeared for you to use. It has colour coded icons to show you which axis it will align to.If this isn't where it should be then you must not have installed it properly.
As to your alignment question, I have attempted to explain how to you before and you only get upset so I politely choose not to get involved again.
Merry Christmas and a Happy New Year to you.
Box, I did follow your video, and followed your advice, and (to my mind anyway) responded directly and respectfully to you with
@unknownuser said:
Thank you very much for the workaround. Sincerely.
But it only works for objects with all 90degree corners. In fact I'm presently, and usually in these situations, dealing with more complex objects.
...which is true. Then I followed that thanks with a generalized outpouring of anger at yet not getting anywhere with this.
To which you helpfully added
@unknownuser said:
Frascati: a fairly fullbodied whine from italy.
Then you provide me one more video, thank you again by the way, and couldn't resist dropping a snide little "happy?" for me at the end.
A few times now it's been me called childish simply for expressing outrage a little to volubly. Seriously?
Neither of your examples works for me. I've said that quite clearly in that thread and here as well. What do you suggest by my edit? Just out with it for god's sake. Really. What's with all the fun and sarcasm here? I just backed off on the swearing. I edited no other content than those specific words. What do you find so "interesting"? Did it change, even one small bit, the context relevant to our exchange? Can you explain how for me? I started a fresh thread on this hoping to escape some of this nonsense so I'll just leave this alone and back out of it. Please BOX, do resist any temptation to make me any more miserable there.
Or just petulantly ignore the thread. I'm just getting arguments and sarcasm on balance anyway.
Two objects/components that do not share any axis in common. How to fix that? How to reset them both to occupy the same xyz. Anchoring one point and then using the rotate tool does not work for me in most instances. If you can show me how you used this method on the attachments below I'd be grateful.
I'm just going to start fresh here and hope for the best.
Here is a very simple example.
In this particular case it seems complicated by the object being out of alignment with its wireframe. Don't know how that happens. But it throws a wrench into a few of the instructions presented in past posts here on the topic. No matter what I do, explode it, regroup it, single/double/triple click it... I cannot get the context menu to display any "align" options. So to begin with, how to correct this if it's even necessary.
But even with a fresh slate, so to speak, when I have two very simple objects that eventually get out of line I'm yet unable to realign them anyway.
I have tried half a dozen plugins to no avail. I've followed at least a dozen videos online but none seem to address what I'm talking about... astonishingly, since I'd have sworn that this was a need most users would run into on a daily basis.
There are two .skp files below.
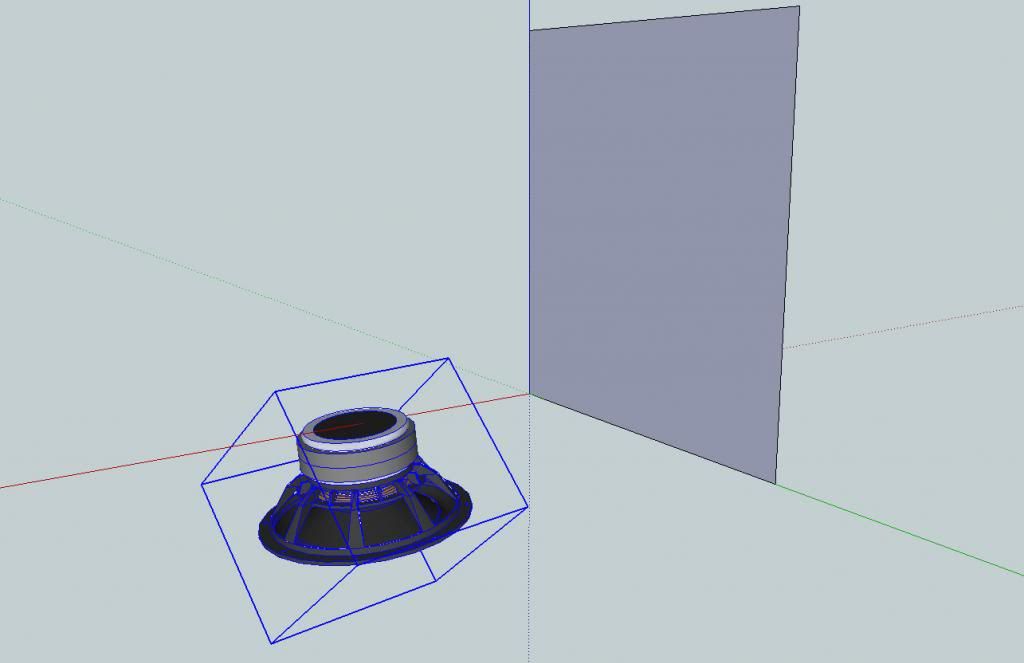
Would someone please reorient the single speaker component in the attachment so that it correctly occupies a flat plane as if sitting on a tabletop with the cone upward (blue axis pointing up out of the center of the cone). Please explain step by step how you did this. If it is not a simple procedure I will probably just gloss over it and go on to the next post. I'm looking for something intuitive, quick, and error free. Grabbing at corners and rotating is fraught with all but invisible micro errors that tend to crop up and bite you much later on in the drawing.
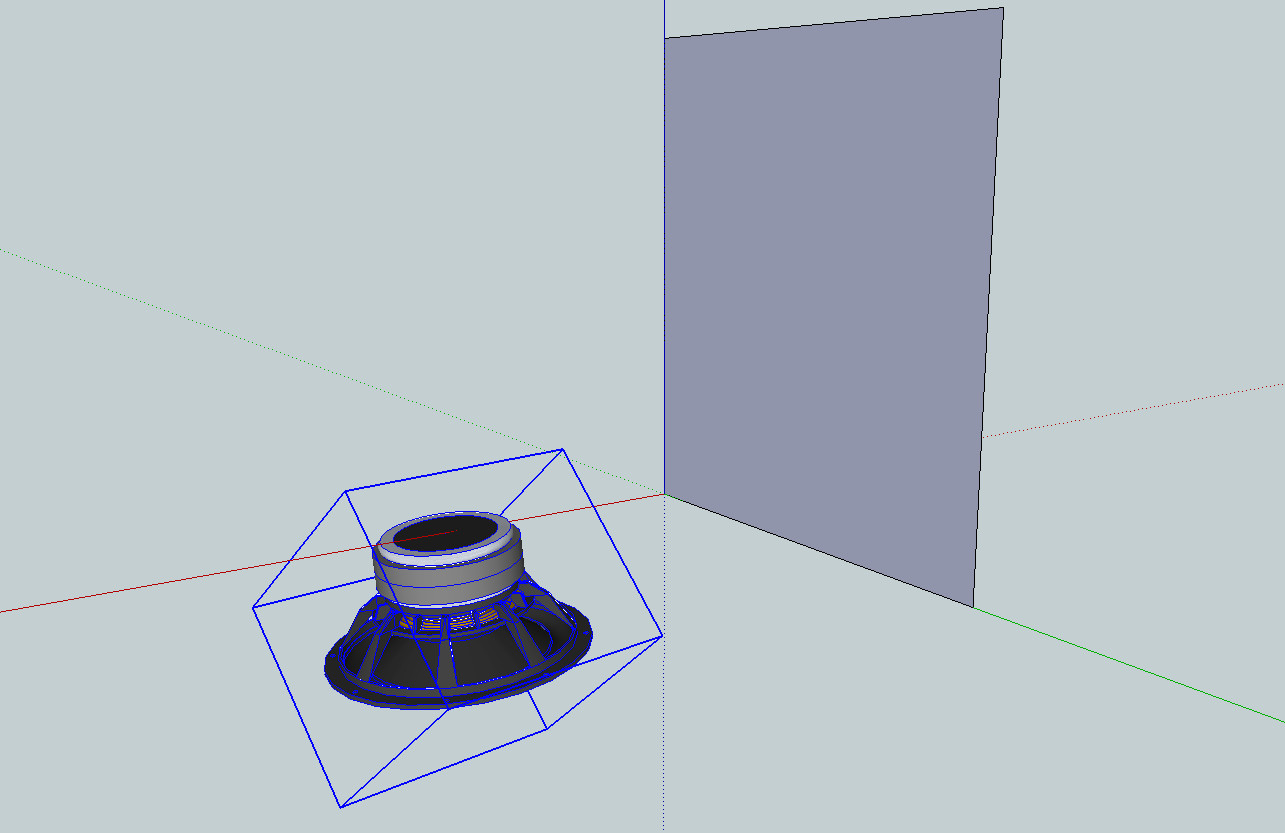
With the second attached image, please place the speaker flat on the nearest face of the rectangular box. Please describe how you did it.
Anyone who participated in my older posts I hope you will allow me a fresh start here. I apologize if I was unable to follow a couple of your suggestions. I followed to the letter and came up empty each time. If you'd care to reiterate more clearly, bearing in mind this is the newbie section, I'd be happy to try again. I did not ignore any earlier suggestions, I just couldn't get anywhere with them.
If you do know of plugins appropriate for this, PLEASE tell me the names. I've searched and installed half a dozen of them.
Thanks so much.
I'm so damn sick of this stuff that I'm bordering on rampage. One more of, dozens, examples of finding a plugin that I'd like to try.. downloading it, installing it in my sketchup plugin folder, and then not provided with any heads up on HOW TO FIND THE #$%%&^ THING!!!!!!!! I go online to google just to discover half a dozen threads indicating that others have the same frustration. Every %$^&^& TIME a plugin is offered up in a thread and discussed it involves half a dozen or so smug %%^%$##'s who forgot how irritating it can be to crack the learning curve toward guessing WHERE THE HELL THE AUTHOR DECIDED TO PUT THE PLUGIN IN ORDER TO USE IT!!!!!!.
Go ahead. Kick me off. I'll come back under a fresh name and start anew. I'll do it anyway just to keep my blood pressure down. A plugin, that I know is going to take an hour or so to get the hang of to be useful to me, and yet part of that struggle must, just about every time, require me to go outside the thread I discovered it on here in sketchucation, half an hour or more through multiple links via google, JUST TO FIND THE %##$$%i& THING IN THE MENU DROPDOWNS!!!!!!
@unknownuser said:
Hmmm, not a tool I have used before so I installed it. As the first post in the thread shows a toolbar I simply looked for a toolbar after installing it and would you believe it, it was just sitting there smugly waiting for me.
"smugly"? There's a whiff of Freudian slip there. Depressingly common of these threads when someone gets a little over the top frustrated like myself. Pile on even if you don't have anything really substantial to add such as help to find and use the plugin, or some more elegant method of accomplishing this very fundamental task in Sketchup.
No link in my toolbar. Is there another "bar" i'm missing? Is it the toolbar along the side as "toolbar" would suggest? Or is it in the menus?
It almost does not matter. I looked, again, for solutions to this crap and was once again utterly demoralized by discovering threads I started as long as six months ago that never did eventually address this. For a program like Sketchup not to be able to do this with it's basic functions, and then require an addon script that heaps layers of complexity on top of my principle, oft stated, need is just mind bending.
So Box, with 1600 posts here, and never finding the need for this plugin, would you mind sharing with me your method of accomplishing the following...?
I have two objects on the screen.
neither occupy the same x,y,or z plane.
I want to be able to click a point (a if you will) on both objects and fasten them, or move one to the other, in one move or click. Easy enough at this point with the move tool.
...click point 'b' on the second object, click any point along the same plane on the first objcet, and align them together on that axis with a single click or move.
...click point 'c' on the second object, click on any point along the same plane in the first object and with this third operation align them precisely within all axes.
Better yet, by far, would be some method of selecting one object, selecting the second object with the shift or alt key so that they were both selected but understood to be related in the next move, and then having ONE dropdown command under tools to "align objects x,y,z.
So all bad blood aside, please, someone tell me that my request has simply been misapprehended or misworded all along and I am, in fact, able to do this with sketchup wit a few simple commands.
The couple of videos on youtube that address this need to align two objects are JOKES. Moving one point to an anchor on the second object and then fiddling around with the rotate tool, hit or miss, to bring the next two axis points into alignment. Watch these. It's actually laughable.
Thank you very, very, much for that. I don't recal the tutorials warning specifically against it.
I had meanwhile thought I'd found a fix, but it was only half a fix (if that). I was working in .5mm letters. I changed the scale of the drawing so that I was working with .5meter letters and -almost- all of the z-fighting disappeared.
I notice your letters are aligned along the red axis. Is that the 3d lettering default? If I align the object along the red axis according to the text I want to place will that always eliminate the need to rotate it (assuming, of course, that I want it to be conventionally left to right and horizontal across the object)?
I installed the plugins manager and installed TIGs 2d text plugin. Subsequently can't find it and once more (grrrrrrrrrrrrrrrrr) I wish that at a VERY MINIMUM instructions on where to find a plugin after installing it were provided. It's installed there under plugins manager.
I attempted the very basics of 3d text once again. Drew a simple box shape. Placed 3d text on it and oriented it. Immediately had the problem described. Placed same test on side of box. That seemed to go ok. Saved the file, and the top 3d text lost its fill. would not take it afterward either.
I went to my original drawing and tried there again. This is what happened on the first attempt.

What is wrong with this? Glitch in my installation? This the only one I've seen in two years of the same install. When I try to fill that it will only fill part way. When I try to save it the fill will disappear. It's almost like the 3d text cannot make up its mind what plane it wants to fully inhabit with part of it obscured. Kind of like that confusion sketchup returns when you place two planes in precisely the same place and get that shimmering ray effect. But this has nothing to do with complex drawings with hidden planes and features. This happened on a newly drawn flat plane.
Tell me you know what is happening here please?
I didn't find it took that many steps. I must have been doing it wrong.
By all means, school me. Can you eliminate any of my efforts to get me there quicker?
I went back to square one. I just made a simple rectangular object. I used 3d text to label it. I painted the text black. So far so good. I saved it. Dammit if it didn't save with the fill missing again. Nothing I did would correct it.
So what am I doing wrong?
*Honey, do you know the zip code to love?
Uh, no?
That's why you're not getting any male in your box!*
Ya gotta admit, you're asking for it with that name:)
I did see that tutorial on 3d text. I followed it to the letter (can I get a rimshot?)
First problem was that nonsense with the rotate tool. I had to put 28 labels on one object and rotate each damn one as I went. Admittedly, there is probably a simple way around this, but once again why make such a simple need so complicated? Just to type a label on an object?
Then I had to go back to FAQs and tutorials just to find out how to fill the letters in. Paint them... of course! Ok, so rotate, and paint, each label that I want to add to my object.
Ok, that took me 10 minutes that should have taken one. One minute should be sufficient to type a label on an object. Ok, I'm coming across curmudgeonly again and inviting rancor. I picked my avatar carefully. Please try to get along. We've all got our faults.
Now for the denouement! That would be "Save" of course. I save and get that heartstopping little warning that the project you've been working on for hours requires repairs, "would you like to make them now?". Well eventually I'll just have to, so go ahead I say.
Repairs made, the resulting saved file removed half of the paint fills of the 3d text on my object. Nothing to be done. The letters would not accept paint again. I zoomed in and noticed that some of the letters were missing segments. Aha! Solved!. I attempt to replace segments with line tool so that the paint will fill.... and the 3d text will not accept the lines. No go.
You see what I'm saying now? This NONSENSE of the first order. I JUST WANT TO TYPE A WORD ON AN OBJECT AND HAVE THE ABILITY TO RIGHT CLICK ON THAT WORD AND CHANGE FONT STYLE AND SIZE, ITAL, BOLD, ETC.
It's just inconceivable to me that Sketchup can't do this ultra simple task without a lot of problematic rigamarole.
So there's no good solution.
I'll just wing it somehow.
This has to have been covered ad nauseum but I cannot find the solution so help me. I've searched, watched youtube tutorials, and pulled hair out of my head. A few forum threads have gone into some absurdly complicated workarounds that I cannot follow.
It has to be something simple that i'm missing.
Let's say I have a box. I want to label it "box". I want the label to be a permanent part of the image as if I've literally painted "box" on it.
Try as I might I cannot accomplish this simply. Zoom on the box and the text does not zoom with it. Rotate the box and the text floats all over the place according to sketchup's parameters that I don't wish to utilize. I just want to paint "box" on the object as if it were a literal object in my hands. I've tried to utilize 3d text but get mired in options with seemingly no simple choice to do what I'm asking.
Am I making sense?
How do I do this?
thank you. i'm sorry that was such an easy one. i googled to no avail.
i'm guilty, after a few years of playing with sketchup, of not sitting myself down to a top to bottom investigation of all the menu items and their purposes. i've learned as i go and sometimes the easy stuff just eludes me.
I'm not even sure what they are technically called.
The three lines on the opening screen of every project.
Sometimes they intrude a bit on the final drawing and I would like to erase them.
Is it possible? Thanks.
Thank you very much you guys. Good options. Drawing on the vertical blue axis was especially helpful. Makes the movement of the object with the orbit tool more intuitive all around and enables rotating it as I wished without the need to select all or use other plugins.
This is one of those frustrations that I've learned to live with and never resolved.
Imagine a drawn refrigerator.
When I want to rotate to see its side the orbit tool seems to want to tip it in every direction BUT that which would enable me to see the side. Eventually when you arrive at that side with the orbit tool the fridge is upside down.
So my "workaround" has been to tip the fridge forward, select all, use the rotate tool, rotate it 90 degrees, and tip it backward again. Very tedious.
If the 'position camera' 'look around' or 'walk' tools are supposed to facilitate this move I have yet to figure out how to use them so. I've tried without success.
How is it done?
maybe a good thing that I didn't figure it out the plugin. after looking at it for a while i realized it would be much easier to simply turn that top bevel to face the bottom one and then I only have one odd angle to deal with when making this. All i wanted was a sketch to pull dimensions from in order to cut and tig weld this up. I was actually able to do that better, in this case, without the plugin.
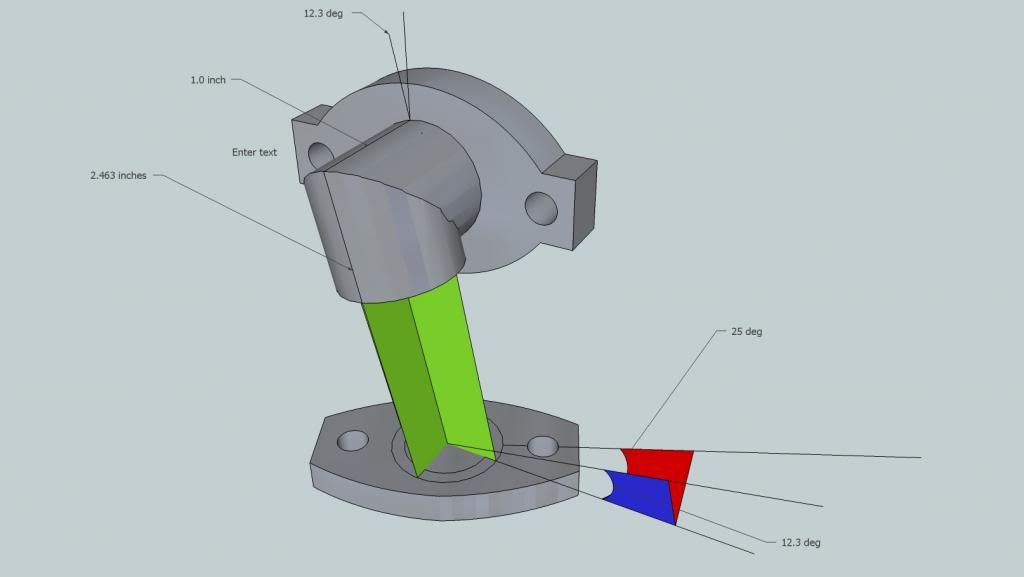
I'd be grateful for any response however to my basic question on how to sketch a tapered pipe with two off axis end faces. The only option in Tapermaker, it seems, is to make certain the path between parts terminates perpendicularly to the face you want angled. There are many many cases though in which that is not the result wanted.
Using the rotate tool to move the faces into the required degree of bevel won't work either since the cross section to the extruded path changes as you tilt it.
I realize there are "more ways to....." in sketchup, like push/pull the face into a solid before rotating it, intersecting it with model, and then erasing away the excess. I'm surprised that there is not a plugin that eliminates such time consuming work-arounds.
Hello,
I've used taper maker before. this time i'd like to draw a tapered pipe with beveled/angled ends.
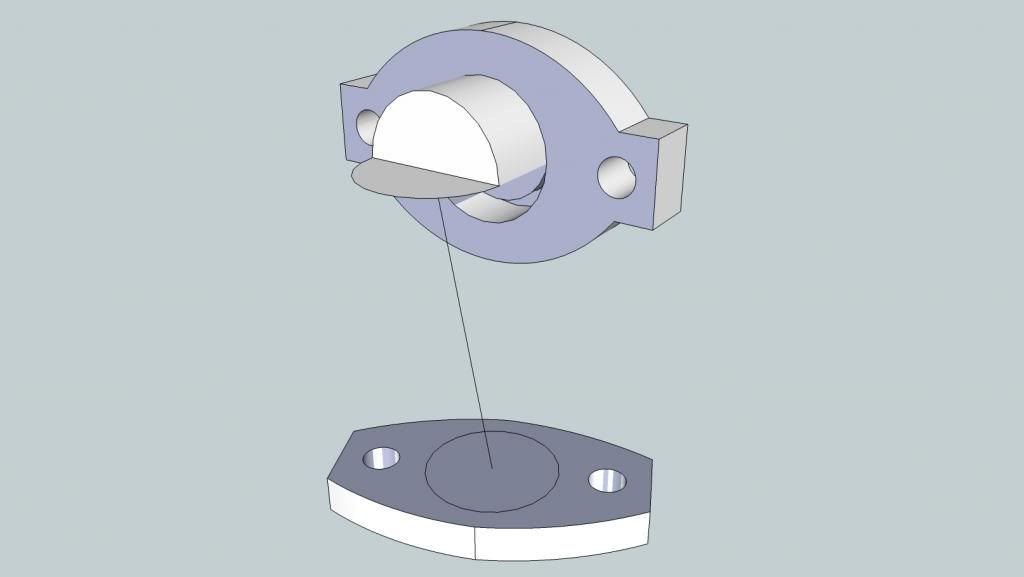
The pipe is straight. both ends are beveled on both axis.
The tutorial at the end of the following page
http://www.drawmetal.com/tapermaker
appears to offer this possibility, but I cannot seem to find the option/panel they've opened for the tutorial so help me.
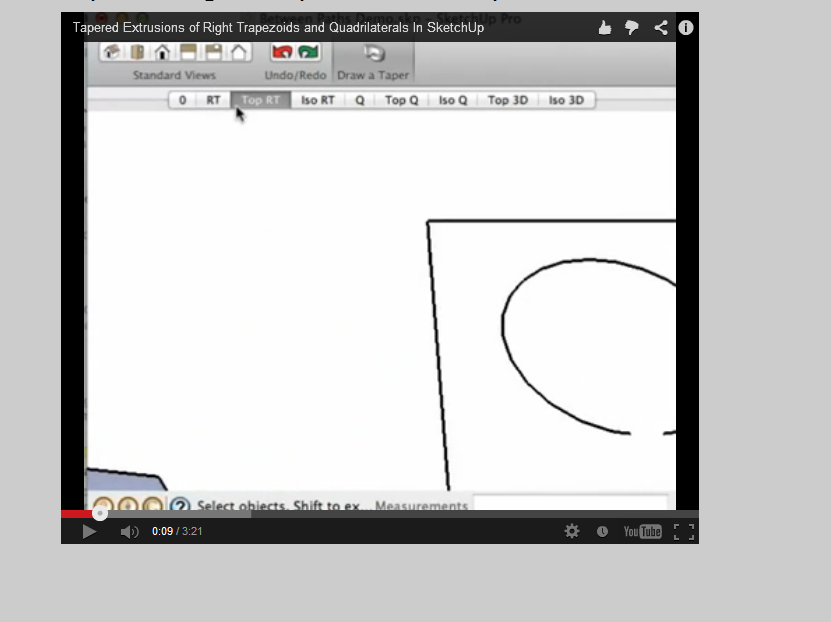
Is it another plugin that they don't mention or presume I have?
Is there presently any other plugin that will do this more elegantly?
By that I mean skipping all the data input and simply requiring selecting all three objects, both ends and the line of travel, and clicking "enter".
Thank you very much for the workaround. Sincerely.
But it only works for objects with all 90degree corners. In fact I'm presently, and usually in these situations, dealing with more complex objects.
So....
It's been two months trying to find an answer to this question...
And I don't care any longer if the mods delete this thread or delete my account entirely, but..
I'M SO FUCKING FED UP WITH THIS GOD DAMNED NONSENSE THAT I JUST QUIT. FUCK IT ALL. THIS IS SO GODDAMN RIDICULOUS THAT IT'S BEYOND CRAZY ANYMORE. ALIGN TWO FUCKING OBJECTS IN A 3D PROGRAM? ARE YOU FUCKING KIDDING ME??????? DOES ANYONE WHO IS ACTUALLY EXPERT IN THIS PROGRAM ACTUALLY CHANCE BY THESE FORUMS???
GET RID OF THIS THREAD. IT'S A FUCKING EMBARRASSMENT FOR ME TO BE ASSOCIATED WITH THE QUESTION ANYMORE. WE'LL JUST PRETEND THAT IT'S SOLVED.
GOOD NIGHT.