sketchucation logo sketchucation
    • Login
    ℹ️ Licensed Extensions | FredoBatch, ElevationProfile, FredoSketch, LayOps, MatSim and Pic2Shape will require license from Sept 1st More Info

    Seamless texture techniques

    Scheduled Pinned Locked Moved SketchUp Components, Materials & Styles
    sketchup
    35 Posts 29 Posters 12.2k Views 29 Watching
    Loading More Posts
    • Oldest to Newest
    • Newest to Oldest
    • Most Votes
    Reply
    • Reply as topic
    Log in to reply
    This topic has been deleted. Only users with topic management privileges can see it.
    • massimoM Offline
      massimo Moderator
      last edited by

      I have Pixplant, but it's not very good with wood. I also use sometimes a Phototoshop plugin called tiler. I don't know if it works in Paintshop but you can use it in some photo viewer like, for example, XnView.

      1 Reply Last reply Reply Quote 0
      • soloS Offline
        solo
        last edited by

        Thanks guys, I'll give those a try, I noticed that both Photoshop and paintshop use the same plugin extension so they will work.

        I have been using Pixplant for over a year now to create displacement and normal maps, but not for seamless textures, not sure I know how it will work.

        http://www.solos-art.com

        If you see a toilet in your dreams do not use it.

        1 Reply Last reply Reply Quote 0
        • pugz1983P Offline
          pugz1983
          last edited by

          Hi guys,

          I use Pixplant and the redfield plugin, but both have problems with wood. For wood I first give it a try in GIMP. That's a free photoshop type app. It has a filter for it. You can find it under filters->Projections-> make seamless

          But this doesn't work perfect for all textures, but better than pixplant anyway.
          Hope this helps.

          Greetz Twan

          1 Reply Last reply Reply Quote 0
          • H Offline
            hilly
            last edited by

            i always find using the classic offset method works best (v easy in photoshop). some trial and error occasionally involved but works 99% of the time.

            1 Reply Last reply Reply Quote 0
            • simon le bonS Offline
              simon le bon
              last edited by

              Hi guys,

              I have heard the best from experimented people who have tried many solutions about Texture Maker (you can try the evaluation version)
              And
              This Making normal maps from photographs tutorial will may be makes sens to you!? (I'm just beginning to begin to study the bump map questions)

              and in case:
              Open Source Normal Map Generator ://: SSbump Generator 5.3 w/ CUDA
              😕 simon

              1 Reply Last reply Reply Quote 0
              • S Offline
                ScottPara
                last edited by

                Pete,

                Things like wood and fabrics that have a unique or complicated pattern are going to be difficult for many programs to process without having issues. It may be best to use something like Genetica Studio (http://www.spiralgraphics.biz). I use Genetica as well as Pixplant for 95% of all my textures. I also have and use Imagesynth for blending 2 images together but not nearly as much as the other 2. You also might want to try FilterForge. Making your own textures is going to give you better results as you can control more aspects of the process than sampling a small or even large image as typically it does not show the full pattern or repeat.

                My texture arsenal:

                Pixplant 2
                Genetica Studio
                Imagesynth
                Photoshop CS5 Ext
                FilterForge
                Crazybump

                Scott

                Love the fact that some HATE my avatar.....

                1 Reply Last reply Reply Quote 0
                • EdsonE Offline
                  Edson
                  last edited by

                  pete,

                  looking around in bookmarks filed over time I found these entries related to seamless textures. I hope some of them will be of use .

                  http://www.bricksntiles.com/
                  http://www.red-field.com/filterSeamlessWorkshop.htm
                  http://www.seamlesstexturegenerator.com/

                  regards.

                  edson mahfuz, architect| porto alegre • brasil
                  http://www.mahfuz.arq.br

                  1 Reply Last reply Reply Quote 0
                  • TIGT Online
                    TIG Moderator
                    last edited by

                    Don't forget that many of the 'PhotoShop' plugins [like Red-Field's] also work with free 'Gimp' if you have the Gimp 'pspi.exe' plug-in tool, and you put them into the correct folders etc...

                    TIG

                    1 Reply Last reply Reply Quote 0
                    • Chris FullmerC Offline
                      Chris Fullmer
                      last edited by

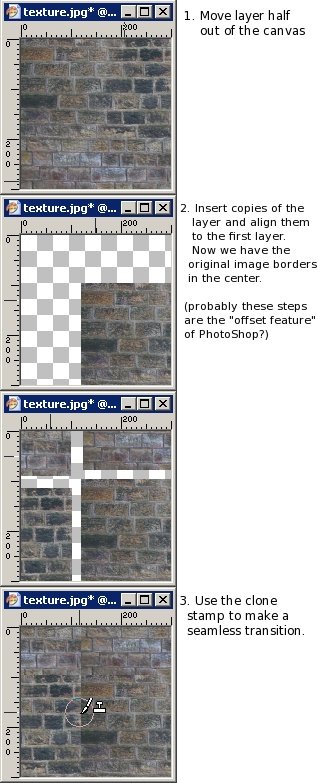
                      Does Paintshop have an "offset" feature built into it? I just do the standard Photoshop trick of offsetting an image in the x and y directions, so that the seams then are showing in the middle of the image. Then I carefully go through and clean up the seam with clone stamp tool or whatever tool I need. Can you do it like that? I could explain it better if that makes no sense.

                      Chris

                      Lately you've been tan, suspicious for the winter.
                      All my Plugins I've written

                      1 Reply Last reply Reply Quote 0
                      • D Offline
                        dedmin
                        last edited by

                        http://www.mediachance.com/pseam/index.html
                        http://www.mediachance.com/patternstudio/index.html

                        1 Reply Last reply Reply Quote 0
                        • EdsonE Offline
                          Edson
                          last edited by

                          @chris fullmer said:

                          Does Paintshop have an "offset" feature built into it? I just do the standard Photoshop trick of offsetting an image in the x and y directions, so that the seams then are showing in the middle of the image. Then I carefully go through and clean up the seam with clone stamp tool or whatever tool I need. Can you do it like that? I could explain it better if that makes no sense.

                          Chris

                          a short tutorial would be great, chris.

                          edson mahfuz, architect| porto alegre • brasil
                          http://www.mahfuz.arq.br

                          1 Reply Last reply Reply Quote 0
                          • Chris FullmerC Offline
                            Chris Fullmer
                            last edited by

                            I like the brightness level correction ideas there Jan. I have not done that before, but I like how it sounds. I'll give it a shot next seamless texture I make.

                            I'll try to do a quick video on this process.

                            Chris

                            Lately you've been tan, suspicious for the winter.
                            All my Plugins I've written

                            1 Reply Last reply Reply Quote 0
                            • L Offline
                              linea
                              last edited by

                              Have to say if you haven't tried Make Seamless in Gimp it is worth a look.

                              1 Reply Last reply Reply Quote 0
                              • A Offline
                                Aerilius
                                last edited by

                                I often use the same technique with the brightness correction. I always thought it is a bit unprofessional and Photoshop owners would surely have a real tool for that, but it's great to see that others are doing it the same way.

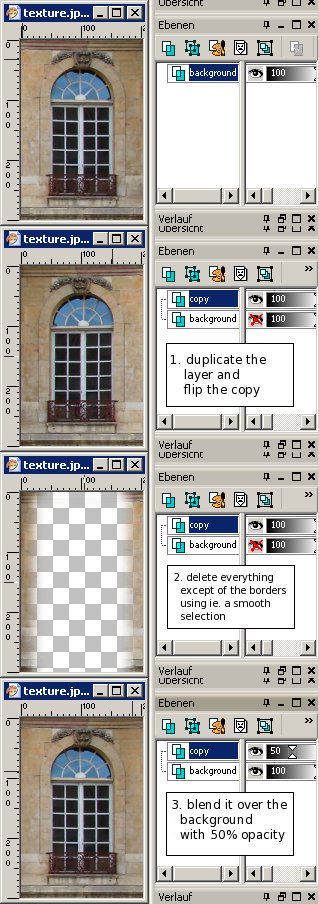
                                I have already tried some texture programs or plugins and wasn't satisfied as they often created just a blurry cross-fading without considering fine details like grooves of a wall.
                                Here are two ways how I do it (PaintshopPro tutorial for Edson 😄)
                                tileable1.jpg
                                and the "sleazy" way
                                tileable2.jpg

                                1 Reply Last reply Reply Quote 0
                                • PixeroP Offline
                                  Pixero
                                  last edited by

                                  @chris fullmer said:

                                  I like the brightness level correction ideas there Jan. I have not done that before, but I like how it sounds. I'll give it a shot next seamless texture I make.

                                  I'll try to do a quick video on this process.

                                  Chris

                                  There is no process that works for every image. Thats why plugins rarly does a good job. You have to adopt and try different paths.
                                  Sometimes several passes of the above mentioned technique might be needed.
                                  Another way is to use Image->Adjustments->Shadows/highlights with advanced settings.
                                  The best way is to photograph with 50 to 100 mm with even diffuse lighting on a cloudy day and photographing several different shots of the same texture which then can be made into a large texture to further reduce tiling.

                                  1 Reply Last reply Reply Quote 0
                                  • PixeroP Offline
                                    Pixero
                                    last edited by

                                    Argh! 😠
                                    I wrote a whole tutorial and when pressing Submit something went wrong and it didnt get posted. Well well I'll try to rewrite it AGAIN...

                                    Short Photoshop tutorial:

                                    First make sure the image is somewhat evenly lit. Otherwise it will be impossible to make it tileable.
                                    If it isnt, do this: Make a duplicate layer of the image and turn down saturation to grayscale and invert it.
                                    Increase contrast with Levels if needed. Then gaussian blur the image quite much as we just want to correct over all lighting. Now set that layers blend mode to overlay and turn down opacity until the image looks more evenly lit.
                                    What "overlay" does is that it darkens the bright parts and lightens the dark parts so we hopefully ends up with a more evenly lit image.

                                    Now make duplicates of both layers and flatten then. This way you have the original layers there for any future editing.
                                    With the two layers flattened go to Filters->Other->Offset and set horisontal and vertical offset to half the image width.
                                    Make sure you have "wrap around" choosen.
                                    Now clone away the edges and use several different clone sources so it's not obvious its a cloned image.
                                    For images that need much editing it can be a good idea to have a copy of the un offset image underneath and use a layermask on the top layer to paint away the edges and show the image underneat.

                                    A good practice is also to remove any too obvious part of the texture as these things makes tileing more visible.

                                    Another good rule is to use textures that are quadratic with sizes such as 256x256, 512x512, 1024x1024 and so on since they use the least amount of memory compared to their size.

                                    Hope this helps!

                                    1 Reply Last reply Reply Quote 0
                                    • N Offline
                                      notareal
                                      last edited by

                                      @chris fullmer said:

                                      Does Paintshop have an "offset" feature built into it? I just do the standard Photoshop trick of offsetting an image in the x and y directions, so that the seams then are showing in the middle of the image. Then I carefully go through and clean up the seam with clone stamp tool or whatever tool I need. Can you do it like that? I could explain it better if that makes no sense.

                                      Chris

                                      I often use this method. For good result it requires that image has even illumination on edge areas.

                                      Welcome to try [Thea Render](http://www.thearender.com/), Thea support | [kerkythea.net](http://www.kerkythea.net/) -team member

                                      1 Reply Last reply Reply Quote 0
                                      • D Offline
                                        dtrarch
                                        last edited by

                                        Here is another freebee that works OK with a little post edit.
                                        sTile
                                        http://www.harmware.net/stile.htm

                                        dtr

                                        1 Reply Last reply Reply Quote 0
                                        • J Offline
                                          john.warburton
                                          last edited by

                                          @chris fullmer said:

                                          Does Paintshop have an "offset" feature built into it? I just do the standard Photoshop trick of offsetting an image in the x and y directions, so that the seams then are showing in the middle of the image. Then I carefully go through and clean up the seam with clone stamp tool or whatever tool I need. Can you do it like that? I could explain it better if that makes no sense.

                                          Chris

                                          I use the Simple Filters Half-Wrap plug in. This lets you wrap the image left-right, top-bottom, or both directions by 50%. You can then use editing tools (Clone for example) to deal with the adjoining edges. Similar to the offset command in Photoshop, but only works at 50% offset.

                                          Life's a reach, and then you gybe.

                                          1 Reply Last reply Reply Quote 0
                                          • B Offline
                                            blair
                                            last edited by

                                            Pete
                                            Which tool or method did you finally choose?

                                            1 Reply Last reply Reply Quote 0
                                            • 1
                                            • 2
                                            • 2 / 2
                                            • First post
                                              Last post
                                            Buy SketchPlus
                                            Buy SUbD
                                            Buy WrapR
                                            Buy eBook
                                            Buy Modelur
                                            Buy Vertex Tools
                                            Buy SketchCuisine
                                            Buy FormFonts

                                            Advertisement