Seamless texture techniques
-
-
@chris fullmer said:
Does Paintshop have an "offset" feature built into it? I just do the standard Photoshop trick of offsetting an image in the x and y directions, so that the seams then are showing in the middle of the image. Then I carefully go through and clean up the seam with clone stamp tool or whatever tool I need. Can you do it like that? I could explain it better if that makes no sense.
Chris
a short tutorial would be great, chris.
-
I like the brightness level correction ideas there Jan. I have not done that before, but I like how it sounds. I'll give it a shot next seamless texture I make.
I'll try to do a quick video on this process.
Chris
-
Have to say if you haven't tried Make Seamless in Gimp it is worth a look.
-
I often use the same technique with the brightness correction. I always thought it is a bit unprofessional and Photoshop owners would surely have a real tool for that, but it's great to see that others are doing it the same way.
I have already tried some texture programs or plugins and wasn't satisfied as they often created just a blurry cross-fading without considering fine details like grooves of a wall.
Here are two ways how I do it (PaintshopPro tutorial for Edson )
)
and the "sleazy" way
-
@chris fullmer said:
I like the brightness level correction ideas there Jan. I have not done that before, but I like how it sounds. I'll give it a shot next seamless texture I make.
I'll try to do a quick video on this process.
Chris
There is no process that works for every image. Thats why plugins rarly does a good job. You have to adopt and try different paths.
Sometimes several passes of the above mentioned technique might be needed.
Another way is to use Image->Adjustments->Shadows/highlights with advanced settings.
The best way is to photograph with 50 to 100 mm with even diffuse lighting on a cloudy day and photographing several different shots of the same texture which then can be made into a large texture to further reduce tiling. -
Argh!

I wrote a whole tutorial and when pressing Submit something went wrong and it didnt get posted. Well well I'll try to rewrite it AGAIN...Short Photoshop tutorial:
First make sure the image is somewhat evenly lit. Otherwise it will be impossible to make it tileable.
If it isnt, do this: Make a duplicate layer of the image and turn down saturation to grayscale and invert it.
Increase contrast with Levels if needed. Then gaussian blur the image quite much as we just want to correct over all lighting. Now set that layers blend mode to overlay and turn down opacity until the image looks more evenly lit.
What "overlay" does is that it darkens the bright parts and lightens the dark parts so we hopefully ends up with a more evenly lit image.Now make duplicates of both layers and flatten then. This way you have the original layers there for any future editing.
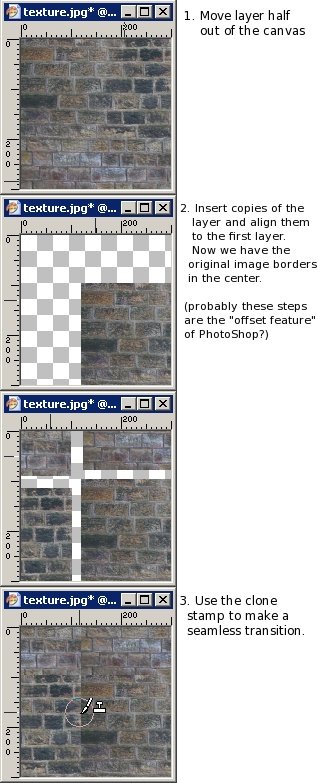
With the two layers flattened go to Filters->Other->Offset and set horisontal and vertical offset to half the image width.
Make sure you have "wrap around" choosen.
Now clone away the edges and use several different clone sources so it's not obvious its a cloned image.
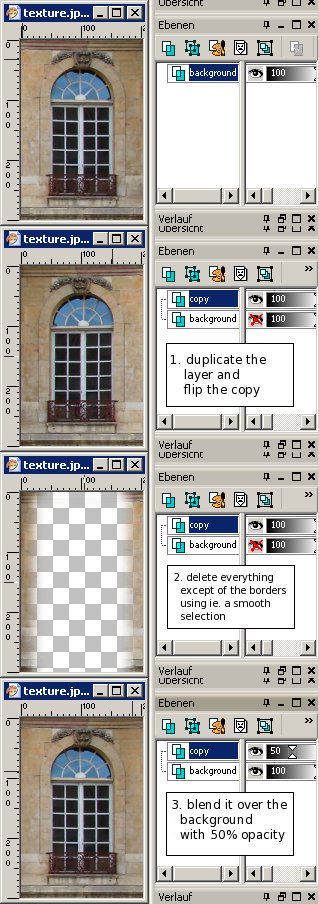
For images that need much editing it can be a good idea to have a copy of the un offset image underneath and use a layermask on the top layer to paint away the edges and show the image underneat.A good practice is also to remove any too obvious part of the texture as these things makes tileing more visible.
Another good rule is to use textures that are quadratic with sizes such as 256x256, 512x512, 1024x1024 and so on since they use the least amount of memory compared to their size.
Hope this helps!
-
@chris fullmer said:
Does Paintshop have an "offset" feature built into it? I just do the standard Photoshop trick of offsetting an image in the x and y directions, so that the seams then are showing in the middle of the image. Then I carefully go through and clean up the seam with clone stamp tool or whatever tool I need. Can you do it like that? I could explain it better if that makes no sense.
Chris
I often use this method. For good result it requires that image has even illumination on edge areas.
-
Here is another freebee that works OK with a little post edit.
sTile
http://www.harmware.net/stile.htmdtr
-
@chris fullmer said:
Does Paintshop have an "offset" feature built into it? I just do the standard Photoshop trick of offsetting an image in the x and y directions, so that the seams then are showing in the middle of the image. Then I carefully go through and clean up the seam with clone stamp tool or whatever tool I need. Can you do it like that? I could explain it better if that makes no sense.
Chris
I use the Simple Filters Half-Wrap plug in. This lets you wrap the image left-right, top-bottom, or both directions by 50%. You can then use editing tools (Clone for example) to deal with the adjoining edges. Similar to the offset command in Photoshop, but only works at 50% offset.
-
Pete
Which tool or method did you finally choose? -
I use Pixplant to make seamless textures from photos I take. I'll go as far as I can with the plugin and then usually do some further tweaking using the offset filter in photoshop until it is reasonably accurate. Then back to Pixplant for the 3D maps. Never tried the Redfield plugin, but it looks interesting. Thanks for the heads up.
Also great tutorial on color and light balancing. Thanks!!!!

-
....brilliant old tutorial(If you remember
 ) ...thank you to Jon again ...
http://forums.sketchucation.com/viewtopic.php?f=18&t=10694 -
@unknownuser said:
This works especially well with the new PhotoShop CS5 clone tool that assimilates the surrounding area and gives great
This works especially well with the new PhotoShop CS5 clone tool that assimilates the surrounding area and gives great results.
-
I use GIMP and the Low Frequency Even filter (http://registry.gimp.org/node/24636) when needed, followed by the Texturize filter (http://gimp-texturize.sourceforge.net/). Most of the time it gives good results although the texturizer tends to crash at more the 500x500px.
-
@unclebim said:
I use GIMP and the Low Frequency Even filter (http://registry.gimp.org/node/24636) when needed, followed by the Texturize filter (http://gimp-texturize.sourceforge.net/). Most of the time it gives good results although the texturizer tends to crash at more the 500x500px.
Ahh, this is why I never could use that plugin
... I tried again and it was a first !
-but this means that my image must be less than 250x250 px
-
@unknownuser said:
Argh!
I wrote a whole tutorial and when pressing Submit something went wrong and it didnt get posted. Well well I'll try to rewrite it AGAIN...It's always a cool habit in case of post of more 3 lines
to copy past in the NoteBook before any Submit
You don't know how many time this little trick can be save!
It's very usefull too when you write an answer on a Net Mail
-
@aerilius said:
I often use the same technique with the brightness correction. I always thought it is a bit unprofessional and Photoshop owners would surely have a real tool for that, but it's great to see that others are doing it the same way.
I have already tried some texture programs or plugins and wasn't satisfied as they often created just a blurry cross-fading without considering fine details like grooves of a wall.
Here are two ways how I do it (PaintshopPro tutorial for Edson)thanks, aerilius.
-
Some really great advice and application references on this thread
The tutorial on brightness level correction was particularly helpful. Does anyone know of a similar method for levelling out the colour in a texture?
I'm trying to create some carpet textures but I keep getting colour banding resulting from uneven colouring in the image I'm tiling.
-
there's also this method http://loadproject.blogspot.com/search/label/tutorials...
i sometimes use it in addition to the traditionnal offset thing...
pix plant is also a good plug
and there are lots of tips on the cg textures website ( tutorials section )
have fun
Hello! It looks like you're interested in this conversation, but you don't have an account yet.
Getting fed up of having to scroll through the same posts each visit? When you register for an account, you'll always come back to exactly where you were before, and choose to be notified of new replies (either via email, or push notification). You'll also be able to save bookmarks and upvote posts to show your appreciation to other community members.
With your input, this post could be even better 💗
Register Login


Advertisement