[Plugin] Extrude Edges by Rails
-

-
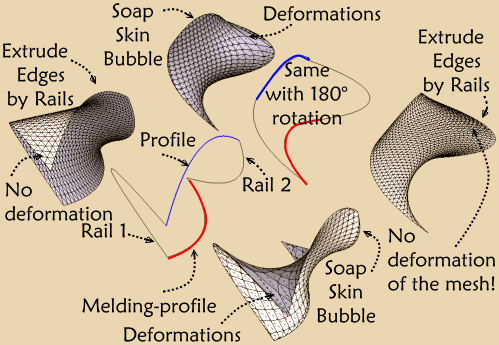
Extrude edges by rail v2 is better than Soap Skin Bubble!

Drawing Mesh is more regular!
That will be better for the UV!
-
Works like a charm

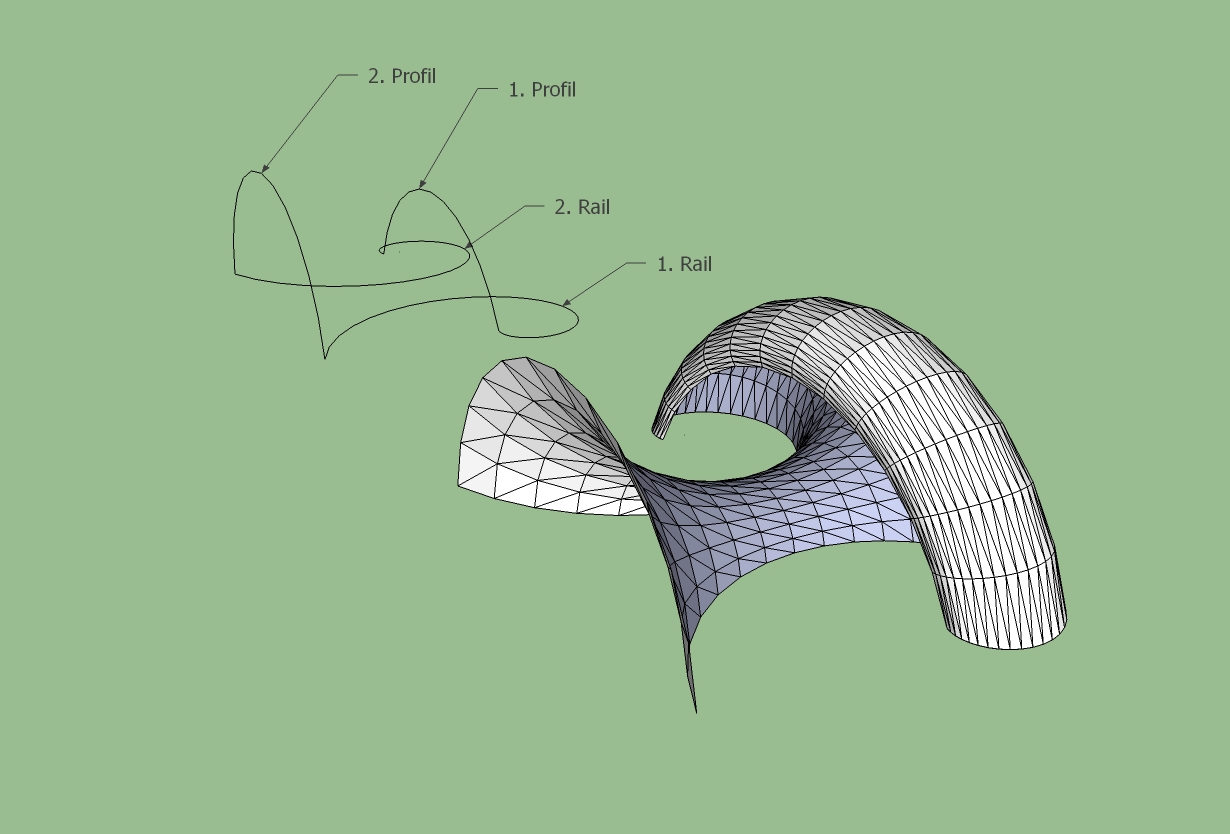
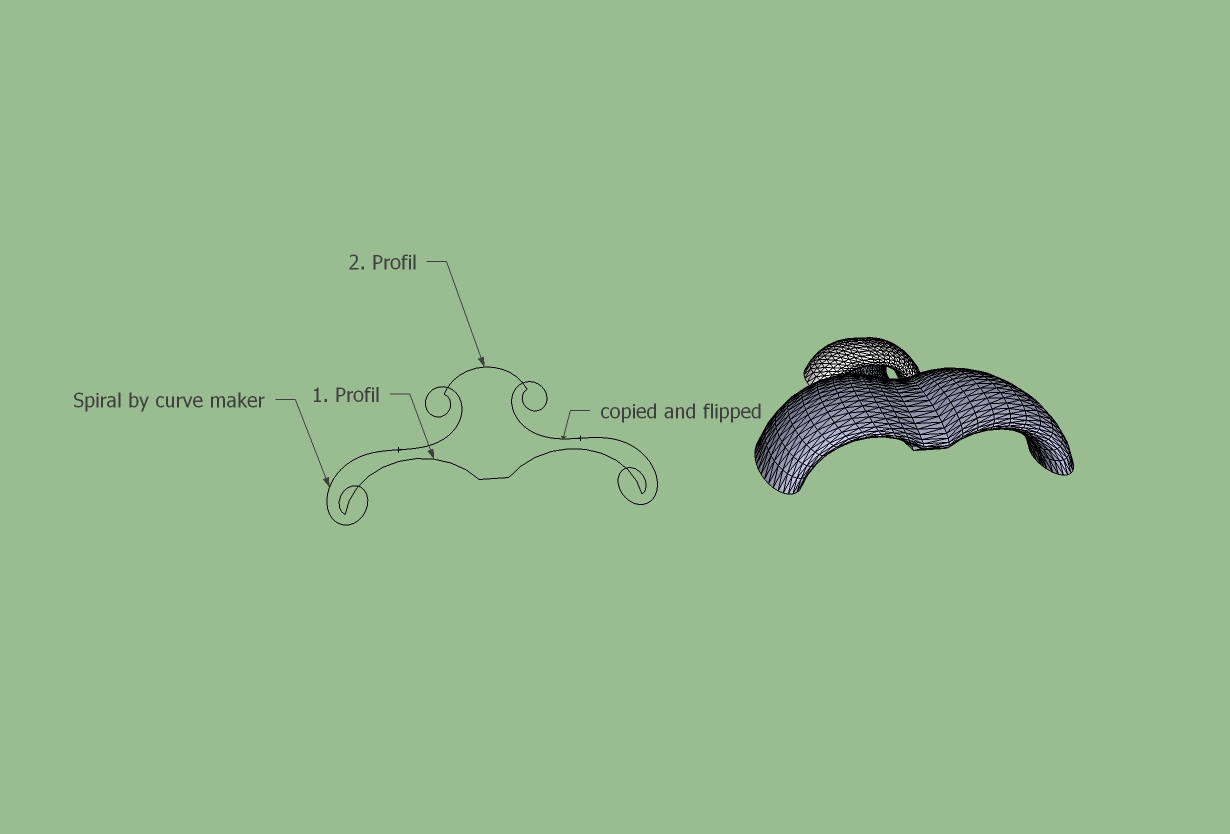
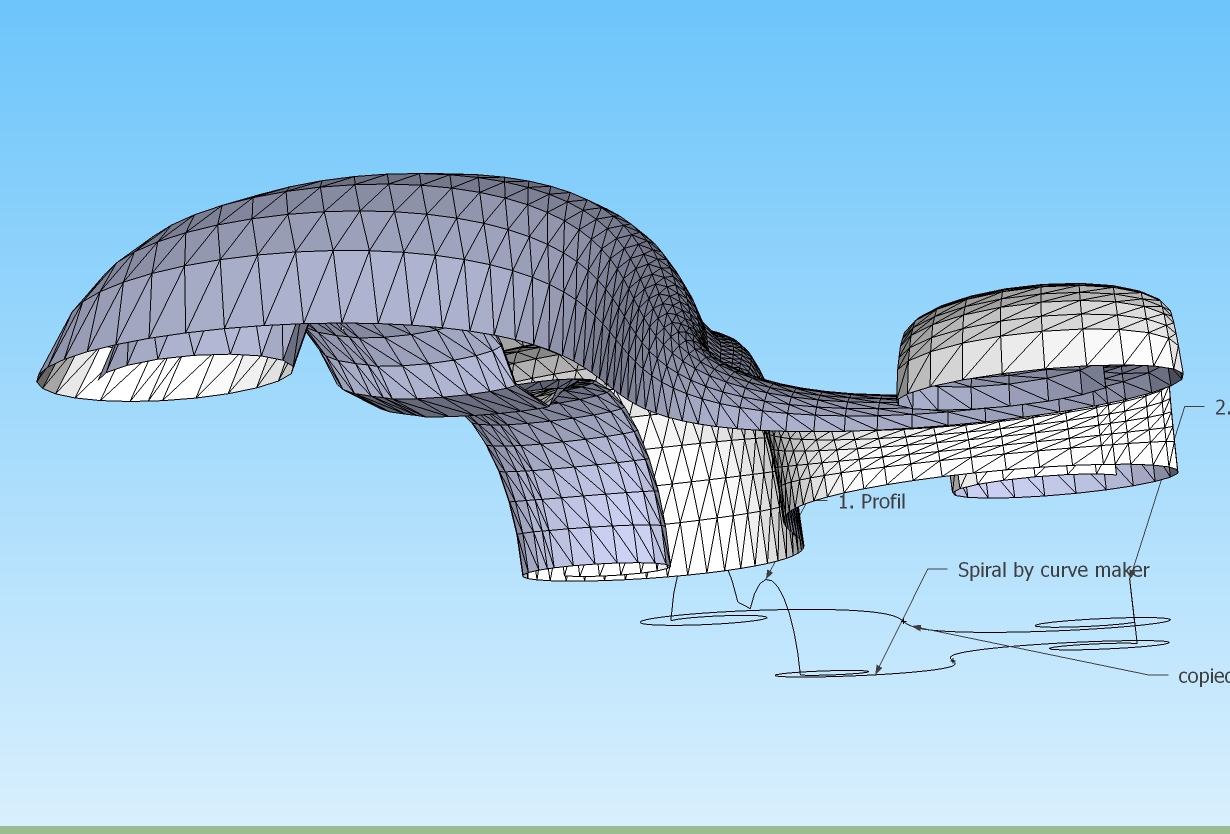
The funny thing is that curves are not obliged to touch themselve!

-
In fact, if the rails / profiles are looped [i.e. they are without an end] then it is better if they don't touch. The profiles are 'moved' to the ends of the rails before making the mesh in any case...
Thanks for the demos - if you would like to make a detailed tutorial I won't stop you !En fait, si les rails / profils sont bouclées [c'est à dire qu'ils sont sans fin], alors il vaut mieux qu'ils ne se touchent pas. Les profils sont «déplacés» à l'extrémité des rails avant de rendre le maillage, en tout cas ... Merci pour les démos - si vous souhaitez faire un tutoriel détaillé je ne vais pas vous arrêter!
-
THANK YOU SO MUCH
It helps me a lot to finish this drawing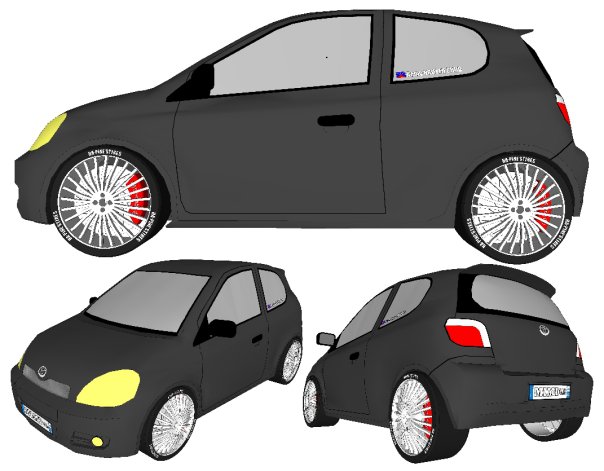 , i've give up some months ago ...
i bet it will be the most used plugin for me (whit weld.rb) ...
yaris pour mimi.pdf -
Seems there is a little bug! (in Round corner or EEbR)

(after making a round corner with the Fredo6 plug)
(erased faces, welding sides)
-
@unknownuser said:
Seems there is a little bug!
might be related to this

in all the test I've done on ramps, curtains, TIG's rails and more, I seem to only have a problem with one direction of selection, (other then complete cock-ups)
I don't know if it's a clockwise V counterclockwise issue or what, but one way round seems to generate hidden grouped and ungrouped geometry DURING the operation that seem to account for the result, the only rail never effected in the above test is still in red,
when the hidden geometry was behind any of the other three i had one of the odd results, and it wasn't there at the start of each run. often there were 3 or 4 sets of hidden bits. A ran this particular drawing in six different drawings 20 or 30 time, the problems were always on the same selection.Only got the points cloud the once?
TIG, one thing I would appreciate is an escape key, if you accidently choose 2nd rail twice (instead of the profile) it can generate vast numbers of edges
john
-
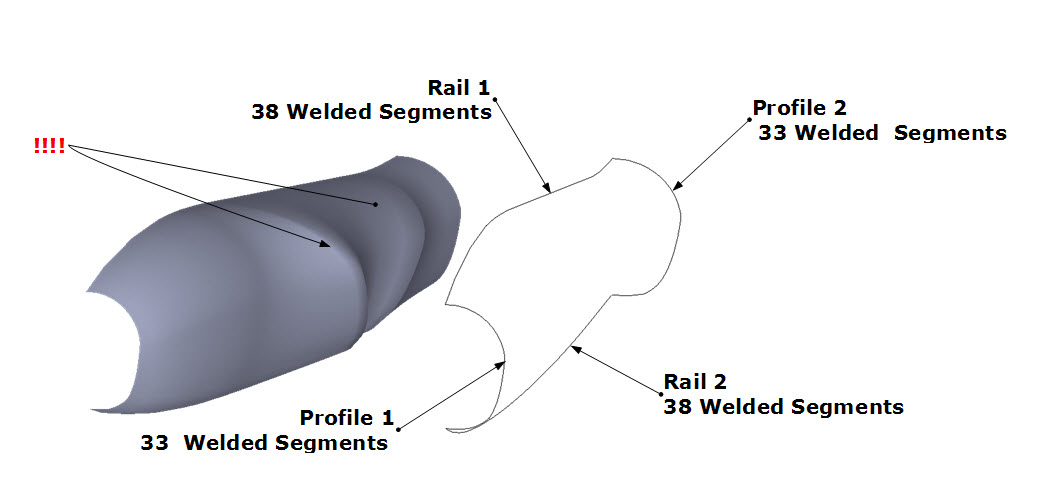
I have been trying to use this ruby since version 1 to make an aircraft body.
I just can't seem to get it to work even with version 2.
Profile 2 is just a scaled up version of profile 1.
All lines are welded after setting to the matching number of segments.
This is just the latest in many tries.
Help

-
Bob, did you try manually exploding each of the rails and profiles first and then re-weld each?
-
@bob james said:
I have been trying to use this ruby since version 1 to make an aircraft body.
I just can't seem to get it to work even with version 2.
Profile 2 is just a scaled up version of profile 1.
All lines are welded after setting to the matching number of segments.
This is just the latest in many tries.
HelpYou can try exploding the Curves and immediately re-Welding them back together - sometimes Curves get muddled in the data-base...
OR try splitting the shape into say three pieces with extra intermediate 'profiles' and make say three meshes and join them at the end ?
Like this...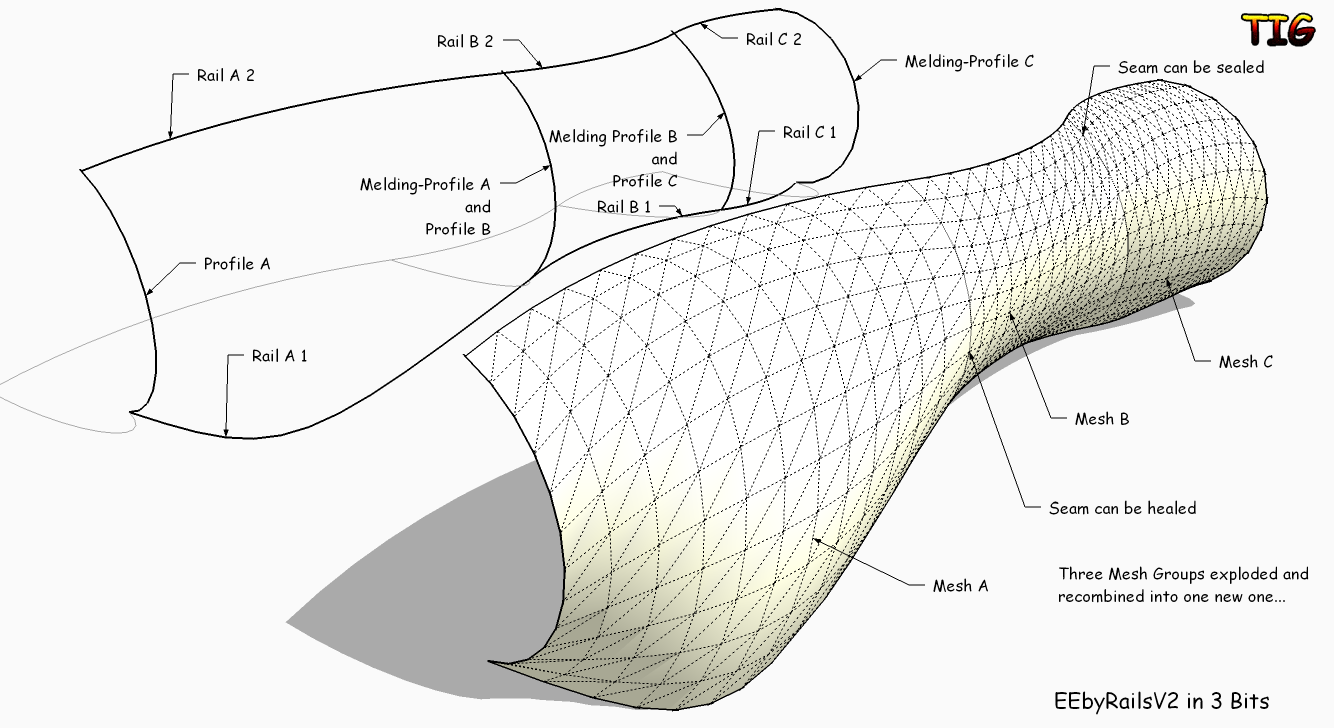
-
This is a truly phenomenal tool. Some tries.
-
@bob james said:
This is just the latest in many tries.
Help :?
Hi Bob, some more things to try...
There are basically 8 ways ( that could give your expected outcome) for any 4 loose profiles (16 if you add surfaces to each, 32 if you don't mind Scaling the length or width back after processing )- Most give either normals or reversed identical copies, some differ and that might be the one you want.
What I've done with stubborn ones is
save them into a new drawing, scale x 10, explode curves, re-Weld, moveCopy of each line out-board by a fractionyou now have 8 line segments, 4 attached + 4 unattached, name or number them, (e.g. L1,L2; T1,T2; R1,R2; B1,B2),
if you really want to be methodical, make 8, 16 or 32 sets of this, side by side, cut and paste in place (just to be sure there clean)
go through all combinations i.e. L1-T1-L2-B2 and name the new group after each combination is used, if you don't want to scale back to size use attached lines as you rails for the first 8 setsIf none work at all you probably have a ruby class, i get some issues if I've used certain tools to make the curves, but closing and reopening the drawing clears those and I also had a problem selectonopen. rb so I binned it and use the space bar.
this plugin is worth getting to know, it's very,very useful ...
john
PS. to speed things up click no all pop-ups, and then you have a proper record of what does what.
-
@driven said:
PS. to speed things up click no all pop-ups, and then you have a proper record of what does what.
John,
I'm not sure I understand your suggestion, but thank you for it.
Not too sure what "click no all pop-ups" means

Bob
-
Thanks, TIG: I may have "broken the code" another way (random luck?)
I lowered the segment count to 20 in the rails. The only problem I can see is the "puckering" at the front end.
The wings and tail surface were also made with EEbR.The nose piece was made with another great ruby: Soap Skin Bubble.
I made the more complete model some time ago by "brute force": note how much smoother the latest is.
Charly2008: Could be the start of some awesome spaceships


-
@bob james said:
@driven said:
PS. to speed things up click no all pop-ups, and then you have a proper record of what does what.
John,
I'm not sure I understand your suggestion, but thank you for it.
Not too sure what "click no all pop-ups" means
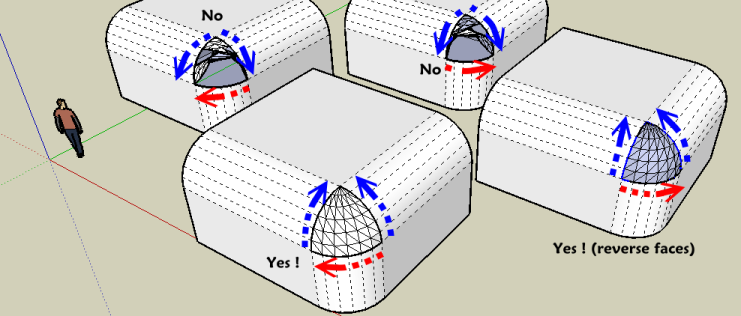
BobWhen the Mesh is made you get a series of dialogs pop-ups that ask if you want to do things to it - like 'Reverse Faces'.
If you answer 'No' to all of them you get to see what's been done... admittedly loads of temporary never-seen groups, point-clouds and the like have gone, but you get to see the mesh edges, triangulation etc that might otherwise be changed had you answered 'Yes'.
The first option 'Reverse Rail...' can only be done by the script, but all of the the others can be done outside of the script after the Mesh is finished, using built-in SUp tools like Reverse, Intersect, Smooth etc or readily available plugins like Erase-Coplanar-Edges...
I recommend that you try and keep the 'bits' relatively simple, with common profiles used from one to the next, mirroring halves etc... -
Got it.
Click no for all pop-ups. I've been doing that and smoothing after it's all done.
-
@bob james said:
@driven said:
I'm not sure I understand your suggestion, but thank you for it.
BobHi Bob,
I see TIG has covered what I meant by pop-ups, but in case it's a more overall misunderstanding.
A few more bits...
Any ruby can only do what YOU tell it to do, based on your understanding of what the script author has told it to do, based on his understanding of SU team has told SU to do, and on and on....
So as non-authors the only bit we can do is either randomly stumble about using a script and hope it works (which is quite fun) or we can methodically evaluate OUR input and keep track of what happens when we do certain things. Then if we come across something 'odd' we can then ask someone else to try exactly what we've done to see if it might be a 'bug' somewhere up stream or simply a local issue.
Because Mac's can have there own set of problems with SU I have been using the above approach on many rubies to make sure problems aren't just me, or my mac's, and it's a great way of getting your head around what can and can't be done with a new ruby.
I also check results against other methods and sometimes (but not with the ground breaking one like this) find that the vanilla SU tools or a discarded 'oldskool' ruby do what I've been trying to achieve for weeks much faster.cheers for a another great script TIG...
john
-
Here's v2.1 http://forums.sketchucation.com/viewtopic.php?p=201286#p201286
General speed improvements and tidying up.
Toolbar added and Tooltip Text added to command.
Outliner clash minimized with start+commit changes.
Undo's step back through Smoothing, Reversing etc.
Rare incomplete coplanar edge deletion fixed.
Faces orientation fixed if has a flat face at zero.To do: Consolidate the closing option dialogs into one dialog.
Feedback please...
-
Hi Tig,
Just to confirm it all seems to work on the mac, tool bar stays between sessions, no new clashes, needed a few more 'first rail reversals' then previous, but I just randomly chucked down and rotated 2 lines to test on, so not surprised, just gets better... cheers.
one thought, is it possible to allow navigating to see if you need to reverse a rail, from some views the new mesh can hide an issue?
john
-
Hallo Tig,
great plugin!
could you make it possible, that if I change one of the original curves/rails,
the mesh gets rebuild automatically...


Advertisement