SubD examples and models
-
Images doesn't seem to load on my end. (IMO it's better to upload to the forum instead of hot-linking.)
-
It's Spanish and I don't see the images too.
-
I found this subdivision tips
http://blog.whiteblaizer.com/2009/03/subdivision-tips-hard-surface-modelling-iv/not sure of the language - might be Italian.
here is the index page
http://blog.whiteblaizer.com/tutorials/Hope it helps.
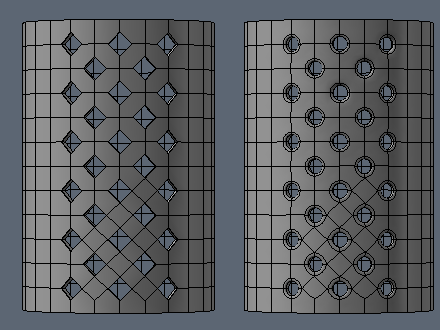
![[img]http://blog.whiteblaizer.com/wp-content/uploads/2009/03/sdm04_05.jpg[/img] [img]http://blog.whiteblaizer.com/wp-content/uploads/2009/03/sdm04_05.jpg[/img]](/uploads/imported_attachments/GQxP_sdm04_05.jpg)
![[img]http://blog.whiteblaizer.com/wp-content/uploads/2009/03/sdm04_04.jpg[/img] [img]http://blog.whiteblaizer.com/wp-content/uploads/2009/03/sdm04_04.jpg[/img]](/uploads/imported_attachments/IJGE_sdm04_04.jpg)
![[img]http://blog.whiteblaizer.com/wp-content/uploads/2009/03/sdm04_03.jpg[/img] [img]http://blog.whiteblaizer.com/wp-content/uploads/2009/03/sdm04_03.jpg[/img]](/uploads/imported_attachments/RwgJ_sdm04_03.jpg)
![[img]http://blog.whiteblaizer.com/wp-content/uploads/2009/03/sdm04_02a.gif[/img] [img]http://blog.whiteblaizer.com/wp-content/uploads/2009/03/sdm04_02a.gif[/img]](/uploads/imported_attachments/Nv05_sdm04_02b.jpg)
-
@cotty said:
It's Spanish and I don't see the images too.
images changed to uploads rather than linked
-
-
@garydorn said:
I found this subdivision tips
http://blog.whiteblaizer.com/2009/03/subdivision-tips-hard-surface-modelling-iv/not sure of the language - might be Italian.
here is the index page
http://blog.whiteblaizer.com/tutorials/Nice! That looks to be similar to the challenge HornOxx and I was looking into earlier:
http://sketchucation.com/forums/viewtopic.php?f=397%26amp;t=63826%26amp;start=300#p588912
http://sketchucation.com/forums/viewtopic.php?f=397%26amp;t=63826%26amp;start=330#p588916 -
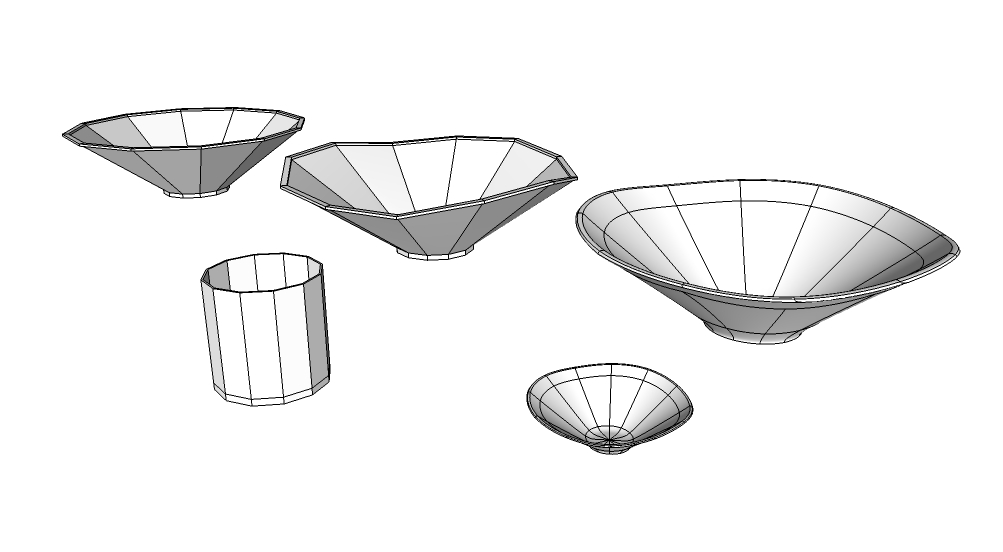
o.k I know it's not a car or godzilla, just started messing about with SubD last night. trying to wrap my brain around a new way of doing things. here's a mod style chip & dip bowl for your next party. copied my steps for the pic.
plain cup in front pretty much native SU tools
far left, base shape of bowl , pretty much Vertex tools
middle bowl , shaped wavy edge , all Vertex
far right , SubD , copied and scaled down for the dip.
I think I really like this, don't think I could have got these shape without Vertex & SubD , thanks thomthom..

-
@tuna1957 said:
I think I really like this, don't think I could have got these shape without Vertex & SubD , thanks thomthom..


-
@rich o brien said:
[edg3d:2tjo9rm3]gV91M4RhOcwv4Fz[/edg3d:2tjo9rm3]
[attachment=0:2tjo9rm3]<!-- ia0 -->female-base-head.skp<!-- ia0 -->[/attachment:2tjo9rm3]
So just when I managed to stop checking to see if there were any updates in the UnWrap thread, you post one here... Pretty sneaky... Pretty sneaky.
Damn it, I built a time machine just so I wouldn't have to wait for this to be released... But either it doesn't work and I keep falling asleep in it or it only moves me forward in 8 hour increments. Stupid lousy impatience.
-
-
@box said:
@jo-ke said:
@rv1974 said:
Box how do you work with symmetrical geometry? Do you temporaly make mirrored low poly components or make all editing twice (from both sides simultaneously)?
This is exactely the same question that I asked myself
Simple answer is 'all of the above'.
Depends what I am doing and what shape I am heading for.
Sometimes I select both sides as you get a better view when it all moves together,
Sometimes I only work with half an object then just mirror it.
Sometimes when working with a complete structure I'll work both sides simultaneously then gradually make them different.
Quite often I will split a model in half and delete the bad side and replace it with the good.
So I'd have to say I have no fixed method and I often do the same things differently the next time.
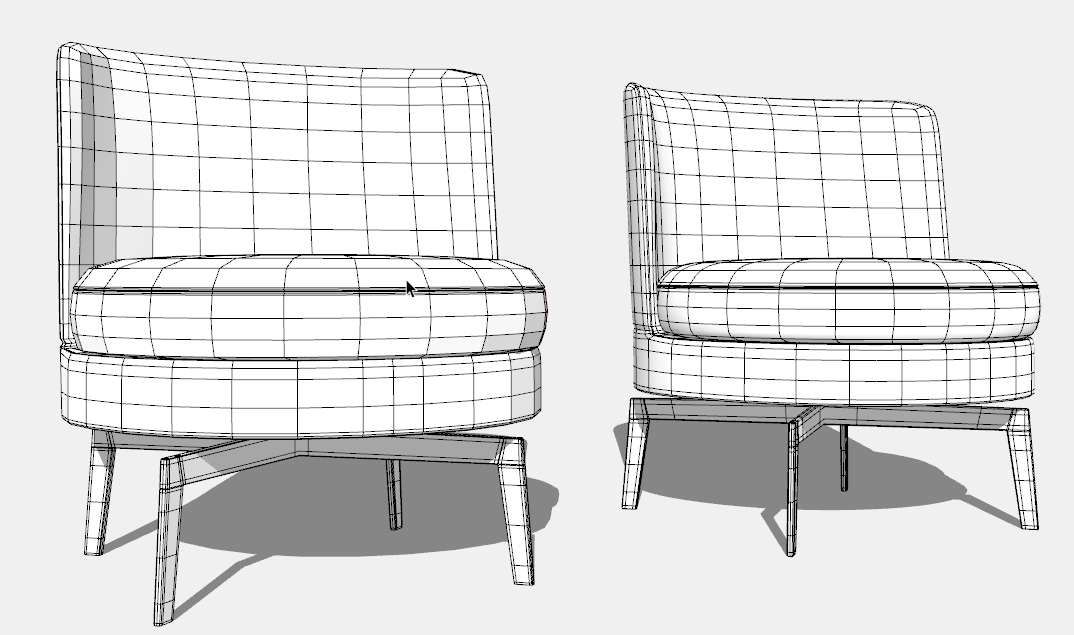
It's worth mentioning that QFT and VT tools make it very easy to select and manipulate both sides at the same time.Hi. I can answer that too, having worked for 4 years on the same complex model that started off making a human head (after watching Rich O'Brien's video), but more complex because it was a human head, using Thom Thom's Vertex Tools primarily and some Quadface Tools. That, of course, I did 1/2 of it, then flipped it, but on top of that part began to model many other sections, some of which are able to be copied and flipped, two other sections contribute to the entire width.
So, I too, have certain sections that are "grouped" half-way and the only time I grab a part from the other side (which literally exists in case I mess something up) and put it back in to the right side.
Then there are other parts that are grouped together that form the entire width of the project. So, it all depends.
But, I will say this, there are a few places where there are SubD parts that will "echo" on the other half what they will do on the one half. In those cases, I will model the half of the SubD, and then "flip" or in this case "mirror" it (using TIG's tool) and "hide" the piece down the center.
Except for one tiny part that is a box, there is nothing about my model that is square. I did go to college in architecture, but my college had a fundamental philosophy about not training their students in CAD. So, I got to the point of "oh no, what am I going to do?" to finding out that Thom Thom had come out with SubD Tools. Yes, all my problems will be solved! Especially since I found out half of my model won't do push/pull, and that's a big part of doing the final decorating. There are other parts that I can do easily now that I can use SubD Tools. I've been watching everything I can on youtube concerning SubD and going over parts of Quadface tools. So, I want to say thank you to Thom Thom publicly. If it weren't for you, I wouldn't be able to complete my project. God bless! And, I want to point out that for those of you who are not experts on quads (or Quadface Tools) there is a 40:57 video on [http://www.youtube.com/watch?v=-VvLj7UeXgY](http://www.youtube.com/watch?v=-VvLj7UeXgY) entitled "Thomthom shows Subd plugin and talks about quads". Also, this is for people who may not have heard of Vertex Tools or Quadface Tools, but there are both groups of youtube videos on those. -
@ntxdave said:
@thomthom said:
@ntxdave said:
- Poly* Quad* Tri* N-Gon* Other Terms
Have you looked at the links on the SUbD site?
http://evilsoftwareempire.com/subd/quadsCurrently there are four links to external sites that describe the general concept of tris, quads and ngons. Is there information there you feel is missing?
Yes, I have looked at those. My outline was to show my current idea of the items that should be in a tutorial/guide called: Beginners Guide to Quad Modeling in SketchUp.
As I continue to try to lean how and when to use quad modeling I have had to go all over the place to find answers and get explanations. As I said before, most of what I find is not really oriented for us beginners so I have to ask a lot of dumb/silly questions. If I ever feel comfortable enough with that I understand it and can apply it, I would like to write the guide. People like you and Box (along with several others) have been very helpful and I totally appreciate it...Again, I am not complaining in any fashion but as a beginner in this whole process it at times is rather difficult to try to determine what, when and why I should do something. Again as an example, please do not take this as a negative, but when I try to understand some of the tools in the QFT toolset, I find the documentation (again for us novices) to not be very clear. Thus I misunderstand what the tool does and/or how/when to use it. A good example of this is the Connect Edges tool. While I have used it several times, I still do not 100% comprehend the pinch action in the HUD. Again, not complaining, just point out that us beginners need to understand as we use this tool what it is going to do and WHY.
Dave, believe me, I understand. I had a serious stroke 18 years ago, 4% chance of living, but thank God I survived. Like I stated in my previous post I went to college in architecture. The damage from the stroke was on the left side of my brain. I think 90% with the right side of my brain. Am I saying this to get sympathy? Absolutely not! I have far surpassed any goal set for me by any doctor, anywhere, anytime. But where I got B's in Calculus in college, the best I can do now is x/58 = 75/150. That's Pre-Algebra. So, I get where you're coming from. (Reading is an activity that is done on the right side of the brain). So, too, is a lot of creativity. Communication, and writing, is done on the left side of the brain. I have to totally thank my now-deceased mother, because she felt like her calling in life was to be a reading teacher. She could have done anything. But when she died, she had a whole wall of books on the process of reading and how it was connected to kids' brains. My twin sister and I learned how to read when we were three. Now, my twin sister has her PH.D. in Microbiology and is a Professor of Forensics at the University of Illinois. I spent a year learning how to reconnect the neurons in my brain so that I could have the same level of vocabulary, and write at the same level. To do this I had to get a professional writing program and write and write and write...about 1,000 pages to get back what I had lost.
Of course, to be an architect, you have to be smart enough to learn basic structures, and if I told you when I graduated and the area of the country I lived in you would probably guess what college I went to. Now, the equations for Structures look like Arabic to me. I can't even say they look Greek, because at least Greek, I can make out some of the words.
But seriously, I ignored the Sandbox tools because I forgot about them. Why did I forget about them? I turned them off in the View>Toolbar. So, I'm four years into this project, having spent a certain amount of time in the hospital, and recovering, and I totally missed a section that I could have covered with the "Smoove" button, and of course that was attached to other sections that I could have converted to Quadface (there's a button for that).
So, don't give up! It might seem to some that I am foolish, or worse, "handicapped". But I don't see myself in that way and though I will tell people that I am sorry because I can't understand Ruby scripts (because my brain is damaged), or I missed something, I am still determined to work through and understand to the best of my ability, these things.
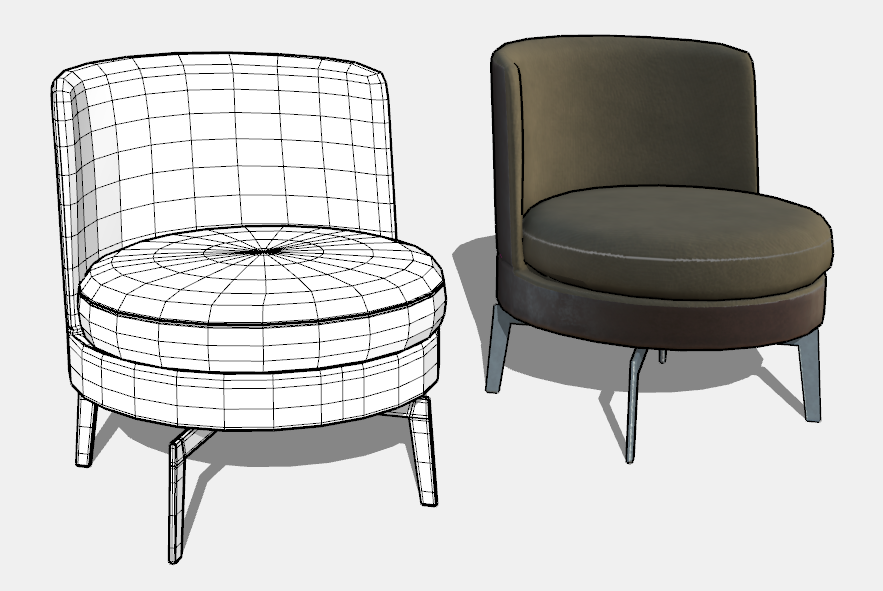
For you, I would recommend watching a set of four You Tube videos of Marcello Pannicia using SubD to recreate the Tatlin Sofa. There you'll see where and how to use the "Connect Edges" and other Tools. Note: the one group of a plugin that he doesn't say where it comes from is a Ruby Script plugin that he made himself (as best as me and some other people on the SketchUp forum could figure out). And watch ThomThom explaining SubD and quads. To him, they're related, and he went from working on quads to coming up with SubD (making Vertex Tools in between). Always wanting to make things organic.
And the catmull-?clark or clark-catmull, no I think it's the other way around; but it's late, I'm forgetting things, but it is basically the thing his quads are, is the standard for other, more expensive (like $2000+) programs.
-
@FrellMeDead - this was a very interesting (and revealing) post. My education is in accounting.
My real point in my post was that as an "account" (actually I never worked in accounting after getting my degree) there are may posts in these threads, which will are very helpful and informative, are difficult to understand. Many of them contain language that many of us (and I am confident that I am not the only one) do not understand. The SubD threads and documentation just happened to be a classic example. For those of us who do not have a technical background and are trying to learn there are a lot of assumptions that are made and terminology used that many of us do not understand.
I fully comprehend that not all things can, or necessarily should be, written or explained at an elementary level. However, I do think that particularly when people write tutorials there is an assumption that your are writing a tutorial to explain how something works or how it should be done. A tutorial means that the emphasis is on "teaching". I think that the author should spend a little more time in understanding who their audience is and at what level things should be explained.
Again, I appreciate and really admire your candor. Thanks for sharing.........

-
Yep ! Very cool tut! : the Tatlin Sofa by Marcello Paniccia

-
There is no question that Quad Face and SubD tools have awesome potential, but (at least for me) they represent a pretty major new direction for us long-time, main-stream SU users.
As a follow-on of ntxdave's comments:
Before I retired, part of my engineering job was getting experienced technicians and engineers to write procedures for doing industrial processes and testing. One of the major reasons for the new procedures was to allow new people to run the tests when the experienced people were unavailable. A big problem was convincing the writers to put in every step of the process.
They were used to doing the tests themselves and knew the “small steps inbetween” the major steps, so they didn’t think to put them in the procedure. But without knowing about those “between” steps the new people were unable to do the tests.
The same situation exists when people take the time to make a tutorial (thank you, thank you, thank you). They often turn out to be “see what I can do with this plugin”, and whiz through the steps too quickly for the new user to follow. Unfortunately, not everyone trying to learn how to use the new tool has the same level of experience and/or can intuit what was done to get the results shown.
Essentially what I’m trying to say is that. ideally, tutorials would be with audio explanations and/or clear, slowly-executed zoom-in cursor movements.
I know that the last thing anyone wants to do is to document what they have created, but unless time and care are taken, the tutorial devolves into show and tell rather than teaching us “noobs” to make use of the tools that have taken so much time and effort to create.
-
@bob james said:
There is no question that Quad Face and SubD tools have awesome potential, but (at least for me) they represent a pretty major new direction for us long-time, main-stream SU users.
For me they represent "hey, I can finally do that".

@bob james said:
As a follow-on of ntxdave's comments:
Before I retired, part of my engineering job was getting experienced technicians and engineers to write procedures for doing industrial processes and testing. One of the major reasons for the new procedures was to allow new people to run the tests when the experienced people were unavailable. A big problem was convincing the writers to put in every step of the process.
They were used to doing the tests themselves and knew the “small steps inbetween” the major steps, so they didn’t think to put them in the procedure. But without knowing about those “between” steps the new people were unable to do the tests.
The same situation exists when people take the time to make a tutorial (thank you, thank you, thank you). They often turn out to be “see what I can do with this plugin”, and whiz through the steps too quickly for the new user to follow. Unfortunately, not everyone trying to learn how to use the new tool has the same level of experience and/or can intuit what was done to get the results shown.
Essentially what I’m trying to say is that. ideally, tutorials would be with audio explanations and/or clear, slowly-executed zoom-in cursor movements.
I know that the last thing anyone wants to do is to document what they have created, but unless time and care are taken, the tutorial devolves into show and tell rather than teaching us “noobs” to make use of the tools that have taken so much time and effort to create.
The major reason why I started doing what I did with my model (after hearing someone tell me about SketchUp) what Rich O'Brien's You Tube video of how he made his face using Thom Thom's Vertex Tools. Thom Thom included this video in his set of you tube videos explaining Vertex Tools, so I was already looking at his Vertex Tools, among other things-- then I saw the one by Rich O'Brien, and that clenched it for me. I must have watched it 7-12 times, until I understood the way I had to do it and off I went. The main part of my model is the "human face" that I built from scratch. Nothing is as hard as that part.
But I always take time to watch every video I can find, starting with any videos made by the person who made the tool set, and then watching every other version I can find. With SubD, this is especially important because there are so many different ways that you can use it. One particular video that is excellent at "teaching" this is http://www.youtube.com/watch?v=ywcGDYioZDM, it looks at building a tree out of SubD (helps me tremendously with one particular part of my model). Another one that is totally different is Fleur-De-Lieux (okay, might have got the spelling wrong). The spoon one is another one. All three of these techniques are drastically different uses of SubD, but all of them I will use. The tree one really brought that whole value of quads and SubD together in my mind to where I now feel confident that I can use those type of things in my project.
And to be honest, when I need help, which is a lot, because I end up doing things that are so contrary to what SketchUp was made for, I ask for it. You guys are awesome in helping me!
I went even further and enlisted the help of an older architect who learned like I did, but then taught himself CAD and gradually moved over to SketchUp. He helped me with all of the "little things" that I should have "just known"
 but "didn't".
 -
Maybe Sketchup is not the more easy and speedy tool for make a human face ?

If you want absolutly "modeling" that try the free Sculptris, and if you don't want modelize for win some time (life is too short) try the free Make Human.
Then free to you to import the result inside SketchUp with some tricky plugings by Tig!
-
@pilou said:
Maybe Sketchup is not the more easy and speedy tool for make a human face ?

If you want absolutly "modeling" that try the free Sculptris, and if you don't want modelize for win some time (life is too short) try the free Make Human.
Then free to you to import the result inside SketchUp with some tricky plugings by Tig!
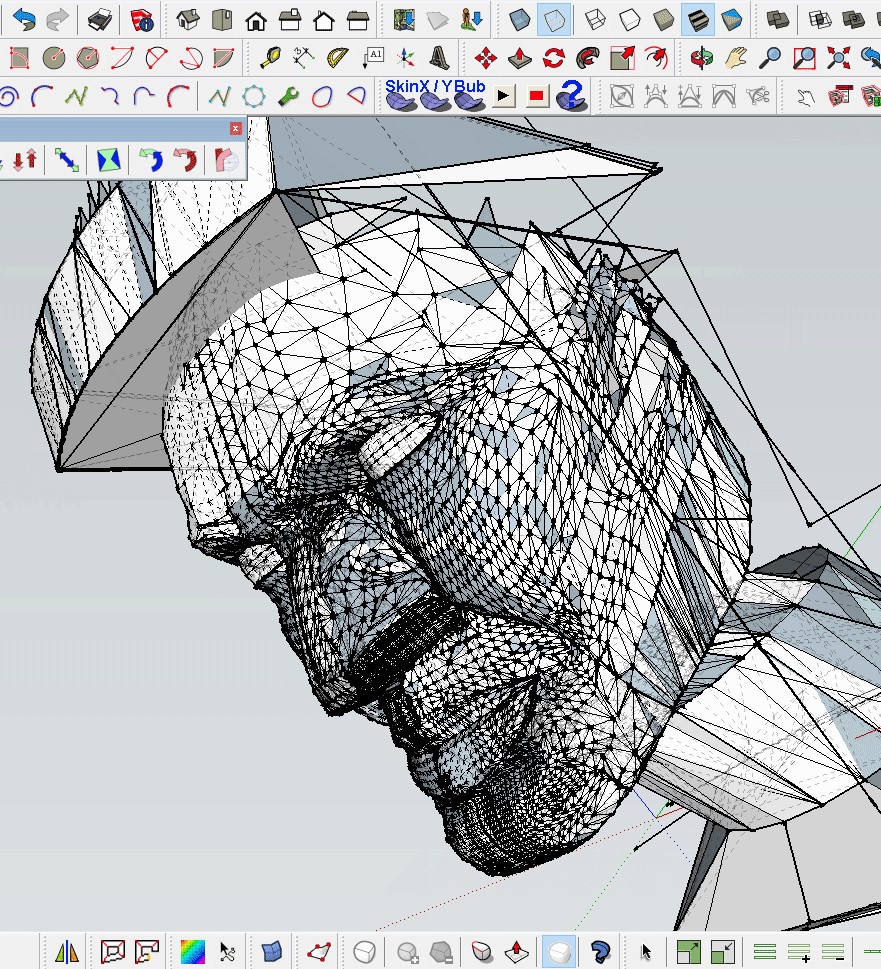
No, I can show you just how successfully I did make a human face using Thom Thom's Vertex Tools. I made half of the face and then "duplicated" or "flipped" to get the other side (following Rich O'Brien's Video that Thom Thom included in his Vertex Tools You Tube Videos). Of course, that part of the model was ages ago and doesn't reflect the many other additions, which I really did need SketchUp for, and the other parts of the "human face" that I have gone back and retouched up, like turning all the "faces" so they are in the correct order, and smoothing out the whole thing. My architect mentor pointed that out. Remember, I was trained in architecture, and though I have a model that doesn't use many straight lines at all, I'm still an architect at heart. So I will still go through that "human face" once more and get everything done exactly right.
I will say this was the first thing I did. I saw Rich O'Brien's video and that convinced me the person who suggested that I look into SketchUp was absolutely correct. Of course, the human face is surrounded by other parts of a helmet, which I took out of the image to show you. Like I said, this was a long time ago, it has gone through modifications since then.
Since I used Vertex Tools, I also had to dabble a bit in using Quadface Tools. So now, I'm excited with SubD coming out. My trifecta of what will end up being the main Tools for my model. Thank you, Thom Thom!
Also, when I talk about having a "model", I am really talking about a full-blown, honest-to-God like what I did in my upper level studio classes, model. One part all the way from the first day of class until the final jury presentation. Intricate pieces all put together to make one thing.
So, I'm not kidding when I have said I knew nothing when I started, and relied on you guys, and on videos, and on reading to figure these things out. It is hard, in one sense, because there are steps that you're expected to know how to do, yet no one tells you how to do them. If it hadn't been for the fellow architect, I would still be stuck on one particular area not knowing what to do next.
-
@ntxdave said:
@FrellMeDead - this was a very interesting (and revealing) post. My education is in accounting.
I fully comprehend that not all things can, or necessarily should be, written or explained at an elementary level. However, I do think that particularly when people write tutorials there is an assumption that your are writing a tutorial to explain how something works or how it should be done. A tutorial means that the emphasis is on "teaching". I think that the author should spend a little more time in understanding who their audience is and at what level things should be explained.
Again, I appreciate and really admire your candor. Thanks for sharing.........

I think when someone like Thom Thom puts out a set of tools, he puts out the written forms, as well as making you tube videos, plus all the other you tube videos, you can get a good basic idea of how things work even if you are a beginner. When I made the human face, that was my first foray into any type of computer aided design (it's a bit ripped away in the shot of it because there are other parts that I just deleted before putting it up there).
But, literally, my next thought after the human face was, "Wow, what the heck do I do next (with SketchUp)?"
I had my design all worked out in my head, and scribbled out on a single sheet of paper (I actually did come across it, when I was looking for something else on my desk). Just a side view, with no measurements. But I did use that image because it showed everything in relation to the human face.
So, I ordered a book, which helped some, but was mostly useless. Because by the time I waited on it, I watched the videos and read the "Help" section. Of course, the videos and Help section are expanded now from then, especially the part on the Sandbox Tools, because like I mentioned earlier I turned them off in the "View>Toolbar" and forgot they were there. Dumb. Dumb. Dumb. I have no excuse. (When I looked in the part this time, Sandbox Tools was greatly expanded upon, and I could see sections where I could have used Sandbox Tools and be so far ahead). But, what can you do now?
Meanwhile, I forged ahead with what I had learned. Slowly, a model started to take shape. It would be almost done by now, except for 1/2 of it won't allow me to push/pull certain shapes. So, I've got to change it. But, I'm trained as an architect, and I don't know half the things that are mentioned here.
-
comfy.....

Advertisement


