Good find! bookmarked, and will give it a proper read later or over the weekend.
Oops, your profile's looking a bit empty! To help us tailor your experience, please fill in key details like your SketchUp version, skill level, operating system, and more. Update and save your info on your profile page today!
Sketchucation Tools 5.0.7 | Licensing improvements and bug fixes Learn More
R
Offline
Posts
-
RE: Found a really good website, practice and magazine
-
RE: Hopetown carriage works (wip)
Archirag, I usually do new buildings in sketchup and therefore have no photo reference to go with, but often find that the textures are too uniform and don't have enough natural variety in them, and i'm therefore trying to figure out the best way of introducing textures which vary across the whole surface (albeit using a rather extreme example). i'm just experimenting at the moment to the best way, so I'm not sure my way is the easiest or most effective (and will no doubt change as I progress this model)
but i'll try to briefly explain how i've achieved it so far
-
Create the main form

-
export parallel projection image

-
Open previous image in photoshop or gimp, and create the material.
In this case I have used layers with masks to reveal the materials I want. So for example this material consisted of 4 layers:
-Stone
-Render
-Paint
-Dirt/graffiti
(note that the materials have not been by cloned from the photograph, the photos have only been used as reference, I chose to do this because when I get to modelling/rendering new buildings I won't have a photograph to clone from) -
Save a copy of this image as a jpg
-
Import into sketchup and align with appropriate face

-
'Project' texture on faces (note I didn't do this with every face, for example the window frames)

-
Export to kerkythea
-
apply bump map to texture. You should also be able to create a bump map based upon the masks and textures in photoshop. This is where I've been able to get more depth and detail into the texture.
-
For added control over the textures, for example if one of the materials is reflective, you can export textures and maps from photoshop and create a layered material in kerkythea. For this model I didn't need to do this just yet, but did it anyway. If you're interested the full set of images I used for the texture can be seen here
Obviously this is a long way round of modelling/rendering an existing building, but as I said this is more for practice than anything.
-
-
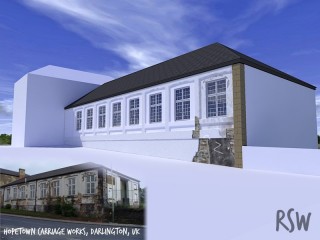
Hopetown carriage works (wip)
I decided to leave my previous wip for now and get back to something which is more familiar. so I've started modelling a building which is at the end of my street (for anyone whos interested in what it is theres some info on wikipedia)
This, like my other wip, is essentially for practice in texturing / rendering, and is not about recreating an exact replica the building, hence why I'm not too bothered about the proportions of the building being exactly the same as the photo. Although unlike my other wip I do intend completing this one.
Obviously this building has a great variety of texture and has a lot of work to do before it'll even be close to finished. As practice for later projects I am reluctant to use photos of the building as a basis for creating the textures, so all the textures are made from scratch, with the exception of the base layer of stone from here
I think it's ok so far, and by the end I might get an image which I'll be happy with, and hopefully be able to apply what I learn from this to other projects.
Textures created with Gimp
Rendered with Kerkythea
-
RE: SU+KT
@unknownuser said:
Will03 wrote:
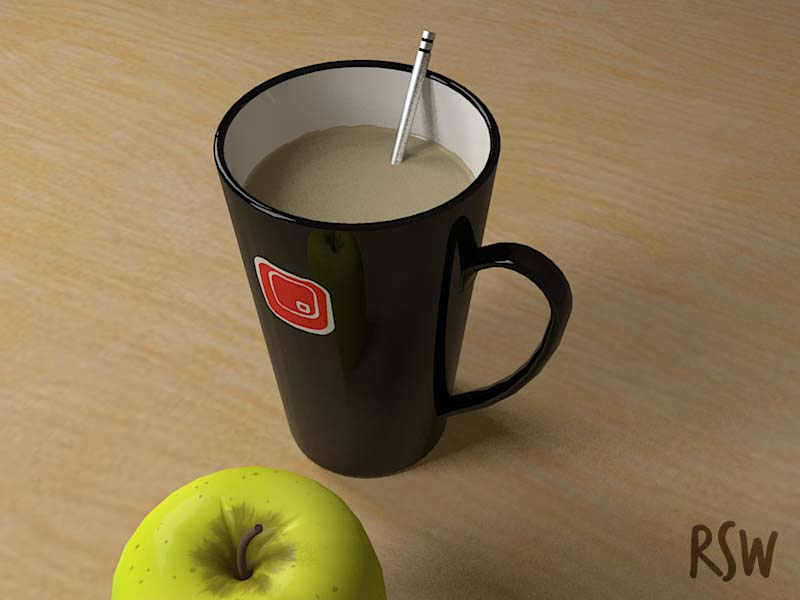
The only thing that I could suggest to make this any better, would be to add just the tiniest bit of translucency and reflection to the coffee. and maybe an HDRI map, just to get a couple more reflections in that beautiful coffee cup.thanks for the suggestions, tried adding the translucency to the coffee, but it didn't seem to make much difference that I could see, but will give it another go later, as you are right it would help - I'm also wondering what it would look like with a 'swirling' effect to give the impression it has just been stirred.
As for the HDRI maps, could you suggest a good source for free ones?
thanks
Richard
-
RE: SU+KT
@unknownuser said:
CraigD wrote:
Only thing for next time would be to change the side count for the Circle tool...Noticed that after my first test render, but at the time didn't want to go back to change the geometry of the mug, but I have done this now, as well as some adjustments to the geometry of the apple.
Thanks for the comments so far.
Richard
-
SU+KT
Hi new here!
I have been using SU for a while now - mainly for external views of buildings for work. I recently came across Kerkythea, and thought i'd give it a go - although I thought I'd try something a bit different to what i'm used to.
I've posted this on the KT forum as well, and as I said there I'm pleased with the results so far, although I know there's a lot that could be improved. This was really just for myself to test out SU2KT and experiment with materials, lighting etc and get used to KT rather than produce a finished piece of work, but c+c are welcome!
All modelled in SU and rendered in Kerkythea
Richard
-
RE: Pirate day be aproachin'
@stuartb said:
Richard . . just a guess . . but your British and you watched CBBC last week?
British, yes
watched cbbc last week, no -
RE: Pirate day be aproachin'
A little joke for you:-
Why are pirates called pirates?
Because they arrrrrrrr!
Signed;
Agnostic Sully Morgan -
RE: Radius challenge
Just been experimenting with this, and it works well for more complicated shapes also:

bevel_complex.skp
This was done the same way as above, except it was rotated so the front face with the bevelled/chamfered edges faced upwards. -
RE: Radius challenge
A quick tutorial on how I created the image in my last post and the first image I posted. This was really just an experiment to see how/if a shape could be chamfered and does not work for every shape.
A - Create your basic shape and group it:


you can see in this example there are not all lines carry on across the whole object, thus there are no 'ribs' as in SchrieberBike's example
B - Create your radius
C - Create a flat plane below your object and using the sandbox tools drape your object onto the flat plane
Edit: There shouldn't be any need for this step instead keep a copy of the shape of the object when you create it, but this way would be good for more complicated shapes created from lots of intersections etc.
D - Delete excess geometry, move your created radius down to here and offset the shape inward to the points of the radius

E - Copy the top of the shape up to the points of the radius (similar to idea as above)

F - Push pull every other section of the offset shape (step D)

G - Intersect the shapes created in step E, and then delete the geometry from step F

H - Delete excess geometry so you are left with the top cap and contours for the chamfer

I - Use skin.rb to skin the chamfer

J - Explode all the geometry, soften/smooth edges (its also worth deleting any coplanar geometry to tidy things up a little)

Heres the model as well bevel.skp
-
RE: Radius challenge
@rodentpete said:
double click the top face, then select follow me and click on the fillet. You'll then have to delete any excess faces around the top.
Got me thinking now as this doesn't work so well with a steeply curving top surface, a problem I think I've come up against before, like in this .skp:

and ends up with a bulge like here:

I worked out a long way around of getting it how I wanted it, but just wondered how others might do it?

-
RE: Radius challenge
I assume that you mean something like this with a curved edge all the way around the top??

-
RE: Free Font Samples I Found
Some nice fonts there.
Another source of various free, shareware and demo fonts at http://www.dafont.com aswell
-
RE: Gingerbread House Challenge
I nearly forgot about this
and almost didn't read this thread
now I find that I have won
I am glad you enjoyed my gingerbreadThanks
-
RE: The Best Mouse?
Personally I don't like the 'spongy' scrollwheels either, and have to agree the intellimouse models seem to be good - still have an oldish optical version at work which is still going strong.
As for the digestives: If it was a plain digestive I would say that the top is the side with the writing on (I presume they are made on a flat surface in the factory with the writing side up), it would follow that since on a chocolate digestive the chocolate is on the opposite side to the writing, the chocolate side is therefore the bottom.
-
RE: Anyone Up For Some Friendly Competition?
@gaieus said:
aer you serious that you eat your toast with ketchup? You can't be that big of a SketchUp fan!

Its meant to be jam!!
-
RE: Anyone Up For Some Friendly Competition?
A kerkythea render of a toast shaped toaster

-
RE: Can this be modeled in sketchup want a step by step tutorial
Yes this can be modelled in su and i'm sure someone could do a brief tutorial for you (I would but I got carried away with trying to model it myself and forgot about the tut altogether)
You might find this youtube vid by monsterz3r0 of use. (its the first thing I thought of when I saw your post)
Also you may find this useful (it was going to be a tutorial and not just a model!)
It was created very similar to the above vid (you should be able to see that the main part of the fusilage is a circle push pulled and then scaled to the correct size, then push pulled again etc etc.hope thats of some help.
-
MS Intellimouse
I was bored over lunch and couldn't concentrate on modelling anything too complicated, so modelled my ms intellimouse. Just modelled by eye, so is probably a little inaccurate and is not the best model in the world, but thought someone might find a use for it.

SketchUp file: mouse.skp
-
RE: CatchUp - Speakers
Those are the same as the speakers i have at home.
Good model, like the presentation too.


