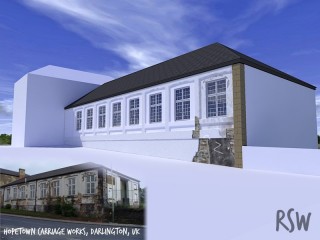
Hopetown carriage works (wip)
-
I decided to leave my previous wip for now and get back to something which is more familiar. so I've started modelling a building which is at the end of my street (for anyone whos interested in what it is theres some info on wikipedia)
This, like my other wip, is essentially for practice in texturing / rendering, and is not about recreating an exact replica the building, hence why I'm not too bothered about the proportions of the building being exactly the same as the photo. Although unlike my other wip I do intend completing this one.
Obviously this building has a great variety of texture and has a lot of work to do before it'll even be close to finished. As practice for later projects I am reluctant to use photos of the building as a basis for creating the textures, so all the textures are made from scratch, with the exception of the base layer of stone from here
I think it's ok so far, and by the end I might get an image which I'll be happy with, and hopefully be able to apply what I learn from this to other projects.
Textures created with Gimp
Rendered with Kerkythea

-
hi, this looks great so far... forgive my ignorance but could you go through how you have went about texturing the various parts?
did u draw the chiped away parts and then extrude and colour and alter the texture map or is there some photomatching involved
Keep up the good work! -
Archirag, I usually do new buildings in sketchup and therefore have no photo reference to go with, but often find that the textures are too uniform and don't have enough natural variety in them, and i'm therefore trying to figure out the best way of introducing textures which vary across the whole surface (albeit using a rather extreme example). i'm just experimenting at the moment to the best way, so I'm not sure my way is the easiest or most effective (and will no doubt change as I progress this model)
but i'll try to briefly explain how i've achieved it so far
-
Open previous image in photoshop or gimp, and create the material.
In this case I have used layers with masks to reveal the materials I want. So for example this material consisted of 4 layers:
-Stone
-Render
-Paint
-Dirt/graffiti
(note that the materials have not been by cloned from the photograph, the photos have only been used as reference, I chose to do this because when I get to modelling/rendering new buildings I won't have a photograph to clone from) -
Save a copy of this image as a jpg
-
'Project' texture on faces (note I didn't do this with every face, for example the window frames)

-
Export to kerkythea
-
apply bump map to texture. You should also be able to create a bump map based upon the masks and textures in photoshop. This is where I've been able to get more depth and detail into the texture.
-
For added control over the textures, for example if one of the materials is reflective, you can export textures and maps from photoshop and create a layered material in kerkythea. For this model I didn't need to do this just yet, but did it anyway. If you're interested the full set of images I used for the texture can be seen here
Obviously this is a long way round of modelling/rendering an existing building, but as I said this is more for practice than anything.
-
Hi RSW
I am digging around the net looking for details of the Darlington Locomotive Works with a view to making an N scale 3D printed copy to go with my N scale 60163 locomotive.
Do you know if there are any dimensioned drawings of the building?
Your 3D Sketchup drawing is the first I have found that has the possibility of being useful.
If you are able to make some measurements available it would be greatly appreciated.
I live in Christchurch New Zealand so it is a bit complicated just to pop down and get the measurements my self.
Thank you and best regards.
Alex
Advertisement


