You're welcome. Just giving back to this forum, whatever I can, whenever I can! You were only the ideal victim 
JQL
You're welcome. Just giving back to this forum, whatever I can, whenever I can! You were only the ideal victim
JQL
Oh no!
Now that I was all comfy with Sketchup...
Thanks I guess...
JQL
Glad I could help.
Best regards,
JQL
That makes total sense Rich.
Would you recommend Blender for architecture?
Would it have any more uses other than 3d for presentations?
Best regards,
JQL
In the past year I made the same move you are trying now. Never regreted a day and my work has become both more productive and fun.
You'll have issues, like I did, all successfully overcome.
Best regards and good luck,
JQL
I'm not sure I understand your problem, but I think what you need is this:


So take a look at the model attached.
Best Regards,
JQL
tridem,
The method you present is indeed effective if you have your model working properly. However if you have some errors or the clipping plane problem in your model, it wouldn't do you any good.
You could try copy and paste in place but, with heavy models it probably would be very difficult with the 3GB Ram limit of 32-bit skecthup (I think).
What you can do also is to create a component for the whole model define its axis to be on origin of model and export that component using "save as" option available on context menus either on outliner, component manager, or model screen.
Then you would import that component to a new file and you have it in the same origin.
If this file has all scenes defined the new model will be shown in those scenes.
It's a cumbersome process and it would be much more effective to copy scenes from model to model.
There are some plugins that can exchange scene cameras from one file to another but for me those are not enough as scenes are much more than cameras and all of its parameters should be able to be copied/pasted.
For architecture It would be fundamental to replicate also:
I think I read something about this being impossible with Ruby, but I bet it would be a simple feature for Sketchup Team at Trimble..
Best regards,
JQL
pcmoor,
Yes you could do that and I've considered it once or twice, for standard doors and windows.
I didn't find it practical though... Why create a more complex component that you have to explode, if it is easier to just have 1 simple component mirrored?
Have you found other practical uses for that method? I definetly think Sketchup should have multiple hole cutting components. Those, combined with dynamic components, could become interesting...
Best regards,
JQL
Even if SU Pro is totally worth it, Dynamic Components will only add complexity to your problem and there is an easier way to solve it.
Having said that I had never thought of a solution to your question until you asked for it... So thank you already!
See the attached image and skp file for reference.
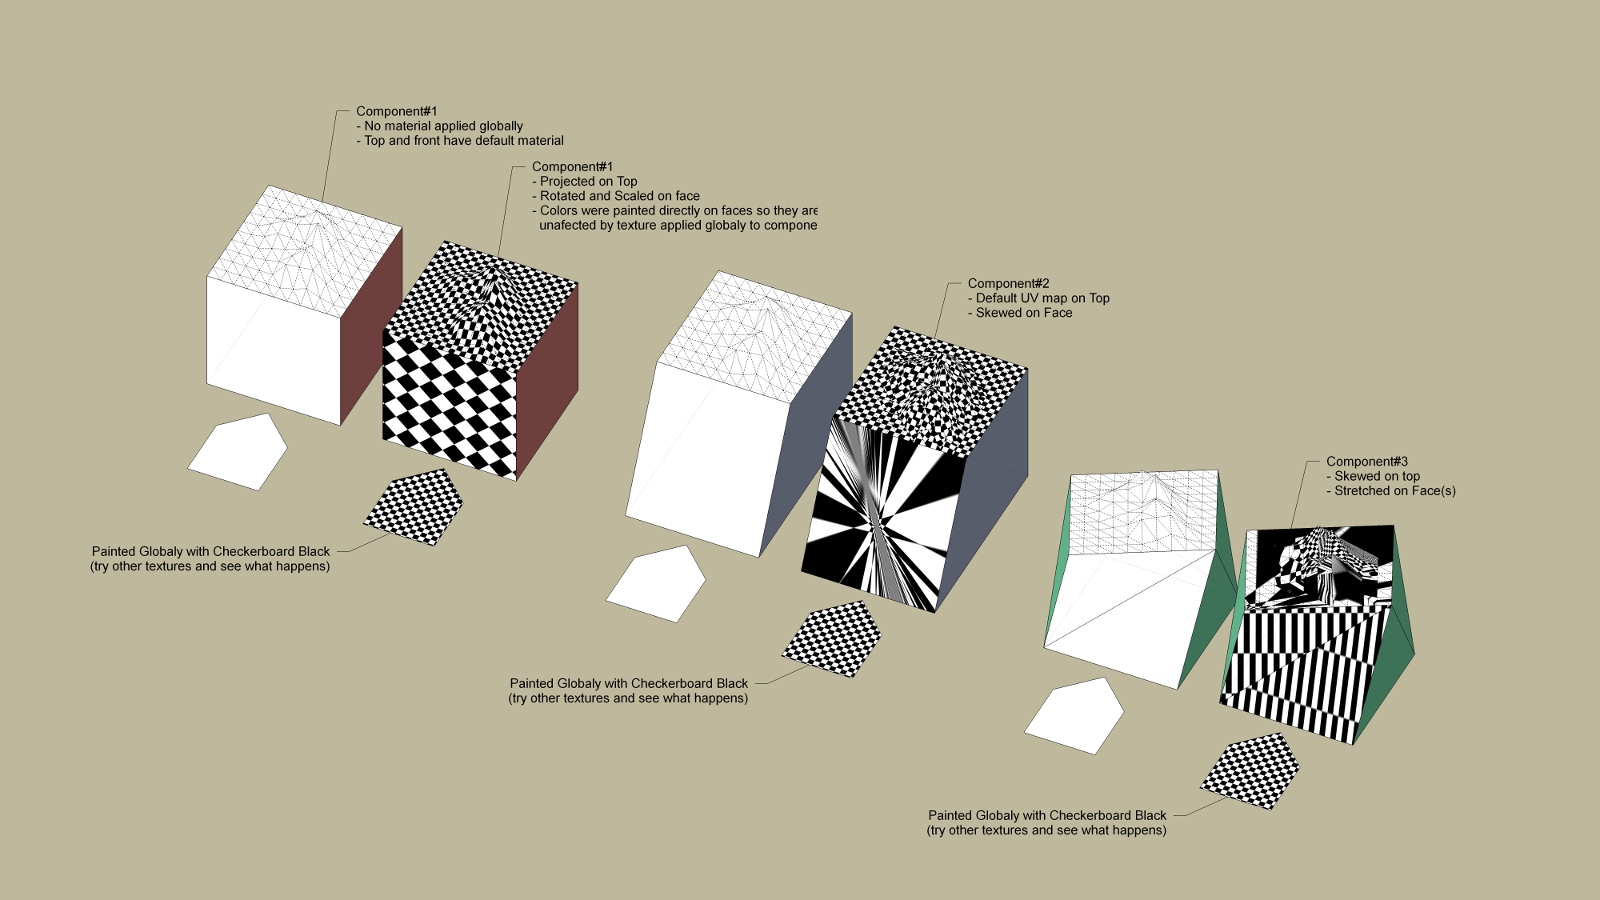
When a texture gets scrambled like that on a mesh the simplest thing to do is to project the texture using another face for reference, with the material applied. This will only work for faces and meshes but there is a workaround to use it (or any other UV mapping) on groups/components. So here it goes:
A - Projected Textures
A.1 - To do that, apply a textured material on a face that as the average inclination of your mesh (in the example I used an horizontal face)
A.2 - Right click the face being careful not to select edges or anything else
A.3 - Click texture > projected on the context menu(aparently nothing happens)
A.4 - Press B or click on paint bucket
A.5 - Press and hold alt key and click on the texture that you just turned to projected. You can release alt, and from now on you've "memorized" this UV for this material.
A.6 - Paint the mesh/faces directly and the texture is projected on those faces
As I said before this doesn't work on groups or components though. If you try that, everything gets scrambled. That happens because the faces inside have only global Sketchup UV coordinates. To define UV coordinates "locally" you'll have to apply materials directly onto faces, projecting or positioning them... You are then applying materials and UV mapping faces the sketchup way. After that you'll have to somehow replace those materials with the default one, as only the default can absorb other materials applied to groups and components. The problem is you have to do that and also keep UV coordinates leaving you with no chance to paint the faces with the default material directly again...
Lost already? You need a work around! Follow the next steps and have faith:
B - UV coordinates on Default Material inside Components
B.1 - Get inside the component until you can select the faces to paint.
B.2 - Use a material with a nice and regular texture (like checkers or tiles) and apply that to the faces/meshes you want to change later. Lets call this material "UV Checkers" (check the model attached for "UV checkers")and give it a simple scale. In my case 1mx1m per square, wich means a 2mx2m material.
B.3 - If you are using 3d meshes the simplest method of getting good results is if you use projected textures like explained above.
B.4 - If you use plane faces you can right click the face and position the material with texture > position (do not select anything else but the face or it won't show that option on context menu).
B.5 - You can copy this "UV" position to other faces using step A.5 of the projected texture tut above.
B.6 - After step B.3 and/or B.4 you have the faces UV maped. However you also have a material applied to them so, if you apply a material to the component, nothing will happen to those faces.
B.7 - The workaround is to simply delete the material from the material library. To do that Press B or click on paint bucket, go to select tab, find your material (in this case "UV Checkers") right click on it and delete it. Now those faces have the default material applied AND are UV mapped. They will absorb materials applied to the component globally, AND will position them correctly on faces.
NOTE - Don't paint those faces directly again or you'll loose the UV mapping and materials.
Try erasing "UV Checkers" material from the reference model and see what happens to the components that were painted with it.
I tried to cover every aspect and I sincerely hope it was useful. Best regards,
JQL
No chance spence... Tried it and failed!
There is only one plane for hole cutting components. You have a simmetric geometry there so you could create only half component and mirror it if you'd like.
You had to then hide some edges on the cutting plane, so they wouldn't show on the openning, and also the edges on the sides, so the walls would look continuous.
Almost no work would be lost...
Best regards,
JQL
Masterpaul,
I can't imagine being in your position right now. No matter the right you conceeded in giving away your model, "You retain ownership of any intellectual property rights that you hold in that content. In short, what belongs to you stays yours."
EDIT:
However, if the lawyer is not sharing your point of view there's always some dangerous (and probably funny) acts you could pull (wich I wouldn't advice you to because I wouldn't dare pulling them myself).
Let me try to cheer you up with some ridiculous ideas:
Now for a more conservative aproach: The first thing I would do here in Portugal is go talk to the Portuguese Architectural Association and ask them for help. Here they have lawyers that give preliminary legal advice for free and I sincerely think that there are some fundamental deontological questions not being respected here. Greece and Portugal are both in EU so the base rules should be the same. Here that could put them out of business for some years and guess what? PAOK won't be waiting for long... or will they?
EDIT:
I hope I helped or cheered you up a bit!
Best regards,
JQL
The triangle is a vertical face on the end of "floor" plan opposite fro point of view... I guess!
Ashscott,
If you are further developing the plugin, I got an idea from using it that I think you could consider, even if it's not that important and there are many ways to get around it:
The window could go a step further and besides displaying the message, it could have a one click button for extending zoom to all similar components, and back to where you were editing.
It's just a minor thing but the alarm box would become both text and function, and all aspects related to the anxiety of editing components would be covered.
Again, this is a very nice plugin, and should have been there from the start. Best regards and thank you.
JQL
Hi again,
When working on nested components, there are two things happening that I think could be revised.
1 - The flag doesn't go off as I dig inside components nested inside other components. One has to turn them off manually.
2 - The value showed does not reflect how many components really exist in the model if there are components inside other components.
Still better to have it than not so thanks again,
JQL
Either
Hi Tig and Rich,
Thanks for this addition to SU arsenal.
To improve on what you already have, is it somehow possible to make the plugin work also on holes created by "hole cutting components"?
Best regards,
JQL
Hi again Renderiza,
When I saw WASD keys I thought you would make us enter our own projects shooting badguys around corners.
It's a safe plugin I guess...
Best regards,
JQL
I just bumped into this thread and I must say, this is an excellent plugin!
Thank you for sharing,
JQL
Unbelievable Renderiza, your plugin is now able to rename without changing name? What a paradox... If I didn't see it with my own eyes I wouldn't think it was even possible!
Thank you again,
JQL
What a powerful concept! Could make me rethink the way I manage my Sketchup models...
Could the plugin be adapted to also have a filter for the active layer?
Thank you very much!
