[Tutorial > Modeling] Wall thickness components cut holes
-
mac1,
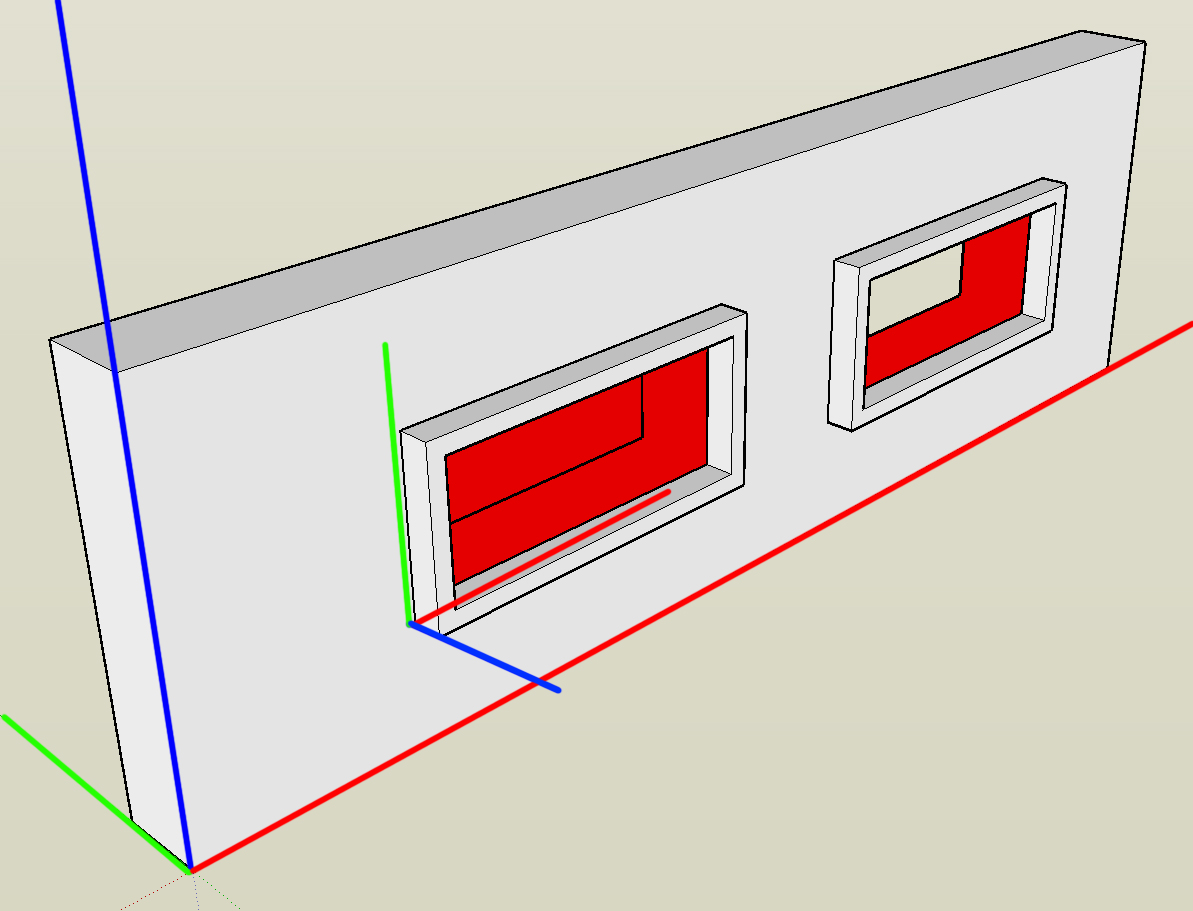
I attach the picture showing exact axis' setting as is in the model. I made a small mistake in showing direction of BLUE axis of the component #3.
The point of my "tutorial" was to find a system of how to set axis of the component made of two other components, to make it cut at least one plane when placing on to the thick wall. When finishing the model, select all instances of the window component, explode them, and you will have windows with double-sided opening. And all this had been achieved without any punch-in openings which are hard to edit.
And the simple tip you might find useful:
If you are grouping walls for example, when making model, only way to make the cut-in component work (ex. #3 from my model) is to enter the group (walls) and then paste component (window) from the component browser. Putting components on groups doesn't work in terms of cutting-in. There are other ways to do it, depending on your work system (if you group/ make components or not).
-
Alright, I watched the video Burkhard posted, and it looks so elegant and easy ...but I can't do it!! First off, I can't block the whole window in with two clicks for the diagonal line; nothing happens. I have to outline the whole window and draw a diagonal twice (and even then it doesn't work each time). Then, when I push the window tracing through, it still only cuts through one wall. This is what I have.

I think I'm following the video exactly, but clearly I'm not ...
-
I suggest you find my 'Hole Punch' tool [Plugins Index] - it 'punches' any cutting components through a wall and makes reveals etc, in a different way, without this level of complication...

-
Yes, that's a great tool (released since this tutorial which made it a bit obsolete)

-
Would love to -where is it? I found the Plugins forum, and this discussion, which I think is about it:
http://forums.sketchucation.com/viewtopic.php?f=323&t=30846&p=336899&hilit=hole+punch+tool#p336899
but is there a list of the plugins themselves somewhere?
And is it as difficult to use as that thread suggests?
 I haven't used any plugins yet, am still plugging away, haha, at the basics...
 -
At the top of this page is an array of red buttons, links to the indicated destinations. See Plugins Index. Look in list by Author. Find TIG, scroll to desired thread.
-
The 'Plugins Index' - the big red button just above here! Lists all of the scripts available on this forum - plus some with links off...
You have found the right thread for 'Hole-Punch'.
The download is on the first post in the thread [as it is for most plugins].
Read the instructions for install and use...
Put simply it adds a new submenu to the right-click context-menu.
Within that there are several possible tools, these are enabled depending on your selection - for example you cannot 'punch' if no punching component-instance/s is/are selected, or the selected one/s is/are already 'punched' - however, then you do get other options to un-punch, re-punch, un-link etc; you can [re]set the punch depth-limit at any time - it's 500mm/20" which will suit most walls that are that or less thick [it punches to the inner face of the wall OR the limit if no face is found], but if you have an exceptionally thick walls you can up it to suit - but please don't make it too big otherwise if a cutting component were placed in a 'single skin' wall and you specified say 3m/10' as the limit it might punch right across the room to the wall face opposite!! as it has nothing else to find in between.
-
Even searching on Google is gonna give you a result. I just google 'TIG holepunch' and it was the second item.
NOTE
Do not search for images with 'safe search' off. It may reveal TIG's identity and she wouldn't appreciate that

May the force be with you
-
Heh, I see the red button now.
Thanks, all! Will definitely try out this plugin. -
@gaieus said:
Well, to me it seems to work as expected.
BTW another model (component) I made this way (click on the image):you said "Twilight ready" in the warehouse, Gaieus. what is that mean?
-
The materials are all "tweaked" already for Twilight Render. When you save such a model, these settings are saved with it and are even maintained when you upload the model to the 3D Warehouse.
Hello! It looks like you're interested in this conversation, but you don't have an account yet.
Getting fed up of having to scroll through the same posts each visit? When you register for an account, you'll always come back to exactly where you were before, and choose to be notified of new replies (either via email, or push notification). You'll also be able to save bookmarks and upvote posts to show your appreciation to other community members.
With your input, this post could be even better 💗
Register Login


Advertisement