[Tutorial > Modeling] Wall thickness components cut holes
-
This tutorial has been "republished" - and a bit better explained according to the feedback given below - under (menu) Resources > Tutorials > "Window to Cut Hole on Thick Wall"
Any questions or suggestions are of course still welcome in this topic.
-
Thanks for that Gaieus. A lot of work went into that tut.

-
Thanks Eric - maybe some more could go in there - it's just half past one in the morning here... I might "revise" it tomorrow or one of these days (also the flash is quite jaggy and got those black sides, too...)
-
Get to bed man! It is half past 6PM here.
-
Gaieus,
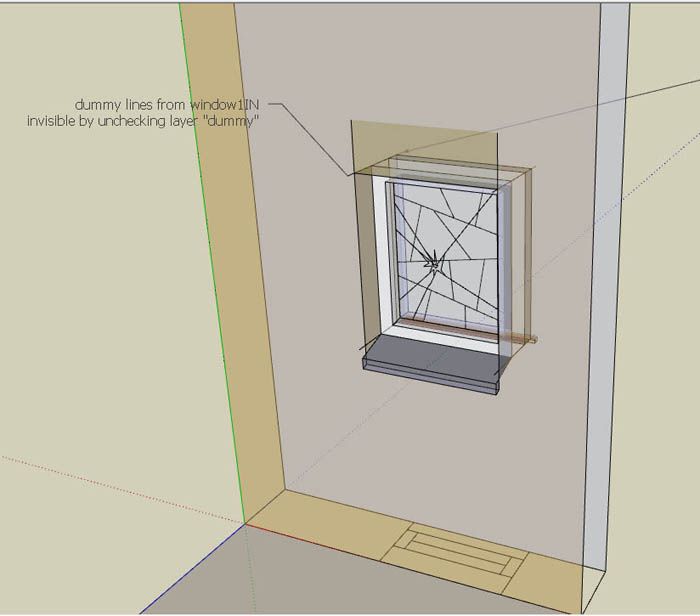
Nice of you to remember. I had those dummy lines in a dummy layer to
be checked or unchecked but I like your idea to have them as hidden geometry.
Great tut. thanks to you!!!cheers,
Wo3Dan -
Wodan, that's what gives the point of the whole tut! Of course I remembered the long talk about the issue and I think it is just evident that I don't "steal" your idea!

Actually I remembered hidden dummies - but the layer thing may be even better for when you have a bunch of hidden geometry, it is hard to navigate between them.Thanks for adding it (actually I was trying to find your model about this in the WH but couldn't so I didn't link).
Have fun - as always!
-
Gaieus,
Here is the link to the Window1 model in 3DW to check if you want:
http://sketchup.google.com/3dwarehouse/ ... 7a5fd52cab
I used 4 lines from both sides (in both components) here but in fact only one (overlapping) line in each component will do.
Overlapping is to make aligning the components easier.cheers,
Wo3Dan
p.s. nothing yet with the yacht Endeavour.
-
Csaba, Wodan,
Thanks, that is a great tutorial and component.
Also I'd like to add a tip (this is probably obvious but may help a newbie), I like to attach a 2D plan view component to 3D windows and doors that I put in a different layer so that I can keep my 2D plans up to date while I move doors, windows etc. This makes the generation of construction drawings much quicker with as little post CAD work as possible. .
-
Thanks Jon - this is the nice thing here, everyone has a kind of workaround or routine to solve problems and when we all share our experiences we all benefit from them.
-
Another way I made for youtube. ( German language )
But you can see different types of windows ( components and handmade )how to handle this in double skin walls.
First video with windows as components, second as new window construction with editing to components.I put it here under the same theme.
http://de.youtube.com/watch?v=Q6rCZ89dvnM&feature=channel_page
http://de.youtube.com/watch?v=AC4WWl4yWQM&feature=channel -
Hello everyone. I think I made another small step in resolving this double-sided cut-ins for window/door components. I might have missed the solution posted earlier, but here is my 5cents.
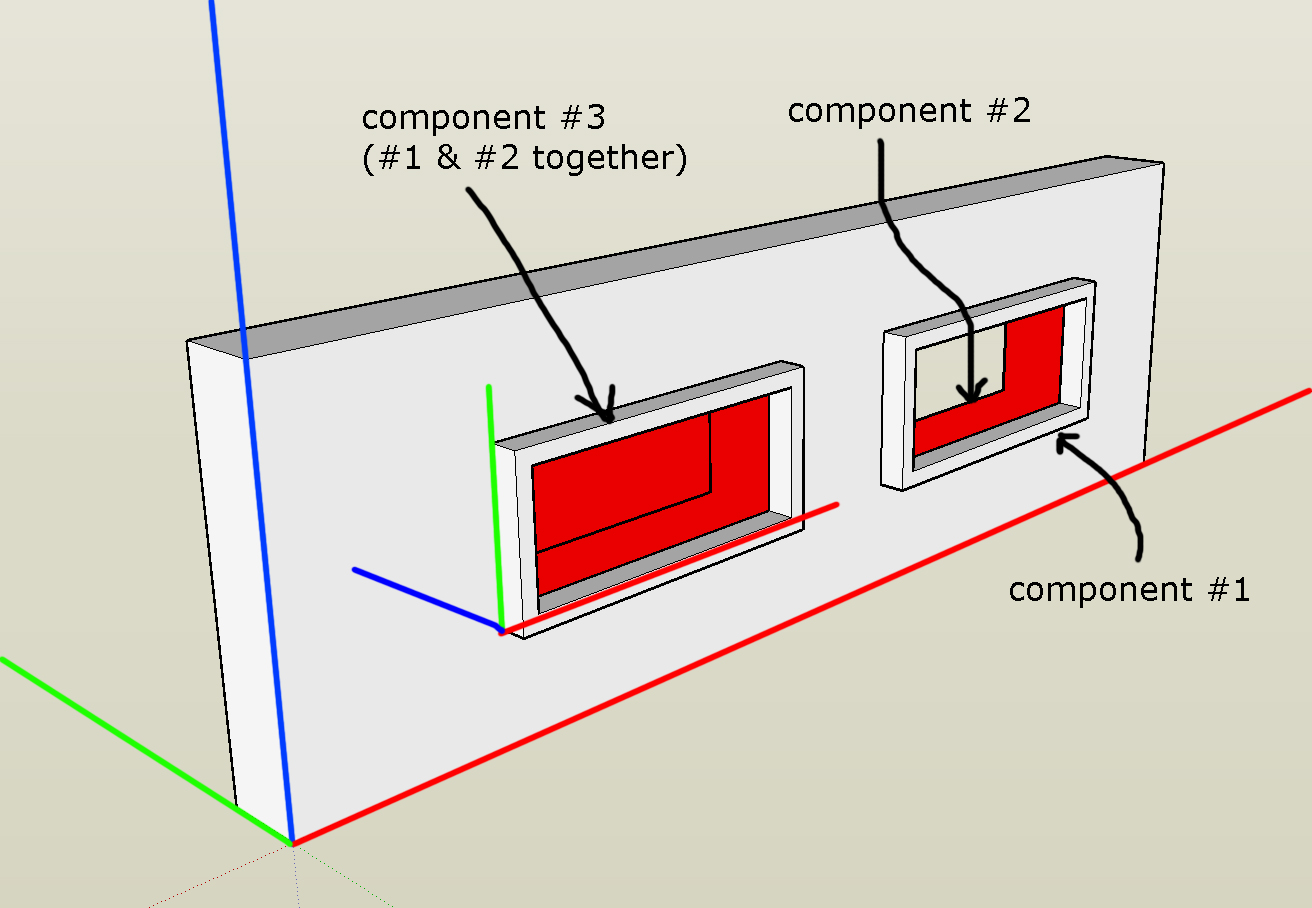
I get to the point where I nested #1 and #2 (external and internal openings) components inside the #3 which is a full window. What happened- I obviously lost 'cut opening' capability for all of them. But, when creating #3 component I set it's axis into those shown on enclosed image. Then I took it from component browser and dropped into the model. It lost 'cut-opening' feature only for the internal opening (#2). #1 still has it, and so #3. After exploding, #3 gets full cut-opening features. I hope you all understood what I meant, I think the picture shows it all. Only thing I don't understand is why component axis have to be different from model axis... any suggestions ?
-
Hi Jakub,
To me, from the picture, it looks like the parent (#3) component does not have a gluing/cutting feature set. If it had, while editing/placing its axes, it should have differently looking axes (or are you not doing that in the screenshot?).
Could you also attach the skp file itself?
-
see the model attached. I edited the picture myself in PS
thick axis were to emphasize their setting.
-
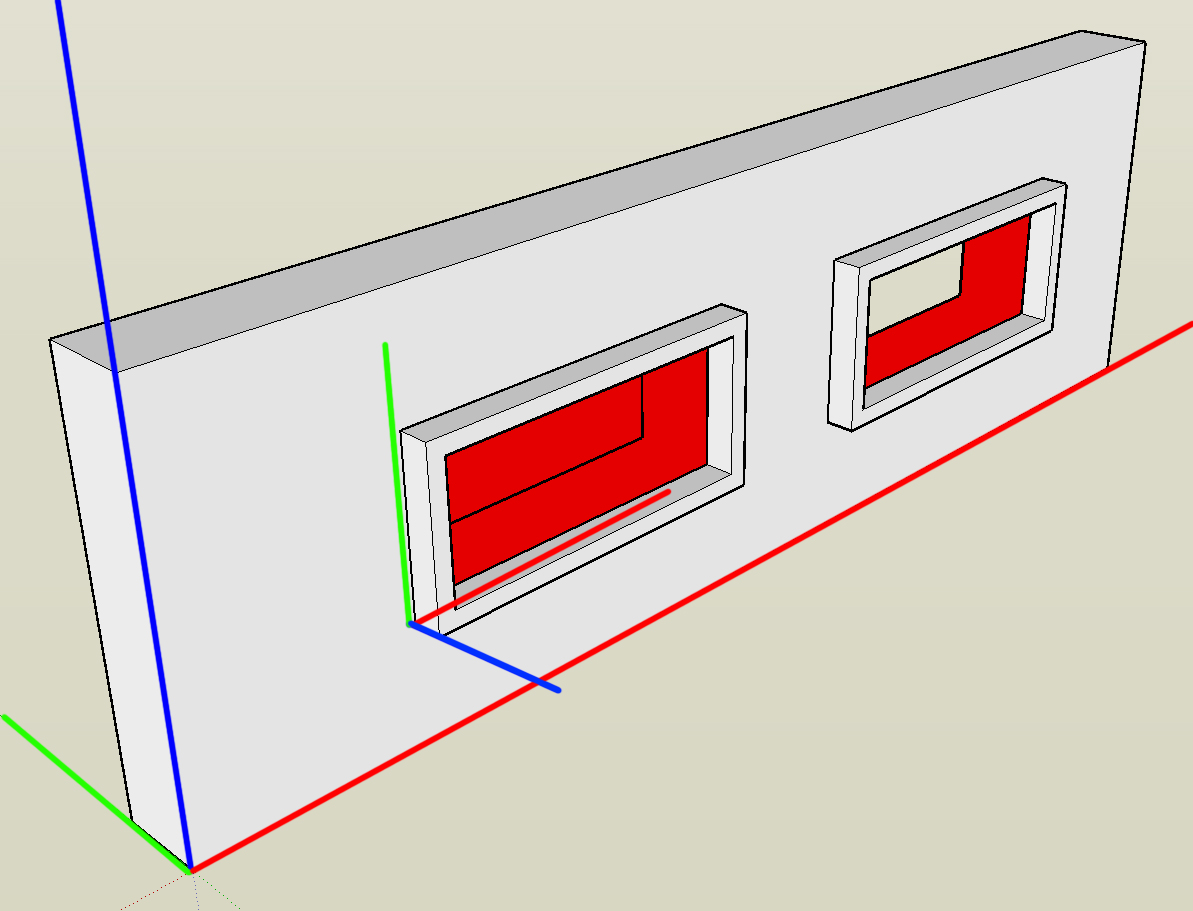
Well, to me it seems to work as expected.
Insert component 3, explode and both faces are cut by the nested child components.
The only thing is; you should edit either to cover the "depth" of the wall thickness (currently you can see the back faces of the wall between the two components) but the concept works successfully.
BTW another model (component) I made this way (click on the image):
-
@skakub said:
Hello everyone. I think I made another small step in resolving this double-sided cut-ins for window/door components. I might have missed the solution posted earlier, but here is my 5cents.
I get to the point where I nested #1 and #2 (external and internal openings) components inside the #3 which is a full window. What happened- I obviously lost 'cut opening' capability for all of them. But, when creating #3 component I set it's axis into those shown on enclosed image. Then I took it from component browser and dropped into the model. It lost 'cut-opening' feature only for the internal opening (#2). #1 still has it, and so #3. After exploding, #3 gets full cut-opening features. I hope you all understood what I meant, I think the picture shows it all. Only thing I don't understand is why component axis have to be different from model axis... any suggestions ?
For c#3 in your skp file the red cross green axis shows a right hand system but , the PS edited shows left or did I miss some thing??
-
Additional thought ref axis issue.
This link http://forums.sketchucation.com/viewtopic.php?f=18&t=677 and others I have read have an under laying theme of axis setting issues. I have a suspicion / gut feeling about what is going on but absolutely no proof.
The thought is when a axis translation and especially rotation is done the final results one gets is a function of the sequence used to get there.
This means it is not invariant. To prevent this artifact from happening quaternions are used or one has to be very careful the sequence is properly used to accomplish the change. The following is from http://en.wikipedia.org/wiki/Quaternions_and_spatial_rotation:
"A simple exercise of applying two rotations to an asymmetrical object (e.g., a book) can explain it. First, rotate a book 90 degrees clockwise around the z axis. Next flip it 180 degrees around the x axis and memorize the result. Then restore the original orientation, so that the book title is again readable, and apply those rotations in opposite order. Compare the outcome to the earlier result. This shows that, in general, the composition of two different rotations around two distinct spatial axes will not commute"
As long as translations are done co-linear with the SU drawing axis where the component axis are set then things should be OK but rotation can be an issue
Just a thought -
Aterf all my rambling this AM and spending much of the afternoon running test I can come up with several conclusions:
1)If one enables the componet axis and the gluing plane (the blue x) is not visible the component will not glue;
2) A component can be glued, rotated, pasted / copied , array copied on a single colinear surface;
3) Cutting both sides of a thick wall requires some type of trick involving two components. Some consist of nested components. I used construction points turned into a component with a gluing plane and then a "replace selected" form the component browser for the front with the front points selected and then repeated the same for the back component;
4) Selecting both the front and back and attempts of move / copy , paste etc is not sucessful because the gluing plane ref is lost. This appears to not be a Open GL problem because it was the same for both Open GL enabled and disabled. I expected to see some difference here ref the above rambling quaternions because Open GL does use those;
5) In regards to axis swap this is the only ref. Do a search for LENY in the user manual and it addresses the axis swap
-
mac1,
I attach the picture showing exact axis' setting as is in the model. I made a small mistake in showing direction of BLUE axis of the component #3.
The point of my "tutorial" was to find a system of how to set axis of the component made of two other components, to make it cut at least one plane when placing on to the thick wall. When finishing the model, select all instances of the window component, explode them, and you will have windows with double-sided opening. And all this had been achieved without any punch-in openings which are hard to edit.
And the simple tip you might find useful:
If you are grouping walls for example, when making model, only way to make the cut-in component work (ex. #3 from my model) is to enter the group (walls) and then paste component (window) from the component browser. Putting components on groups doesn't work in terms of cutting-in. There are other ways to do it, depending on your work system (if you group/ make components or not).
-
Alright, I watched the video Burkhard posted, and it looks so elegant and easy ...but I can't do it!! First off, I can't block the whole window in with two clicks for the diagonal line; nothing happens. I have to outline the whole window and draw a diagonal twice (and even then it doesn't work each time). Then, when I push the window tracing through, it still only cuts through one wall. This is what I have.
I think I'm following the video exactly, but clearly I'm not ...
-
I suggest you find my 'Hole Punch' tool [Plugins Index] - it 'punches' any cutting components through a wall and makes reveals etc, in a different way, without this level of complication...


Hello! It looks like you're interested in this conversation, but you don't have an account yet.
Getting fed up of having to scroll through the same posts each visit? When you register for an account, you'll always come back to exactly where you were before, and choose to be notified of new replies (either via email, or push notification). You'll also be able to save bookmarks and upvote posts to show your appreciation to other community members.
With your input, this post could be even better 💗
Register Login


Advertisement