[Tutorial > Texturing] Texturing an arch - #2
-
that's part of my "problem", i don't know what it is that i am doing wrong, and my last skp. file i posted was my own
-
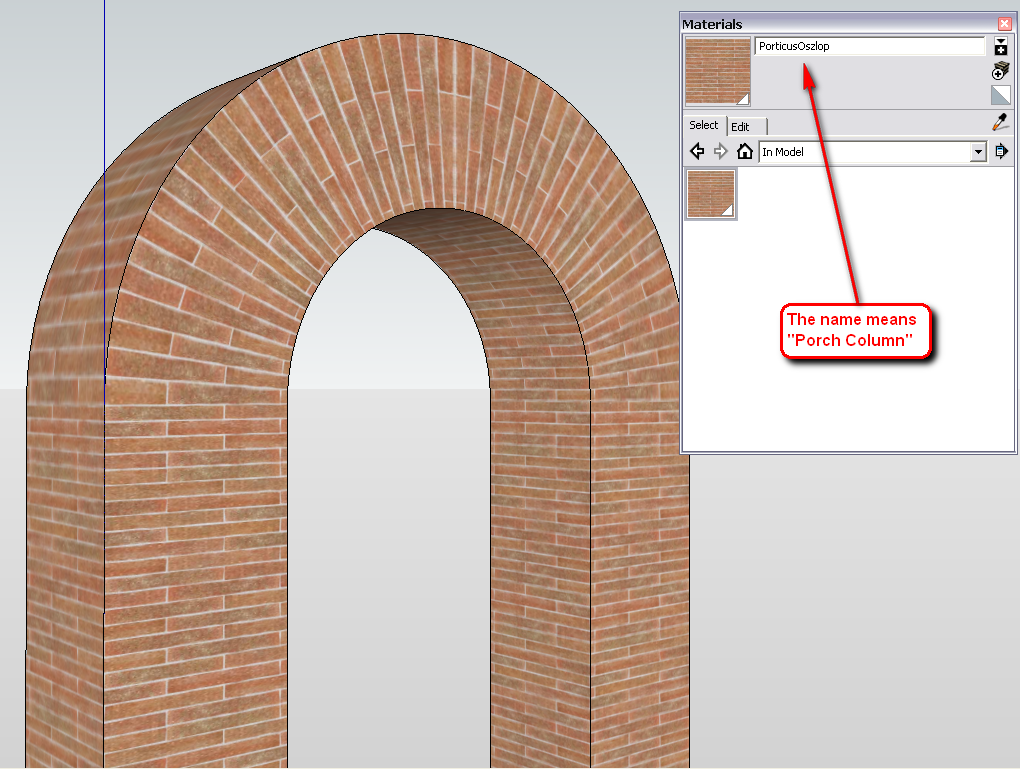
And I exported that image above from this file. To me, it seems to be correct (within the possibilities with this kind of mapping). At least try to tell what you do not like in that arch.
Is this file that you have problems with? It seems that you may have incidentally shared another file. At least this material in here is what I made for another project (even the name is in Hungarian). I have shared it here somewhere but I can also imagine you somehow uploaded this instead of the one you have problems with?
-
GAIEUS,
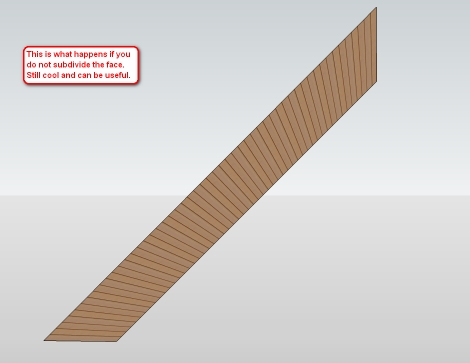
can you please explain in detail how to get this? (see photos)
I'm trying with tools diFredoScale, but ... I do not get results
thanks
-
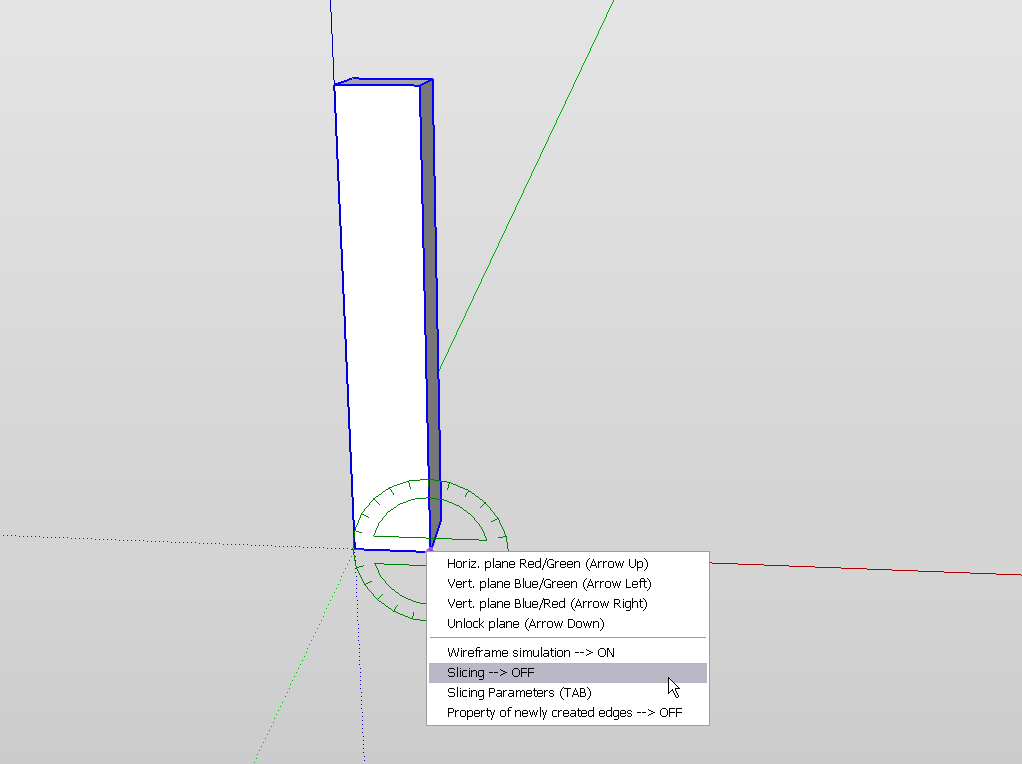
You need to have slicing off (right click after selected Radial Bend of Fredoscale)
or you can enter the "fine tuning" dialog by pressing the TAB key then.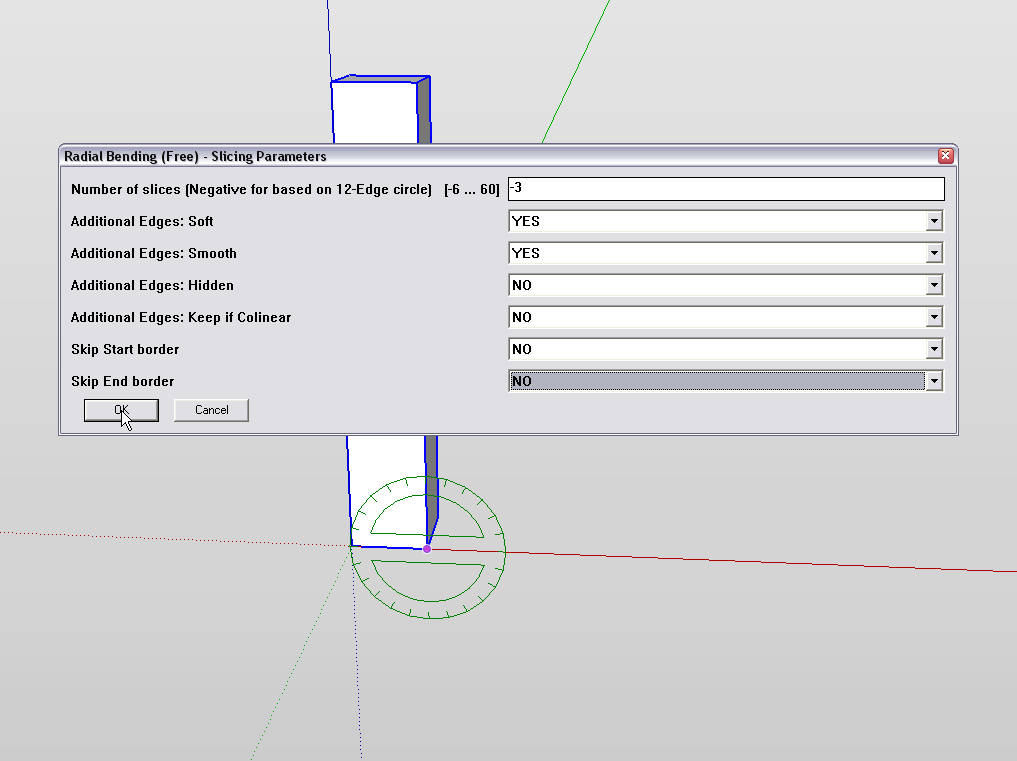
-
Very good.
thanks a lot -
My first post. Thanks a lot, as new user, SketchUcation is my first learning resource. I have SU 8 pro.
I am trying hard to understand how texture archs. My model is a roman villa near Palencia (Spain) I want to model.
Until now I cannot get any results. I have downloaded the UV.skp file that Massimo send to Gai. The workflow was:
-load UVmassimo.skp
-hidden geometry off
-select face with textures , one click
-remember UV
-fredo scale and bend 90º
-open the group fredo scale has made, select face with textures, one click (hidden geometry is off)
-restore UVNothing happens...the textures are again horizontal.
Another thing I dont understad how to build the vertical column before bending. Reading the thread, it seems that you have to create a bloc, texturing-bricks, stone, whathever-and then copy and add pieces until you have the whole column you want to transform in an arch. I have done so, and my blocks do not macth and after CTLR+delete to smooth the inner lines of separation I cannot select with one click the whole surface to aplicate "remember UV".
Please, could anyone tell me what I am doing wrong?
-
Hm. I am not sure what you are doing wrong. Make sure however to completely turn off slicing in Fredoscale (see the post above). The reason is that UV Toolkit can only remember UV co-ordinates on the exact same faces it remembered them from. This means you cannot introduce any new faces otherwise it will not work. The number of faces must be the same before and after the bending.
For this same reason (and to be able to bend the column), I had to copy all your divided edges onto the other three sides as well.
@juanfernandez said:
after CTLR+delete to smooth the inner lines of separation I cannot select with one click the whole surface to aplicate "remember UV".
You can turn off hidden edges afterwards under the View menu. But you can just select all and do the bending and restoring this way.
Here is your (half) arch. You can mirror it to get a whole.
Ah, by the way, when we are at Roman villas in Spain... I took part in a EU project that also involved one in Fuente Álamo (Puente Genil):
http://www.h2g2.hu/peregrinus/sp/2.1.html
-
You can use QuadFace tools: http://forums.sketchucation.com/viewtopic.php?t=39442
Check out the videos for how to UV map. -
Thanks a lot, Gai and Thom. The slicing off did the job, now I can bend the bricks and builid archs in my La Olmeda model. How could we newbies do anything without you the masters?
Gai, if it happens that you come to Spain to see Roman villas or whatever, drop me an email-hope that you, as moderator, can get my email. Please note I am in Palencia, with P (people get confused with Valencia, with V).

| Villa Romana La Olmeda
La Villa Romana La Olmeda, es una gran mansión rural del Bajo Imperio (s. IV d.C.), cuyo edificio principal o pars urbana, es de planta cuadrada flanqueada por torres en cada esquina y se dispone en torno a un patio central y peristilo al que se abren las distintas dependencias. Esta villa palaciega abarca una extensión en superficie de 4400 m2 con un total de 35 habitaciones repartidas entre la vivienda principal y los baños, 26 de las cuales están decoradas con 1450 m2 de mosaicos polícromos conservados in situ. El conjunto fue declarado Bien de Interés Cultural el 3 de abril de 1996.
(www.villaromanalaolmeda.com)
(both in Spanish, sorry!)
-
That's quite a villa indeed!

The first link did not work at all but the wikipedia page also exists in English: http://en.wikipedia.org/wiki/La_Olmeda
-
The first link is OK, Gai. The web administrators, I don't know why, shut off their web sites by night, and turn on then early in the morning. It's a provincial institution-Diputación Provincial in spanish- and they have this weird way of publishing their web sites.
-
Yes, I can see now... "Reconstrucción Virtual > Próximamente". Is this what you are working on?
-
No, I am a newbie, and cannot take that job by now. I am a teacher, we plan do educative software and documents related to the Olmeda Villa. My 3D model is may way to learn SU with a motivating subject. Perhaps in the future I will be able of making something worth of the Villa.

-
Get me to do it then. I am an archaeologist, too.

-
Ok, Gai, I'll take your word.

When I became profficient enough in SU to do the job, I'll call you. I have to work hard in SU. Then they have to let me take photographies and measurements of the Villa. I think there will be no problem, because I am in very good relations with the Villa's provincial managers. -
Thanks guys! Thanks for the tutorial and the tools!
Just saved me with this huge arch for an addition, which matches a design done 10 years ago on the same building.BTW - I didn't read past the initial steps since I didn't have any issues, but if you are matching an opening - make the height of the flat column of brick equal to the length of outer arc of the assembly. Did that make sense?
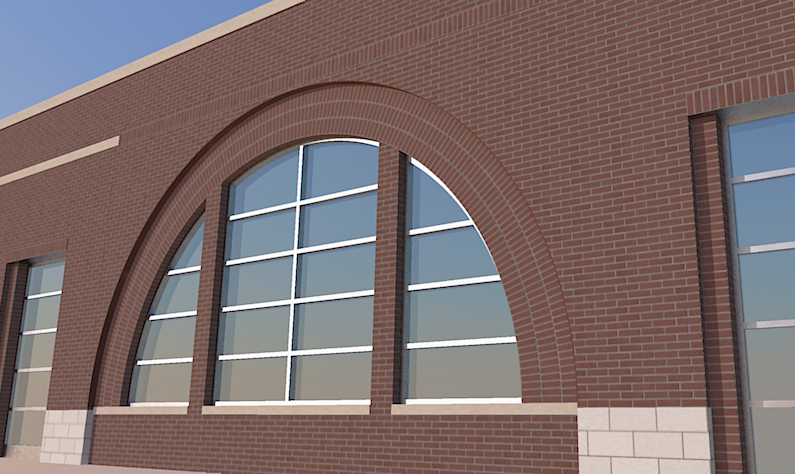
-
Nice arch!

Of course, now we have Whaat's SketchUV Plugin (with tube mapping) which save even more time and head-ache...
@marvins_dad said:
BTW - I didn't read past the initial steps since I didn't have any issues, but if you are matching an opening - make the height of the flat column of brick equal to the length of outer arc of the assembly. Did that make sense?
I guess it all depends where you grab that column (inner or outer side) with Fredoscale.
-
Is there a way to do this without the FredoScale plugin? I'm making a gothic arch like the one mentioned in the previous thread:

I assume this was modeled with the follow me tool, which is what I did do model it.
-
This wasn't made with FredoScale nor the Follow me tool.
I drew the outline, then offset to make the inner hole. Then another offset to create the line in the middle. After that I selected the edges of the inner hole and moved it inwards.
hm... this is probably better suited with screenshots....
-
Hello! It looks like you're interested in this conversation, but you don't have an account yet.
Getting fed up of having to scroll through the same posts each visit? When you register for an account, you'll always come back to exactly where you were before, and choose to be notified of new replies (either via email, or push notification). You'll also be able to save bookmarks and upvote posts to show your appreciation to other community members.
With your input, this post could be even better 💗
Register LoginAdvertisement


