sketchucation logo sketchucation
    • 登入
    Oops, your profile's looking a bit empty! To help us tailor your experience, please fill in key details like your SketchUp version, skill level, operating system, and more. Update and save your info on your profile page today!
    🔌 Smart Spline | Fluid way to handle splines for furniture design and complex structures. Download

    [Plugin][$] Curviloft 2.0a - 31 Mar 24 (Loft & Skinning)

    已排程 已置頂 已鎖定 已移動 Plugins
    1.3k 貼文 299 Posters 2.5m 瀏覽 297 Watching
    正在載入更多貼文
    • 從舊到新
    • 從新到舊
    • 最多點贊
    回覆
    • 在新貼文中回覆
    登入後回覆
    此主題已被刪除。只有擁有主題管理權限的使用者可以查看。
    • TIGT 離線
      TIG Moderator
      最後由 編輯

      @Bruno

      If none of the preceding comments apply or fix your issue... then please attach a SKP to a post and we'll look at it...

      It will be 'do-able'...

      TIG

      1 條回覆 最後回覆 回覆 引用 0
      • jgbJ 離線
        jgb
        最後由 編輯

        Jeff

        You are being picky. 😒 😒

        Of course the "fail to loft" is not a CL fault. It is the geometry faults that "prevent" CL from lofting.


        jgb

        1 條回覆 最後回覆 回覆 引用 0
        • O 離線
          oli_sketch
          最後由 編輯

          Hello Fredo or someone who can help me.....

          I have installed Fredo pluggins like Round Corner, Join Push Pull and curviloft on MACOSX 10.9.1 macbook pro 15" 2014 retina

          When I use Fredo´s plugging Round Corner, Join Push Pull and curviloft the window with the different options and parameters are really, really small. Is impossible understand anything.

          Can you help me ?

          Kind regards

          1 條回覆 最後回覆 回覆 引用 0
          • cottyC 離線
            cotty
            最後由 編輯

            It's a known problem with retina displays...

            my SketchUp gallery

            1 條回覆 最後回覆 回覆 引用 0
            • O 離線
              oli_sketch
              最後由 編輯

              Thank you very much Cotty.

              I´ll be waiting for a solution....

              kind regards

              1 條回覆 最後回覆 回覆 引用 0
              • cottyC 離線
                cotty
                最後由 編輯

                @oli_sketch said:

                Thank you very much Cotty.

                I´ll be waiting for a solution....

                kind regards

                You should share your details here, maybe it will help Fredo to find a solution ...

                my SketchUp gallery

                1 條回覆 最後回覆 回覆 引用 0
                • S 離線
                  SamAxe
                  最後由 編輯

                  Hello,
                  This is my first post.

                  I am having trouble skinning the curve that I have attached. Am I am doing something wrong?

                  I will appreciate any help.

                  I am running this on SU 2014 pro.

                  Thanks in advance. Appreciate all the help I can get.

                  -Sam


                  SkinTesting

                  1 條回覆 最後回覆 回覆 引用 0
                  • TIGT 離線
                    TIG Moderator
                    最後由 編輯

                    It is VERY faceted - several tens of thousands for potential facets !

                    The biggest 'arc' has 240 segments on its own...

                    Can you simplify the segmentation ?

                    TIG

                    1 條回覆 最後回覆 回覆 引用 0
                    • M 離線
                      mac1
                      最後由 編輯

                      Had some stray lines!
                      Also file is too large to load here see Dropbox link https://www.dropbox.com/s/xmtune9hovo9cqk/TestSkin11.skp used Fredo's Curviloft to skin and done using SU v8

                      1 條回覆 最後回覆 回覆 引用 0
                      • M 離線
                        mac1
                        最後由 編輯

                        TestSkin12.skpUsing TIG's suggestion reduced edges from ~670 to ~63 and used 'extrude edges by rails', as an alternative.
                        No noticeable difference, except model size is greatly reduced!

                        1 條回覆 最後回覆 回覆 引用 0
                        • charly2008C 離線
                          charly2008
                          最後由 編輯

                          Have a look at my post.

                          http://sketchucation.com/forums/viewtopic.php?f=15%26amp;t=56028%26amp;start=30

                          He who makes no mistakes, makes nothing

                          1 條回覆 最後回覆 回覆 引用 0
                          • S 離線
                            SamAxe
                            最後由 編輯

                            Hello TIG & mac1,
                            Thank you very much for replying. As it is obviously evident, I am a newbie at not only sketchup but also mechanical drawing.

                            I have to sheepishly admit that I don't know what you mean by simplyfying the model or reducing the edges. How do I do that? If you can suggest some links I can read up on my own, and wont bug you guys with any more stupid problems borne out of my inexperience.

                            Thank you again.
                            -Sam

                            1 條回覆 最後回覆 回覆 引用 0
                            • TIGT 離線
                              TIG Moderator
                              最後由 編輯

                              A Circle or Arc has a number of segments.
                              These defaults can be seen in Entity Info [24 & 12 ?].
                              If the curve has not already been incorporated into a 3d form then you can adjust the segmentation for it there.
                              You can also change it as you create the Arc - e.g. type 6s +<enter> when you start the tool and the segment count becomes that.

                              Each segment is used to create an edge in a 3d form, so the more segments you have the more extra geometry is made. This affects performance as there are shadow casting/receiving to be calculated and material/textures to render etc...
                              This applies to native tools and plugin 'surface makers'.
                              The Circle default is 24s, so if you extrude that with PushPull you end up with 24+24+24 = 72 edges and
                              24+2 = 26 faces.
                              That will look smooth enough for most purposes.
                              It it were a handrail reducing it to say 12s would still probably look the same with hidden-geom off...
                              12+12+12 = 36 edges and 12+2 = 14 faces - a significant reduction in unneeded geometry...
                              If you foolishly increase it to say 360 [1 segment per degree!] it'll look little different from 24s AND you'll have a staggering 360+360+360 = 1080 edges and 360+2 = 362 faces 😮

                              SO when you draw lines/curves that might become 3d objects think about the edge/face count that might result as they combine... 😕

                              TIG

                              1 條回覆 最後回覆 回覆 引用 0
                              • U 離線
                                unearthed
                                最後由 編輯

                                What an amazing plugin this is, Thanks very much Fredo

                                Anyway I'm drawing a model of part of a river for a planting design - there's no money for a surveyor so I drew cross sections and used Curviloft to loft between them using the streamline as the curve. All worked perfectly, BUT one section is a bit odd (a result of
                                curviloftQ.JPG
                                straightening the channel) and I can't find a way of skinning between the profiles - is there a way in Curviloft, or would another tool do the trick? Due to the extrme bend of the stream it's hard to see a way of using new profiles between the existing one as a way to bridge the problem.


                                single skp enclosed - unzips to 4.5Mb

                                Growplan - People ∩ Plants ∩ Place

                                windows 7 64b, 4GB RAM, SU 8.0.16846
                                Gimp, QGIS, Vectorworks 12, Bricscad 11

                                1 條回覆 最後回覆 回覆 引用 0
                                • jgbJ 離線
                                  jgb
                                  最後由 編輯

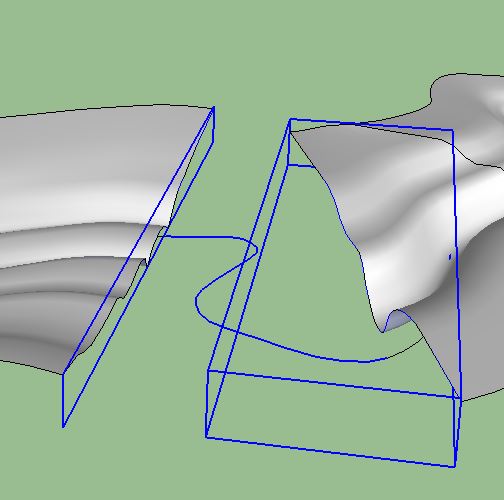
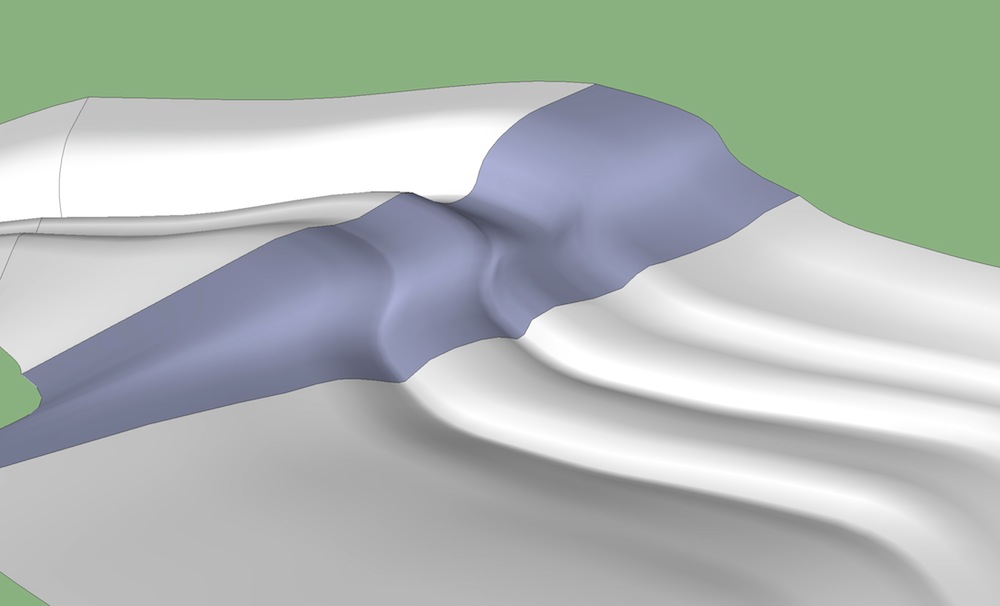
                                  You would probably do better if you connected the edges at the banks with a manually drawn curve. Then use the skinning function. Ignore (for now) the control curve path. I quickly tried this but it resulted in a partially bad curve. 😢 (See Attachment)

                                  In doing complex skins as this that will not form right when tried as a whole piece, (airplane fairings for example) I found it better and quicker to split the perimeter in several easier sections, skin them, then explode them in place. Unfortunately, I have no time just now to do this for you. 😞

                                  Also, on the right side the edge is made up of a lot of small faces that really do not add any useful detail to the mesh. Simplify them, and it should make a better skin overall.

                                  Almost, but not there yet.....


                                  jgb

                                  1 條回覆 最後回覆 回覆 引用 0
                                  • jeff hammondJ 離線
                                    jeff hammond
                                    最後由 編輯

                                    @unearthed said:

                                    • is there a way in Curviloft, or would another tool do the trick? Due to the extrme bend of the stream it's hard to see a way of using new profiles between the existing one as a way to bridge the problem.

                                    ignore the bend line you have drawn in that section.. the way it's setup, it's going to result in bad geometry even if it did work.. if you really need that extreme of a bend then you'll have to figure out the profiles which would really work through there as the ones you have now won't do it.

                                    probably just Loft that section instead using the two edges as the input (the edges in the image that are marked with a red & blue line) .. use the tension controls to obtain the bend while preventing overlaps..

                                    click pic -> bigger

                                    riverXform1_A.jpg

                                    dotdotdot

                                    1 條回覆 最後回覆 回覆 引用 0
                                    • U 離線
                                      unearthed
                                      最後由 編輯

                                      Thanks Jeff - I may not need the extreme bend (If I do I'll draw contours between the sections and skin them with from contours)

                                      and thanks too for showing a bit more about using Curviloft - I was really amazed when it lofted the individual stretches of stream (and gave the option to tweak the result).

                                      Growplan - People ∩ Plants ∩ Place

                                      windows 7 64b, 4GB RAM, SU 8.0.16846
                                      Gimp, QGIS, Vectorworks 12, Bricscad 11

                                      1 條回覆 最後回覆 回覆 引用 0
                                      • jeff hammondJ 離線
                                        jeff hammond
                                        最後由 編輯

                                        @unearthed said:

                                        Thanks Jeff - I may not need the extreme bend (If I do I'll draw contours between the sections and skin them with from contours)

                                        and thanks too for showing a bit more about using Curviloft - I was really amazed when it lofted the individual stretches of stream (and gave the option to tweak the result).

                                        no problem.. and really, you might get better results if you eliminate that path curve all together and just loft the whole thing.. select all the profiles at once, loft, follow the steps i showed.. if you have more than two curves selected, you'll be able to individually click each portion (the black parts) and adjust.. then move to the next.. all in one launch of the curviLoft tool..

                                        but what that would do is make sure you're always tangent through your profiles and will lessen the possibilities of kinks if your path curve isn't exactly tangent to the profiles as it passes under (which is happening in your model)

                                        dotdotdot

                                        1 條回覆 最後回覆 回覆 引用 0
                                        • J 離線
                                          jpaparicio
                                          最後由 編輯

                                          HI fredo i just bought an Imac running Maverick, im using Sketchup pro 2014...how can i install curviloft?? THANKS ALOT

                                          1 條回覆 最後回覆 回覆 引用 0
                                          • mariochaM 離線
                                            mariocha
                                            最後由 編輯

                                            @jpaparicio said:

                                            HI fredo i just bought an Imac running Maverick, im using Sketchup pro 2014...how can i install curviloft?? THANKS ALOT

                                            Install Sketchucation plugin store ( instructions on page) then just look it up in there and click "install". And please do read the instructions and recommendations, like required Lib folder.

                                            %(#008000)[Mario C.
                                            Every rule has exceptions, but some.]

                                            1 條回覆 最後回覆 回覆 引用 0
                                            • 1
                                            • 2
                                            • 51
                                            • 52
                                            • 53
                                            • 54
                                            • 55
                                            • 65
                                            • 66
                                            • 53 / 66
                                            • 第一個貼文
                                              最後的貼文
                                            Buy SketchPlus
                                            Buy SUbD
                                            Buy WrapR
                                            Buy eBook
                                            Buy Modelur
                                            Buy Vertex Tools
                                            Buy SketchCuisine
                                            Buy FormFonts

                                            Advertisement