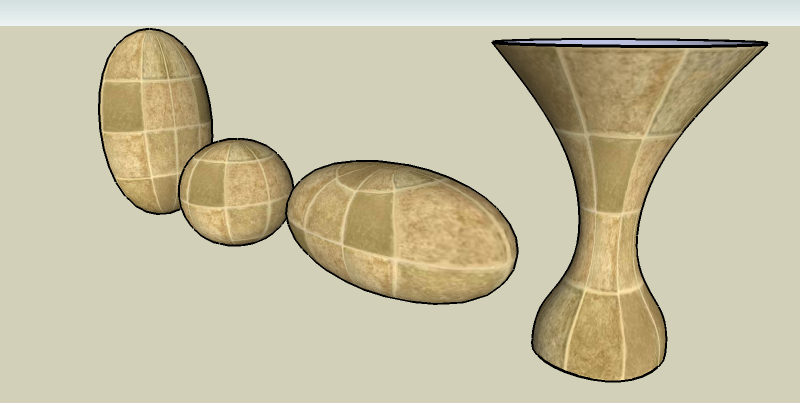
[Plugin] UVTools v0.1
-
This plugin is a work in progress. There is much functionality yet to be added but it is still quite useful in it's current state so I am releasing it.
Installation:
- Copy to SketchUp/Plugins folder
Usage:
- The plugin will create a context menu called 'UVTools'
- Select the faces that you want to project. The faces should all have the same texture applied to them.
- Select 'Spherical' or 'Cylindrical' from the context menu. The axis of the sphere or cylinder will be parallel to the SketchUp Z-axis and will be located at the center of the all the selected faces. There is currently no option to change this.
- After performing the projection, you can change the amount of tiling by changing the texture size in the SU Paint Bucket.
Known Issues:
- Texture position is messed up at the 'poles' of the spherical projection.
- The plugin may fail due to certain types of faces. No error message will be displayed to the user. (I'll try to fix this, soon.)
Enjoy!
Whaat

-
Very nice - very useful - very promising !
Thanks for sharing those gems, Whaat! -
Whaat Thank You!
lately i'm not even sure what program i'm working on!

-
 fanks man!
-
Much obliged.

-
Cheers, i look forward to trying this plugin out.
-
all hail the whaat machine!


-
Cool, I shall go and play with this now - Thanks

-
Thanks, Whaat. It's perfect!

-
Yeah
 ....Thank god you didn't leave for Basecamp and stuck with us to deliver some goodies.
Better news over here than @Boulder ?.....
Thank you very much Whaat!
-
Thank you so much..!!

I read somewhere that people are calling you WhaatUp... No wonder why..!!
-
Whaat, you ROCK!


-
I thought it was Whaat'sUp

-
You're right, Chris...

Of course it's Whaat'sUp...
(I actually wrote that to begin with, but got unsure... )
) -
No you are both wrong... it's:
WhaatzzzUp!
With your tongue sticking out...
Thanks again for another nice plugin!
-
Tip: trying this plugin on an untextured object causes the fastest splat you've ever seen. Zappp - and SU's gone.

-
@unknownuser said:
Tip: trying this plugin on an untextured object causes the fastest splat you've ever seen. Zappp - and SU's gone.

Thanks for the comment. This is an easy fix.
-
Cool. Been fiddling with this baby - works pretty well! Well-integrated too.

-
Dear Dale,
I have very little experience of rendering and I tend not to texture my models, so I am not too sure how to use a UV tool. By the way, what does UV stand for? If I understand your post correctly, the tool 'wraps' a texture around a curved object by projecting the texture from a plane positioned over and/or under the object. Further, the plane should be positioned so that its normal is along the centreline of the curved object which is itself aligned with the z-axis. Is this correct?
Can one project/wrap textures from a plane over and a plane under an object by dividing the surface area of the object into two along an x-y plane? I imagine a vase with different designs on the upper and lower halves.
Sorry for being so dense.
Kind regards,
Bob -
Theres a good illustration of spherical UV mapping there.
And i tihnk UV is just he coordinaet system thats used when applying textures in this way, so thats where the name comes from.
Hello! It looks like you're interested in this conversation, but you don't have an account yet.
Getting fed up of having to scroll through the same posts each visit? When you register for an account, you'll always come back to exactly where you were before, and choose to be notified of new replies (either via email, or push notification). You'll also be able to save bookmarks and upvote posts to show your appreciation to other community members.
With your input, this post could be even better 💗
Register LoginAdvertisement


