Curved_slanted_wall
-
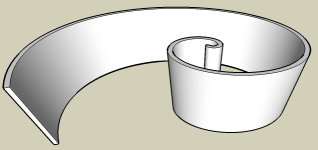
What's the best approach for doing a curved tilted wall of giving thickness?
See file attached. Is there a good ruby script for this?
I'm tryin to get the wall to slant to the outside at a given angle.
-
Hi Lapx,
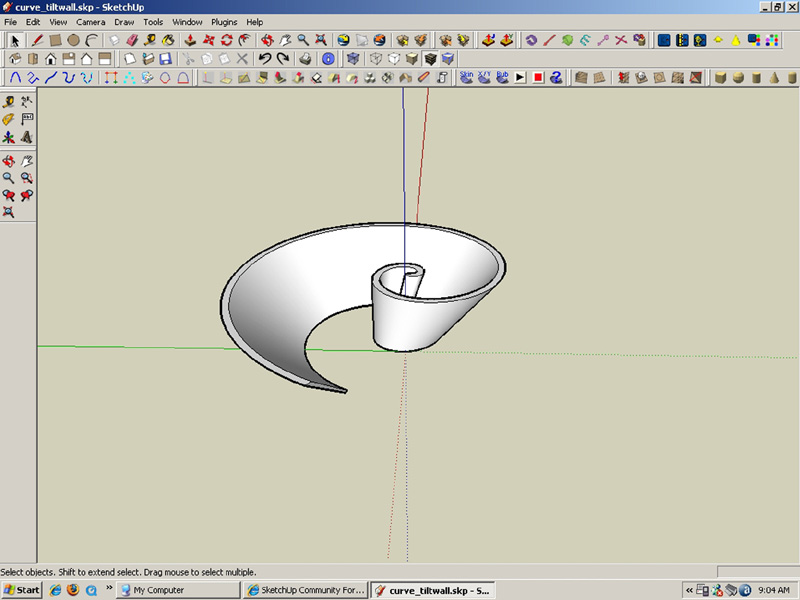
Something like this?
- I copy moved it up
- then used skin.rb to create a face
- then used Joint PushPull to give thickness
- needed some intersection and cleanup at the origin (even now it's not perfect there)
- finally selected the outer edge and moved it down a bit.
-
Greyhead,
Beautifully done model. I love these elegantly simple yet subtle SU solutions.
Fred
-
Geyhead,
That's It! Thanks Greyhead.

-
Lapx,
Please, see my post above and the attached skippy.

-
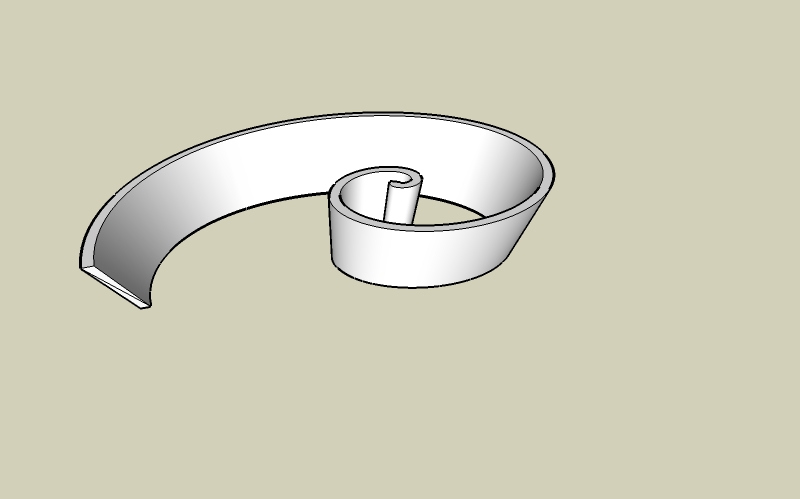
Is this more what you had in mind with the wall sloping?
For this style:
- Create a upright rectangle the height and width of the wall;
- Place it at the center of the spiral (at the origin along the green axis);
- Use the follow-me tool to copy it along the curve;
- Select the top surface only and rotate copy through 180 (this is to provide a fixed center for the next step)
- Select the top surface of the wall and the copy and scale about the center to get the outer end of the wall to match the slope you want.
- Clean up and smooth lines.
Bob

-
Thanks Gaieus,
I don't see that your wall tilts outward. I'm also trying to get it to slope in the z direction as well.
-
My next challenge is to slope the top of the wall. That is the highest part would be at the smaller radius point and the low part would be at the end of the largest radius.
At first glance I thought I could easily draw a rect and slope the top and intersect this form with spiral wall but ofcurse this will not give the desired result. Any ideas?edit: Maybe I need to do the top wall slope part before the scaling.
-
Ah, sorry. Yes obvuiously it was a misunderstanding - the top of it is slanting - not the whole wall is tilting (damn - my bad English...)

-
That's quite alright Gaeius. We at east know how to do this when it comes up.
That's the great thing about this community is that in looking for solutions to one problem may solve another for someone else, so all is not lost.Have a wonderful weekend!
-
@lapx said:
My next challenge is to slope the top of the wall. That is the highest part would be at the smaller radius point and the low part would be at the end of the largest radius.
At first glance I thought I could easily draw a rect and slope the top and intersect this form with spiral wall but ofcurse this will not give the desired result. Any ideas?edit: Maybe I need to do the top wall slope part before the scaling.
lapx,
Here is my attempt in the attached skp.
(partly Bob's solution integrated)
-
That's neat - I didn't think of smooving to lift the spiral.
Bob
-
@wo3dan said:
@lapx said:
My next challenge is to slope the top of the wall. That is the highest part would be at the smaller radius point and the low part would be at the end of the largest radius.
At first glance I thought I could easily draw a rect and slope the top and intersect this form with spiral wall but ofcurse this will not give the desired result. Any ideas?edit: Maybe I need to do the top wall slope part before the scaling.
lapx,
Here is my attempt in the attached skp.
(partly Bob's solution integrated)As a newbie, I almost get this!
I do remeber another tutorial by someone on the forum, who demonstrated the Scene 3 technique. The one that copies and flips 180 degrees to have a center point. Can you elaborate again one why this is done? Then I will fully get it!
Great job! -
Wo3Dan great job. One tip though, would it not be easier to use the contour from scratch in lieu of hand stitching? Just have to erase to to clean up excess.
-
gorygreg,
My attempt to try to explain is in the attached skp.
@lapx said:
Wo3Dan great job. One tip though, would it not be easier to use the contour from scratch in lieu of hand stitching? Just have to erase to to clean up excess.
Lapx,
Leaving the top face in the curved boundary when using the Smoove tool will often result in an irragular pattern of triangles. I find it hard to correct all these lines. Better to do hand stitching, letting you make small adjustments to make cross sections horizontal at the top (if necessary).
I don't know how you are going to apply the "contour from scratch" tool here.
Maybe I can learn something. In my opinion SU will make a mess of all the extra lines (edges) within the curves. So what did you mean?Wo3Dan
-
@unknownuser said:
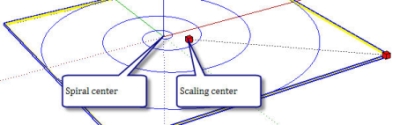
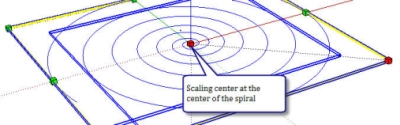
I do remember another tutorial by someone on the forum, who demonstrated the Scene 3 technique. The one that copies and flips 180 degrees to have a center point. Can you elaborate again one why this is done? Then I will fully get it!
This is done here because we want to keep the inner end of the wall vertical. The scale tool will leave the 'center' of the shape unchanged. But the center of a spiral is not at the inner end (see spiral_1). Copy-rotating the spiral gives a new shape where the scaling center is at the center of rotation and when you scale this shape the center of the spiral remains unchanged.Bob
-
lapX
Just back from ski trip so a little late to all this but if the attached is what you wanted just let me know.
dtr
-
Great explaination on that scaling issue. I figued this was the case your explaination reaffirmed. Thanks!
On the "contour from scratch" I just selected the top edge of the wall and used SU's contour from scratch. From first glance it seamed to work fine with a little clean up.
I will look at it again.@dtracrh,
My walls would be titlted out ward as it follows the path. However, I would be interested in
what method you chose to arrive at your conclusion. -
@lapx said:
@Wo3Dan,.......
On the "contour from scratch" I just selected the top edge of the wall and used SU's contour from scratch. From first glance it seamed to work fine with a little clean up.
I will look at it again.
......lapx,
Now I see what you mean, not "contour from scratch" (and not "from scratch" either) but "From Contours".
And you are quite right, that works perfect when no height corrections are needed.
When you have both the inner and the outer curves selected (spirals in scene 4, without their connecting edges at beginning and end) and apply "From Contours" you get a very good result that only needs some cleaning up.
I guess I was to much focused on "what if height corrections are needed for horizontal cross sections at the top of the wall". Even though the curves are slanted it's best to apply "From Contours".
(Leaving the face in scene 3 > 4 will give bad results when applying the "Smoove" tool)
Well, as I said: "maybe I can learn something".
Thanks for the suggestion.Wo3Dan
-
Thanks for clearing that up for me
Hello! It looks like you're interested in this conversation, but you don't have an account yet.
Getting fed up of having to scroll through the same posts each visit? When you register for an account, you'll always come back to exactly where you were before, and choose to be notified of new replies (either via email, or push notification). You'll also be able to save bookmarks and upvote posts to show your appreciation to other community members.
With your input, this post could be even better 💗
Register Login


Advertisement