sketchucation logo sketchucation
    • 登入
    Oops, your profile's looking a bit empty! To help us tailor your experience, please fill in key details like your SketchUp version, skill level, operating system, and more. Update and save your info on your profile page today!
    🔌 Smart Spline | Fluid way to handle splines for furniture design and complex structures. Download

    Joint Push Pull Classic (Old version) - v2.2a - 26 Apr 17

    已排程 已置頂 已鎖定 已移動 Plugins
    368 貼文 150 Posters 2.0m 瀏覽 150 Watching
    正在載入更多貼文
    • 從舊到新
    • 從新到舊
    • 最多點贊
    回覆
    • 在新貼文中回覆
    登入後回覆
    此主題已被刪除。只有擁有主題管理權限的使用者可以查看。
    • boofredlayB 離線
      boofredlay
      最後由 編輯

      Brilliant new interface, thanks. 😍

      http://www.coroflot.com/boofredlay

      1 條回覆 最後回覆 回覆 引用 0
      • boofredlayB 離線
        boofredlay
        最後由 編輯

        Is it possible for this script to explode the curve after it is run? Or at least segment it into parts. It would cut down on a step if you are trying to erase lines for a cleaner face. See image.


        ExplodeCurve.jpg

        http://www.coroflot.com/boofredlay

        1 條回覆 最後回覆 回覆 引用 0
        • GaieusG 離線
          Gaieus
          最後由 編輯

          @unknownuser said:

          ...I also very much want to see an offset tool for curved surfaces.
          Can it be done?

          Well, to me this is practically theoffset tool for curved surfaces. Or am I missing something?

          Gai...

          1 條回覆 最後回覆 回覆 引用 0
          • soloS 離線
            solo
            最後由 編輯

            Thank you so very much for this amazing plugin.

            This is another step towards SU being able one day to model organic shapes with ease.

            The idea of an offset tool for curved surfaces would be fantastic.

            We have so many talented coders here that I believe Google is sitting back watching how SU is upgrading itself without much input from them as the users have given this amazing app a life of it's own.

            OT: Now if only we can get some uber geek help on the texture mapping thing.

            http://www.solos-art.com

            If you see a toilet in your dreams do not use it.

            1 條回覆 最後回覆 回覆 引用 0
            • fredo6F 離線
              fredo6
              最後由 編輯

              @unknownuser said:

              Is it possible for this script to explode the curve after it is run? Or at least segment it into parts. It would cut down on a step if you are trying to erase lines for a cleaner face. See image.

              I put precisely some code to keep curves on the original surface (to be as less destructive as possible). Note however that the generated corresponding contour is not welded as a curve. Is it the situation you have?

              1 條回覆 最後回覆 回覆 引用 0
              • fredo6F 離線
                fredo6
                最後由 編輯

                @unknownuser said:

                that's great.. i like the feel much better than the first one.. it's faster and more intuitive for me..

                a couple of the tool bar icons are showing up blurry.. any idea why?

                I guess you are on Mac.
                No idea of what happens with the PNG files, especially because only 2 of them appears in the 'fog'. They all come from the same source (thanks to Daniel S. who designed them). One idea, make sure you got all 5 icons of the latest version (they are all 24 x 24). The two I designed and published in the initial version were 32x32.

                1 條回覆 最後回覆 回覆 引用 0
                • fredo6F 離線
                  fredo6
                  最後由 編輯

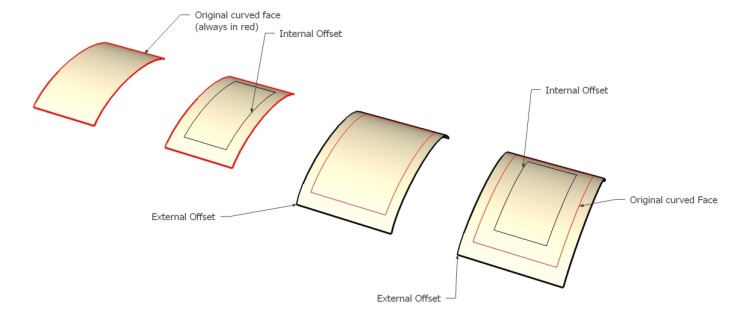
                  On offset tool for curved surfaces:

                  I am not totally clear on what several of you are targeting. Personally, I see 2 categories of such surface offset tool:

                  1. Only offsets the external border edges of the surface. This means for instance that all interior faces are left untouched. This does not exist in native Sketchup but can easily be done by a script. Actually the faces are just there to give the overall contour the planes for offsetting and the direction interior / exterior.
                    First method - Offset only the border contour

                  2. Deform continuously all faces of the model to accommodate the offset of the contour. In such a case, I think it would always change (even slightly) the shape of the overall surface. The best is probably to Scale the surface in all directions, and then move it to the closest position to fit the original surface. This can also easily be automated by a script.
                    Second method - Scale up the whole surface and try to fit to the original surface

                  Maybe I lack imagination and there are other forms of surface offset someone would think of!?

                  1 條回覆 最後回覆 回覆 引用 0
                  • fredo6F 離線
                    fredo6
                    最後由 編輯

                    @jclements said:

                    "The editor makes full usage of the Sketchup inference mechanism so that you can
                    visually adjust the distance by reference to a particular point in your model, as in most
                    Sketchup tools. However, when you drag, you may want to skip some inferences. For
                    this, just keep the SHIFT key pressed down, while dragging faces."

                    For me, keeping the SHIFT key depressed doesn't appear to do anything. The black triangle at the cursor seems to be inferencing to other geometry. Perhaps I am misinterpreting its usage?

                    The black triangle will seem to 'block' on other geometry, but it position will be ignored when you drag the faces. So inference is skipped 'geometrically', but I did not find a way to skip it 'visually'. Hope this answers your question.

                    1 條回覆 最後回覆 回覆 引用 0
                    • D 離線
                      Daniel S
                      最後由 編輯

                      About the icons.. i made the two that are blurry on mac on a different day.. so perhaps i export the icons with different settings...
                      Jeff here i attach the two icons again... tell me if this fixes the problem (i don´t have a Mac for testing).

                      And about the offset the best method for me will be option nº 1: Only offsets the external border edges of the surface.

                      Daniel S


                      Icons for Mac.zip


                      offset.skp


                      offset.jpg

                      1 條回覆 最後回覆 回覆 引用 0
                      • U 離線
                        urs0815
                        最後由 編輯

                        hallo Daniel,

                        I´ve tested the 2 icons on my mac -> same problem as before 😕

                        but the icon of the very first edition of jpp were OK, so we can use them 😉

                        urs

                        1 條回覆 最後回覆 回覆 引用 0
                        • D 離線
                          Daniel S
                          最後由 編輯

                          Here i made them with other settings... try this ones please


                          Icons for Mac2.zip

                          1 條回覆 最後回覆 回覆 引用 0
                          • jeff hammondJ 離線
                            jeff hammond
                            最後由 編輯

                            [EDIT] daniel posted the latest update while i was typing this reply.. iconsformac2 are correct..

                            i switched to the first icons and they worked ok..

                            Picture 1.jpg

                            the new pngs display as sharp in all other apps except sketchup.. i compared the blurry ones against the sharp ones in PS and found the image sizes are different.. i changed the blurry J & V files to the following size..

                            Picture 3.jpg

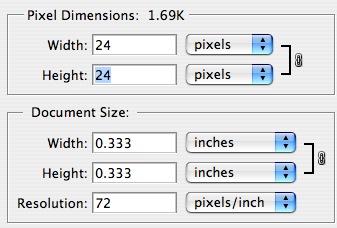
                            ..and now the new icons look ok..
                            Picture 4.jpg

                            it's a strange thing to me because the new icons are all 24x24 px.. it's just the resolution and wxh are set different but i would have thought they would display on a monitor according to the pixel size alone..
                            fwiw - the blurry icons are set to 24 x 24 px... .08 x .08 inches .... resolution 299.974..

                            dotdotdot

                            1 條回覆 最後回覆 回覆 引用 0
                            • urgenU 離線
                              urgen
                              最後由 編輯

                              M-m-m-many thanks to Fredo6 ! very conveniently! 😍 ...
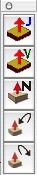
                              ...and let's write it in the end in "jointpushpull.rb" :
                              #------------------------------------------------------
                              UI.add_context_menu_handler do |menu|
                              menu.add_separator
                              menu.add_item("Joint Push Pull ") { JointPushPull.execute 'J' }
                              menu.add_item("Vector Push Pull ") { JointPushPull.execute 'V' }
                              menu.add_item("Normal Push Pull ") { JointPushPull.execute 'N' }
                              menu.add_item("Undo") { JointPushPull.undo }
                              menu.add_item("Redo") { JointPushPull.redo }
                              end
                              #--------------------------------------------------------------

                               ....right click mouse we select the  face and activate skript board Simultaneously :stuck_out_tongue: ...Process of drawing will be faster! :tada:
                              

                              --pupil forever...------

                              1 條回覆 最後回覆 回覆 引用 0
                              • fredo6F 離線
                                fredo6
                                最後由 編輯

                                Urgen,

                                Very good idea and quite natural in Sketchup.
                                I updated the files in the script repository (also with non blurry icons).
                                http://www.sketchucation.com/forums/scf/viewtopic.php?f=153&t=6708&p=42783#p42783

                                Thanks

                                Fredo

                                1 條回覆 最後回覆 回覆 引用 0
                                • PixeroP 離線
                                  Pixero
                                  最後由 編輯

                                  There is a bug in the latest version there should be a ] in this line:
                                  menu.add_item(Traductor[DLG_MnuRedo]) { JointPushPull.redo }

                                  1 條回覆 最後回覆 回覆 引用 0
                                  • fredo6F 離線
                                    fredo6
                                    最後由 編輯

                                    Oops...!!
                                    Updated with correct code in Ruby repository

                                    Fredo

                                    1 條回覆 最後回覆 回覆 引用 0
                                    • boofredlayB 離線
                                      boofredlay
                                      最後由 編輯

                                      @unknownuser said:

                                      @unknownuser said:

                                      Is it possible for this script to explode the curve after it is run? Or at least segment it into parts. It would cut down on a step if you are trying to erase lines for a cleaner face. See image.

                                      I put precisely some code to keep curves on the original surface (to be as less destructive as possible). Note however that the generated corresponding contour is not welded as a curve. Is it the situation you have?

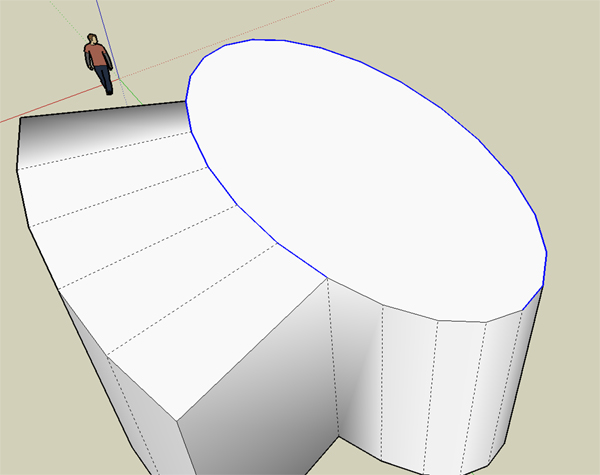
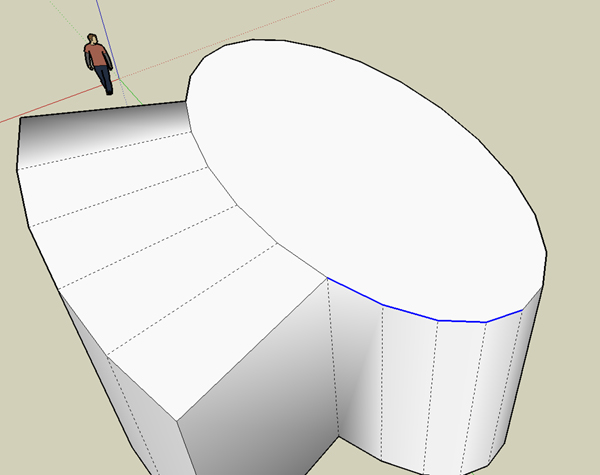
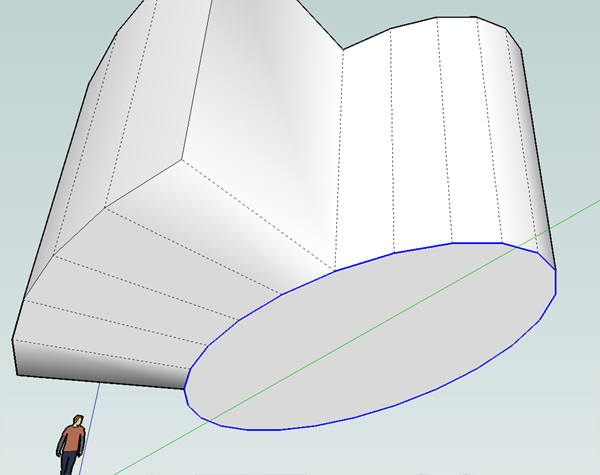
                                      The generated contour is not welded correct.
                                      The original is however. I did another test after installing the latest and I get conflicting results. The top ellipse is broken into 2 welded curves that do not correspond the the new JPP created. The bottom ellipse stays completely intact.
                                      See images.
                                      Again, thanks for this script.


                                      Top1.jpg


                                      Top2.jpg


                                      Bottom.jpg

                                      http://www.coroflot.com/boofredlay

                                      1 條回覆 最後回覆 回覆 引用 0
                                      • fredo6F 離線
                                        fredo6
                                        最後由 編輯

                                        Coen

                                        If you scale uniformly a surface, it will never match the original (think of a sphere for instance). However, this is somehow an approximate way to offset its contour, while preserving the overall shape of the surface.

                                        With the first method (only offset the borders), you just use the shape of the outer borders and ignore the ones which are inside. So if you offset by a large distance, you will certainly 'dilute' the shape of the surface.

                                        Both methods have their own benefits and drawbacks, and both can be implemented via a script.

                                        That's what I meant.

                                        Fredo

                                        1 條回覆 最後回覆 回覆 引用 0
                                        • X 離線
                                          xrok1
                                          最後由 編輯

                                          where is this offset tool?????

                                          “There are three classes of people: those who see. Those who see when they are shown. Those who do not see.”

                                          http://www.Twilightrender.com try it!

                                          1 條回覆 最後回覆 回覆 引用 0
                                          • F 離線
                                            Fletch
                                            最後由 編輯

                                            beautiful, Fredo... simply fantastic. Thank you so much for your generosity in sharing!

                                            Fletch
                                            Twilight Render Cross-platform Plugin for SketchUp on PC or Mac

                                            1 條回覆 最後回覆 回覆 引用 0
                                            • 1
                                            • 2
                                            • 3
                                            • 4
                                            • 5
                                            • 18
                                            • 19
                                            • 1 / 19
                                            • 第一個貼文
                                              最後的貼文
                                            Buy SketchPlus
                                            Buy SUbD
                                            Buy WrapR
                                            Buy eBook
                                            Buy Modelur
                                            Buy Vertex Tools
                                            Buy SketchCuisine
                                            Buy FormFonts

                                            Advertisement