Can't connect the dots
-
In addition to making your lines thicker like Jeff says, reduce the blueprint opacity down to about 30%...this lets you see your lines even better.
-
Do most of the good tips already given - like making your texture ~30% opaque.
Also set length snapping to 'off' as this might also cause issues.
Here's my fix...
Erase those diagonal lines that shouldn't be needed to make a split off face [diagonals etc]
Now select a face that refuses to split into sensible pieces and erase it.
Select the edges that should form individual faces [or just 'All'] and use a 'face making script' to add faces to them [there are several available - I used my own FaceMaker...]
Now you should have new faces added as expected in individual parts using the default material.
Select a 'part' that is already correctly textured/divided off - right-click Texture > Projected
Select All faces.
Use the eyedropper in the Materials browser to select the projected-material from the previously seelcted 'part'.
Apply this material to all selected faces.
Note that sometimes a face-making tool might make duplicated 'overlaid' faces - these can be seen as darker if a semi-transparent material is used on them - erase any such duplicated faces so only one remains...You are now back in business...
-
Well, this problem is still with me, and it's driving me nuts almost on a daily basis.

 I just don't understand how you can connect three lines on a surface and not create a face. I am very careful to make sure that I see the green dot when I'm connecting lines, and if I'm intersecting a line I make sure it says "on edge" before I click the mouse.
I've waived a chicken foot over it, I've turned counterclockwise six times and spit twice, I've sprinkled goat's blood on it - I don't know what else to do.
Someone out there must have a fix for this incredibly frustrating and time-wasting silly problem.
My kindom for the solution.
-
dang.. I was going to suggest waving a chicken foot over it but I guess you've already tried that

(sorry you're still having this problem.. I wish I knew how to make it go away but I don't)
-
hi,
I just did a test, which seems to work,
Don't use the line tool... at all.
I rotated your car onto the ground plane, and 'locked' it.
drew a circle roughly around the side view, exploded the edges, hid the face, and used scale to get an oval.
then using move tool, I roughed out the outline. when iI needed more points , I selected the nearest line and divided it.
once it was OK (for a test), I unhid the face and used paint dropper to paint the image on, the grouped that profile,While still 'unhidden' I made a second circle 'on-face', exploded it's edges, hid it's face , then hid the 'first profile' while I worked on the second 'detail', once done, I 'cut/pasted' it into the 'first profile' and the lines are all 'on plane'.
I hadn't tried this way before but found it really quite quick and fun... just don't 'pre-select anything before using move... and I'd probably leave the details grouped inside the 'first profile' until the end if doing it for real...
worth a try???
john
-
@driven said:
hi,
I just did a test, which seems to work,
Don't use the line tool... at all.
I rotated your car onto the ground plane, and 'locked' it.
drew a circle roughly around the side view, exploded the edges, hid the face, and used scale to get an oval.
then using move tool, I roughed out the outline. when iI needed more points , I selected the nearest line and divided it.
once it was OK (for a test), I unhid the face and used paint dropper to paint the image on, the grouped that profile,While still 'unhidden' I made a second circle 'on-face', exploded it's edges, hid it's face , then hid the 'first profile' while I worked on the second 'detail', once done, I 'cut/pasted' it into the 'first profile' and the lines are all 'on plane'.
I hadn't tried this way before but found it really quite quick and fun... just don't 'pre-select anything before using move... and I'd probably leave the details grouped inside the 'first profile' until the end if doing it for real...
worth a try???
john
Sure this may work, but the chickens foot is way more fun.

Seriously, I'm paying special attention to this, cause I thought it was just me.

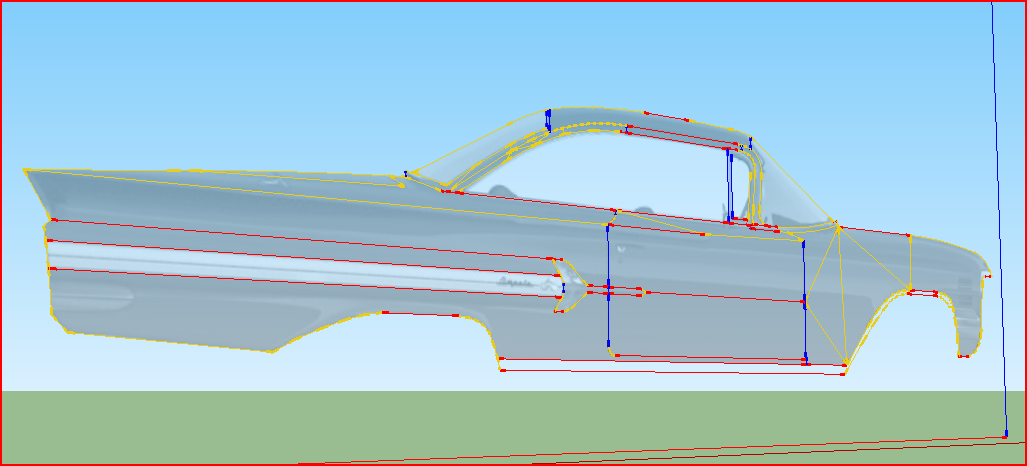
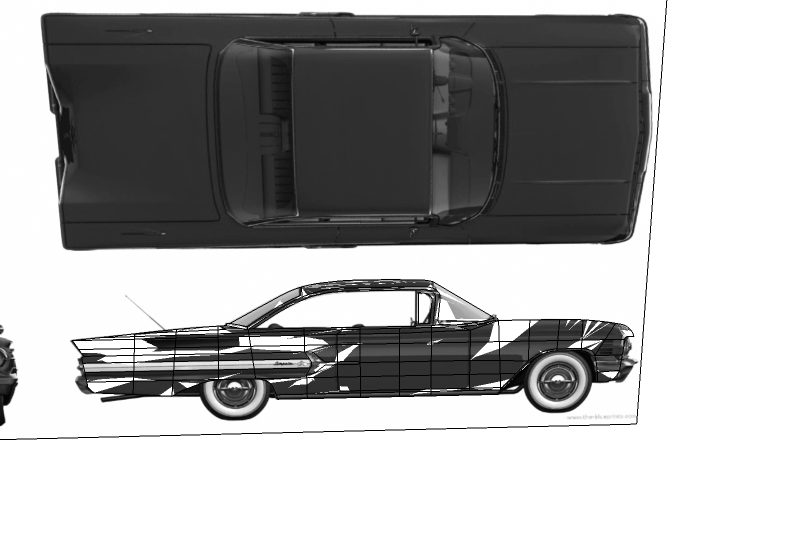
Woah, is that a 59 Impala?
-
@unknownuser said:
dang.. I was going to suggest waving a chicken foot over it but I guess you've already tried that
Ah, I think I see the problem now. Instead of wavingthe chicken foot, I waived it, which means to "put aside for the time; defer; postpone; dispense with; refrain from claiming or insisting on; give up; forgo"
So all I need to do now is catch that dang chicken again (it's surprising how fast a one-footed chicken can move) and do it right this time.
@driven said:
hi,
I just did a test, which seems to work,
Don't use the line tool... at all.
I rotated your car onto the ground plane, and 'locked' it.
drew a circle roughly around the side view, exploded the edges, hid the face, and used scale to get an oval.
then using move tool, I roughed out the outline. when iI needed more points , I selected the nearest line and divided it.
once it was OK (for a test), I unhid the face and used paint dropper to paint the image on, the grouped that profile,While still 'unhidden' I made a second circle 'on-face', exploded it's edges, hid it's face , then hid the 'first profile' while I worked on the second 'detail', once done, I 'cut/pasted' it into the 'first profile' and the lines are all 'on plane'.
I hadn't tried this way before but found it really quite quick and fun... just don't 'pre-select anything before using move... and I'd probably leave the details grouped inside the 'first profile' until the end if doing it for real...
worth a try???
john
I really appreciate the response, John. But, what I'm looking for is an explanation of why it happens, and how to make it not happen anymore.
I don't think anybody should have to use any convoluted work-around method to do something that should be one of the easiest and most straightforward tasks in the entire program. -
I call "Him" when I have these problems.

-
@hellnbak said:
an explanation of why it happens,
here's a shot,
your adding a point onto 3d plane, the points x,y,z can have any value (before you click),
the plane has a tolerance, if you wait for the tooltip to confirm your 'on face', then that x, or y,or z will be a constant.
if you click through quickly, each point will be individually assessed and all values will to be rounded (to some extent), so you may have clicked outside of the tolerance for the 'fixed' plane.
It may be soooo close that you can't see why it's failing to make a face, and sooo close that plugins made to 'fix it' can also miss the fact it's outside of the planes the tolerance.
2d programs 'fix' it by saying x always equals zero (or y, or z) depending on the elevation your working in.
SU attempts to 'fix' it by giving you the 'on face' tooltip.@unknownuser said:
how to make it not happen anymore.
find and wait for the 'on face' tooltip before every click...
In SU, my experience is the 'ground' close to origin appears to have the broadest field tolerance for 'planar', but it may not be true.@unknownuser said:
I don't think anybody should have to use any convoluted work-around method to do something that should be one of the easiest and most straightforward tasks in the entire program.
you would like a 3D program to behave like a 2D programme then you need an appropriate 'work flow' and or 'plugins', which isn't the same as a ' work-around ' which you need for 'bugs', which this isn't (it's a pain in the arse, but not a bug)
While, I agree it should be less flaky, I actually have far more issues when trying to draw 'off' plane
or 'off' inference, if SU increased the tolerances, adding a detail 'bump' would become a total nightmare when points kept being made 'planar'.Maybe you could try TIG's 2D tools to do this bit, I believe it flattens all the 'x' values as you add them... [or something similar]
john
-
I never trace directly over the blueprints.
I keep the blueprints grouped and locked and I trace over creating new geometry.
Indeed sometimes the lines won't create new faces when you want but if you select them and intersect them they will behave.
-
-
@ely862me said:
I never trace directly over the blueprints.
I keep the blueprints grouped and locked and I trace over creating new geometry.
Indeed sometimes the lines won't create new faces when you want but if you select them and intersect them they will behave.I was about to post another rant about this when I revisited this previous rant and decided to give your idea a try and....it works!!!
Don't know why I hadn't tried your idea sooner, probably just fell out of my brain like so many other things do nowadays.
Yeah, the smilie has a stupid bow on it, I really hate the changes they made to them. Got rid of some of the most popular ones and added a bunch of dumb ones. But that's a rant for another day.
-
@hellnbak said:
.......... But, what I'm looking for is an explanation of why it happens, and how to make it not happen anymore.
......Hi, attached file / model may somehow explain what is going on when creating similar weird faces.
There are certain "conditions" that have to be met to create them. Don't ask me why SketchUp can't handle them. It probably has to do with the order of creating loops and the sequence of edges and their endpoints that confuses the program to decide which faces have to be created and where to split them. The model shows two situations that you better avoid when modelling. Although dragging endpoints accross an opposite edge isn't the most likely operation.
Often "intersect faces with....." doesn't help. And you can keep on adding edges, only shifting the profiles to some other little face. Delete the corrupt part and/or re-create it with a workaround (like in the second scene)
I hope this somehow helps in understanding when and why this issue occures.
Hello! It looks like you're interested in this conversation, but you don't have an account yet.
Getting fed up of having to scroll through the same posts each visit? When you register for an account, you'll always come back to exactly where you were before, and choose to be notified of new replies (either via email, or push notification). You'll also be able to save bookmarks and upvote posts to show your appreciation to other community members.
With your input, this post could be even better 💗
Register Login


Advertisement