How to create a depression with complex curves?
-
Hi, I realize this is probably a veeery basic issue, but I nevertheless can't seem to find a solution. I am trying to make a 3D model of a mould used to cast arrowheads (exciting stuff form my dissertation...
 ). From reading I've done about Sketchup, I figured the best way to start was to divide the mould down the middle and model only one half and later mirror it (which I have yet to learn how to do) in order to ensure that it is symmetrical.
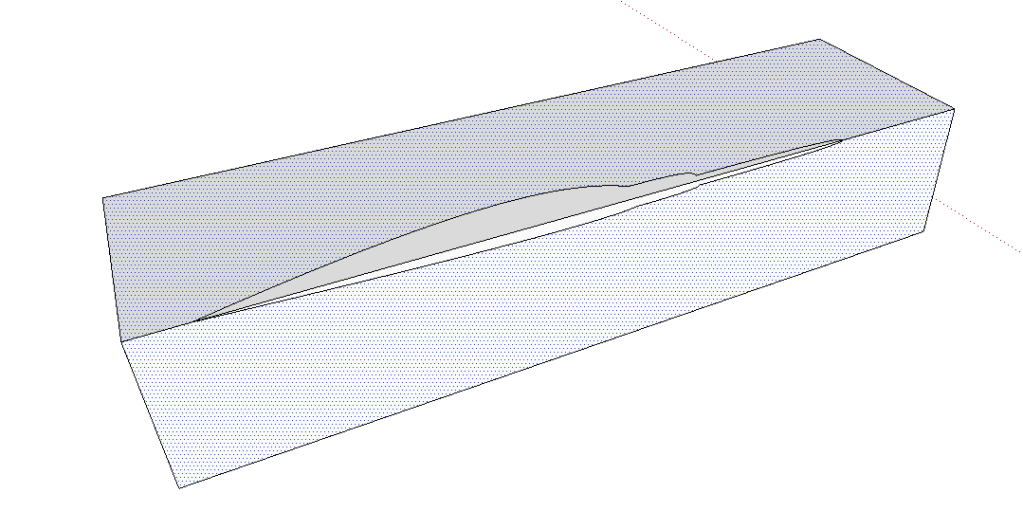
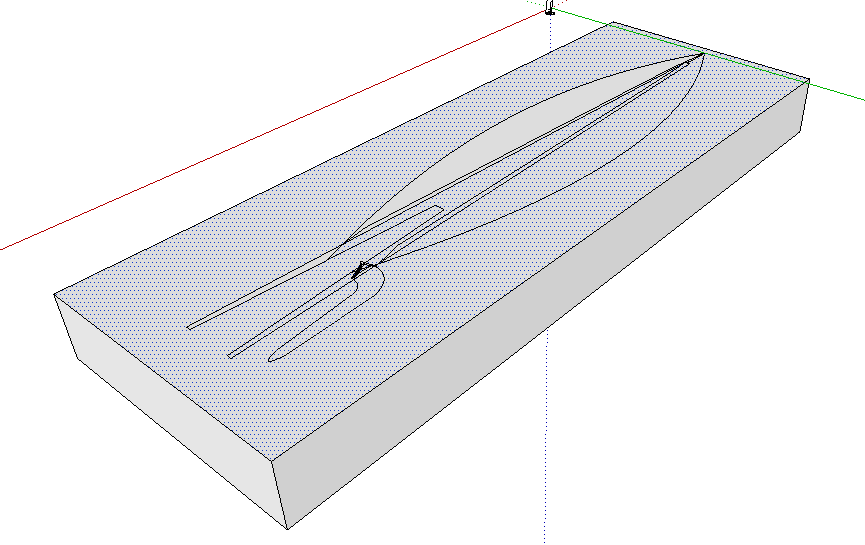
So, I started by creating half of the mould block, and then drawing the outline of half of a typical arrowhead on the top (with one edge as the center line). Then, on the side I did the outline of the profile of the arrowhead.
What I would like to do now is to remove the center line and have a cavity that curves from one line to the other so that when I mirror the block, there will be a clear arrowhead-shaped depression in the middle of it, deep along the center line and tapering to the surface at the edges. Of course, when I simply erase the center line, it just leaves a hole right now. Is this what the skin plugin is for?
Please forgive my extreme ignorance; I'd appreciate any suggestions you may have!!
-
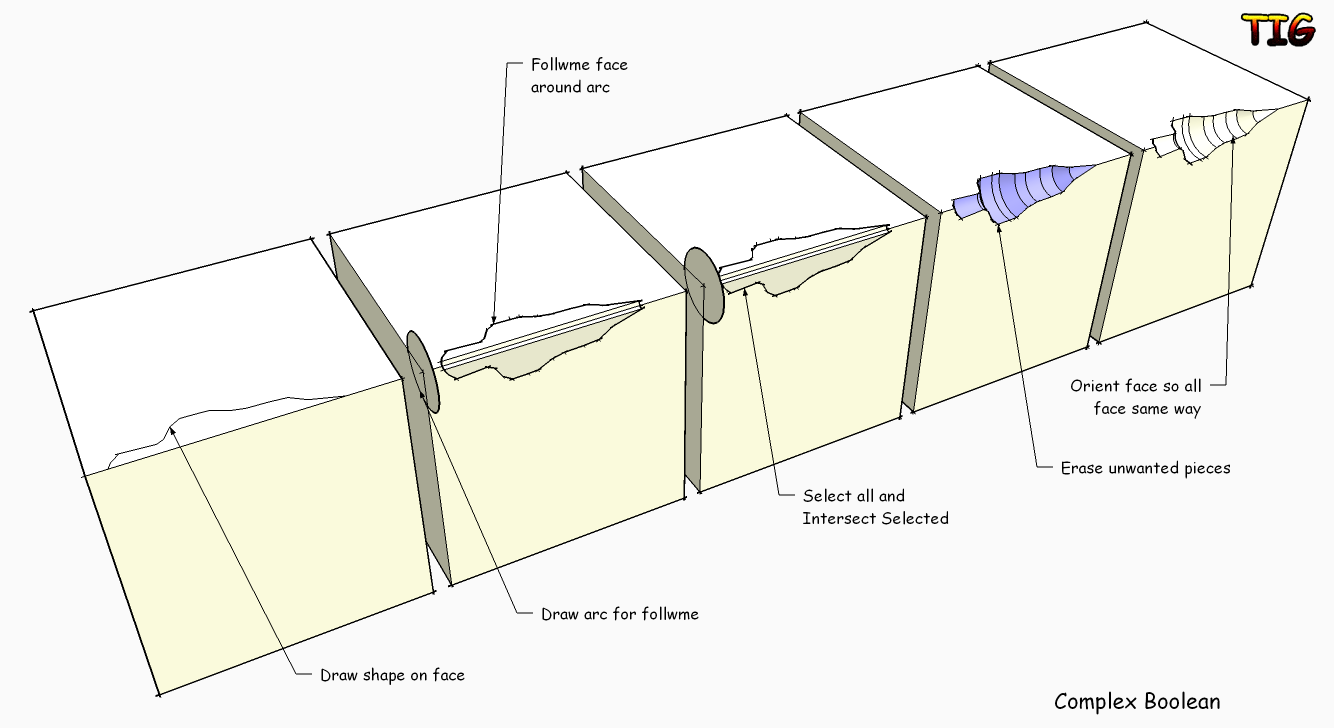
Like this...
-
No, TIG, arrow heads are not circular like that.
You can start however with a lathed shape like in TIG's example model the "positive" (the arrow head) however - then remove half of it and use the scale tool to "flatten" the piece a bit.
Still problem would probably be that the piece you place into the arrow is generally rectangular so the shape is a bit more difficult even than that. What age is it?
-
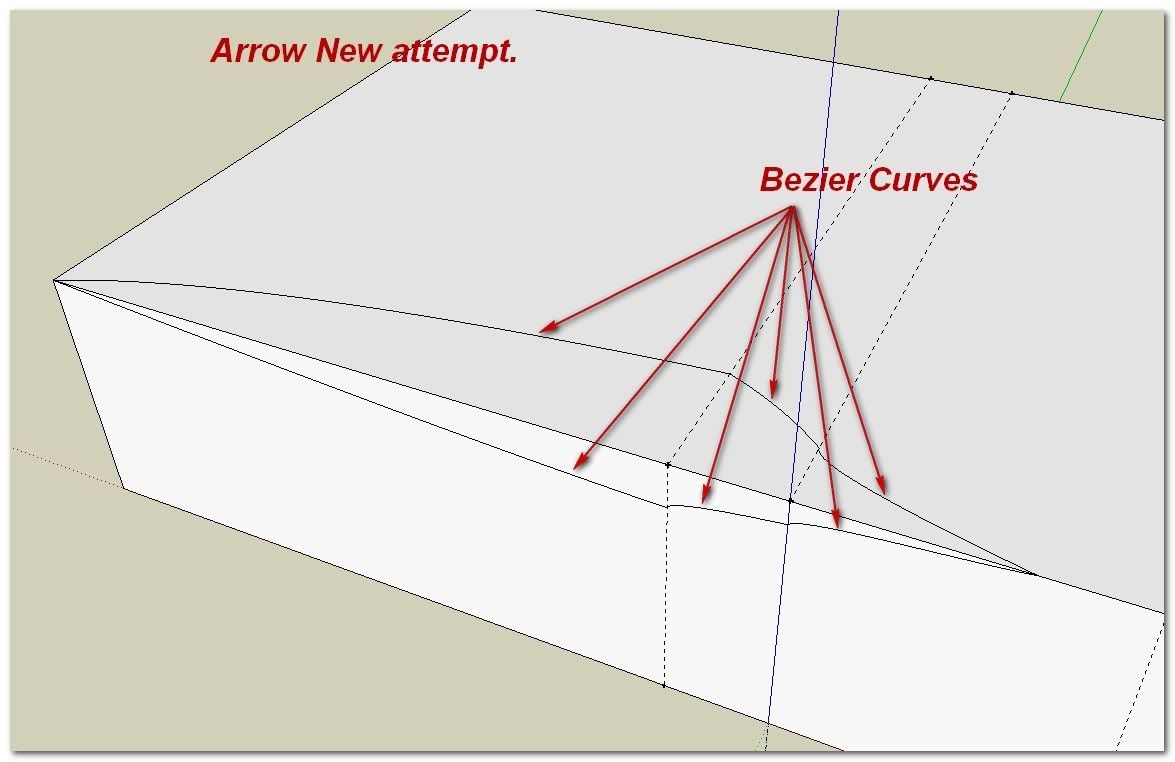
Thanks for the fast replies!! Giaeus is right, the section of the arrowhead should be pretty flat, though this particular kind has pretty simple curves, so flattening might do the trick. I will have to play around with it, since I still can't seem to get it to make faces (also when I manually draw in an arc connecting the two lines). I think maybe part of my problem is that I used bezier lines to make the profile nice and smooth; maybe that's why it isn't generating faces?
If it would be easier to make the positive first, is it then simple to create a "negative" of it in another object?
This is a typical sort of arrowhead used in the Neo-Assyrian period (northern Iraq and eastern Syria, early first millennium BC), though I imagine you'll find very similar ones in many different periods (there are only so many ways you can make an arrowhead, after all!). My PhD thesis is on the manufacture of arrowheads in this period, and a typology of the different forms used. Bound to be a thrilling page-turner, no doubt!

-
@ushumgal said:
If it would be easier to make the positive first, is it then simple to create a "negative" of it in another object?
Surely it would.
@ushumgal said:
My PhD thesis is on the manufacture of arrowheads in this period, and a typology of the different forms used. Bound to be a thrilling page-turner, no doubt!
Well, my archaeology thesis was about some 400-450 pieces of Roman terra sigillata pottery fragments with scratched inscriptions on them. The catalogue was itself three times longer than the evaluation. I guess no-one has ever read it except my professor.
So you mean the curves are pretty accurate? Could you upload the model as an attachment?
-
-
@gaieus said:
Well, my archaeology thesis was about some 400-450 pieces of Roman terra sigillata pottery fragments with scratched inscriptions on them. The catalogue was itself three times longer than the evaluation. I guess no-one has ever read it except my professor.
Lol, I know the feeling! sigh Unrecognized genius, right?
Where were your ostraka from?@gaieus said:
So you mean the curves are pretty accurate? Could you upload the model as an attachment?
They are accurate in that they accurately represent the basic shape of an arrowhead of the time. They don't represent a specific example, though, and of course the actual preserved artifacts are often somewhat irregular (and often very badly corroded). This is just for the section on moulding methods, so I only need to have an idealized example.
In any case, as soon as I finish the model, I will happily upload it for you.
@jean lemire said:
Hi Ushumgal, hi folks.
See this SU file for ideas.
Merci beaucoup, Jean! That looks like it should give me just the results I want! Now I just need to figure out how to do each step... XD
-
@ushumgal said:
Lol, I know the feeling! sigh Unrecognized genius, right?
Where were your ostraka from?Intercisa, Pannonia Inferior (actually, a Syrian mounted unit garrisoned there, the Cohors I Milliaria Hemesenorum Sagittaria - as the name says, from Emesa/Hemesa).
@ushumgal said:
In any case, as soon as I finish the model, I will happily upload it for you.
Well, I actually meant for the precise instructions (that I could only get from the current model) but in any case, I would definitely be interested.
@ushumgal said:
Merci beaucoup, Jean! That looks like it should give me just the results I want!
Well, Jean is definitely inspiring with his excellent tutorials.

-
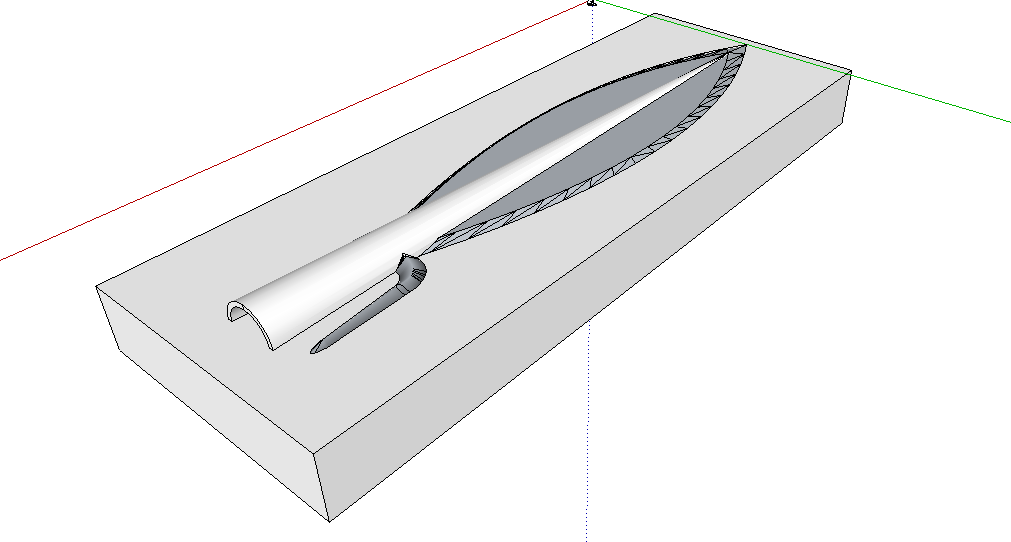
Hi,
there is method i used to model a sword. Maybe useful for you and very simple.
Karlheinz
-
@gaieus said:
Intercisa, Pannonia Inferior (actually, a Syrian mounted unit garrisoned there, the Cohors I Milliaria Hemesenorum Sagittaria - as the name says, from Emesa/Hemesa).
Well, there's irony for you...those guys were from the area I study, but were living just downstream from where I used to live! (Vienna) Bet they did NOT enjoy the winters...
Were the inscriptions in Latin or Aramaic?And sure, once I have a technique worked out, I'll post instructions. I'm going to have to make a number of these before I'm done...
@charly2008 said:
Hi,
there is method i used to model a sword. Maybe useful for you and very simple.
Karlheinz
Vielen Dank, Karlheinz! I like the way you got nice curves using the triangles...I'm going to have to work on that!
One more question: I've made a sexy arrowhead, but now I need to embed it in a box and then delete it to leave the cavity. Does that involve making a group, like in Karlheinz' example? If someone could point me to a tutorial for this bit or give me a quick walkthrough, I'd be much obliged!
-
Now if you do have the arrow head, just cut it into two (delete one part) and you already have the negative. Of course, orienting front/back faces would be also good.
(The inscriptions were mostly Latin and some very few Greek - but this is already the "Hellenised East" from the 2nd-3rd century AD)
-
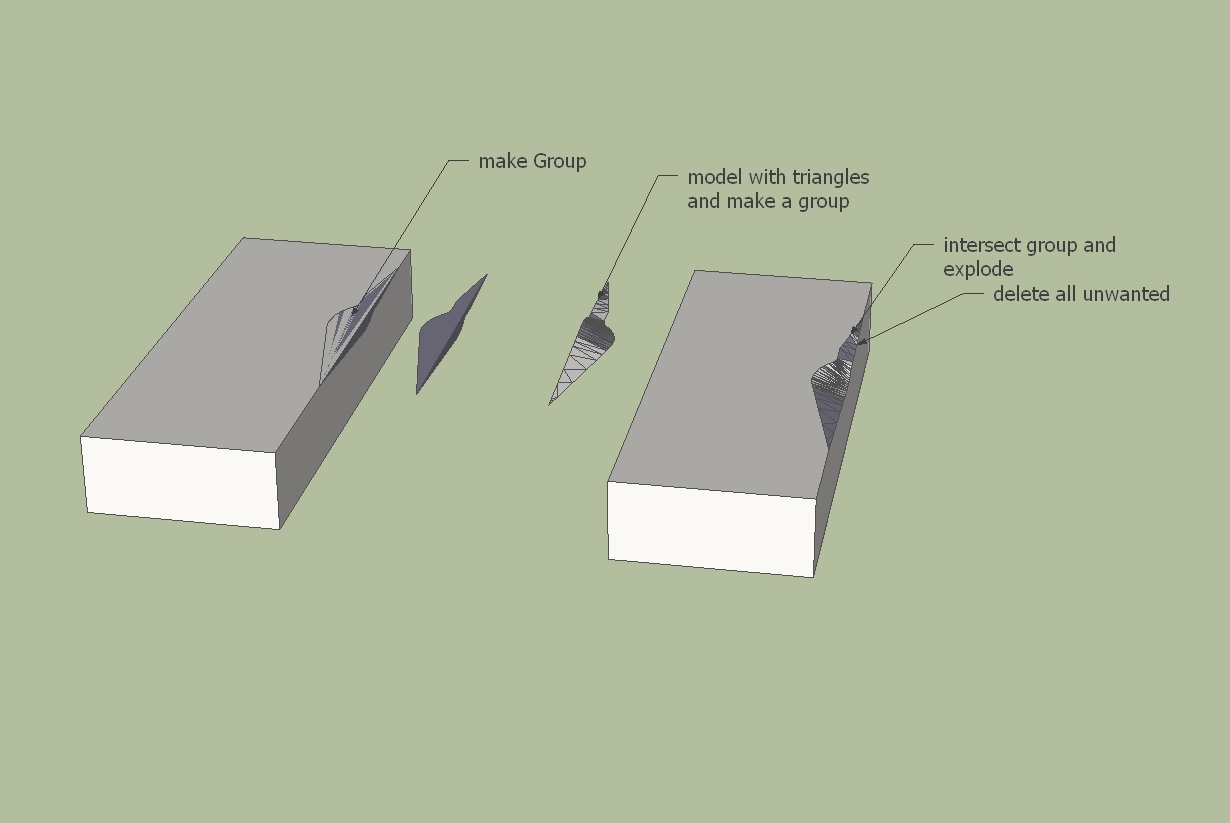
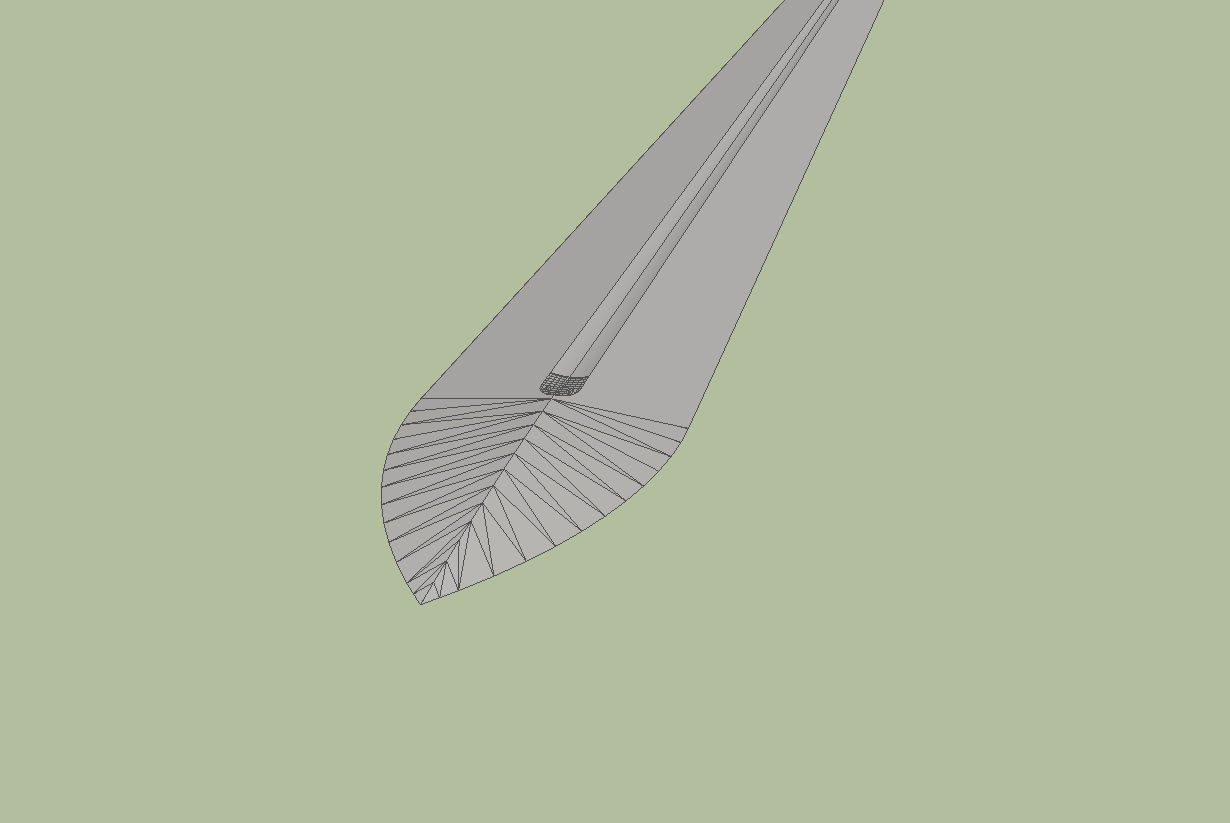
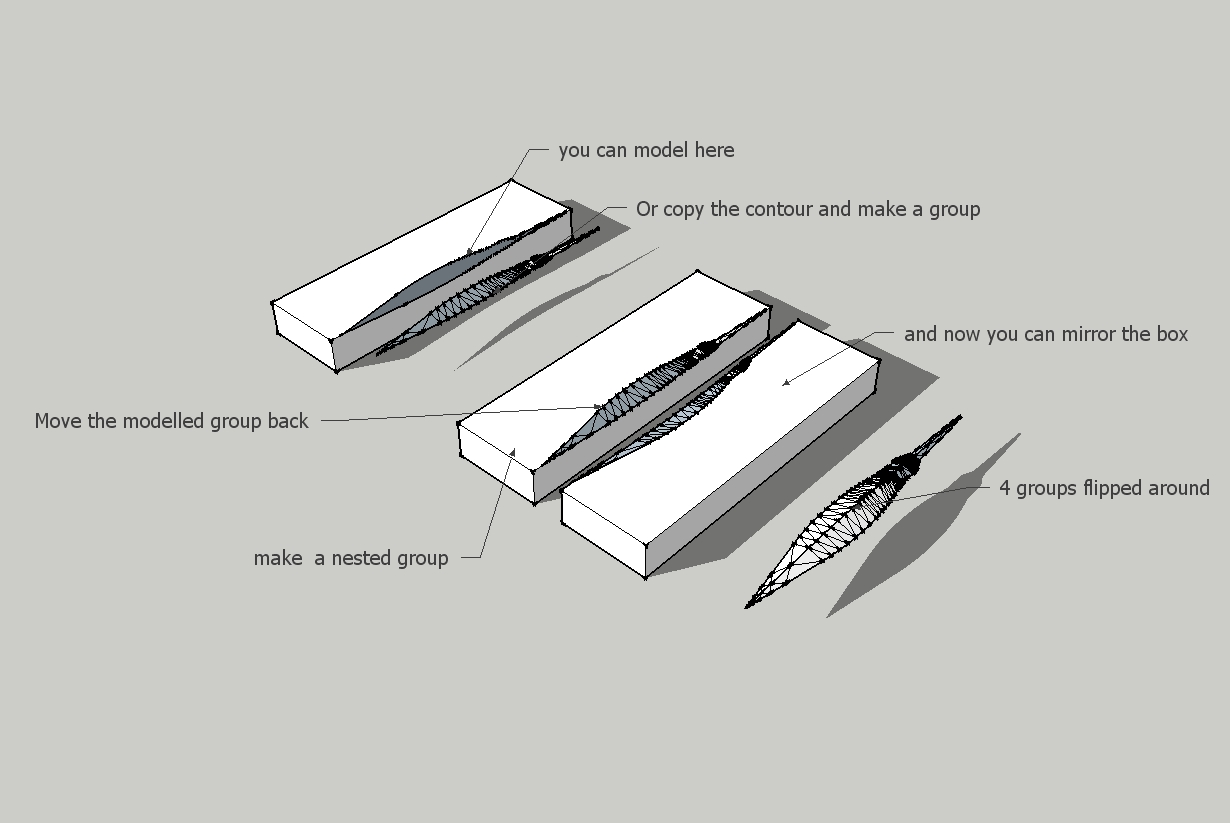
Hi ushumgal,
i copied the the Contour and made it a group. Then i modelled as i explained the triangles at each endpoint of the curves. Below is a better example.
Karlheinz
-
Hi,
I am always surprised by the different techniques used to execute a design. Thanks TIG, your second step in your example was new to me. Thanks Simon and Jean that you showed your technique. It's nice that there are so many creative people.
Karlheinz
-
@gaieus said:
Now if you do have the arrow head, just cut it into two (delete one part) and you already have the negative. Of course, orienting front/back faces would be also good.
(The inscriptions were mostly Latin and some very few Greek - but this is already the "Hellenised East" from the 2nd-3rd century AD)
Gotcha...sounds like good stuff!
I see what you mean about deleting one half to get the negative, but unfortunately I put mine together a different way. I had trouble correctly aligning the bottom half once I copied and flipped it...is there some trick to it to get things to line up correctly? Instead, I made a rectangle and then drew a line down the center of the 4 sides, and brought the edges down to that center line. So I modeled it whole rather than in half. But I'm not sure how to cut it in half now, especially since I used a cylinder for the tang.
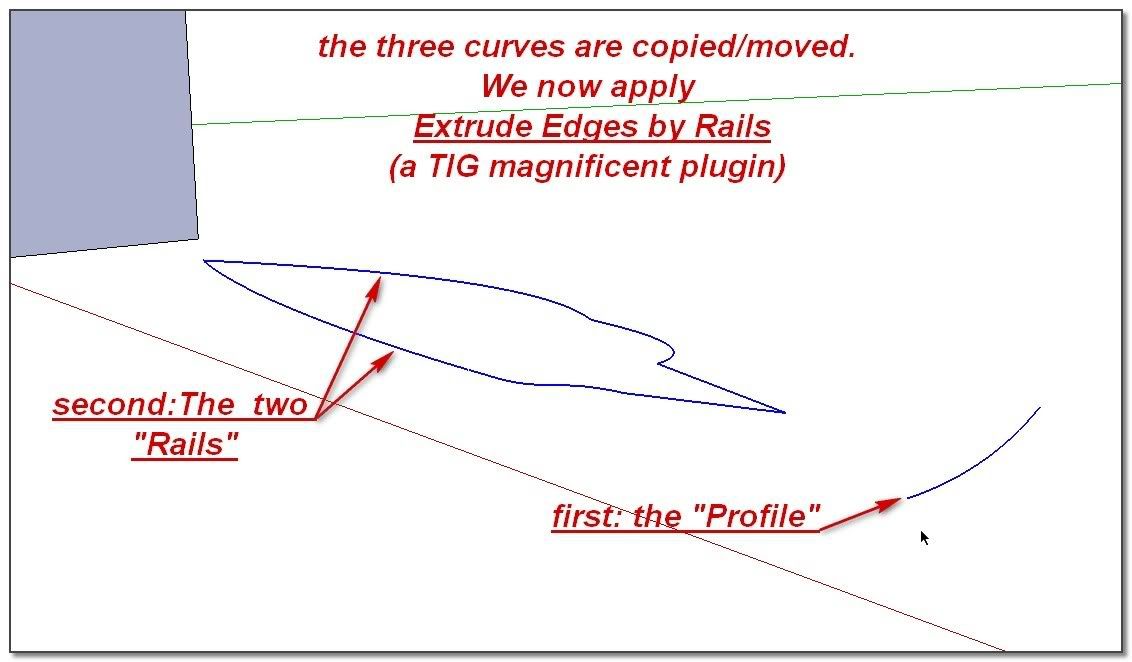
@simon le bon said:
Hi ushumgal
As I can understand, you need round spoon shapes (I don't know better how to express
 )
)Thanks for the links to the plugins, Simon...TIG's extrude edges by rails is amazing!! I'm having some success with it, but I do have a question. I divided the arrowhead into 3 segments (which all have somewhat different sections). When using this tool, how do you merge one segment into the next? For example, if one segment is nearly cylindrical and the next is significantly flatter? I always have a gap between the segments when I try it.
@charly2008 said:
Hi ushumgal,
i copied the the Contour and made it a group. Then i modelled as i explained the triangles at each endpoint of the curves. Below is a better example.
Karlheinz
Thanks for the example! To skin an object using the triangles, do you do it manually or is there a plugin to do it automatically for you?
Also, when you flip the quarter of the arrowhead around to make a complete example, can you tell me how you get everything to line up correctly? When I tried to do that with halves, I could never get them perfectly aligned.
Thanks everyone!! I started with Sketchup about a month ago, but I've learned more in the last 24 hours than in the last 28 days!
-
I did it manually
-
Oh, never mind about the flipping/mirroring question...I just figured out mirror_selection...
-
@ushumgal said:
What I would like to do now is to remove the center line and have a cavity that curves from one line to the other so that when I mirror the block, there will be a clear arrowhead-shaped depression in the middle of it, deep along the center line and tapering to the surface at the edges. Of course, when I simply erase the center line, it just leaves a hole right now. Is this what the skin plugin is for?
@gaieus said:
No, TIG, arrow heads are not circular like that.
You can start however with a lathed shape like in TIG's example model the "positive" (the arrow head) however - then remove half of it and use the scale tool to "flatten" the piece a bit.
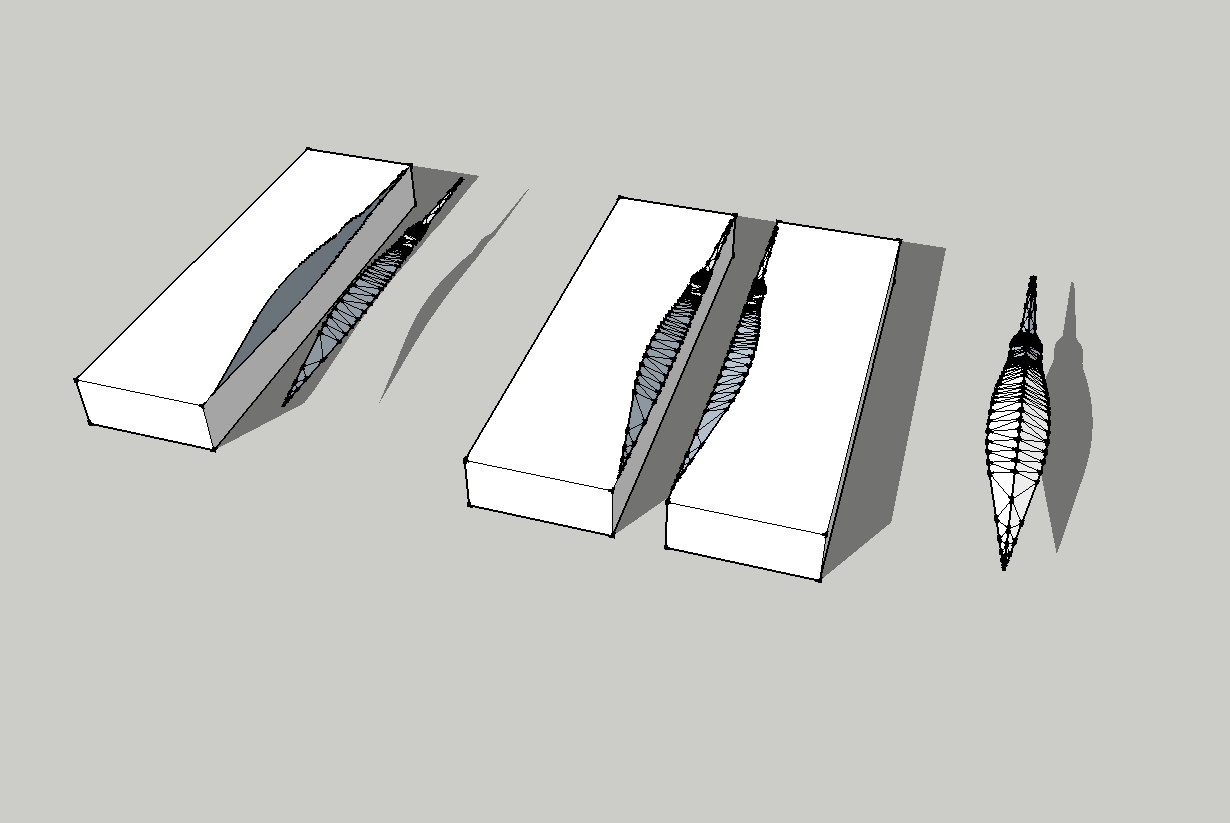
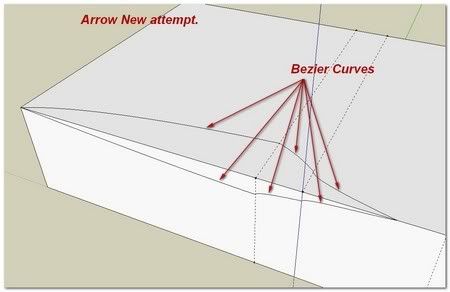
Hi ushumgal
As I can understand, you need round spoon shapes (I don't know better how to express
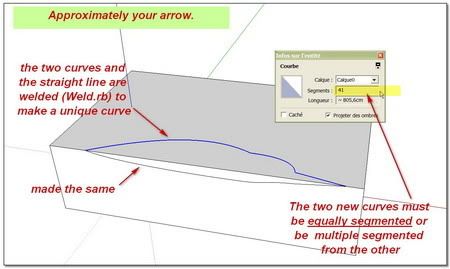
)Here is a way with
TIG_Extrude Edges by RailsI Have also used:
RickWilson_Weld.rb
Fredo_BezierSpline
TIG _ Mirror.rbIn your mould work, a boolean tool seems very useful
Whaat_BoolTools (commercial)
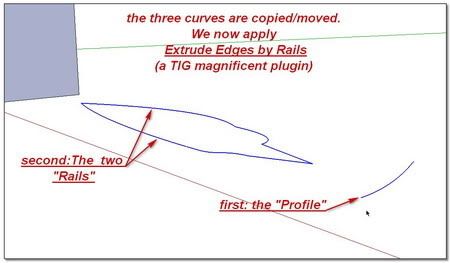
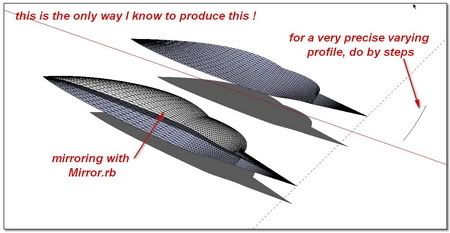

simon -
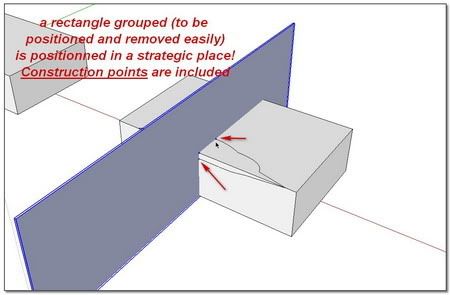
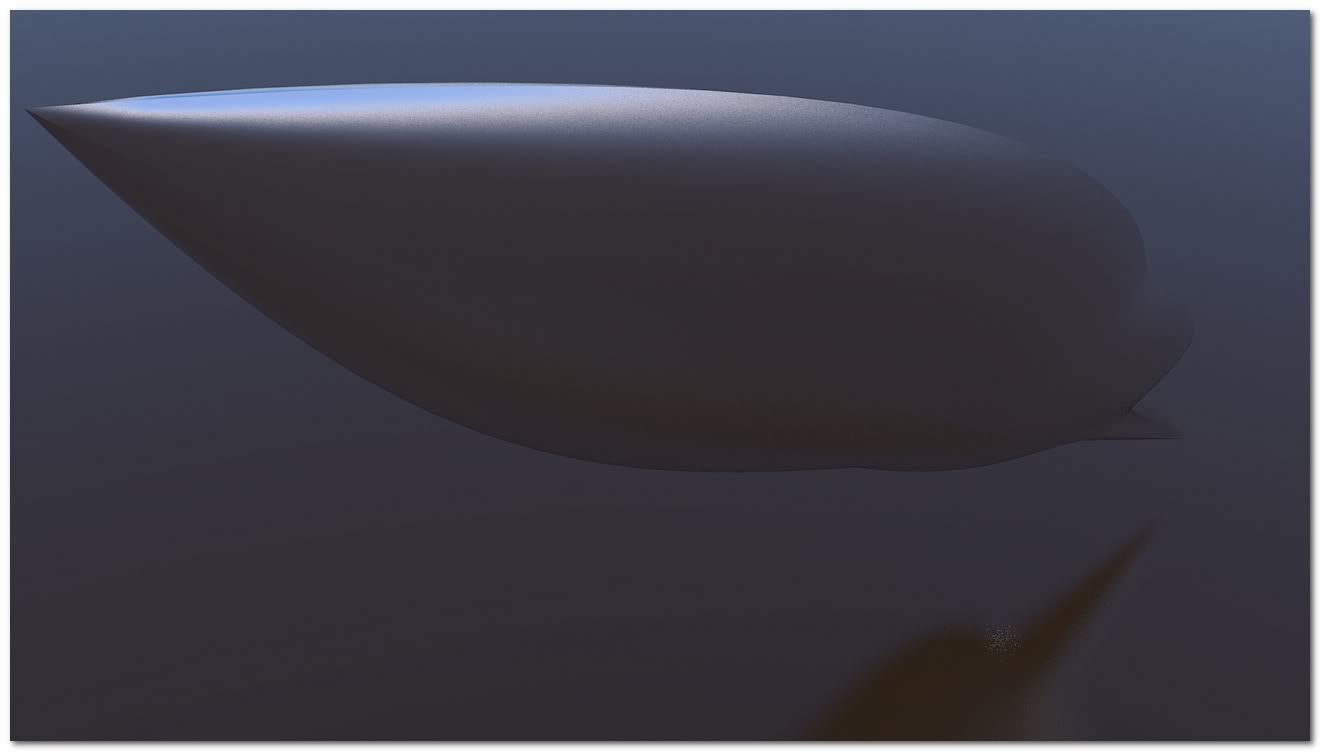
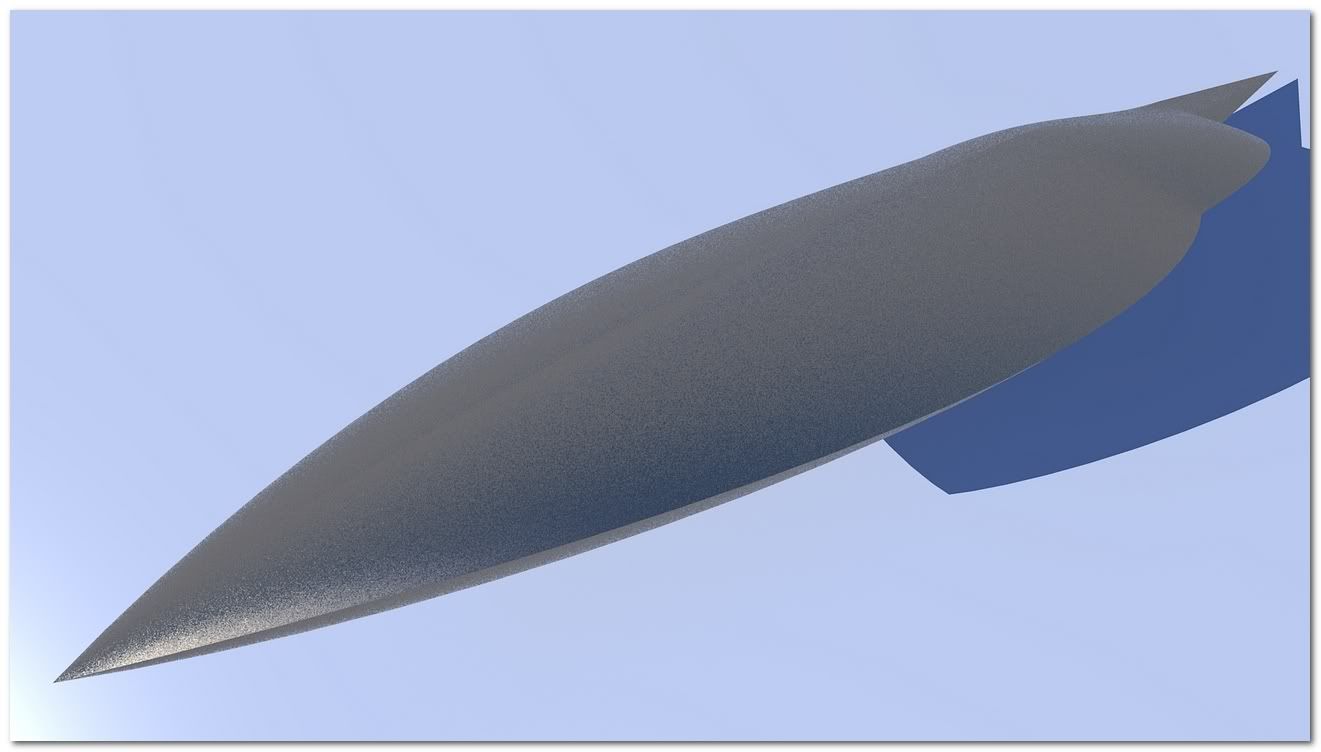
Hi everyone!
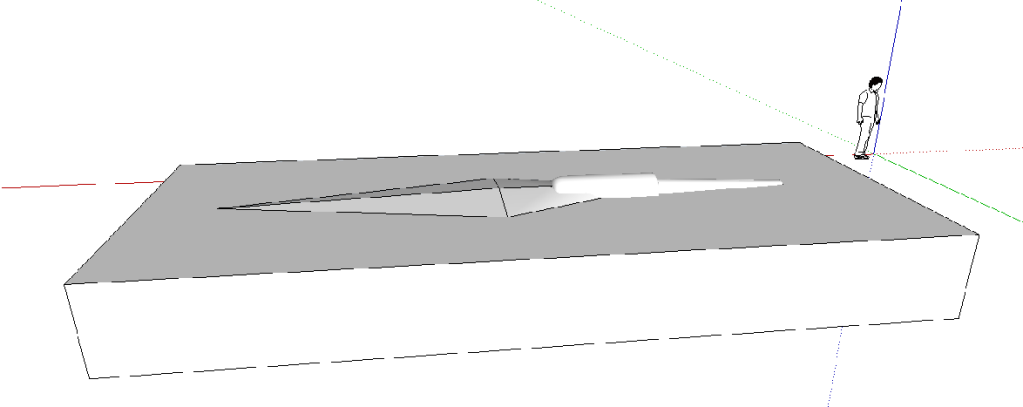
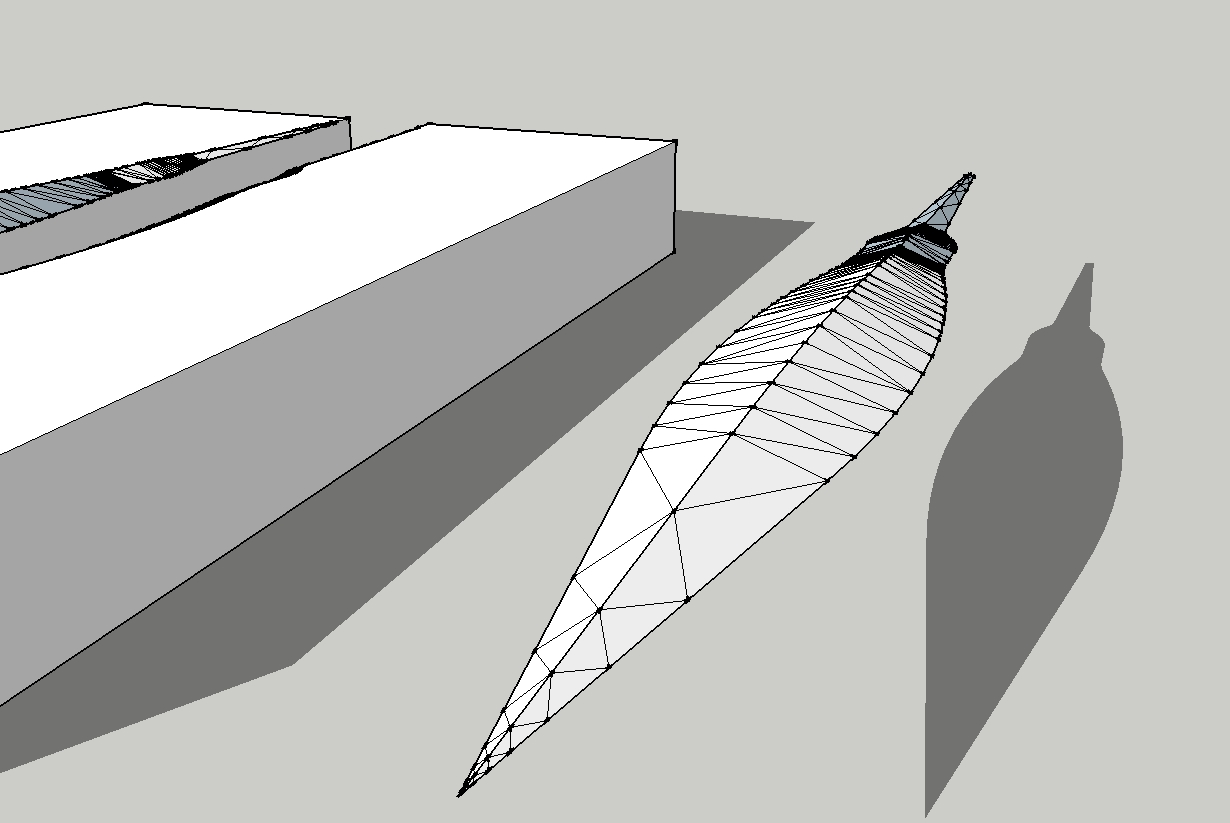
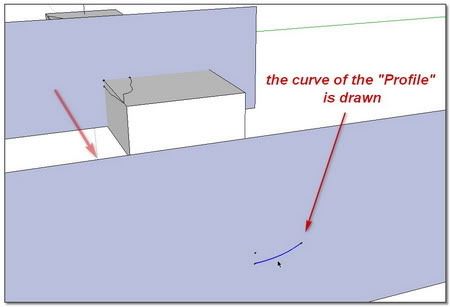
The holidays slowed me down, but now I'm back at it and I have made a number of very sexy arrowhead models (in the process of which I learned a LOT about SketchUp!). Now I have one remaining problem...I'm following the instructions that Jean provided. Using a complete model of an arrowhead, I draw a rectangle around it and drag it down to become the block forming half of the mould. Now I should intersect and then delete the arrowhead itself, leaving a cavity in its shape. But whenever I try this, it never seems to work. Should the arrowhead be a group? And I try intersecting both the arrowhead and the block with the model, but I still end up with a mess when I try to delete.
Anyone have any ideas what I am doing wrong?
[See images of before and after I delete the arrowhead below.]
-
Well, first of all, Jeans method would work best with a single faced object but you obviously have wall thickness for the part you slide the arrow stick in so that will make it a bit more complex.
If you leave the arrow head a group or component, you should do the intersection twice - once for the "box" from outside of the group and once inside the group for the group itself. So best would be to explode the baby so that both parts will be in the same editing context.
-
Hi ushumgal Hi everybody,
@ushumgal said:
Thanks for the links to the plugins, Simon...TIG's extrude edges by rails is amazing!! I'm having some success with it, but I do have a question. I divided the arrowhead into 3 segments (which all have somewhat different sections). When using this tool, how do you merge one segment into the next?
Tig has is own explanation about that: Here
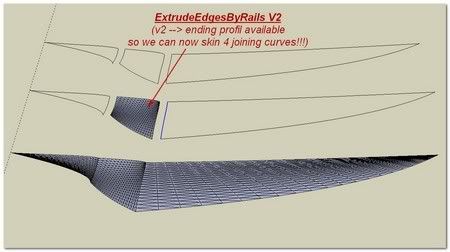
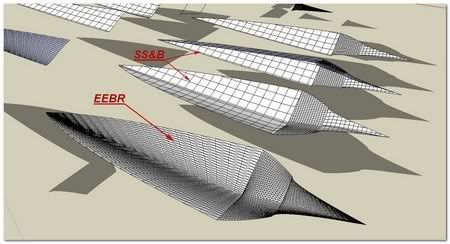
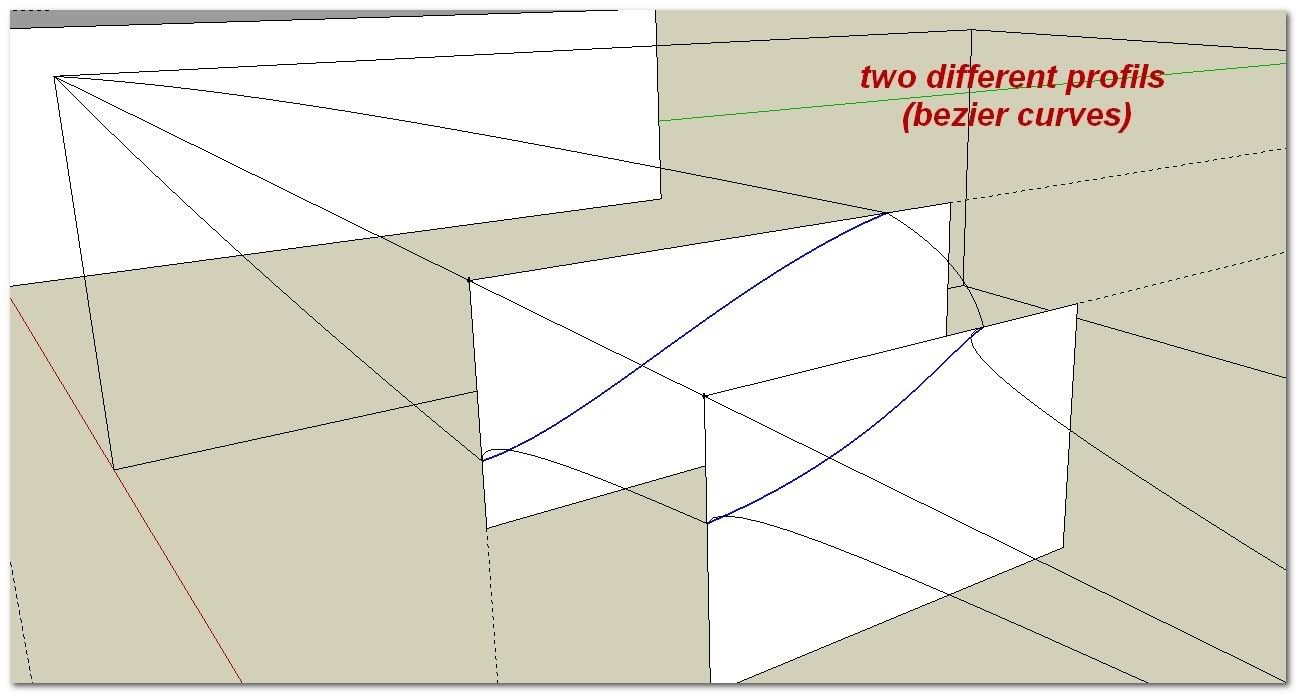
But In fact it was very uneasy to skin the middle segment with EEBR for it was not possible to skin directly 4 joining curves.
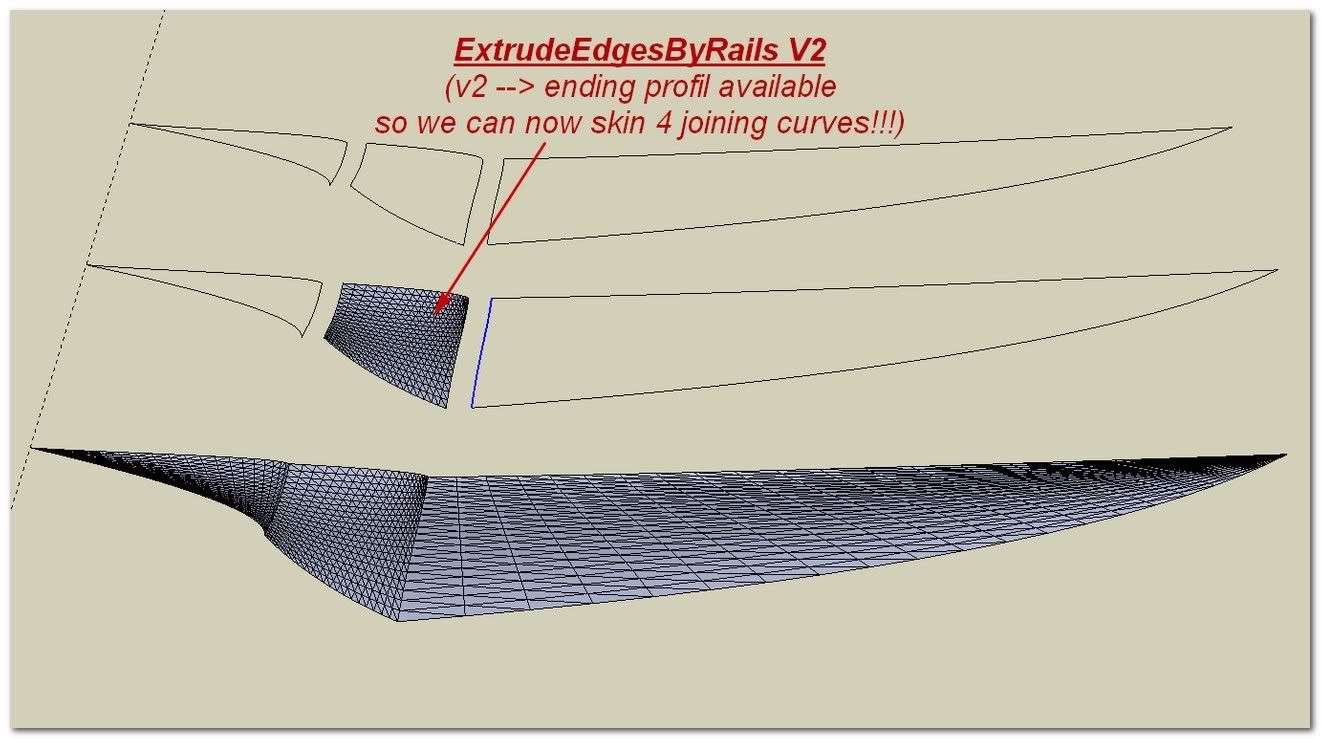
I said "IT WAS" because ExtrudeEdgesByRail V2 is out and this limitation has now expired
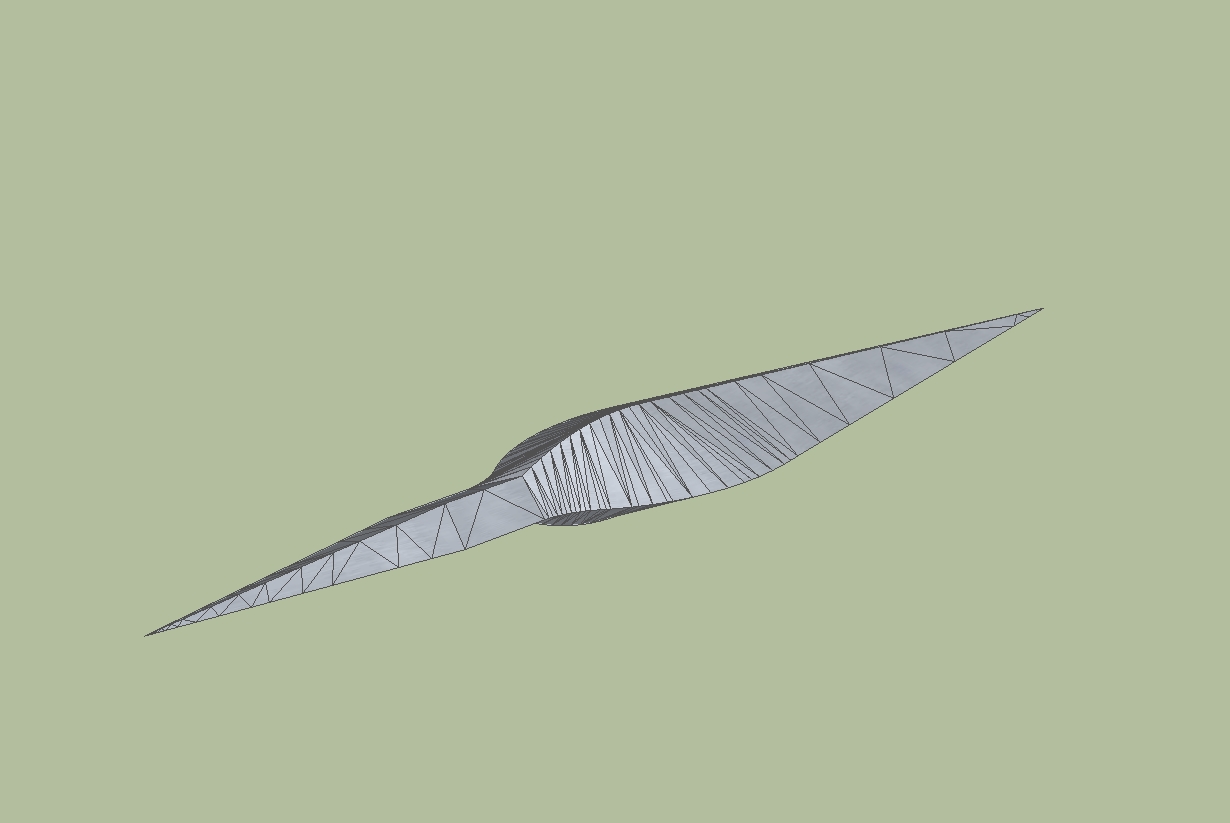
Segmented arrow:
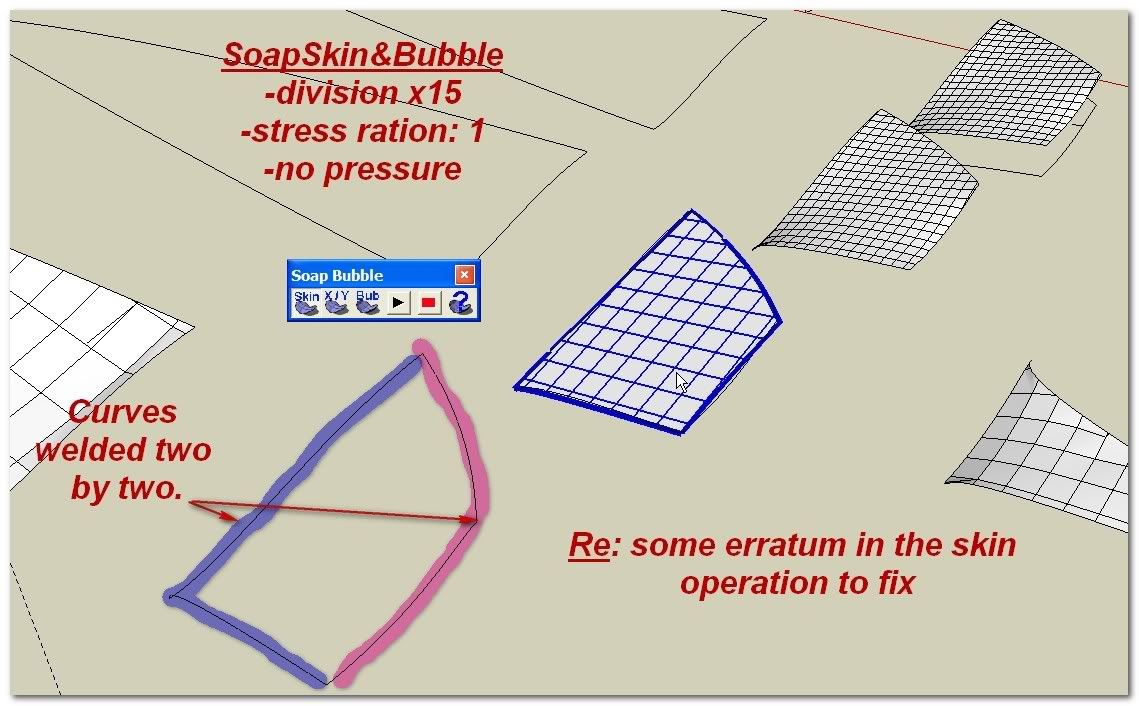
You can also use Soap Skin & Bubble
Which add the possibility to inflate or depress the skined faces.
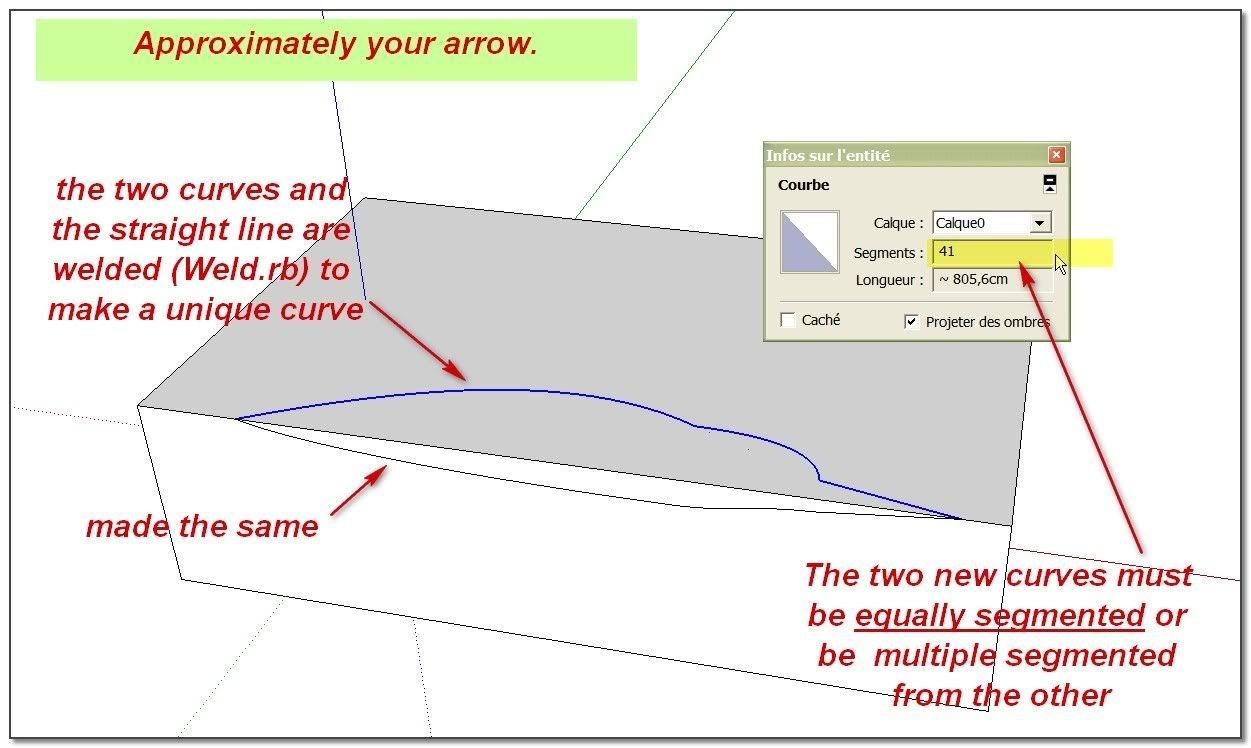
The process need to be initiate with Weld operation for SS&B works with two joining curves. Some small fails may happen and need to be repaired. Something a bit difficult for newbies.
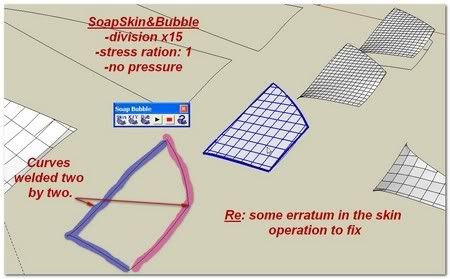
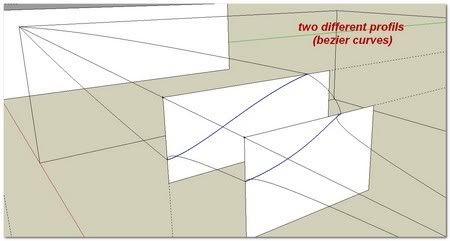
The two different skins:
.../
I see you are doing skins manually to join your curves (good thing). This can be made with plugins. Unfortunately, powerful ArchitectBoy's Skin.rb (& see also& skin thread) only skin separate curves, but Rick Wilson Curve Stitcher does it very simply(you can throw a glance on my little skin reminder here even if it must be updated)
++simon


Hello! It looks like you're interested in this conversation, but you don't have an account yet.
Getting fed up of having to scroll through the same posts each visit? When you register for an account, you'll always come back to exactly where you were before, and choose to be notified of new replies (either via email, or push notification). You'll also be able to save bookmarks and upvote posts to show your appreciation to other community members.
With your input, this post could be even better 💗
Register Login


Advertisement