sketchucation logo sketchucation
    • Login
    1. Home
    2. Technohippy
    3. Posts
    โ„น๏ธ Licensed Extensions | FredoBatch, ElevationProfile, FredoSketch, LayOps, MatSim and Pic2Shape will require license from Sept 1st More Info
    T
    Offline
    • Profile
    • Following 0
    • Followers 0
    • Topics 7
    • Posts 36
    • Groups 1

    Posts

    Recent Best Controversial
    • RE: [Plugin] RichSection V0.5.8 UPDATED march 2015

      @davecoopstl said:

      @Technohippy - Did you have to change the Permissions to the ...SketchUp 2013\Materials folder? Or somewhere else?

      I'm about to install RichSection on another user's computer, and I'm trying to figure out what to expect.

      Let us know.
      Dave.

      I just changed the permissions for the whole sketchup folder and made sure The user profile as well as the admin was set to full control.

      Using windows 8 and sketchup 2013

      posted in Plugins
      T
      Technohippy
    • RE: [Plugin] RichSection V0.5.8 UPDATED march 2015

      This is just great. Got it working by fiddling with the folder permissions, thanks for this

      posted in Plugins
      T
      Technohippy
    • RE: My first two commissions

      @mistro11 said:

      Very nice. Hope you see many more projects. I have a building pending for a decision myself. It would be my first. It must be a good feeling to know something you designed in Sketchup will actually be built.

      Thanks,

      The knowledge it will be built is fairly awesome, Good luck with your decision!!

      posted in Gallery
      T
      Technohippy
    • RE: My first two commissions

      thanks guys

      posted in Gallery
      T
      Technohippy
    • RE: My first two commissions

      @rich o brien said:

      Hi Andrew,

      Nice to see you back around the place. Fantastic images ๐Ÿ‘

      Thanks Rich... nice to be back... its been a while!!

      posted in Gallery
      T
      Technohippy
    • My first two commissions

      Recently picked up my first two commissions, a couple of replacement dwellings for Design and Materials Ltd. Both were awarded their planning permissions with the clients understandably happy!

      As always its a learning process. The first project was this
      Final Post pro 01 WM (Custom).jpgFinal Post pro 01 cropped (Custom).jpg
      there's a few things I would do differently even now, the faked in grass and fencing could be better, but I'm really happy with the overall feel of this piece. Photos for the panoramas were taken by me and stitched in hugin.

      The photos for the second piece were taken by the client without a tripod which made stitching the panorama quite problematic. Also the the photos were taken on a grey day which made matching the lighting quite difficult. Getting the foreground tree to look natural in front of the new building was also quite challenging.
      058 final panorama 06 picasa (Custom).jpg058 final panorama 06 picasa cropped (Custom).jpg
      All the modelling was done in Sketchup, rendering was done in kerkythea, compositing and post pro in Gimp with some final tweaks in picasa. picasa's filters really help to blend all the elements together and have great tonal control.

      posted in Gallery
      T
      Technohippy
    • RE: Split level concept house... again

      @mitcorb said:

      Hi, Andrew:
      This is excellent. You really have mastered the technique. Besides the overall pleasing image, is the incorporation of the geometry beyond in faint sketch style, giving the viewer an idea of the whole form.

      Thank you, high praise indeed!

      I was very pleased with the outcome, the tutorial I followed is brilliant and made producing this, frankly, really quite easy.

      posted in Gallery
      T
      Technohippy
    • Split level concept house... again

      My "go to" architectural model gets a different sort of treatment this time following this excellent tutorial http://www.alexhogrefe.com/blog/2012/9/9/sketches-part-2-extended.html

      This image http://fav.me/d2reokf was used in the making of this

      Modelled - sketchup
      clay render - kerkythea
      post pro - gimp

      split level sketch Final titled 1.png

      posted in Gallery
      T
      Technohippy
    • RE: Split level concept house

      @roger said:

      Mottle the light hitting the driveway. Like light filtering down through tree branches Add some foreground framing.

      great idea... I shall try that

      posted in Gallery
      T
      Technohippy
    • RE: Split level concept house

      @daniel said:

      Looks good. Two comments: 1) looks a little too hazy, out of focus, and 2) on the right, the straight angled lines where the building meets the grade do not look natural.

      Thank you... two very good points. The first is easily tweakable in gimp, the second might have to be a bit of hand painting, as it were. Although I was intending to add a bit more greenery, planting along the walls etc, so that might be the best idea.

      posted in Gallery
      T
      Technohippy
    • Split level concept house

      This was an exercise in post work. modelled in SU, I the took a basic render from kerkythea and added the trees, sky, drive, and grass in GIMP. hard work and lots of tweaking!


      split level - su output.jpg


      split level - kt simple textures.jpg


      split house post work 02.png

      posted in Gallery
      T
      Technohippy
    • RE: Steampunk Mobile Phone

      Would you be interested in a simple kt scene which has this material as part of it.

      I'd be interested to see how thea interprets this material

      posted in Gallery
      T
      Technohippy
    • RE: Steampunk Mobile Phone

      LOL must be a good scratch then!!

      I think the haze must come from the specularity, primarily using the windy texture scaled either to match or at a slightly different scale from the windy bump.

      the windy bump on mine is very light, almost unnoticeable and quite large in comparison to the piece.

      question for you, I had heard thea can open kerky files, is this true?

      posted in Gallery
      T
      Technohippy
    • RE: Steampunk Mobile Phone

      Looking good! if you produced that from my tute, then I'm happy.

      The only things I would change are the bump and specular maps and how they interact, I don't know how thea works in this regard, does it have the same procedurals as kerky?. what are you using for the scratches? they look a little minerally.

      I had a thought and googled 'scratch' under images and came up with the file which I based my scratches on

      http://www.stock-textures.com/images/wallpapers/44719319/Metal/metal-scratch.jpg
      I fiddled with it in GIMP using the photocopy filter to make it more monochrome, but this was the basic image.

      I think a lot of the hazyness in my image comes from the light probe... it adds so much realism.

      Also I love the sterling engraving... nicely done

      posted in Gallery
      T
      Technohippy
    • RE: Steampunk Mobile Phone

      @escapeartist said:

      Is there any way you could share some tips to get that nice, buffed (but not too shiny) soft silver look with the wear scratches? It's very nice.

      I started putting together a couple of screenshots and ended up turning them into a mini tutorial!

      I should point out that the average size of the phone is 45mm x 95mm, and a lot of the work in this and the rest of the materials was ensuring the scale of the material was right for the piece!

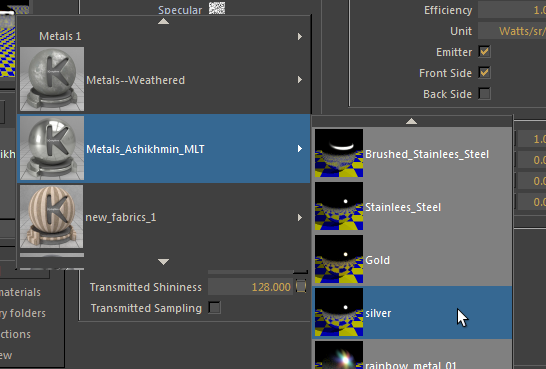
      This material was based on the silver available in the Metals Ashikhmin (mlt) library available at the Kerkythea website
      metals ashikhmin mlt silver.png
      the weighting of the layers is as follows
      OA setup.png
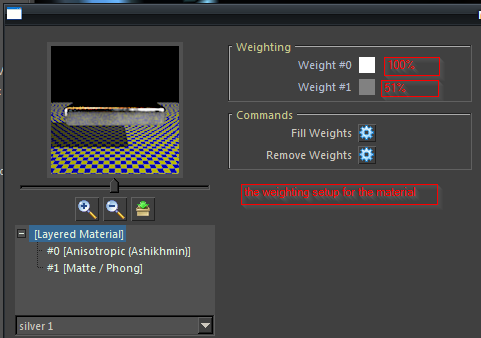
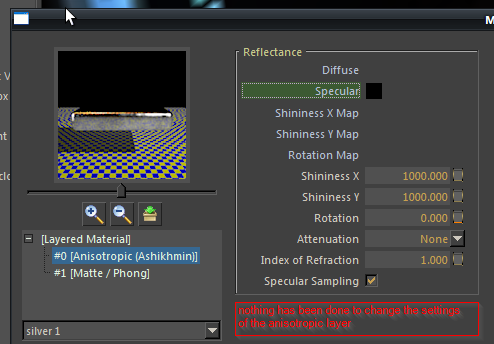
      the anisotropic layer is left untouched
      anisotropic.png
      the only part of the matt/phong layer that is changed is the specularity
      mattphong.png
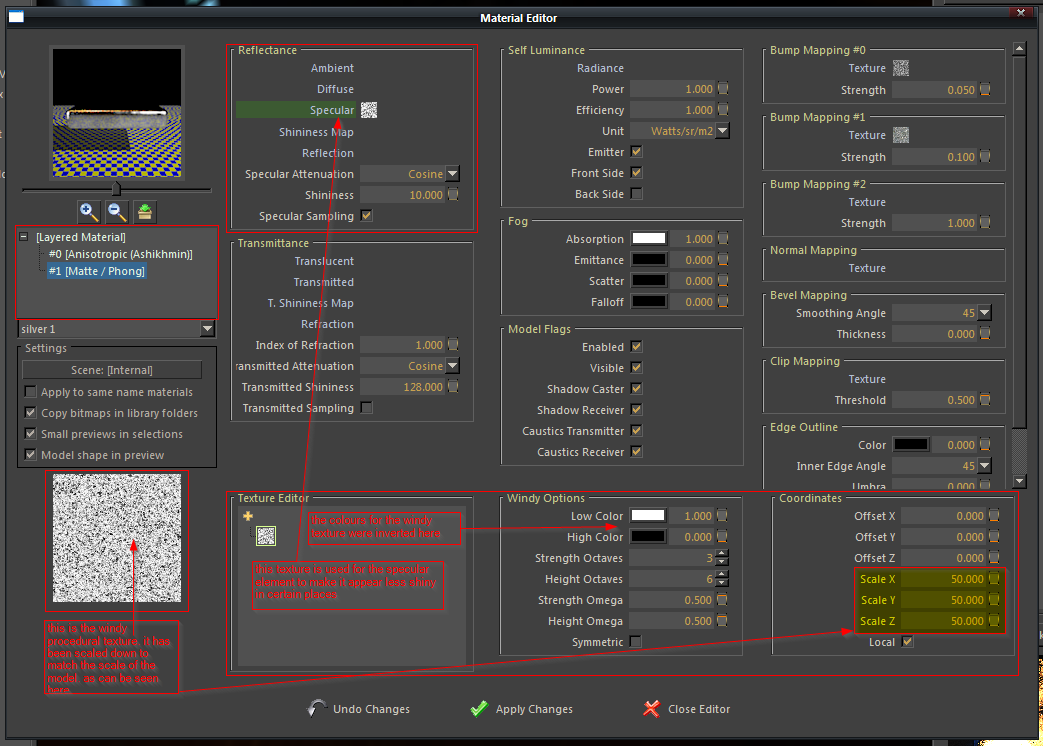
      the real work in this material is the was in the specularity and the bump maps, bump map 1 was about making the metal seem imperfect and not perfectly flat (which is virtually impossible in the physical world and way too easy in the digital world)
      bump 1.png
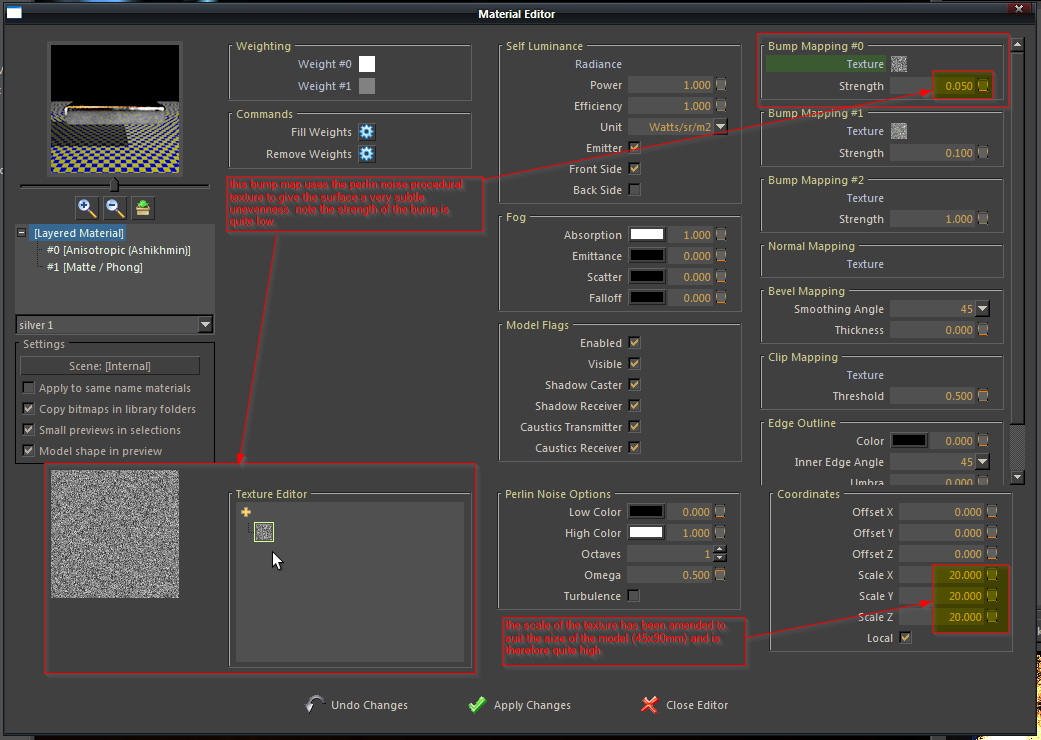
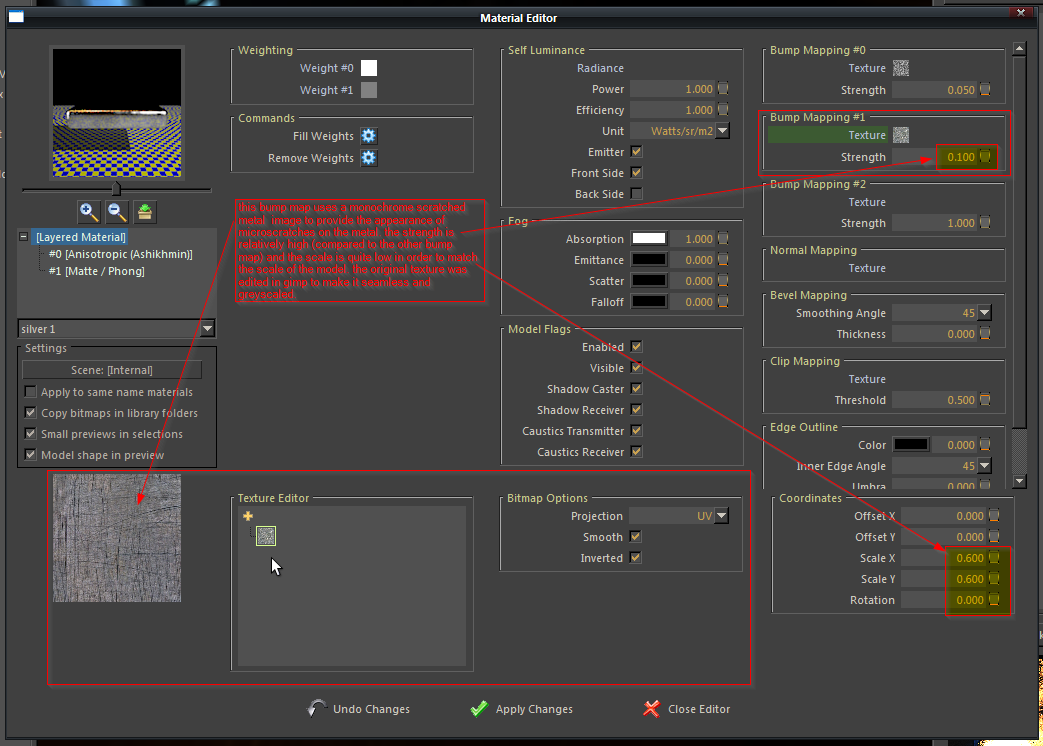
      bump 2 was about creating the micro scratches which accompany any piece of silver
      bump 2.png

      Its a good idea to save this finished material to your material library if you want to use engravings.

      For the engraving I used a monochrome frame i sourced at openclip art, I mapped it in sketchup to ensure the dimensions were correct prior to exporting. In kerkythea, I opened the materials editor for the engraving and selected the diffuse label in the reflectance panel. In the texture editor right click on the engraving bitmap and copy it.

      left click the preview panel and choose your new material as saved above and once it has loaded click apply, then in the empty bump mapping panel select 'texture' and in the texture editor right click and paste. kerky will place the engraving bitmap, correctly mapped, into the spare bump map slot. Next fiddle with the strength control until it looks right.

      Alternatively you can convert your image to a normal map using GIMP (which is what I ended up doing eventually) and use that instead. if you start by exporting a mapped image kerky will remember the mapping, so it doesn't matter if you use a different version of the image.

      I hope thats not too in depth, once I get on a roll, I tend to cover ALL bases!!

      posted in Gallery
      T
      Technohippy
    • RE: Steampunk Mobile Phone

      @majid said:

      ammmazing... really amazing , and good knowledge of KT materials (and render settings). ๐Ÿ‘

      thanks majid most of the work was materials, for render settings I use preset mlt(bpt) and for lighting I used one of bob groothuis's excellent globals

      posted in Gallery
      T
      Technohippy
    • RE: Steampunk Mobile Phone

      @box said:

      Such a wonderful piece of work.

      And seriously valuable, if you could get it produced, perhaps with a larger screen, you would make millions.
      I would buy one on the spot.

      Thank you, I have looked into 3d printing for this but its expensive and just wouldn't do it justice. frankly i'd buy one too if I could afford it! although if it got made i figure i could afford it based on your figures!! ๐Ÿ˜›

      posted in Gallery
      T
      Technohippy
    • RE: Steampunk Mobile Phone

      @escapeartist said:

      Is there any way you could share some tips to get that nice, buffed (but not too shiny) soft silver look with the wear scratches? It's very nice.

      I'd be happy to, I'm doing some screenshots for you now

      posted in Gallery
      T
      Technohippy
    • RE: Steampunk Mobile Phone

      @unknownuser said:

      @technohippy said:

      my goal is realism, not perfection.

      And you sure nailed it. ๐Ÿ‘

      thanks man!

      posted in Gallery
      T
      Technohippy
    • RE: Steampunk Mobile Phone

      @unknownuser said:

      What else can I say? This is eye candy! Great concept, nice modelling, and excellent renders. IMO, the render with the ruler looks the most photo-realistic. It looks too imperfect for a render. ๐Ÿ˜ฎ Looking forward to seeing your next project. ๐Ÿ˜‰

      Hmmm. I know I've seen this somewhere before. ๐Ÿ˜• Perhaps the Kerkythea forums a few months back?

      Yep it was at the kt forums.

      thanks for your comments, my goal is realism, not perfection.

      posted in Gallery
      T
      Technohippy
    • 1
    • 2
    • 1 / 2