Congratulations professor!
Oops, your profile's looking a bit empty! To help us tailor your experience, please fill in key details like your SketchUp version, skill level, operating system, and more. Update and save your info on your profile page today!
🚨 Skimp | 25% Off until March 30 Buy Now
Posts
-
RE: My Works-WIP-
Thanks showmak!
Lyall, thank you for your kind words! Yes, I build the walls as well.A friend of mine, learn 3ds max and vray some time ago, and I watch with him some tutorials made by Christopher Nichols for gnomon workshop. This guy is a great artist, and his "love" in CG is global illumination. He said that, light in CG should be exactly like in real world. So, you need a sun, skylight from the windows, and other lights from the home appliances.
This is the "golden way", but I don't follow it exactly.I have rendered some interiors with studio setup settings, but you have to remove walls and the ceiling, and keep only what you will se in the render window. It has a great feel of depth, but not so great reflections.
Usually I use a combination of Mado settings and mine, but recently I used Teofas's visopt. witch seams to give me what I want( white walls). He find a great use of color mapping with some low burning values, witch don't allow to much color bleeding.
So, try to use Teofas visopt (I will upload for you some visopts, other that the ones you have already in vray). Make windows, and make the the sun to enter in your interior throw the windows via sketchup, then go in the vray options and uncheck the sun, push update button, then choose again default, push again update button( because if you not, you will get his shadows). Some times, I remove one wall behind the camera, but only for rotate and pan, and that's why, I usually make some other spaces near my room, and a bigger ceiling, because I don't want shadows and light from there. That should be enough, but sometimes, you need rectangular lights in windows, if not enough light it's coming from outside.
That should give you an idea about my work-flow. If you have other questions, don't be shy to ask
This is the link for visopts:
http://rapidshare.com/files/268307546/render_settings.rar.html
Good luck! -
RE: VRAY HELP
Could you please upload the scene, so we can have a better look? I don't need the hdri you used, because your settings will be saved anyway, and I cold use one of mine.
-
RE: Vray manual you can recommend
The black rectangle that you see, it's the back of the light. Try to rotate it. Or you can make it double-sided. About the multiplier, that depends basically of the physical camera. First disable it, make your scene to look right(illumination) and then, turn on physical camera, and start increasing the multiplier of the light, until you get the same effect. That should give you an idea about how much you have to push the multiplier when you have physical camera on.
Good luck! -
RE: VRAY HELP
After you select "bitmap" in the right side, under UVW section, you need to choose "environment" not "texture", and then, as mapping, choose "spherical" or "angular", but that depends of the hdri type that you have. Cold be spherical map or light-probe.
You could also upload the image(rendering) that you have, because I'm not sure what you are trying to do with the hdri. -
My Works-WIP-
Hello everyone!
I will post my works in this topic from now on. I only hope that it will grow like many of yours. Basically, I do furniture, especially kitchens, so.....you guys will see allot of these.
I don't render every project I do, and when I do it, I only try to "represent" the way furniture it will fit in the space, so not to much detail. I know that's the reason my renders look "dead".
All the work was done in sketchup and v-ray.
Regards,
Stefan


-
RE: VRAY HELP
If you don't use physical camera, put 1 to the multiplier. But if you use it, increase it ,like 100-1000-10000. But anyway, multiplier is your problem.
-
RE: Randomness
WOW! It's more and more obvious that you really are an artist. Respect!
-
RE: Sofa & Carpet texture test
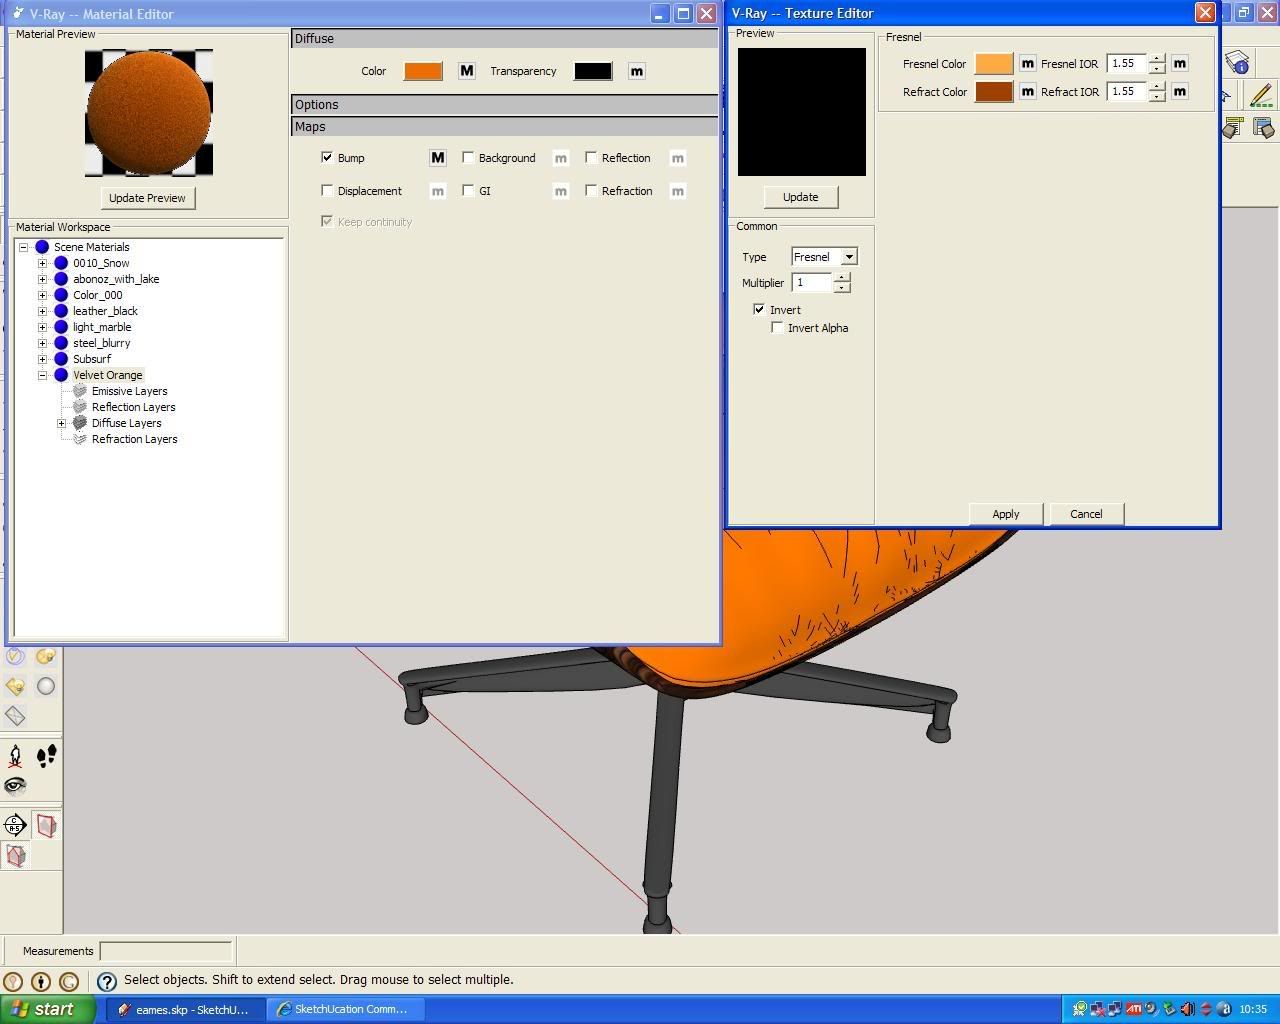
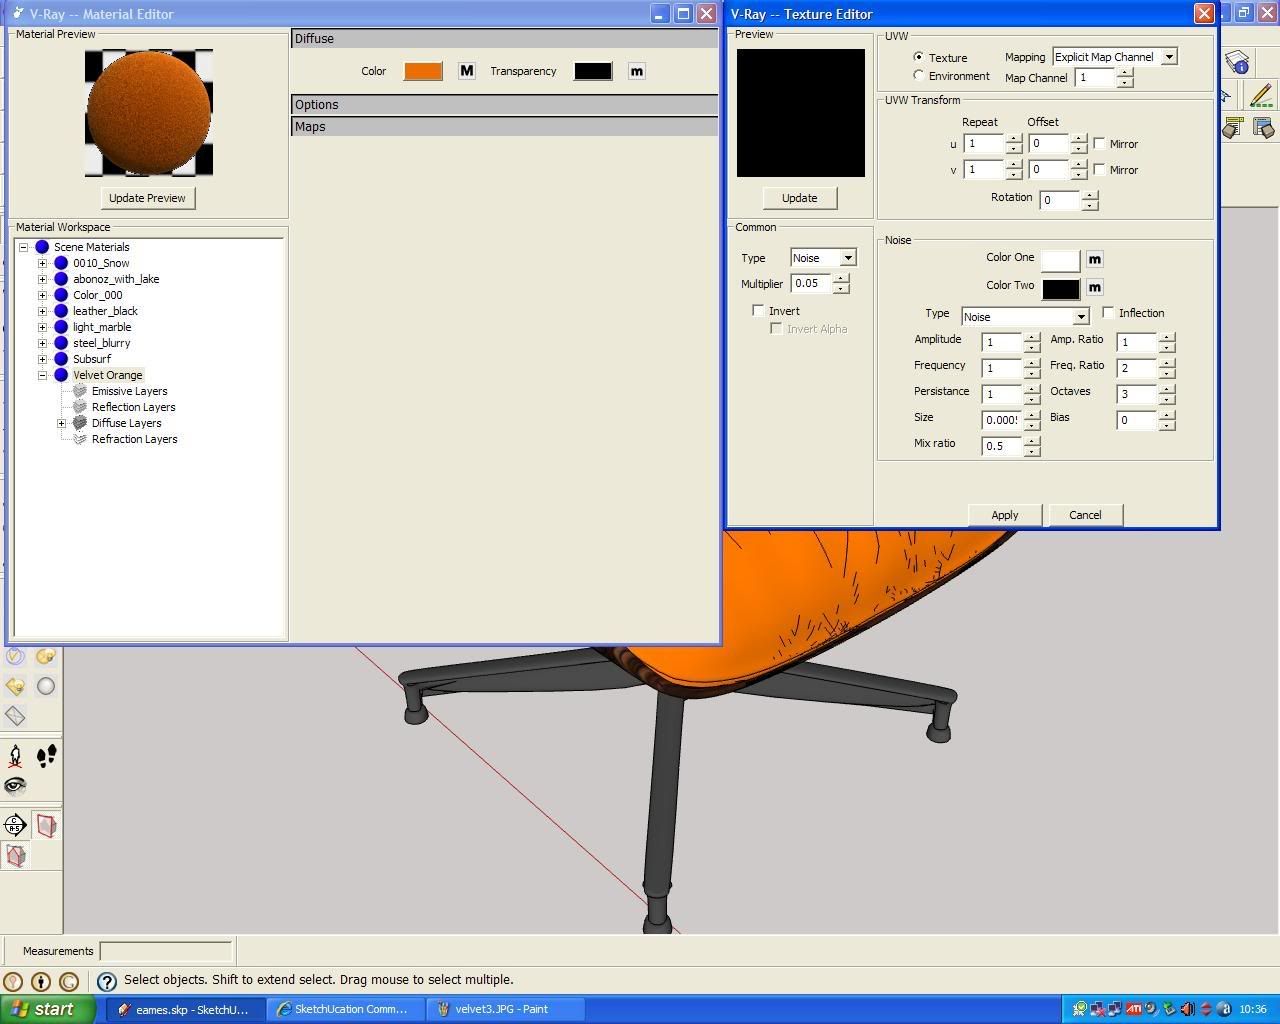
Actually, it is noise. Look at the last image, where you have the setup for the bump.
Nomer, that was my intention, to show Fred how make his velvet with first vray. -
RE: Sofa & Carpet texture test
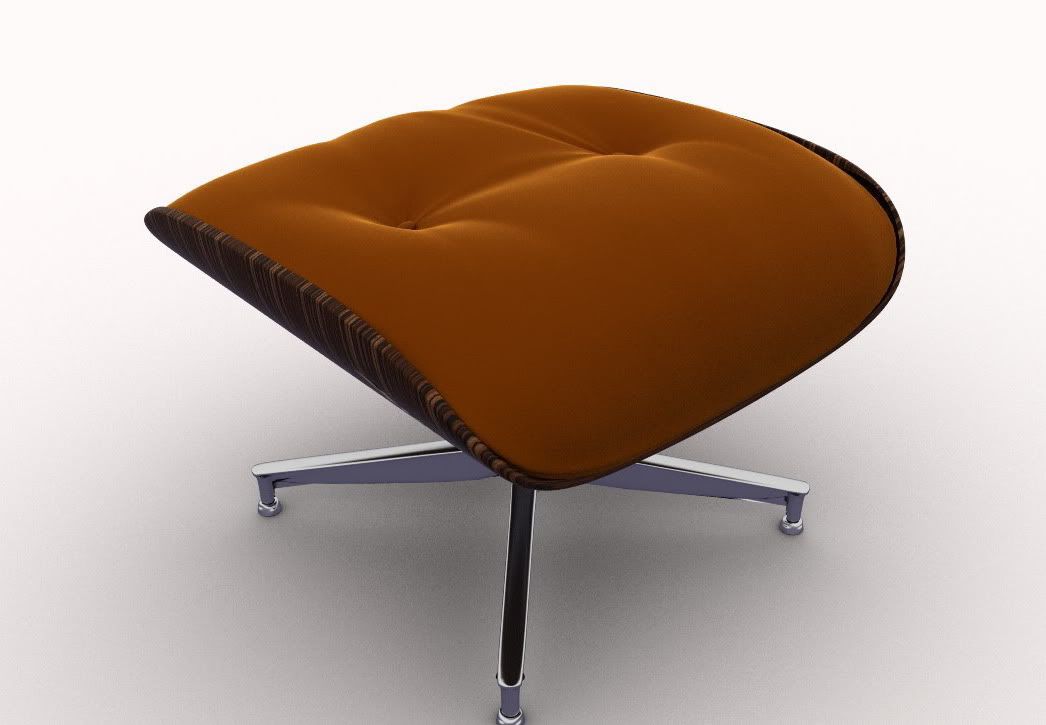
Fred, congratulations for this, it seams that you learn very quickly. In the last release of vray, you can find velvet material. But the bump effect it's not so great like yours. So, in the velvet material, there is just a diffuse with "fresnel" where actually two colors are combined. I just make some tests right now. I'll post a sample here, if you allow me.
Cheers!EDIT:
pic. 1: bump value 0.005
pic. 2: bump value 0.05
pic. 3: fresnel setup from diffuse chanel
pic. 4: the noise setup from bump chanel
-
RE: V-ray not rendering transluscent walls
try to reverse that face, it could be inverted
-
RE: I think I'm starting to get it.....
Great lighting, nice materials! Very good render, congrats!
-
RE: Simple scene
Daniel, thanks for coment....well, I think I'm frustrated because it seems that I can't make any progress, regarding the rendering, and I'm stuck with this kind of quality. I don't have the free time how I used to have.....should I blame my wife for that?

Cheers,
Stefan -
Simple scene
Just a quickie for a client. I'm not very happy with this, but well....
Regards,
Stefan

-
RE: Sloowwww render in v-ray
white dots= pixels with value beyond 255 (very very bright pixels)
solution: in "Color Mapping" check "Clamp Output" and "Sub-pixel"
Good luck! -
RE: Bush Lodge - Vray - updated
WOW!! This it's perfect, simply the best I've seen so far!
Congratulations!


