sketchucation logo sketchucation
    • Login
    1. Home
    2. bantymom
    ℹ️ Licensed Extensions | FredoBatch, ElevationProfile, FredoSketch, LayOps, MatSim and Pic2Shape will require license from Sept 1st More Info
    B
    Offline
    • Profile
    • Following 0
    • Followers 0
    • Topics 11
    • Posts 29
    • Groups 1

    bantymom

    @bantymom

    10
    Reputation
    1
    Profile views
    29
    Posts
    0
    Followers
    0
    Following
    Joined
    Last Online

    bantymom Unfollow Follow
    registered-users

    Latest posts made by bantymom

    • RE: Layers Are Disappearing (Falling off?)

      Just to put a fork into this and call it done (and to help others who might read this), it seems I must have somehow deleted the objects in those layers and then they disappeared when I cleaned up last time. I don't recall doing it, and I thought I was being careful, but I shall just have to be more careful!

      As to why I am using so many layers, it is so I can try out each different moulding in its place on each wall, switching them back and forth to see the difference. That means that there are 3 layers (for the 3 different walls other than the bath area) for each crown design, each chair rail design, each base design, and each casing design. Additionally, I put each piece of furniture on its own layer.

      I love layers.

      I am sure the overall size of my model is so large because there is a small half-spheres used for each bead on the mouldings. That's a ton of edges and faces. In my defense, I am still a beginner and am still learning the basic.

      Thank you again, Dave, for taking the time to help me.

      leaves brownies

      Cheers,
      Bantymom

      posted in Newbie Forum
      B
      bantymom
    • RE: Layers Are Disappearing (Falling off?)

      Thank you for coming to my rescue!

      I tried to post my model with my original post, I know how important it is, but it was too big.

      I don't think I purged them accidentally, though anything is possible. The "missing" layers are suspiciously all at the bottom of the list and deal with the shower and tub area, which I haven't messed with for a while now.

      I found the Model Statistics and see that I have 88 layers, which is the number I can see in the list. (I was so hoping that would lend some answer to the mystery.)

      I am trying now to send my model by PM.

      Edit: Ah, yes, still too large....
      "The attachment’s file size is too large, the maximum upload size is 4 MB.
      Please note this is set in php.ini and cannot be overridden."

      I had done a clean-up in preparation to trying to post it (after the layers were discovered missing) so I don't know if I can make it any smaller and still leave everything there for you to look at. I will be happy to send it to another address if that helps.

      posted in Newbie Forum
      B
      bantymom
    • Layers Are Disappearing (Falling off?)

      (I'm sorry if this eventually shows up twice. I sent it once and it didn't show up, so I've sent it again. If it shows up twice, I would like to ask the moderators to kindly remove the other one.)

      Greetings all,

      I am fussing about with the moulding in a bathroom. Each wall of the bathroom, and each moulding trial on each wall is on its own layer. I was just beginning to feel very confident when working with layers (even thought to name in such a way to make them easy to find), but all of a sudden, some are missing.

      It isn't that when I select a layer to turn on that it isn't showing up in the model, what I mean is that the layer is no longer even showing up in the list of layers!

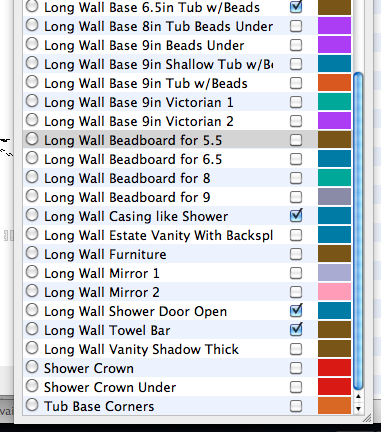
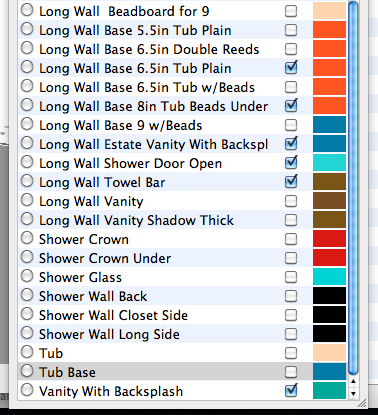
      In the model I am working on, there was an entire section for the shower walls, the tub, and the moulding at the base of the tub. They are almost all missing. Only the layers labeled Shower Crown, Shower Under Crown, and Tub Corners remain. Shower Glass, Shower Wall Back, Shower Wall Closet Side, Shower Wall Long Side, Tub, Tub Base, and possibly others are all gone.

      These missing layers were all at the bottom of the list. It's as though they just dropped off. Is there a limit??? I did a search and the only thing I found was a reply that said you could have 500 layers, and I am no where close to that.

      I have attached two screenshots. The first is of the layer list from the model I am currently working on. The second is of the layer list from the older model that I abandoned that still has the missing layers for comparison. I know the models themselves would be more useful, but they are 8mb each and so exceed what I believe is a 2mg limit for attachments.

      Screen Shot of the Layer List that is missing layers from the bottom Screen Shot of the Layer List from the older Model that still has the missing Layers.

      I suppose I could save this model as another version and delete layers I am not currently working on, say, the shower area and the closet wall, but that is a work-around, and I would really rather know what I am doing wrong.

      I would appreciate any help.

      Thank you very much,
      Bantymom

      posted in Newbie Forum sketchup
      B
      bantymom
    • RE: [Plugin] TECLA 0.1

      @chrisjk said:

      This sounds very interesting but I use a Mac.. - looking forward to the OS X version!

      I, too, think this sounds interesting, but I, too, use a Mac and am looking forward to the OS X version, or did I miss it? If I have, please just point me in the right direction. 😄

      posted in Plugins
      B
      bantymom
    • RE: Extremely Newbie Question

      Thank you again for the time you are taking to help me. Things are slowly coming along.

      Some responses:
      The individual tiles are no longer part of the current version of the model. I did that when I was working on the layout of the tile, but that is finished now. I took pictures of the finished tub and shower surround and used the one for the front of the tub on the model (plus just the bottom row of tile as one long piece with no grout lines as I want to be sure things work out with the base moulding) so I can see how my choices for moulding go with it, but otherwise the walls of the surround are now blank, though the thickness of the mud bed and the tile is accounted for.

      You should also know that my rendering skill is about as unadvanced as my SU skills (I have the free version of Podium). I didn't plan to make an official render of my bathroom, but your comments have made me consider it and have given me things to keep in mind. I am sure there will be more questions from me if I decide to try.

      I'm afraid I can't open the attached example of the "Face Me" component because I still have SU v.7 (I don't want to dl the new one in the middle of this. I am slow enough and I want to keep working with what is familiar to me). I have cut away all the backs and tops of the beads that go up against the moulding, so I hope that helps. As soon as I finish this post, however, I will go find information about it in a video. 😄

      I must seem a very poor student, slow in learning. Thank you again for all your patience and the time everyone has taken and continues to take to explain things so clearly too me. I must tell you that being able to do that is a skill in and of itself that is very rare to find among people who are already good at at the thing they are trying to explain. Not everyone can teach, but here I find there are many who can.

      And, yes, there are more brownies! Some with walnuts and some without.

      The attached file is of the three versions of the beaded moulding:

      24 is the original, not cleaned up
      8 is the first one I did, cleaned up, backs, tops, and sides removed, made into components.
      12 is the second one I did, cleaned up, backs, tops, and sides removed, made into components.

      Above the 24 is another moulding that I went back and redid, reducing all the curves and arcs to fewer segments. I now have only the chair rail and base moulding to do now.


      Moulding Masters - Latest.skp

      posted in Newbie Forum
      B
      bantymom
    • RE: Extremely Newbie Question

      Thank you everyone for your patience.

      After reading TIG's response, I went back and followed the directions and came up with what I think Alan Fraiser came up with. The original sphere said "24" in the dimensional window, which fits with the 12 for the half that TIG said. I missed that part that he had been speaking of half of the sphere, and so entered 6 in the box and got something that didn't look much like a sphere. I did it again with 8 and ended up with a passable sphere that when put together looked like Alan Fraiser's example. (I'm still using SU7, so I couldn't check that yet, and I'm not ready to go to a new version of SU in the middle of this project.) Then I reread TIG's response and did it with 6 for the half, or 12 in the box, and that looks very much like a sphere.

      With both revisions, I did the intersections and trimmed away all the extra bits, then also intersected 3 of the beads and trimmed away the place where they overlapped as well. I think the 8 (4 for the half) will be sufficient. 😄

      I missed the part about making my final result into a component, so I will go back to do that, but I will have to remember to make the bead that will be sliced by my corner slicer (yea! I actually understood that part!) a different component before I trim it away, or won't it trim all of them?

      (I love my corner slicer)

      I also went back and changed the little coved part from a 12-sided arch to a 6-sided arch, and I've been softening up everything.

      As to why I want to put all the little beads into it in the first place, I know it seems very silly and that I am putting in so much more work than necessary, I just feel more comfortable with it that way right now. This is my second project ever, and I am not used to how things turn out in the end yet. You guys are soooo good at this, and have had a lot of experience, and know just how much detail is needed. I'm not quite there yet. I need to make things hard first and then back off of them. Thank you for trying to help and get me there sooner, and thank you for being patient with me.

      And I actually have put in many of the little details (hinges, tracks for the shower doors, floor tiles, etc.) as I have gone along because it helps me work through the process of how everything goes together. For example, when I did the shower tile, I put in every single one and accounted for the grout lines. Now that the tile is in, I have removed all that detail from the current model, but know for certain sure what the facsimile means that I put in its place. But it was very useful for me when it did it to see what kind of situations might arise before the tile guys got there, so I knew what I wanted for sure.

      I also was able to print out many many views of the tile work (there were many different components) and tape them up to the walls for the tile guys to use. I want to be sure there were no misunderstandings as they worked. I was able to go over each one ahead of time and make the very few adjustments then, before they began mixing things, and they really liked being able to refer to the diagrams as they went. I was very pleased with how the tile came out.

      Once I see that the beads are going to give the effect I am hoping for, then I can use something more vague if I want to, or I can leave them in and use close-up views for reference if needed.

      Big Smile

      So now I'm off to tweak my moulding and change the beads into components. Should each one be a component? or should I do them in groups of three or so?
      posted in Newbie Forum
      B
      bantymom
    • Extremely Newbie Question

      I'm afraid this is not at the level of other newbie questions, but I'm still very much a beginner.

      I am working on designing the moulding for my bathroom and I've gotten to the point where I really need to "see" it in place, so I turned to SketchUp.

      The moulding has beading on it, which I managed to make, spacing it out evenly with just a bit of overlap to look like the real thing. Problem now is that all my hundreds (perhaps a thousand when I am done with it) of tiny spheres will all their faces and edges, are bogging things down. I considered just making a long round part to just stand for all the beads, but determined that I really needed to see the effect of the beading.

      I used the Draw Sphere thing to make the first bead. Is there a way to make more "efficient" beads? If I make it with fewer faces, will the hole at the poles be larger? Or is there a way to compress all the information once I make each row of moulding?

      I am attaching the .skp file. I hope I do it correctly.

      Thank you very much for your time and help. sets out brownies as a bribe


      Moulding Example for SketchUcation.skp

      posted in Newbie Forum sketchup
      B
      bantymom
    • RE: Paintbucket tool stuck?

      Yes! That was it! The brick! Thank you so very much!

      posted in Newbie Forum
      B
      bantymom
    • Paintbucket tool stuck?

      I wanted to make a new color, so I clicked on the color picker at the top, got my color, but now I can't seem to make it go back to the way it is supposed to look with all the boxes of colors.

      posted in Newbie Forum sketchup
      B
      bantymom
    • Simplifying Model and Reducing Filesize

      I recently found the Kohler bathroom models on the 3D warehouse and the actual toilet we are putting into the bathroom. After downloading it, however, I discovered it is 2.4 mg! I would like to know if there is a way to simplify the geometry without losing too much of the detail. I know now, for example, that when modeling, I can reduce the number of segments in the arc tool and save myself some space, but I really don't want to remodel the whole thing. That's why I went to the warehouse.

      Any suggestions?


      Kohler Toilet 3D warehouse.skp

      posted in Newbie Forum sketchup
      B
      bantymom