Yeah - I'm with you on that one. Clients, eh??...... 
A.
Nicely done. Well-proportioned model, just enough detail  - look forward to seeing the final result of your efforts
A.
Thanks All.
Attached one more piece - can't show much more, as I'm working under a load of NDA's at the moment 

This one was produced in a similar manner. The front end of the vehicle was taken from an existing 3dwarehouse model, the rest was done from scratch. Half the sky was taken from a photo, extended with hand-painting.
cheers,
A.
OK, ok I'll try and be a bit more helpful 
This was all painted with one brush (except for the blue glow at the centre). It's a standard round brush, with a roundness of 60% and an opacity of 50%, with the stroke width and opacity determind by the pen pressure. Keeping the opacity down around the 50% mark means that you can gradually build up colour in smoother transitions. And reducing the roundness of the brush just makes the strokes a bit more natural. Then using the eyedropper to sample the colours in the graduated areas allows you to paint with these intermediate tones as well. The blue glow was created on a new layer: a rectangular selection with heavily feathered edges, filled with blue colour, with the layer mode set to 'screen'.
This scene has two light sources: the centre blue light, and the 'sun'. The sun direction and shadows were provided by the SketchUp output, and I just eyeballed the blue lighting.
This was all done with the most basic Wacom Bamboo tablet.
Hope this helps a little?
A.
Thanks modelhead. I'd love to give a step-by-step. Trouble is it would be more of a lesson in how-not-to-do-it  It's a fairly organic, chaotic process. I tend to constantly swich from working on small details, to large areas, allowing the painting to sort of evolve as I go along. I usually paint entirely on one layer in Photoshop - which is really, really bad practice - but having to switch between, and keep track of layers really seems interupts the painting process
  As the painting nears completion, I usually add a couple of adjustment layers, to allow fine-tuning of the colour values. Occasionally I'll overlay a few bits of photo reference - but just to add some noise and texture to the image, not actual detail. Other than that, I just keeping painting until it looks sort of finished. They are never really finished, but sometimes you need to just walk away.
This one was painted without any reference. As this project progresses I'll probably work to some reference material, just to add to the general detail / believability level.
Sorry, just re-read those ramblings, and they were probably no help at all
Andy
Thanks Solo - much appreciated. Mouse for the SU work, and a tablet for all the Photoshop stuff. Never use a mouse for PS anymore, even for stuff which doesn't technically require a tablet. Feels so much more natural, and as a result is a lot faster.
cheers,
Andy.
Thanks Oli. Took about 6 hours start-to-finish.
A.
Hi All.
Been absent for a while, but thought I ought to share something. So, attached a quick painting from a project I'm currently involved with.
First off, the SU model. Looks quite detailed, but is really just a few modular blocks copied, arrayed, and messed about with.

And here's the painted-over version. All painting done in Photoshop, over single-colour shaded Sketchup render (shadows on, lines hidden).

And finally a small detail at full-res (the actual image is 4096 pixels wide)
showing the exent to which the SU output has been over-painted.

Thanks for looking;)
Andy
Rob - that is a massive help to me -thanks so much.
Genuinely grateful - you've got me out of a real hole. 
cheers,
Andy.
Hi Guys - help please! Found myself out-of-my-depth (AGAIN!!) I need to draw up a steel frame for a platform. It will be constructed from 254mm x 146mm section RSJ's, supported on 100mm square section steel uprights. What is the (non-permanent) standard way of connecting RSJ's to form corner- and T-joints?? This is a temporary structure which needs to be built and de-rigged quickly, so I'm assuming some type of bolt fixing? Does anyone have a picture/sketch of the right way to do this??
As ever, all help gratefully received
A.
Nice bit of well-deserved exposure for you Alex
Great images. Really nice quality of light in the second one.
cheers,
Andy.
Coen: first step: Using a layer mask in PS, I created a layer with just the buildings visible. Then on the original layer below, I painted out the buildings, by cloning areas from the original sky, and hand-painting where necessary. This gives you a layer of buildings, sat in front of an un-broken sky. This then means that as you hack away at the buildings, you reveal the sky behind. The building layer, in addition to all the damage which was a mixture of photo-reference and hand-painting, was 'dirtied-up' by adding a new layer in 'overlay' mode which was a mixture of black-and-white photos of rust, cracked concrete etc. This adds some random noise to the image (and helps to hide the joins between the original photo and the additions.
A.
Been a while since my last one, so here's some recent work. This was a quick test piece for a client to demonstrate how a scene could look - so there are a lot of rough edges (don't look TOO closely!! ) Mainly a Photoshop job, but I decided to add an additional building on the right to balance up the composition, and stop the viewer's eye from drifting out of the image. This was done in Sketchup. Very crude model, with some semi-decent textures.
Anyhow, here's the original plate: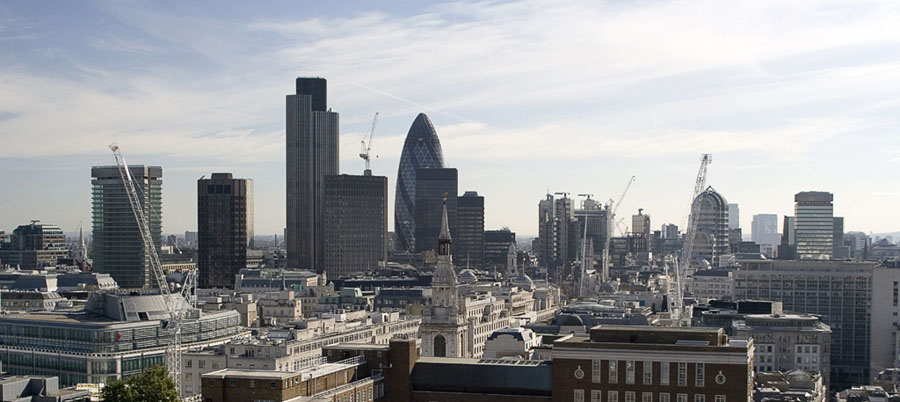
And here's my re-worked version: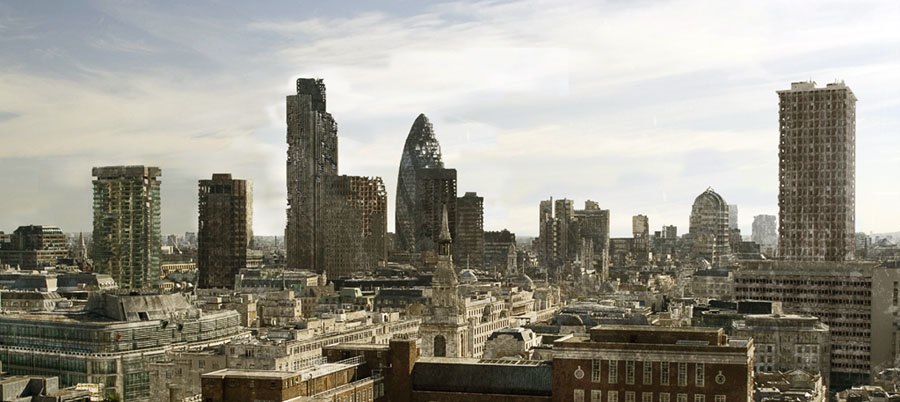
Thanks for looking,
A.
Allan: the painted elements are nice. However, to my eye, the people and foliage now look very cut-out. I'd suggest painting these elements as well (you can use the entourage as a guide, sample the colours from them, and paint over the top). I'd also reduce the opacity of your brushes a touch. This would enable you to build up the colour in layers, so adding a bit more depth to the work. A final point - all your brush strokes look a similar size. If you were painting for 'real' you'd start by laying up broad washes and areas of colour, befroe gradually working in the detail with increasingly small brushes.
Nice start though.
hope this helps.
A.
Ah, what the hell, I'll lift the lid on Pandora's box a little wider...
Smokin: can I ask why for free? Given what you say, you seem to have some experience. Patent drawings are quite a specialised field, and I'm sure people would be prepared to pay for them...?
A.
Dummyer / Bagar - really sweet design and model. Personally, I'd like to see it in a more dynamic pose, and with some really weathered, battle-damaged textures. (but perhaps that's just me). Some really interesting textures could actually save you needing to go into insane detail with the modelling. Either way, I think you've got the makings of something really special, and I look forward to seeing where you take it
Andy.
You could try GimpShop - its the Gimp, but with a more photoshop-like interface
A
Hi Bob. The towers are tied back to other structures, but not in a way that would counteract the (non-existent!) sideways forces.
Once again guys, thanks for taking the trouble to respond to this. Think we're all sorted now
A.
Great stuff. Love the camera work. Reminds me of Tim Burton's camera moves - and that IS a compliment. Really slick presentation that works to sell your concept, and is absolutely appropriate to the subject matter. Nice one
A.
Hi Guys. Really appreciate the quality and depth of your responses. A little more detail if it helps: This is for a trade-show stand. The arch is constucted from from two MDF profiles, skinned with plywood to form a box-section. The supporting pillars are aluminium framed structures. The tops of the pillar frames contain an mdf plate, to which the arch-ends are screwed. Originally the arch was to have been a full semi-circle, but a restriction on-site prevents this. So the plan now is to build as per my earlier drawing. The concern is whether this non-semi-circular arch will apply a spreading-load to the pillars (which cannot be secured to the floor). Ultimately, we'll build this in our workshop to assess it before installing on-site. I'm just keen to understand the forces at work here!
EDIT: TIG you replied as I was typing. The arc is wholly rigid, so would, as you say, function like a beam. What you wrote makes a lot of sense. Thank you.
A.