[Tutorial > Modeling] How a Pro Builds a House in SU pt 2
-
How a Pro Builds a House in Sketchup Part 2
Continuing from Part 1 http://sketchucation.com/forums/viewtopic.php?t=723&p=4194
Continued in Part 3 http://sketchucation.com/forums/viewtopic.php?f=18&t=723hello fellow sketchupers... last week we left off with...
"step 11
repeat this process for your foundation, your first level and your second level and third...
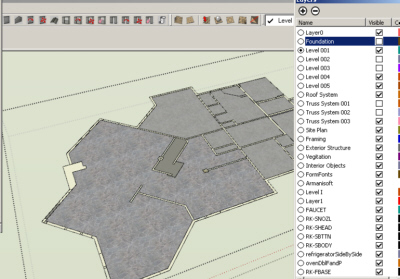
next time we'll create components from each of the layers and show how to work on your house while looking at it too..."since we last spoke, you should have traced each of the floor plans on your house and cut out the doors and windows.now you should have your floor plans on separate layers. "Level 001" and so on.

before we begin
let me stress the importance of a "Tidy Drawing"... Layers, Groups & Components... make sure to use them often and make sure to not to rely on the Hide command very much. Hide should be used to hide geometry lines, not things you are not working on. having everything on controllable layers and groups will allow you more control later when the model becomes larger and harder to deal with. the ability to work on specific areas will make your life much easier and make exporting your drawings much easier later on down the road. so when you build something, check it's layer and get into the habit. when you group something, go back and name that group in the group list window. this will allow us to view as much or as little of our plan at any given time, while leaving them connected, although you might find it easier to not only make Level 001 Layer but also a Level 001 Group so that you can move it around with out destroying vector lines. that's your chastisement for the day....
a word about detail. from this point on you need to decide your detail level, from here you could start building the rough framing for your house and putting it on a separate layer... if you go this far and even farther by setting a value for material you can use your model for very accurate take offs. I use it regularly for concrete volumes and roof square counts and tile counts and so on. for this example we are just going to build the wall shell for visual walk through.... now on to the lesson.
Step 1.
turn off all layers Except the Level 001.
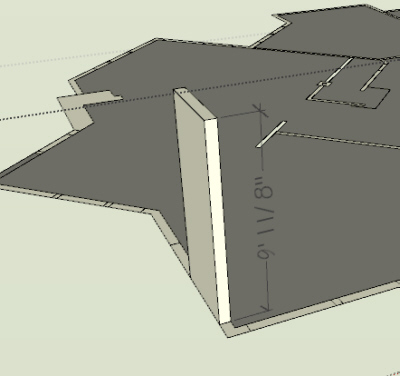
Step 2.
extrude, or push/pull all of the walls up 8' 1-1/8" or 9'1-1/8" or so on for what ever top plate line you intend.
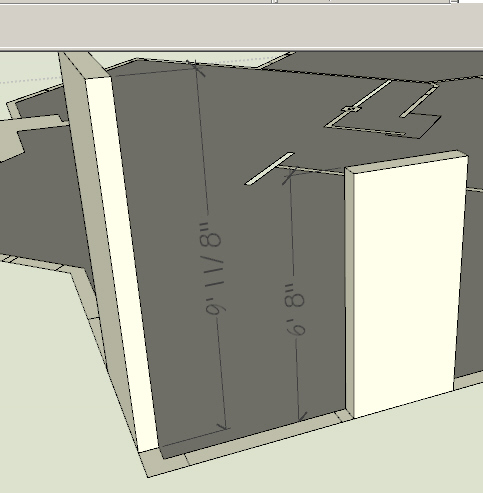
Step 3.
now extrude each door and window section up the blue axis 6' 8". this will be our door or window opening.
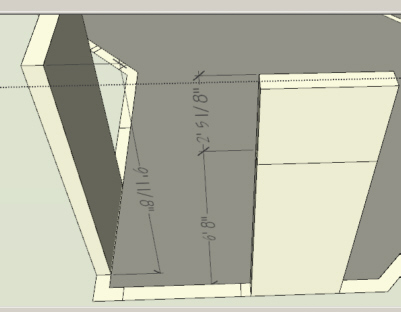
Step 4.
now extrude a new face up again to the top of the plate line. if you chose 9' 1-1/8" plate line, then it would be 2' 5-1/8" this will leave you a header area, and now is the time to think about transoms.
Step 5.
now is the fun part. time to find or preferably build some door and window components. search the internet for real door companies like Pella, Anderson or in my case for this project Peachtree http://www.peachtreedoor.com/products/windows_casement_500.asp. now click on the lower right-hand corner where it says size chart. here you will chose a style and size. use the numbers at the top and side to build your components and also to name them, that way later they will be easy to use again. if you're lazy or just want to be like us kool people you can purchase components from places like http://www.FormFonts.com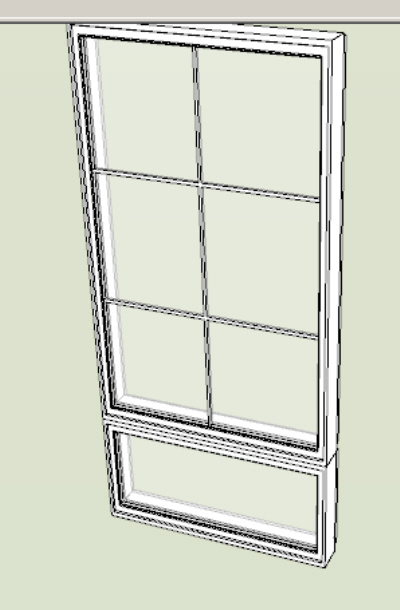
Step 6.
insert your windows and doors at the appropriate level. make sure they are all on our current Level 001. make sure that while you are inserting the doors and windows, that you don't delete the side lines from top plate to bottom. this will be needed for the floor plan sections we will export later.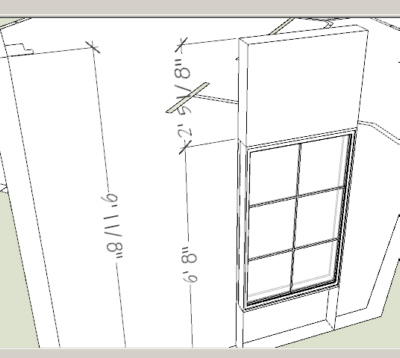
Step 7.
Repeat Step 3, 4 & 6 on your other levels. be sure to assign them to their respective layers and groups.
Step 8.
restrain yourself from adding textures and furniture just yet. texturing and furniture layout should be seen as a reward to your for your hard work on the model, and leaving it until later will allow us to make changes to the structure if a problem should arise in our layout, with out redoing texture and furniture. only use it early if you need it for sizing rooms.Step 9.
we should be starting to see a recognizable structure now.... let's go around and offset corners and exterior walls 4" or 6" for stone facades... also we can do our columns and other exterior attachments. again, layer these accordingly.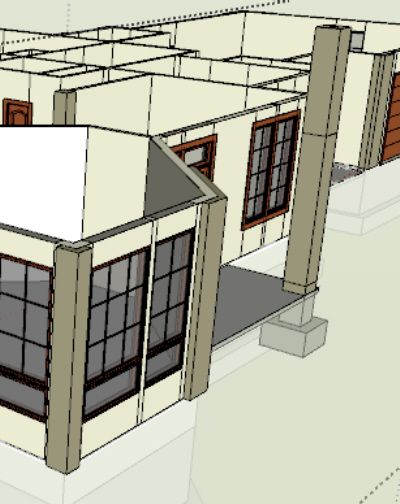
Step 10
now for the crème de la crème.
if you are building multiple copies of one structure or just want to watch your design as it is built. save each of your levels as components and then make copies of each level and stack them in order over in a "Viewing Area" in your model. and put it on a layer named "Whole House" now after you do this, you'll be able to work on each level independently and watch the changes over all on the whole house model....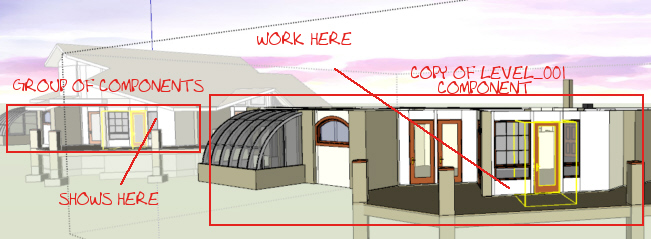
next time we'll add a foundation and a roof....
I'll add some screenies tomorrow...
-
Hi from India,
I am building a new home, we have finalized the floor layout, and construction of foundation already started. I am a bit stuck on the exterior/elevation, like how it should look like.. and if i do that how it will look like in real world...
I have used sketchup before to layout cubicles at my office. Before, our 1000 square feet room just occupied 21 seats, and after giving my sketchup layout, it was restructured into a room which occupies 44 seats with lot of living space for each seat. Every one loved Sketchup!
But, I am not confident about using sketchup to do the elevation of my house. Because, i learned sketchup using trial-and-error method, which is time consuming. And i lack the basics of drawings. I always used to get confused about where my line is getting drawn, is it in x axis/yaxis/z axis... and i still dont know how to draw a line is a particular axis... i click here, i click there, then draw and will check where it came up, if its not in right direction, i will delete it and will try again... and it suX(could some help me out of this?).
I was googling around 'how to draw house in sketchup' and then i got this post(few minutes back), and i am happy. I think this is what I was looking for. I used to resize my floor layout given by my architect to mark dimensions of each room and stuffs... but I had no idea how to do that in the 'right way'.
I am 'closely' following ur article, so that i can do things in the 'right way'. Thanks for finding time to write this article, and thus helping poor souls like me...
While waiting for those screen shots which you promised... I am going to start plotting my house from 'Step 1'.
Wish me good luck
thanks
Vijoy~(thedifferenz)
-
hi kris,
this tutorial is a great input for most people, I am sure. thanks a lot for your generosity.
-
thedifferenz,
how your structure will look in the real world, to be as real as possible... use real world materials. and I mean componenets really. if you are going to build a wall, don't just draw a face and pull it up, create 2x4's 2x6's 4'x8' plywood and sheet rock, and then manipulate those comonents over and over, using the "make unique" command on the context menu. put these together to create your wall and then you will know exactly what the framer in the field will run up against.
"But, I am not confident about using sketchup to do the elevation of my house. Because, i learned sketchup using trial-and-error method, which is time consuming. And i lack the basics of drawings. I always used to get confused about where my line is getting drawn, is it in x axis/yaxis/z axis... and i still dont know how to draw a line is a particular axis... i click here, i click there, then draw and will check where it came up, if its not in right direction, i will delete it and will try again... and it suX(could some help me out of this?)."
this should be solved with the color of the axis in sketchup.

I've posted those screen shots... and I invite everyone to add their WIP (Work In Progress) pictures to this thread... and feel free to ask questions...
emahfuz,
thanks for the kind words... I have a design you might like called Paixao...
I mainly did this thread for the exact reason of thedifferenz, he found this page via Google already and I just made it a few days ago... that is shooting the rank of this site up... and getting new visitors... the more helpful posts, the more folks we get...
-
Kris,
Very interesting and very useful. I'll try soon.
Thanks a lot
-
kris,
let me know where to find Paixao...
-
-
thanks, shawn.
it is a curious name for a design as it means passion in portuguese. it can also be a fairly common surname.
regards.
-
thanks Shaun for posting the link... my lil SU Groupie...

emahfuz, yes Passion... is the name, I knew being Brazilian you would notice...
-
kris,
Your tuts are good:You have heard the thing about give a man a fish, feed him for a day, teach him to fish.... judging from the muscle in your template I think you could write a great tut on template building that would power the lessons in push/pull walls and roofs even faster and farther. Keep up the good work! thanks! -
I am eagerly waiting for part 3.
edson
-
Fantastic tutorial!!!
I've learned a lot of things!!!!
Thanks for sharing you knowlegde!!!
Rick
(Tegman)
-
The tutorial is very good - I'm just a beginner.
Wondering where we find Part 1?
Thanks!
(norske)
-
@unknownuser said:
The tutorial is very good - I'm just a beginner.
Wondering where we find Part 1?
here ya go...
-
Greetings all, my 1st post on these new forums. Well done to Coen setting this place up; a far superior environment and interface than the new google groups in my opinion.
Anyway back on topic. I've read through this how-to and felt that I should add my own thoughts on the advice given in a constructive manner that will hopefully provide some of the newer modellers with an alternate method of construction.
My main disagreement with the workflow provided is the procedure of the wall construction. There was good advice given regarding the tidyness of our drawings however I feel that one of the most important area of modelling/CAD housekeeping is to not create faces and edges that aren't required. If you follow the procedure of push-pulling rectangles to form the external walls in a series of panels as shown, you end up with 4 lines and 1 face between each panel junction that simply aren't required (note: only on panels which run parallel!). This method of modelling is akin to building blocks whereas my personal preference is to somewhat different.
Stage 1
My advice would be to trace the outline of the external wall to form a shape and offset the wall thickness inwards. This will leave you with 2 shapes (1 for the thickness of the external wall and another for the internal void) Of course the internal line of the external wall may have areas where it differs from the plane of the external but the line tool and eraser can quickly tidy this up as required.Stage 2
With the correct shapes now drawn, a simple push pull of the external wall face to the necessary height will extrude our entire wall in one operation instead of several and we will have the minimum amount of faces required. The top and bottom faces of the wall extrusion can also be deleted as they won't normally be seen unless in section. Internal walls follow the same procedure of tracing the outline to form one face and extrude as before.Stage 3
Window and door openings. My preference is to make components of these and I would locate the insertion point at the top center of the component. Once made I would create a guideline at 2.1m (sorry, child of the metric age here!) above internal finished floor level and place my door or window on this. A simple horizontal move will finish the required location of the component.Previously I would create components that would cut the external wall face however now I tend not to. As SketchUp is a suface and not a solids modeller my components wouldn't cut the internal face of the wall. to solve this I now draw a rectangle on the external wall face, tracing the opening of the already placed window/door. Push-pulling this new face inwards the depth of the wall thickness (either type the distance or switch to wireframe and snap to an internal face edge). This makes the soffit and jamb faces (internally and externally) in a quick clean operation and should not require any data cleanup.
I hope it all makes sense and as I recognise a few names from the former sketchup forums I know you guy's (and gal's!) will probably be aware of the workflow already but perhaps some newcomers will benefit from it.
Time for a coffee...
(DzineTech)
-
there is a method to my madness...
the reason I want those extra faces... it prepare for autocad and drafting a house's construction documents. if this were just a 3D model I would agree... but it's for a pro to make a real house out of.... so we need to be able to cut sections at any poin where a window is and see the mullions...
thanks for you advice though.
-
Sorry, but I don't understand what you mean by requiring the extra faces for autocad; perhaps you can explain or illustrate with a screenshot?
@unknownuser said:
but it's for a pro to make a real house out of.... so we need to be able to cut sections at any poin where a window is and see the mullions...
I assume when you mean pro you mean that you will produce construction drawings based on the model and these will be issued to a professional kit manufacturer (timber frame/metal frame) or to a contractor for his brick layers. Your requirement to see the window components (head, cill, transom, mullions, jambs etc..) works exactly the same for section cuts in my workflow as yours does; the important factor being that the window component would need to be detailed enough to reveal enough information wherever the section planes are located.
(DzineTech)
-
Kris, this is probably the most germaine and most required tutorial for SketchUp. So good of you to go to such detail to do this. Great job.
-
yes I need to buckle down and get part 3 done... the home is complete...
here are some screenshots
http://www.aboveallhouseplans.com/Clients/Wilson/Wilson_Forrest.htm
there are a few problems with it, but I never really complete anything... I'm always off to the next project
-
DzineTech,
yes you are correct in your assumption, however if you were to cut a section above the window, most people have removed those faces, and thus the window only shows up if you cut the section directly through the area in which the window is located.
so we may both be right...
DzineTech points out that it is the proper way to model, to remove any faces which are not seen or used. which I agree with.
and as he or she points out, you can model the house and make construction docs from it using his method, if the all the windows and openings are at the same level, through out the home. however if some windows or openings are above others with in the same floor or plane, then you will not see them when you do a section cut at the nominal level.
am I being clear? I'm trying, I'll make some screenshots later like DzineTech suggested. and I'll try to get part three done.
Hello! It looks like you're interested in this conversation, but you don't have an account yet.
Getting fed up of having to scroll through the same posts each visit? When you register for an account, you'll always come back to exactly where you were before, and choose to be notified of new replies (either via email, or push notification). You'll also be able to save bookmarks and upvote posts to show your appreciation to other community members.
With your input, this post could be even better 💗
Register Login


Advertisement