sketchucation logo sketchucation
    • 登入
    Oops, your profile's looking a bit empty! To help us tailor your experience, please fill in key details like your SketchUp version, skill level, operating system, and more. Update and save your info on your profile page today!
    🔌 Smart Spline | Fluid way to handle splines for furniture design and complex structures. Download

    [Plugin][$] VisuHole - v1.5a - 01 Apr 24

    已排程 已置頂 已鎖定 已移動 Plugins
    103 貼文 39 Posters 127.4k 瀏覽 39 Watching
    正在載入更多貼文
    • 從舊到新
    • 從新到舊
    • 最多點贊
    回覆
    • 在新貼文中回覆
    登入後回覆
    此主題已被刪除。只有擁有主題管理權限的使用者可以查看。
    • fredo6F 離線
      fredo6
      最後由 fredo6 編輯

      The information on VisuHole is maintained on the Plugin Home Page of VisuHole. This is also where you can download the RBZ file.

      726bb806-62dd-49d3-a9ae-1a5da01ff284-Requirements.png

      • LibFredo6: v14.3b or above

      • Sketchucation ExtensionStore: v4.4.0 or above (for licensing)

      • Sketchup version: SU2017 and above

      • Platform: Windows and Mac OSX

      • Usage: Licensed under Sketchucation SCFLicense

      • Free Trial period (full features): 30 days from first usage

      • Perpetual license (3 seats): $15

      • Part of Fredo6Bundle2022 license (8 plugins): $50

      To purchase the license of VisuHole or the Bundle of 8 plugins, go to this page and sign in.

      76a6c5e4-20a8-4897-9c1a-27f281ecc5b5-Overview.png

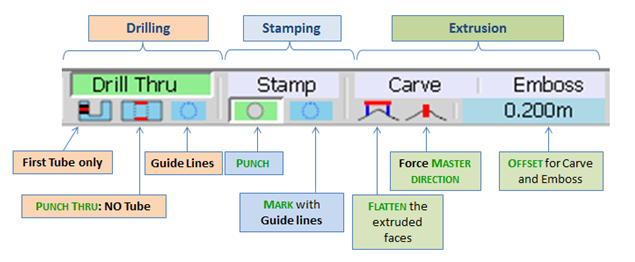
      VisuHole VisuHole is a suite of interactive tools dedicated to holes and extrusions on planar and curved surfaces. In the current version, VisuHole supports the following tools:

      VisuHole - Tools.png

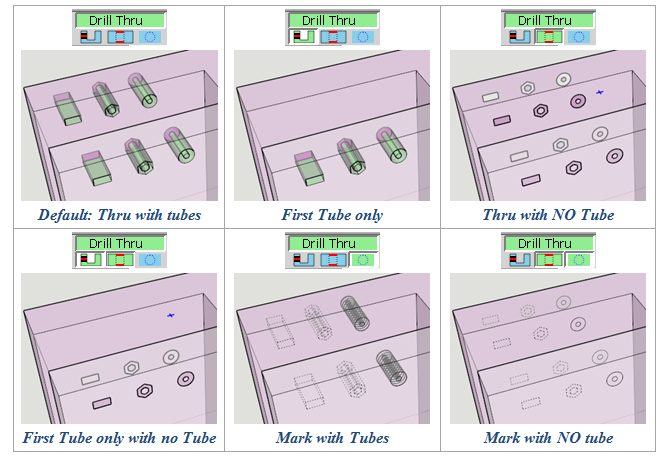
      VisuHole can drill through one or several surfaces, including when embedded in groups or components. The scope of the selection can be specified implicitly or by pre-selection. A few additional options are available:

      • Material assignment: you can choose or pick a material in the model for painting the extrusions, tubes and stamped shapes

      • Grouping, with 2 modes:

      • GROUP IN for putting extrusions in groups in the selection context

      • GROUP OUT for putting all extrusions and tubes in a master group, without altering the original selection

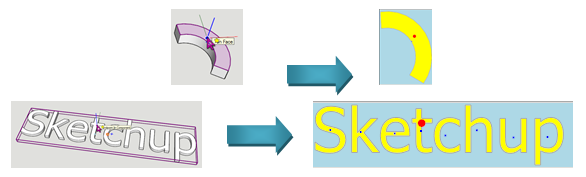
      • Follow Surface for Carve and Emboss on curved surfaces, allowing to respect the shapes relative dimensions (versus Projection mode, where they would be distorted)
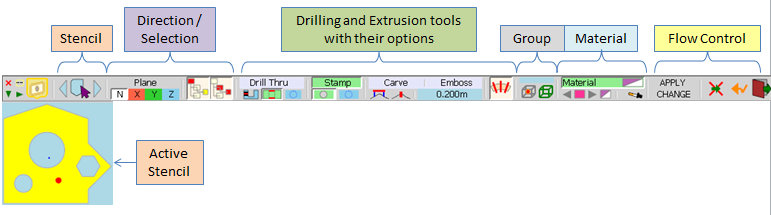
      7912c7a5-3db0-4441-98c5-6fcbd0f6d1e1-Videos.png

      93b32a6a-ce07-4701-958f-ee62c9dbb6ec-Documentation.png

      VisuHole - Main palette.png

      STENCILS

      The object used for drilling or extruding is called a STENCIL. This is actually a set of 2D shapes, with or without holes.

      In the current version, Stencils must be picked in the model. To enter the Pick Stencil mode, click on the button in the palette or press TAB. The main buttons palette will disappear. When you move the mouse on faces and components, a small axis system is displayed. The blue axis shows the direction for 2D projection (on faces it is simply the face normal).

      • Click on a Face or on a group / component to pick the stencil.
      • Click and Drag to pick and orientate the X axis
        VisuHole - Stencils.png

      INFLUENCE OF SELECTION

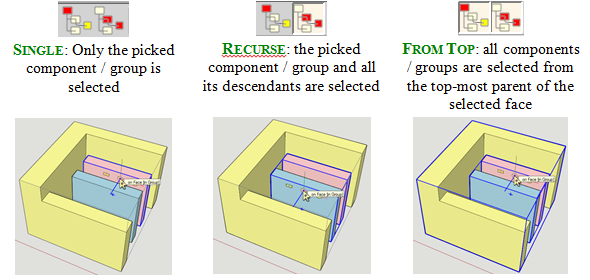
      If the picked face is at top-level (i.e. not embedded in a group or component), then the selection is taken as all connected faces. Note that by pressing CTRL, you can restrict the selection to the picked face or picked surface.

      If the picked face belongs to a group or component, then the selection depends on the options selected in the button palette:

      VisuHole - Selection.png

      TOOLS and GENERAL PROCEDURE

      The VisuHole tool can be selected in the button palette, along with their options:

      VisuHole - Tools Palette.png

      Setting the direction of projection: by default it is the normal to the picked face. You can however impose a direction, either an axis or a custom normal (as in MoveAlong or DrawAlong). For custom direction, mouse over a face and either type ENTER or LONG-CLICK. Once the Z-axis is set, the other axes in X and Y are computed by default.

      You may also set the Material options and Group options (see details later in this chapter).

      Then, to execute the operation,

      • Either double click on a face
      • Or Click–Release–Move–Click–Release or Click-Drag-Release to set a different orientation of the X and Y axis.

      Once the operation is executed, you can either proceed with another operation or modify the settings for the current operation. If you change any parameter in the buttons palette, the button “APPLY CHANGE” will be enabled. When pressing this button, VisuHole will undo the operation and redo it again with the new settings.
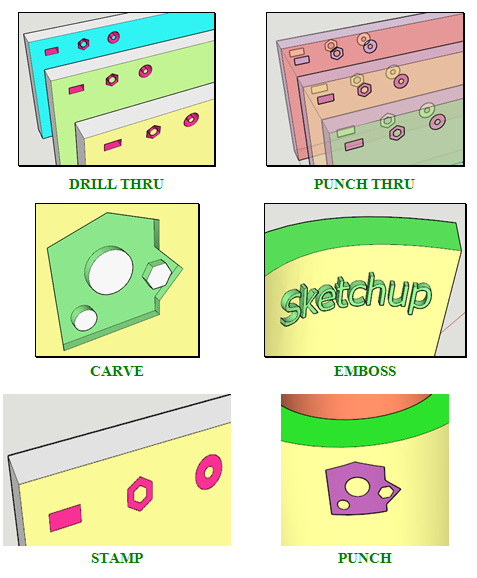
      VisuHole - Apply Change.png

      DRILLING

      You can drill holes with or without tubes, and with edges or Guide lines
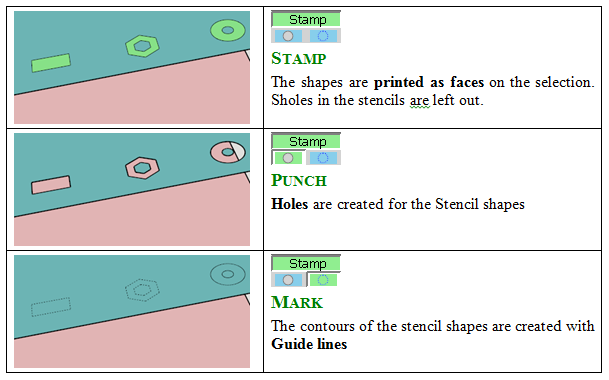
      VisuHole - Drill.png

      STAMPING

      You can Stamp, Punch or Mark. The shapes are printed on the front faces.

      VisuHole - Stamp.png

      CARVING / EMBOSSING

      Carving and Embossing are controlled by an offset and a few options related to the direction of extrusion and flattening it.

      VisuHole - Carve.png
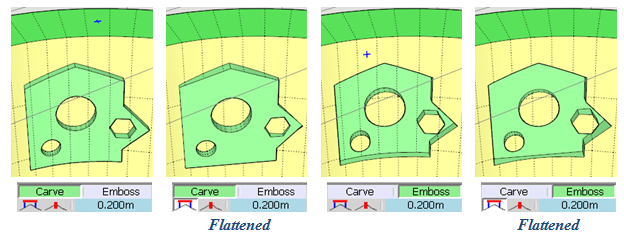
      By combining these options, you can create platforms in terrains

      VisuHole - Platform.png

      1 條回覆 最後回覆 回覆 引用 0
      • cottyC 離線
        cotty
        最後由 編輯

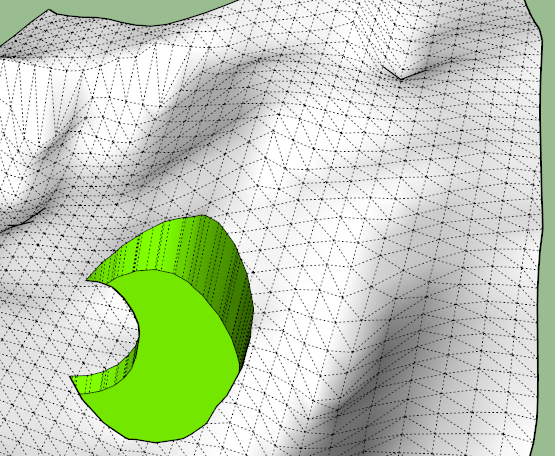
        Fantastic plugin! It deserves a donation and the award "plugin of the year".
        Thank you!

        my SketchUp gallery

        1 條回覆 最後回覆 回覆 引用 0
        • pilouP 離線
          pilou
          最後由 編輯

          Yup a new cool one! 😎

          Frenchy Pilou
          Is beautiful that please without concept!
          My Little site :)

          1 條回覆 最後回覆 回覆 引用 0
          • xiombargX 離線
            xiombarg
            最後由 編輯

            This is huge. Another must have.
            -Mechanical engineering. Easy placement of connecting holes for interlocking or hinged elements. Any kind of embedded socket, hex nuts, washers, etc.
            -Decorative elements that have repeating patterns. Interior design, ceramics, tiled ceilings, jewelry...
            -Quick and easy panel lines.

            1 條回覆 最後回覆 回覆 引用 0
            • F 離線
              function
              最後由 編輯

              mega

              1 條回覆 最後回覆 回覆 引用 0
              • F 離線
                feixia1127
                最後由 編輯

                Yup a new cool one!

                1 條回覆 最後回覆 回覆 引用 0
                • OxerO 離線
                  Oxer
                  最後由 編輯

                  Incredible plugin!! 👍
                  I have done the Spanish Translation but there are some strings missing in the language file:
                  • Current Stencil
                  • Next Stencil in History
                  • Previous Stencil in History
                  • Pick a Stencil Shape in the Model

                  Spanish Language File

                  "The result is the end what is important is the process" by Oxer
                  http://www.oxervision.blogspot.com/

                  1 條回覆 最後回覆 回覆 引用 0
                  • fredo6F 離線
                    fredo6
                    最後由 編輯

                    Oxer,

                    Thanks a lot. Actually, part of the strings are in LibFredo6.

                    Fredo

                    1 條回覆 最後回覆 回覆 引用 0
                    • OxerO 離線
                      Oxer
                      最後由 編輯

                      I know it, I have uploaded the new Spanish Language for LibFredo6 v6.1a but these are missing strings to translate in VisuHole:

                      • "Current Stencil"
                      • "Next Stencil in History"
                      • "Previous Stencil in History"
                      • "Pick a Stencil Shape in the Model"
                      • "PICK A STENCIL SHAPE"
                      • "Pick a Stencil Shape - Click / Release to pick or Click / Drag / Release to pick and orientate - Ctrl down to Force faces - Esc to cancel"
                      

                      "The result is the end what is important is the process" by Oxer
                      http://www.oxervision.blogspot.com/

                      1 條回覆 最後回覆 回覆 引用 0
                      • fredo6F 離線
                        fredo6
                        最後由 編輯

                        Oxer,

                        There seems to be a small problem, maybe for because of the '/'.

                        Still I was able to translate these strings to French. So I need to clarify.

                        Fred

                        1 條回覆 最後回覆 回覆 引用 0
                        • OxerO 離線
                          Oxer
                          最後由 編輯

                          Thanks for the reply!

                          "The result is the end what is important is the process" by Oxer
                          http://www.oxervision.blogspot.com/

                          1 條回覆 最後回覆 回覆 引用 0
                          • A 離線
                            AcesHigh
                            最後由 編輯

                            Awesome, I will try as soon as I can.

                            Quick question before downloading it: saw the first minutes of the tutorial video... when moving the stencil shape over the surface you want to apply the stencil, it seems the stencil is "grabbed" by it´s middle.

                            Is it possible however to for example, move a stencil by it´s corner, and then position it precisely somewhere?

                            1 條回覆 最後回覆 回覆 引用 0
                            • pilouP 離線
                              pilou
                              最後由 編輯

                              @unknownuser said:

                              Is it possible however to for example, move a stencil by it´s corner, and then position it precisely somewhere?

                              Yes of course! ☀
                              When you select a new stencil you choose its own origin and even its orientation! 😉
                              And when you draw it on the volume again position and orientation (on the volume) are possible! 🤓
                              A must indeed! 😎

                              Frenchy Pilou
                              Is beautiful that please without concept!
                              My Little site :)

                              1 條回覆 最後回覆 回覆 引用 0
                              • cottyC 離線
                                cotty
                                最後由 編輯

                                Is it possible to get the result in the back (one step) if you place the drill shape at a border?

                                drill_border.jpg

                                my SketchUp gallery

                                1 條回覆 最後回覆 回覆 引用 0
                                • fredo6F 離線
                                  fredo6
                                  最後由 編輯

                                  @cotty said:

                                  Is it possible to get the result in the back (one step) if you place the drill shape at a border?

                                  [attachment=0:6kxwbix7]<!-- ia0 -->drill_border.jpg<!-- ia0 -->[/attachment:6kxwbix7]

                                  Just make the rectangle a little bit higher. With exact dimensions, VisuHole has difficulty because it does know the original border faces stay.

                                  Fredo

                                  1 條回覆 最後回覆 回覆 引用 0
                                  • Y 離線
                                    yiannis76
                                    最後由 編輯

                                    I can not use this plugin.Whetever i try to do i get the attached error


                                    VisuHole error

                                    1 條回覆 最後回覆 回覆 引用 0
                                    • cottyC 離線
                                      cotty
                                      最後由 編輯

                                      Is it possible to snap the stencil shape (drill thru) to guide points, guide lines? Or to use the normal inference system for positioning the hole?

                                      my SketchUp gallery

                                      1 條回覆 最後回覆 回覆 引用 0
                                      • pilouP 離線
                                        pilou
                                        最後由 編輯

                                        @unknownuser said:

                                        Is it possible to snap the stencil shape (drill thru) to guide points, guide lines?

                                        You can yet with this little trick and if your face volume is Parallel to one axe! 💭

                                        Draw your guides lines crossing anywhere you want
                                        Then call the Stencil and Press one of the the Keyboard Arrow (so x, y, z axis)
                                        The snap will be fine on the crossing guides lines! 😉

                                        Curiously don't work with a Guide Point on the surface but Yes if the Guide Point is on the empty space! 😮
                                        So put the Guide Point on Guideline(s) who will be itself on the surface volume! 😄
                                        drill1.jpg

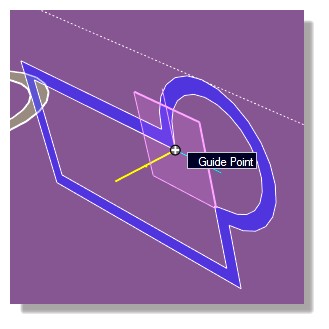
                                        Edit : seems you cant draw your stencil on any position on the space of one Guide Line!
                                        So no need to press the Arrows'keys! 😄
                                        But not on their intersection! Even Drawn a Point Guide at the intersection first! 😮

                                        drill2.jpg
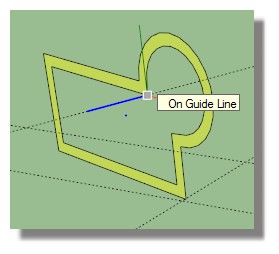
                                        All must be on the surface of the volume! 🤓
                                        Guide line(s) + Point Guide

                                        drill.jpg

                                        drill3.jpg

                                        Frenchy Pilou
                                        Is beautiful that please without concept!
                                        My Little site :)

                                        1 條回覆 最後回覆 回覆 引用 0
                                        • O 離線
                                          optimaforever
                                          最後由 編輯

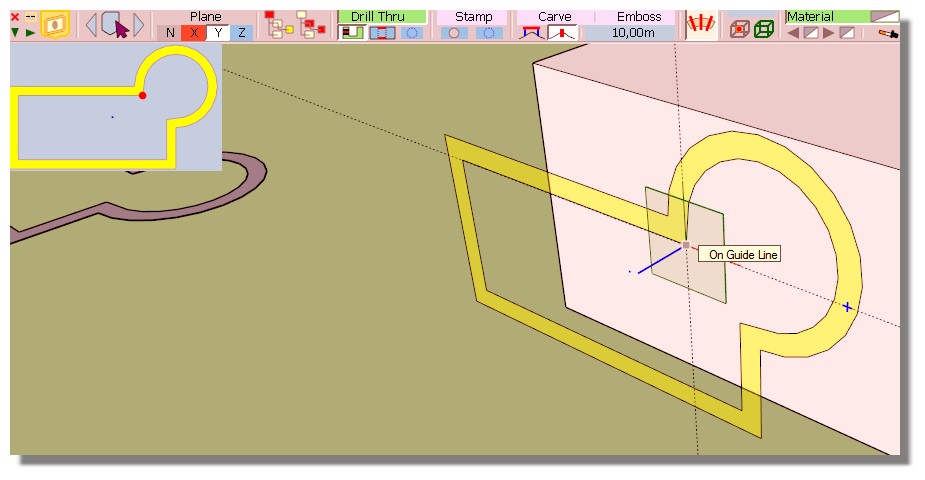
                                          WWWWWWWonderful script indeed! 😄

                                          1 條回覆 最後回覆 回覆 引用 0
                                          • N 離線
                                            numerobis
                                            最後由 編輯

                                            😍
                                            Fantastic plugin! (as usual 😉 ) Thank you very much! 👍

                                            1 條回覆 最後回覆 回覆 引用 0
                                            • 1
                                            • 2
                                            • 3
                                            • 4
                                            • 5
                                            • 6
                                            • 1 / 6
                                            • 第一個貼文
                                              最後的貼文
                                            Buy SketchPlus
                                            Buy SUbD
                                            Buy WrapR
                                            Buy eBook
                                            Buy Modelur
                                            Buy Vertex Tools
                                            Buy SketchCuisine
                                            Buy FormFonts

                                            Advertisement