Make an imported TIF 3D and curved?
-
If you use Adobe Illustrator, it has a trace outline tool that will copy the outline of the writing and save it as bezier curves. These can then be exported as dwg files and imported into SU. You can then run the WELD plugin which connects the line segments so you can use push/pull.
-
You guys are great! I finally managed to trim and pull the image (Thanks Rich, for making a new cleaner image. I tried to clean it up myself but still had problems trimming afterwards!)
(for other newbies like me, I chose yes to 'image stand up', yes to 'flatten' and chose a factor of 1, as it made the least squared edges. Then I selected the image and chose "explode" - otherwise I couldn't seem to get rid of the rectangle around it...). The shapes are still not nice and rounded like yours TIG. How do I get nice smooth, rounded edges?
(for info, there is no correct orientation to the writing...)As for Shapebender, I downloaded it, out it in the plug-ins folder, then closed and re-opened SU, but keep getting this message : Error Loading File clf_shape_bender_loader.rb
no such file to load -- progressbar.rb
Also - I don't have a "plugin" choice in my toolbar???Hélas Roger, I do not have Illustrator, but work is paying for a three day crash-course in it in September!
-
@beemouse said:
no such file to load -- progressbar.rb
Here: http://www.smustard.com/script/ProgressBar
Please, always read the plugin installation instructions carefully. Many plugins require additional ones to be installed, too. Also, some plugins are not in the Plugins menu but elsewhere (Tools, Draw, File etc.) -
I used the default smoothing setting of 2.0 - as recommended in ImageTrimmer's notes...
Once you have the component-instance don't explode it, edit it by a double-click, select-all [Ctrl+A], right-click context-menu 'unhide' to show the edges; select just the face get Entity Info [context-menu] and change its material to the default-material; pushpull the face and make it 3d; select-all again and context-menu smooth/soften to leave only the edges <=90 degrees 'solid'.
Draw a line parallel with the x/red axis and the desired 'curve' - I made a circle and split it with a temporary edge and erased bits.
Select the now 3d component-instance and activate ShapeBender [having ensured that it's installed properly ] follow the prompts and wait a second or two until a copy of your object is bent around the curve.
Because the circle's diameter was made at the original object's length [and the 'red' line length] and the curve was almost a circle I then scaled the bent version vertical by the central green-handle by 3 so that its proportions were restored [i.e. just less than PI].
-
You are all so nice to help me along - I'm so sorry to plague you with these questions, but I do want to understand how to do it myself so I can do it again for future projects... It just takes practice!
Tig, I more or less followed your instructions and everything worked out (though my final product still doesn't look smooth like yours, but the effect I ended up with is kind of cool, so thats OK! My (hopefully last!) question is : I would like the length of the bangle to be 17.5 cm (which was thus the length of the line I drew), bangle to be 5.8cm in diameter, 4.8 in depth, with a 2.5 cm opening. Is there any way to make these exact dimensions? I made a curve just to test, but once the component was bent, the result did not respect the dimensions of the curve (it was much shorter in length). IS there anyway to avoid this happening? -
Take the form you made and Scale it in various aspects to the desired sizes, using unit suffix on the end of what's typed... so were typing in 2 would scale it by 2... typing 2cm sets the size on that scaled axis to be 2cm...
You could always try adjusting the radius of the circle/gap to be near the requirements and then scale vertically to be ~3 x diameter to restore the proportions OR to a fixed 4cm height.
Incidentally your diameter/depth seems a bit disproportionate to the original image ?
I'm not sure all of the numbers can be used exactly as you wish
Note that the selected-curve [arc] needs to be the length not the red-line... -
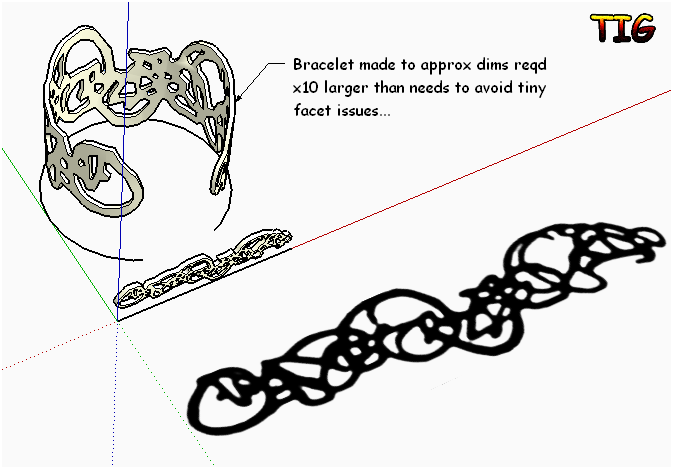
Here's a version - try to approximate the length of the arc and gap, size the line to the arc's diameter and bend, scale vertically to height.
I work x10 larger to avoid tiny facets not forming issues...
Try it yourself...
-
Perhaps I am not using the right terminology? by depth I meant the distance from the gap to the back of the bracelet (so that it forms an oval and not a circle). The height would be homothétique (I don't know how to say this word in English - the height will be calculated automatically according to the other dimensions given). I will try out your scaling ideas (if I can figure it out), and let you know!!
-
You can scale in different axes to make a circle 'oval' - using various green-handles, hold Ctrl to do it center-to-center rather than direct - you can type in various small value changes and watch the selected arcs size change in Entity Info as you do it, till you get near what's needed......
-
One you have completed the Illustrator course, see: http://www.youtube.com/watch?v=YER82N30vc8 which is part one of a two-part tutorial.
-
Well, I started over from scratch, just to get everything correct in my head. You are right Tig, I can't use the exact dimensions I noted, but that is mostly due to the constraints of the 3D printers... I have uploaded and ordered the bracelet. I'll post a picture if it turns out nice!! Thanks for everyone's help! I'll be back soon with questions on how to make layers (ie. a bracelet or pendant with two different layers). Shall surf the forums a bit first though, promise!
-
Well done.
I hope it turns out fine and I'd like to see the result.
What 'material' have you ordered ? -
Thanks! I ordered it in steel for the first go. I won't get it til the beginning of September, but i'll
Be sure to post a pic. I hope I got it all right!! -
I recently got a small stainless-steel puzzle-box made in three pieces, and I was surprised how heavy and 'metallic' it was - they use real metal powder, bound with resins, then the final form is 'tumbled' to polish it, so it comes out just like 'real' s/s...
I was very pleased with it.
The surface finish will never be shiny smooth, but I think that won't detract from this bracelet's appearance anyway.
Hello! It looks like you're interested in this conversation, but you don't have an account yet.
Getting fed up of having to scroll through the same posts each visit? When you register for an account, you'll always come back to exactly where you were before, and choose to be notified of new replies (either via email, or push notification). You'll also be able to save bookmarks and upvote posts to show your appreciation to other community members.
With your input, this post could be even better 💗
Register Login


Advertisement