Texturing: still a big black hole.
-
Hi people,
I have still trouble with texturing stuff's in SU. Especially if the texture has to cover areas around the edge. I saw also on a video-tutorial (unfortunately I don't know the link anymore) that the instructor was positioning the texture and then pick the positioned texture with the color/material picker and paint on another area with the right direction. This is not working for me.
There is (in my opinion) no good tutorial explaining in detail how to texture objects with photo textures or I should sell my computer and play in the sandbox with my grandchild .
.
Par example this attached pallet model. Could somebody record a simple video tutorial how to texture them? It would me help a lot understanding how SU is handling textures.
Pallet_Texturing.skp
Many thanks in advance. BTW, congratulation to the Sketchucation Team! You're great supporter.KR; Lecra
-
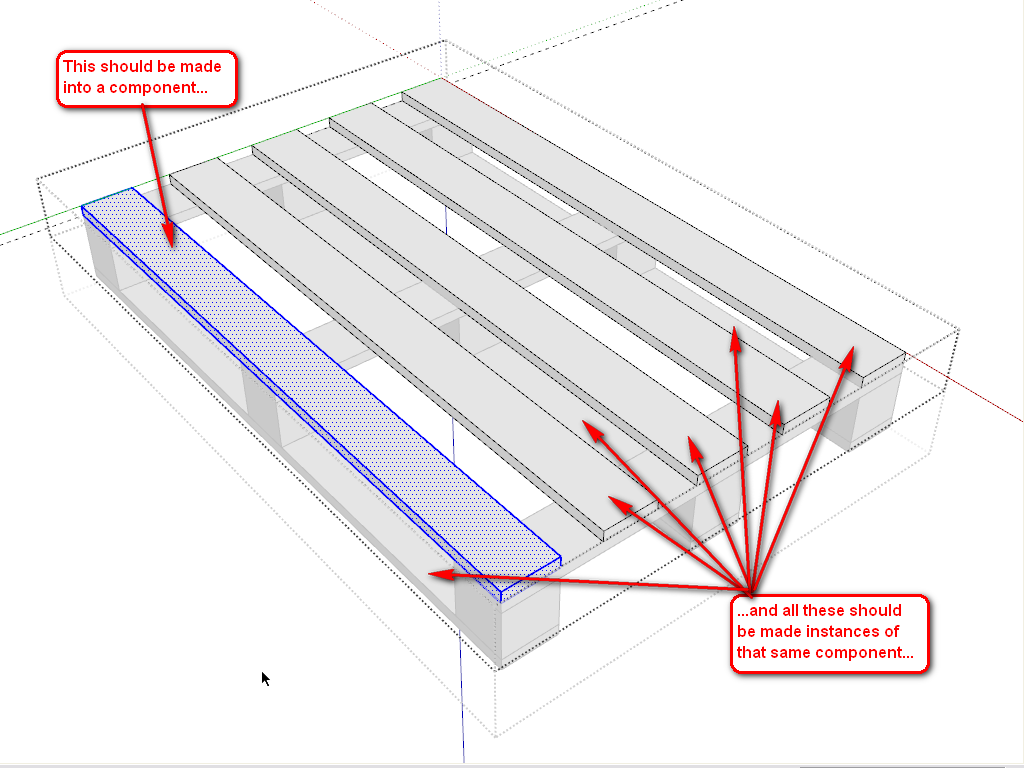
First of all, you need to dig down to your loose (non grouped) geometry (keep double clicking until you reach it - like my selection in the image below) inside the groups in order to be able to position texture on a single face.
Second, whatever is selected below is the same set of geometry as all those marked with the arrows. They should be instances of the same component definition - in which case you would only need to texture the faces of one instance and all the others would inherit it.
-
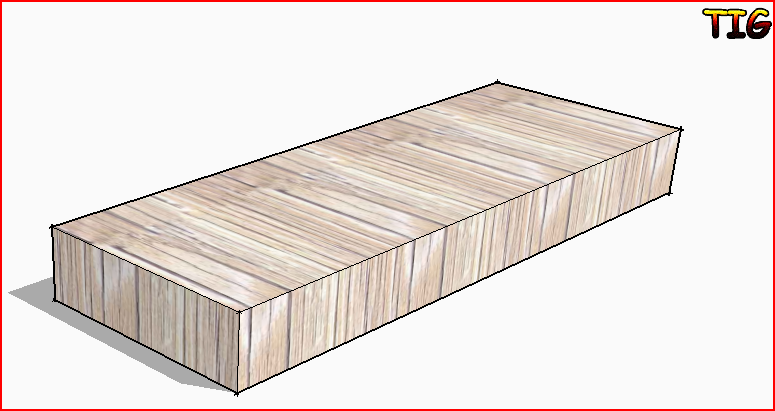
Something like the palette shouldn't be any problem at all. All the faces are on axis and at right angles to each other.
Import a suitably grainy wood texture and paint it onto the top of one of the slats. There are only two possibilities...either it will be correctly aligned, or it will be 90° out. If it's correct, fine! just paint it onto any other faces oriented in the same direction (including any facing downwards too).
If it's incorrect then right-click the surface and choose Texture > Position from the menu. You will get the texture preview with all the adjustment handles. Just ignore them and r-click again, this time choosing Rotate > 90. It should now be correct, so just sample it and copy to all others like it, as before.Then paint the same texture onto the side or end of the slat. It'll probably be correct for the side, but wrong for the end. Either way, just repeat the first process, working your way through the model.
Edit: I assumed the slat was a component, obviously it's not. As Gaius says, make them all copies of the same component. That way, you'll only need to paint one of them. All the others will paint themselves automatically.
-
One top Z [blue] is UP.
Your model is upside down !
Also the tips about making repeated elements instances of the same component is very valid, it will save lots of time as you only need to 'texture' one and they all change to match.If you apply a textured material onto a group or component then any geometry inside it that has the default material will be given that material.
The material applied like that uses the existing texture's size etc and is not editable otherwise.
 Editing the texture's size in the Materials Browser > Edit dialog [for example] affects all things using that textured-material.
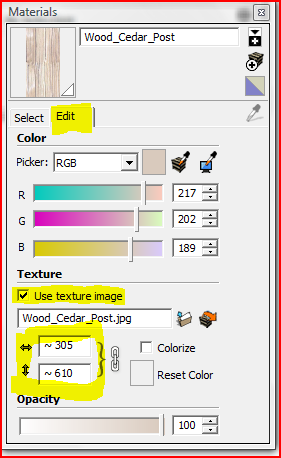 If you edit a group or component you can apply textured materials directly onto individual faces within that context.
Textured materials applied to faces can be individually 'adjusted' as desired.
To do this Select the face with the textured-material and right-click context-menu > Texture.
This has various options to 'position' the texture - from moving it around on the surface, to rotating it, scaling etc. There are several right-click tools with the position option to flip/rotate-orthogonally and so on. You can therefore quickly make things like wood-grain run in the various directions you want etc [I'd have two materials - one for long-grain and one for cross-grain (ends)]... There are also several free tools, like my TextureTools, that allow you to do positioning/rotations/scaling of textures using dialogs / arrow-keys / etc - that you might find more user-friendly ?
 -
All,
Many thanks for all your quick answers! Unbelievable that speed!
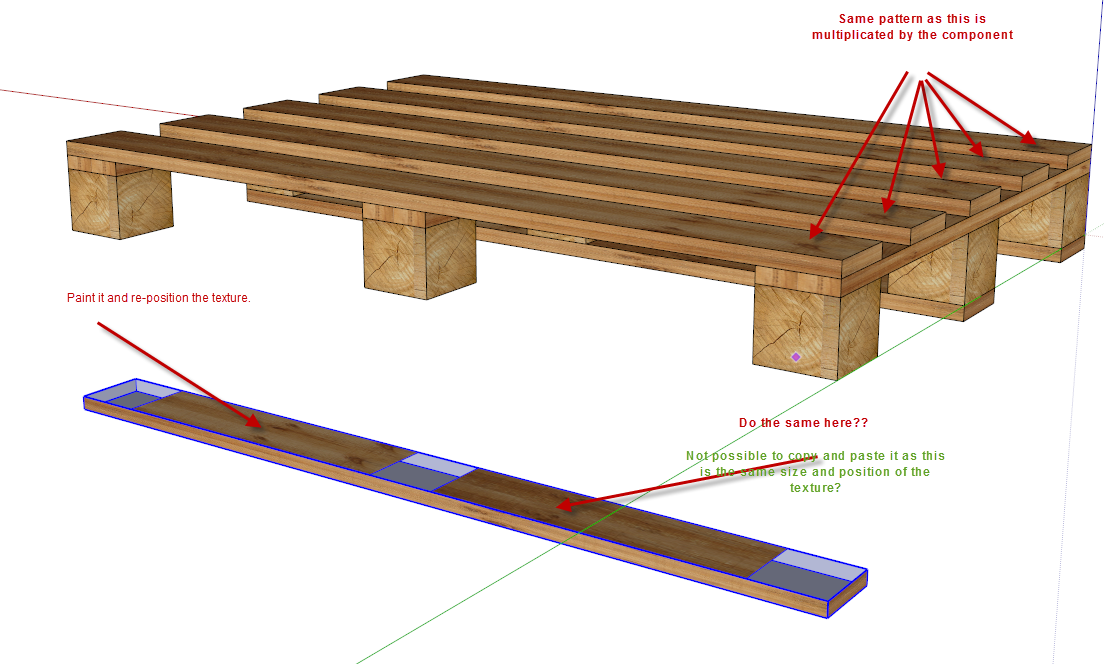
I did now all what you said (have a look at the attachment). Doing that with the components it looks a bit unnatural, not? Every slate looks like the other. That could not be.
But again, do I have really to position the textures again and again? If you take the under slates that are divided by the cubes, I have to paint and reposition every texture. It is not possible to copy the texture from one section to the other?
-
A simple oblong slat has full symmetry.
If you add a full bottom to the slat, then for the same slat-component you can have 3 different versions rotated 180 degrees around the 3 axes; there are also 3 mirrored versions [use Scale -1]. So you have lots of possible orientations of one slat component [6].
Then if you add slightly different texture positions/rotations/handing etc for each of the six faces, placing differently oriented instances of the one slat-component will give enough visual variation...
Or if not why not make two 'almost' identical slats and you have double the variation [12] !If you have a textured-material perfectly positioned on one face you can 'sample' it using the Material Browser's eyedropper and then paint it onto another face to match, you can always [re]position it a little to make it different from a neighboring piece too...

-
On making the planks look less like each other, TIG has a great suggestion with using both sides of the plank and flipping them end for end. Another thing I find useful is to use images of boards like this:

This is 8 or 9 feet long and this allows me to pick different parts of the same board image for either side of the plank. And with Make Unique used on, say, half the planks, I can get a lot more variety.
Most of the wood grain images I use are between 7 and 12 feet long and typically 6 to 10 inches wide depending upon the speciies.
-
@ TIG / Dave,
I don't understand that! If I create a component for the upper plank, copy them 6 times, texturing them as discussed before, positioning the texture it looks equal for all the 6 planks. If I try to reposition the texture of the 3rd or 4th plank, every other plank texture will be also repositioned while this is the same component. So I don't understand your last suggestions!
Or should I make some of the planks unique in order to change the look?Sorry for bothering you, but it seems really that I'm to old for that

KR; Lecra
-
After texturing the planks, you can flip/rotate individual planks either horizontally or vertically so the grain repetition won't be as noticeable as it is now. For some reason, there are white parts in your wood material. Why is that? (This will prevent good texturing all around with the same material wrapped)
-
Here's a graphic example of what we are talking about.

In the back left, four plank components with textures. This is similar to what you have.
Back right, all I did is flip components on their various axes I didn't even rotate any end for end. Remember, Flip is a mirroring operation, not a rotation. I could have randomized the placement of the order of the blanks a bit to help hide the face that it is the same materials on all the planks.To illustrate what I was getting at with the long texture image...
...in the middle is the pine texture I posted above. It is 8' long.
At the bottom, I made two planks unique from the other two and moved the texture image to use different parts of it on different boards. There's still some flipping being done. -
Dave,
Many thanks for your explanations! I heard the bell ringing now !
I will try your method on the palette as well as on other objects and see how it works!
Many thanks for your fast support guy's! Much appreciated.
Kind regards, Lecra
-
@dave r said:
On making the planks look less like each other, TIG has a great suggestion with using both sides of the plank and flipping them end for end. Another thing I find useful is to use images of boards like this:
This is 8 or 9 feet long and this allows me to pick different parts of the same board image for either side of the plank. And with Make Unique used on, say, half the planks, I can get a lot more variety.
Most of the wood grain images I use are between 7 and 12 feet long and typically 6 to 10 inches wide depending upon the speciies.
How did you make your own texture?
-
Get some suitable images [the Internet is downloaded with them!] and edit them as you will.
Use these as Textures in new Materials.
Save them as new SKM files, for use in any future SKPs... -
Hello! It looks like you're interested in this conversation, but you don't have an account yet.
Getting fed up of having to scroll through the same posts each visit? When you register for an account, you'll always come back to exactly where you were before, and choose to be notified of new replies (either via email, or push notification). You'll also be able to save bookmarks and upvote posts to show your appreciation to other community members.
With your input, this post could be even better 💗
Register Login


Advertisement